background image

77

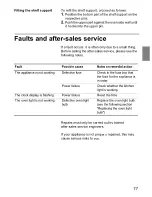
Fitting the shelf support

To refit the shelf support, proceed as follows:

1.

 Position the bottom part of the shelf support on the 

respective pins.

2.

 Push the upper part against the oven side wall until 

it hooks into the upper pin.

Faults and after-sales service

If a fault occurs, it is often only due to a small thing. 
Before calling the after-sales service, please see the 
following notes.

Repairs must only be carried out by trained 
after-sales service engineers.

If your appliance is not properly repaired, this may 
cause serious risks to you.

Fault

Possible cause

Notes on remedial action

The appliance is not working.

Defective fuse

Check in the fuse box that 
the fuse for the appliance is 
in order.

Power failure

Check whether the kitchen 
light is working.

The clock display is flashing.

Power failure

Reset the time.

The oven light is not working.

Defective oven light 
bulb

Replace the oven light bulb. 
(see the following section 
"Replacing the oven light 
bulb")

Содержание F 3470

Страница 1: ...de Gebrauchsanleitung en Instructions for use F 3470 de en...

Страница 2: ......

Страница 3: ...eit einstellen ____________________________15 Back fen ausheizen __________________________15 Brennerdeckel und kelche reinigen _____________16 Topftr ger auflegen __________________________16 Zubeh r...

Страница 4: ...ps __________________________34 Tipps zum Energiesparen ______________________34 Tipps zur Verwendung der Kochmulde _______34 Tipps zur Verwendung der Back fen_________35 Backen ______________________...

Страница 5: ...en Umweltgerecht entsorgen Entsorgen Sie die Verpackung umweltgerecht Dieses Ger t ist entsprechend der europ ischen Richtlinie 2002 96 EG ber Elektro und Elektronik Altger te waste electrical and ele...

Страница 6: ...kann hei er Dampf austreten Brandgefahr Nie brennbare Gegenst nde auf der Kochmulde ablegen oder im Backofen aufbewahren Kurzschluss Gefahr Nie Anschlusskabel von Elektroger ten in der hei en Backofen...

Страница 7: ...arf Reparaturen durchf hren Stromschlag Gefahr Nie eine besch digte Anschlussleitung selbst austauschen Nur ein von uns geschulter Kundendienst Techniker darf die Anschlussleitung auswechseln Wenn das...

Страница 8: ...h ein Legen Sie ihn nicht mit Alufolie aus Stellen Sie kein Geschirr auf den Backofenboden Es entsteht ein W rmestau Die Back und Bratzeiten stimmen nicht mehr und das Email wird besch digt Gie en Sie...

Страница 9: ...Bedienblende und zur Kochmulde sowie zu den Back fen den jeweiligen Betriebsarten und dem beigelegten Zubeh r Die Bedienblende Zweitbackofen Grillfach Kochmulde Hauptbackofen Schublade Elektronikuhr...

Страница 10: ...der Funktionstaste w hlen Sie die Funktion aus Mit dem Drehw hler stellen Sie die Dauer oder Zeit ein Die eingestellten Werte k nnen Sie im Anzeigefeld ablesen Sie k nnen den Drehw hler nach rechts un...

Страница 11: ...ist ein Anschlag Drehen Sie nicht dar ber hinaus Wokbrenner 3 50 kW Normalbrenner 1 75 kW Normalbrenner 1 75 kW Starkbrenner 3 00 kW Sparbrenner 1 00 kW Wokbrenner 3 30 kW Topftr ger Gasbrenner Topf o...

Страница 12: ...auf der Bedienblende Am Ende des Einstellbereichs ist ein Anschlag Drehen Sie nicht dar ber hinaus Zubeh r Das Zubeh r kann in f nf verschiedenen Einschubh hen in das Grillfach geschoben werden Sie k...

Страница 13: ...ck und Bratrost F r Geschirr Kuchen formen Braten Grillst cke Tiefk hlgerichte Emailliertes Backblech F r saftige Kuchen Geb ck Tiefk hlgerichte und gro e Braten Mit dem Einlegerost auch als Fettauffa...

Страница 14: ...nicht dar ber hinaus Zubeh r Das Zubeh r kann in f nf verschiedenen Einschub h hen in den Hauptbackofen geschoben werden Sie k nnen das Zubeh r zu zwei Drittel heraus ziehen ohne dass es kippt So lass...

Страница 15: ...tellbereichs ist ein Anschlag Drehen Sie nicht dar ber hinaus Zubeh r Das Zubeh r kann in f nf verschiedenen Einschub h hen in den Zweitbackofen geschoben werden Sie k nnen das Zubeh r zu zwei Drittel...

Страница 16: ...rr Kuchen formen Braten Grillst cke Tiefk hlgerichte Emailliertes Backblech F r saftige Kuchen Geb ck Tiefk hlgerichte und gro e Braten Mit dem Einlegerost auch als Fettauffang Gef Einlegerost F r Gri...

Страница 17: ...beh r aus den Back fen Entfernen Sie R ckst nde der Verpackung z B Styroporteilchen vollst ndig aus den Back fen Einige Teile sind mit einer Kratzschutzfolie berzogen Entfernen Sie diese Folie 1 Reini...

Страница 18: ...C 4 Legen Sie den Brennerdeckel A exakt auf den Brennerkelch B Topftr ger auflegen Legen Sie die Topftr ger l ngs ber die Kochmulde auf der Abstufung am Rande der Kochmulde ab Damit die Topftr ger nic...

Страница 19: ...chen Stellung und ist die Flamme nicht stabil W hlen Sie deshalb immer eine Stellung zwischen gro er und kleiner Flamme Gasbrenner ausschalten Drehen Sie den Bedienknebel f r die gew nschte Kochstelle...

Страница 20: ...er Backofen heizt In den Heizpausen erlischt sie Grillfach ausschalten Drehen Sie den Bedienknebel auf die Position 0 wenn das Gericht fertig ist Das Grillfach schaltet aus Betriebsart Verwendung 50 2...

Страница 21: ...h rechts auf die gew nschte Temperatur oder Betriebsart Der Hauptbackofen schaltet ein Die Anzeigelampe ber dem Bedienknebel leuchtet wenn der Backofen heizt In den Heizpausen erlischt sie Hauptbackof...

Страница 22: ...chtet wenn der Backofen heizt In den Heizpausen erlischt sie Zweitbackofen ausschalten Drehen Sie den Bedienknebel auf die Position 0 wenn das Gericht fertig ist Der Zweitbackofen schaltet aus Betrieb...

Страница 23: ...brechen Einstellungen ndern 1 Dr cken Sie die Funktionstaste mehrmals bis das jeweilige Symbol blinkt 2 Ver ndern Sie mit dem Drehw hler Ihre Einstellungen Einstellungen l schen 1 Dr cken Sie die Funk...

Страница 24: ...Winterzeit umstellen 1 Dr cken Sie die Funktionstaste mehrmals bis das Symbol blinkt 2 Stellen Sie am Drehw hler die aktuelle Uhrzeit ein Hinweis Sie k nnen die Uhrzeit nicht korrigieren wenn der Kurz...

Страница 25: ...Minuten 1 Dr cken Sie die Funktionstaste bis das Symbol a blinkt 2 Stellen Sie die Dauer mit dem Drehw hler ein Nach dem Einschalten des Kurzzeitweckers leuchtet das Symbol a und die Restlaufzeit wir...

Страница 26: ...atur oder Betriebsart Der Hauptbackofen schaltet sich ein Beispiel Die Garzeit betr gt 90 Minuten 2 Dr cken Sie die Funktionstaste mehrmals bis das Symbol blinkt 3 Stellen Sie mit dem Drehw hler die B...

Страница 27: ...eit Dauer ein Betriebszeit Ende einstellen Beispiel Das Gericht soll um 12 30 Uhr fertig sein 4 Dr cken Sie die Funktionstaste mehrmals bis das Symbol blinkt 5 Stellen Sie mit dem Drehw hler das Betri...

Страница 28: ...n die noch hei sind Backofenbeleuchtung einschalten Zur leichteren Reinigung des Backofens k nnen Sie die Backofenbeleuchtung einschalten Drehen Sie dazu beim Zweitbackofen und dem Grillfach den jewei...

Страница 29: ...uf die Selbstreinigung keinen Einfluss Das richtige Reinigungsmittel verwenden Verwenden Sie keine Reinigungsmittel die scheuernde Substanzen oder S ure enthalten oder Reingungshilfen wie Stahlwolle o...

Страница 30: ...t auf den Brennerkelch setzen Die Brennerdeckel sind schwarz emailliert Im Laufe der Zeit ver ndert sich die Farbe Das hat keinen Einfluss auf die Funktion Ger t au en Edelstahl Fl chen Warme Sp llaug...

Страница 31: ...nicht in Scharnier greifen Backofent r aush ngen Gehen Sie wie folgt vor 1 ffnen Sie die Backofent r 2 Legen Sie die beiden Sperrhebel links und rechts um 3 Schlie en Sie die Backofent r soweit bis Si...

Страница 32: ...und einh ngen Zur separaten Reinigung der einh ngegitter und vereinfachten Reinigung der Backofenw nde k nnen Sie die Einh ngegitter aush ngen Die Einh ngegitter sind an drei Punkten an den Backofenw...

Страница 33: ...weise Reparaturen d ren Sie nur von geschulten Kundendienst Technikern durchf hren lassen Wenn Ihr Ger t unsachgem repariert wird k nnen f r Sie erhebliche Gefahren entstehen St rung M gliche Ursache...

Страница 34: ...die Backofent r 3 Legen Sie ein Geschirrtuch in den kalten Backofen um Sch den zu vermeiden 4 Drehen Sie die Glasabdeckung der Lampe im Inneren des Backofens durch Linksdrehen heraus 5 Ersetzen Sie di...

Страница 35: ...nen Ihnen gern eine Kundendienststelle in Ihrer N he E Nummer und FD Nummer Wenn Sie unseren Kundendienst anfordern geben Sie bitte die E Nummer Produktnummer und FD Nummer Fertigungsnummer des Ger te...

Страница 36: ...n Sie einige Energiespartipps f r die Verwendung der Kochmulde und der Back fen Tipps zur Verwendung der Kochmulde geeignete Kochgeschirr Durchmesser Achten Sie darauf dass der Durchmesser des Kochges...

Страница 37: ...acken Sie am besten nacheinander Der Backofen ist noch warm Dadurch verk rzt sich die Backzeit f r den zweiten Kuchen Sie k nnen auch zwei Kastenformen nebeneinander einschieben Restw rme nutzen Bei l...

Страница 38: ...inweise zu Tabellen Temperatur und Backdauer sind von Menge und Beschaffenheit des Teiges abh ngig Aus diesem Grund sind in den Tabellen Bereiche angegeben Versuchen es zu erst mit dem niedrigeren Wer...

Страница 39: ...Backtabellen Geb ckart Back ofen Einschub h he Betriebs art Temperatur C Dauer Minuten Fr chteflan 2 t 200 220 30 1 3 180 200 40 50 2 t 200 220 30 einfacher Schichtkuchen 1 3 160 180 35 45 R hrschicht...

Страница 40: ...200 220 30 40 Teekuchen 2 t 160 50 60 2 t 160 50 60 M rbeteiggeb ck 2 t 200 15 2 t 200 15 Brandteiggeb ck 2 t 250 15 2 t 250 15 Baisers 2 t 100 60 2 t 100 60 4 Quarters 2 t 120 140 60 2 t 120 140 60 G...

Страница 41: ...25 Nudelauflauf 0 5 kg 1 3 200 220 25 30 Kreolischer Reis 0 5 kg 1 3 200 230 20 25 Frische Pizza und Calzone 0 5 kg 1 3 210 230 30 45 Tiefgefrorene Pizza Calzone und Focaccia 2 s 285 12 20 2 s 315 12...

Страница 42: ...r kleine L cher in den fertigen Kuchen Dann tr ufeln Sie Obstsaft oder Alkoholisches dar ber W hlen Sie beim n chsten Mal die Temperatur um 10 C h her und verk rzen Sie die Backzeiten Das Brot oder de...

Страница 43: ...eischst cke nach der H lfte der Zeit Wenn der Braten fertig ist sollte er noch 10 Minuten im abgeschalteten geschlossenen Backofen ruhen So verteilt sich der Bratensaft besser Hinweise zu Tabellen Die...

Страница 44: ...ammbraten 1 1 5 kg 2 170 180 75 90 Schweinebraten 1 1 2 kg 2 t 170 180 90 110 2 170 180 90 110 2 t 170 180 90 110 Brathuhn 1 1 8 kg 2 170 70 100 2 t 175 70 100 Entenbraten 1 5 2 kg 2 170 180 90 120 G...

Страница 45: ...fe k nnen bei niedrigeren Temperaturen zubereitet werden nachdem sie zum Aufkochen gebracht wurden Verl ngern Sie hierf r die Gardauer Gericht Back ofen Einschub h he Betrieb art Temperatur C Dauer Mi...

Страница 46: ...e Dr cken Sie mit dem L ffel auf den braten F hlt er sich fest an ist er fertig Wenn er nachgibt braucht er noch etwas Zeit Der Braten ist zu dunkel und die Kruste stellenweise verbrannt berpr fen Sie...

Страница 47: ...geheizten Backofen Heizen Sie den Grill 5 Minuten vor bevor Sie das Grillgut hineingeben Betr gt die Grilldauer ber 10 Minuten reicht es aus den Grill 3 Minuten lang vorzuheizen Betriebsarten und Temp...

Страница 48: ...nicht ver ndert werden Beachten Sie die Herstellerangaben auf der Verpackung Hinweis zur Tabelle Betriebsarten und Temperaturen die grau dargestellt sind dienen f r Sie lediglich zur Information Diese...

Страница 49: ...itting the pan supports _______________________62 Cleaning the accessories ______________________62 How to operate your hob______________________63 Switching the gas burners on and off _____________63...

Страница 50: ...__80 Tips for using the oven ___________________81 Baking _____________________________________82 Cakes and pastries ______________________83 Bakes and pizza ______________________84 Baking tips _____...

Страница 51: ...nce Disposal in an environmentally responsible manner Dispose of the packaging in an environmentally responsible manner This appliance is marked in accordance with European Directive 2002 96 EC on was...

Страница 52: ...he oven door carefully Hot steam may escape Risk of fire Never store flammable objects on the hob or in the oven Risk of short circuit Never shut connecting cables for electrical appliances in a hot o...

Страница 53: ...rs only Risk of electrocution Never replace a damaged power cable yourself The power cable must be replaced by one of our trained after sales service engineers only If the appliance is defective disco...

Страница 54: ...floor Do not line the oven floor with aluminium foil Do not place any ovenware on the oven floor Heat will accumulate The baking and roasting times will no longer be correct and the enamel will be da...

Страница 55: ...out the control panel the hob and the oven as well as about each operating mode and the accessories included The control panel Secondary oven Grill compartment Hob Main oven Drawer Electronic clock Co...

Страница 56: ...e function button several times Use the rotary selector to set the cooking time or time The set values can be viewed in the display panel You can turn the rotary selector clockwise or anti clockwise T...

Страница 57: ...here is a limit stop Do not turn beyond this point Wok burner 3 50 kW Standard burner 1 75 kW Standard burner 1 75 kW High speed burner 3 00 kW Economy burner 1 00 kW Wok burner 3 30 kW Pan support Ga...

Страница 58: ...dot on the fascia At the end of the setting range there is a limit stop Do not turn beyond this point Accessories The accessories can be inserted into the grill compartment at five different shelf po...

Страница 59: ...ries Description Flat wire shelf For ovenware cake in tins roasts grilled food frozen dishes Enamelled baking tray For moist cakes baked goods frozen dishes and large roasts With the pan trivet also f...

Страница 60: ...es The accessories can be inserted in the main oven at five different shelf positions You can pull the accessories two thirds of the way out without them tilting This makes it easy to take dishes out...

Страница 61: ...t stop Do not turn beyond this point Accessories The accessories can be inserted in the secondary oven at five different shelf positions For best results we recommend single shelf You can put the acce...

Страница 62: ...e shelf For ovenware cake in tins roasts grilled food frozen dishes Enamelled baking tray For moist cakes baked goods frozen dishes and large roasts With the pan trivet also for catching fat Pan trive...

Страница 63: ...the accessories out of the ovens Completely remove any residues e g small bits of polystyrene from the oven Some parts are covered with film to protect from scratches Remove this film 1 Clean the out...

Страница 64: ...er cap A accurately on the burner B Fitting the pan supports Place the pan supports lengthways over the hob on the step at the edge of the hob So that the pan supports do not slip place the three pan...

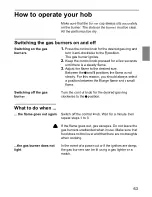
Страница 65: ...n the and positions the flame is not steady For this reason you should always select a position between the large flame and small flame Switching off the gas burner Turn the control knob for the desir...

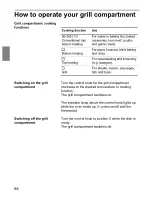
Страница 66: ...ts up while the oven heats up It cycles on off with the thermostat Switching off the grill compartment Turn the control knob to position 0 when the dish is ready The grill compartment switches off Coo...

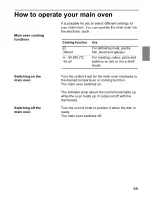
Страница 67: ...to the desired temperature or cooking function The main oven switches on The indicator lamp above the control knob lights up while the oven heats up It cycles on off with the thermostat Switching off...

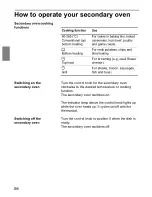
Страница 68: ...s up while the oven heats up It cycles on off with the thermostat Switching off the secondary oven Turn the control knob to position 0 when the dish is ready The secondary oven switches off Cooking fu...

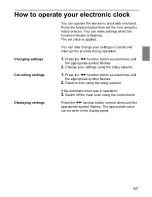
Страница 69: ...ion Changing settings 1 Press the function button several times until the appropriate symbol flashes 2 Change your settings using the rotary selector Cancelling settings 1 Press the function button se...

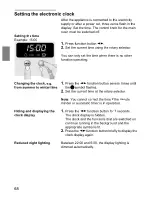
Страница 70: ...summer to winter time 1 Press the function button several times until the symbol flashes 2 Set the current time at the rotary selector Note You cannot correct the time if the minute minder or automati...

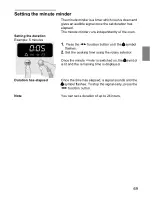
Страница 71: ...ion Example 5 minutes 1 Press the function button until the a symbol flashes 2 Set the cooking time using the rotary selector Once the minute minder is switched on the a symbol is lit and the remainin...

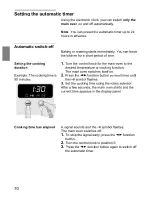
Страница 72: ...e desired temperature or cooking function The main oven switches itself on Example The cooking time is 90 minutes 2 Press the function button several times until the symbol flashes 3 Set the cooking t...

Страница 73: ...ng the rotary selector Setting the end of the cooking time Example The dish should be ready at 12 30 4 Press the function button several times until the symbol flashes 5 Set the end of the cooking tim...

Страница 74: ...mediately Do not clean appliance surfaces which are still hot Switching on the oven light To make cleaning easier you can switch on the oven light To do this for the secondary oven and the grill compa...

Страница 75: ...does not affect automatic self cleaning Using the correct cleaning agent Do not use cleaning agents containing abrasive substances or acid or cleaning aids such as steel wool or steel sponges as this...

Страница 76: ...r caps accurately on the burners The burner caps are black enamelled The colour changes over time This does not affect performance Appliance exterior Stainless steel surfaces Use warm soapy water dry...

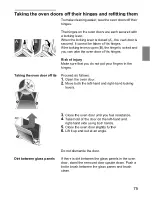
Страница 77: ...ake sure that you do not put your fingers in the hinges Taking the oven door off its hinges Proceed as follows 1 Open the oven door 2 Move both the left hand and right hand locking levers 3 Close the...

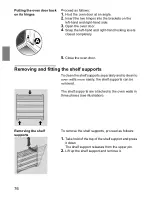
Страница 78: ...he oven door Removing and fitting the shelf supports To clean the shelf supports separately and to clean to oven walls more easily the shelf supports can be removed The shelf supports are attached to...

Страница 79: ...wing notes Repairs must only be carried out by trained after sales service engineers If your appliance is not properly repaired this may cause serious risks to you Fault Possible cause Notes on remedi...

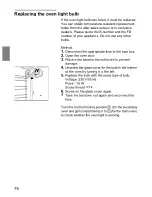
Страница 80: ...fuse in the fuse box 2 Open the oven door 3 Place a tea towel in the cold oven to prevent damage 4 Unscrew the glass cover for the bulb in the interior of the oven by turning it to the left 5 Replace...

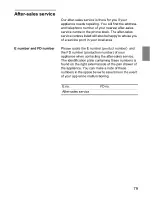
Страница 81: ...ise you of a service point in your local area E number and FD number Please quote the E number product number and the FD number production number of your appliance when contacting the after sales serv...

Страница 82: ...nything goes wrong Energy saving tips Here are some energy saving tips for using the hob and the oven Tips for using the hob Appropriate cookware diameter Make sure that the diameter of the cookware i...

Страница 83: ...other as the oven will still be hot This reduces the baking time for the second cake You can also put in two cake tins next to each other in the main oven Using the residual heat For casseroles and sl...

Страница 84: ...s Cooking functions and temperatures listed in the following tables are a general guide for use The temperature and baking time you select depends on the quantity and type of food This is why ranges a...

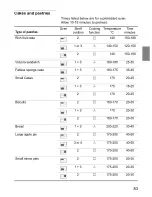
Страница 85: ...150 180 1 or 3 140 150 120 150 2 t 140 150 180 Victoria sandwich 1 3 160 180 25 35 Fatless sponge cake 1 3 160 175 35 45 Small Cakes 2 t 170 20 25 1 3 175 18 25 2 t 170 20 25 Biscuits 2 t 160 170 20 3...

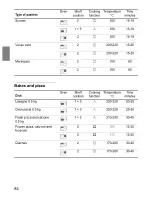
Страница 86: ...ies Oven Shelf position Cooking function Temperature C Time minutes Dish Oven Shelf position Cooking function Temperature C Time minutes Lasagne 0 5 kg 1 3 200 220 20 25 Oven pasta 0 5 kg 1 3 200 220...

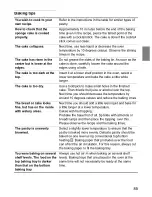
Страница 87: ...e Then drizzle fruit juice or alcohol over the top Next time you should decrease the temperature by around 10 degrees celsius and reduce the baking times The bread or cake looks fine but has on the in...

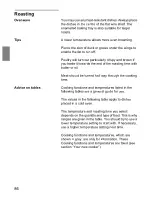
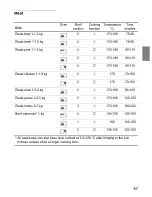
Страница 88: ...uld be turned half way through the cooking time Advice on tables Cooking functions and temperatures listed in the following tables are a general guide for use The values in the following table apply t...

Страница 89: ...180 90 110 2 t 170 180 90 110 Roast chicken 1 1 8 kg 2 170 70 100 2 t 175 70 100 Roast duck 1 5 2 kg 2 170 180 90 120 Roast goose 3 3 5 kg 2 170 180 120 150 Roast turkey 5 7 kg 2 170 180 160 220 Beef...

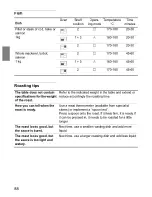
Страница 90: ...the indicated weight in the table and extend or reduce accordingly the roasting time How you can tell when the roast is ready Use a meat thermometer available from specialist stores or implement a sp...

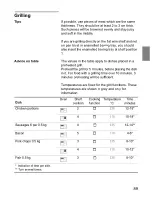
Страница 91: ...in the table apply to dishes placed in a preheated grill Preheat the grill for 5 minutes before placing the dish in it For food with a grilling time over 10 minutes 3 minutes preheating will be suffic...

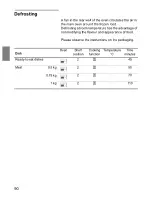
Страница 92: ...en food Defrosting at room temperature has the advantage of not modifying the flavour and appearance of food Please observe the instructions on the packaging Dish Oven Shelf position Cooking function...

Страница 93: ......
Страница 94: ...14 min DTAG Postfach 83 01 01 D 81701 M nchen Fax 49 0 89 45 90 35 32 Internet www neff de Quellenstra e 2 A 1100 Wien Fax 43 0 1 6 05 75 5 12 60 Internet www neff at Per Telefon f r sterreich Tel 08...

Отзывы: