background image

4

1. Introduction

���

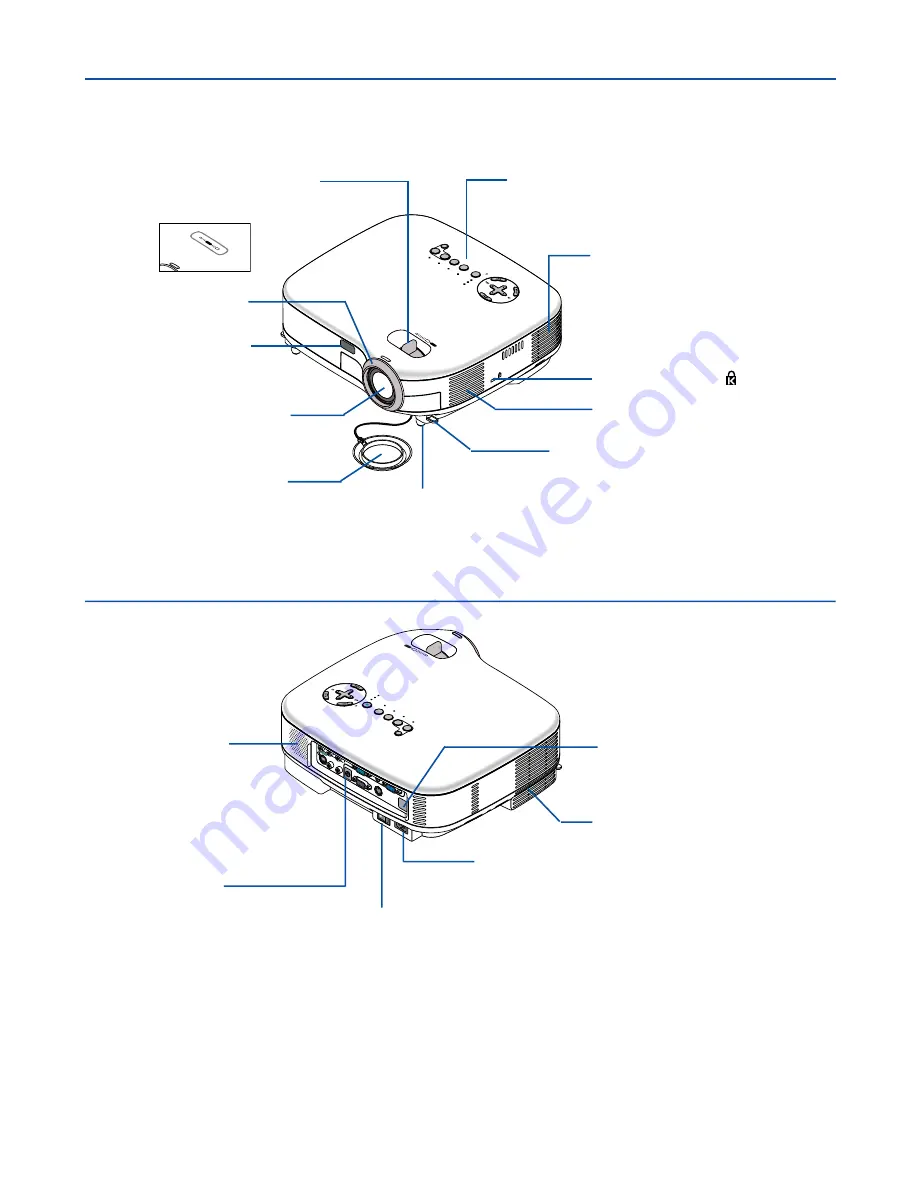
 Part Names of the Projector

ZOOM

FO

CU

S

SEL

ECT

LA

MP

ST

AT

US

PO

WE

R

VID

EO

S-V

IDE

O

CO

MP

UT

ER

-1

CO

MP

UT

ER

-2

ON

/S

TA

ND

 BY

AU

TO

AD

J.

AC IN

ZOOM

FOCU

S

SELECT

LAM

P

STATUS

PO

WER

VIDEO

S-VIDEO

CO

MPUTER-1

COM

PUTER-2

ON/STAND BY

AUTO

ADJ.

AUDIO OUT

S-VIDEO IN

COMPUTER 1 IN

COMPUTER  OUT

PC CONTROL

AUDIO

AUDIO

COMPUTER 2 IN

VIDEO IN

AUDIO

L/MONO

R

AUDIO

L/MONO

R

Zoom Lever (VT670/VT570/VT470)

Digital Zoom Button (VT47)

(See page 

28

)

Controls
(See page 

6

)

Lens

Lens Cap

Built-in Security Slot (   )*

Focus Ring

(See page 

28

)

Adjustable Tilt Foot Lever
(See page 

27

)

Adjustable Tilt Foot
(See page 

27

)

Remote sensor

(See page 

10

 for VT670/VT470)

(See page 

12

 for VT570/VT47)

Ventilation (inlet) / Filter Cover
(See page 

51

)

Ventilation (inlet)

Front/Top

AC Input
Connect the supplied power cable's two-pin plug here, and
plug the other end into an active wall outlet. (See page 

22

)

Main Power Switch
When you plug the supplied power cable into an active wall outlet
and turn on the Main Power, the POWER indicator turns orange
and the projector is in standby mode.
(See page 

23

)

Remote sensor
(See page 

10

 for VT670/VT470)

(See page 

12

 for VT570/VT47)

Terminal Panel

(See page 

7

)

Monaural Speaker

(1W)

Rear

*

This security slot supports the MicroSaver ® Security System. MicroSaver ® is a registered trademark of
Kensington Microware Inc. The logo is trademarked and owned by Kensington Microware Inc.

Ventilation (outlet)
Heated air is exhausted from here.

FO

CU

S

ZO

OM

Содержание VT570 Series

Страница 1: ...Portable Projector VT670 VT570 VT470 VT47 User s Manual...

Страница 2: ...problems WARNING TO PREVENT FIRE OR SHOCK DO NOT EXPOSE THIS UNIT TO RAIN OR MOISTURE DO NOT USE THIS UNIT S PLUG WITH AN EXTENSION CORD OR IN AN OUTLET UNLESS ALLTHE PRONGS CAN BE FULLY INSERTED DO...

Страница 3: ...an outlet on a circuit different from that to which the receiver is connected Consult the dealer or an experienced radio TV technician for help For UK only In UK a BS approved power cable with moulded...

Страница 4: ...power supply fits this requirement before attempting to use your projector 8 Handle the power cable carefully and avoid excessive bending A damaged cord can cause electric shock or fire 9 If the proj...

Страница 5: ...reached the end of its usable life the lamp bulb may shatter and pieces of glass may be scattered in the lamp case Do not touch them as the pieces of glass may cause injury If this happens contact you...

Страница 6: ...creen and the Projector 13 Selecting a Location 13 VT670 VT570 VT470 13 VT47 14 Throw Distance and Screen Size 15 Making Connections 17 Enabling the computer s external display 17 Connecting Your PC o...

Страница 7: ...escriptions Functions Setup 43 Menu Descriptions Functions Advanced 45 Menu Descriptions Functions Information 49 Menu Descriptions Functions Default 50 6 Maintenance 51 Cleaning or Replacing the Filt...

Страница 8: ...d e I m p o r t a n t I n f o r m a t i o n CD ROM User s manual For North America only Registration card Limited warranty For Europe only Guarantee policy Quick Setup Guide Important Information 1 I...

Страница 9: ...k start quick shutoff function means you can set up or put away the projector without delay Nine seconds after turning on the power the projector is ready to display PC or video images When you re fin...

Страница 10: ...contemporary cabinet design is light compact easy to carry and complements any office boardroom or auditorium About this user s manual The fastest way to get started is to take your time and do everyt...

Страница 11: ...djustable Tilt Foot See page 27 Remote sensor See page 10 for VT670 VT470 See page 12 for VT570 VT47 Ventilation inlet Filter Cover See page 51 Ventilation inlet Front Top AC Input Connect the supplie...

Страница 12: ...g surface before turning the projector over to prevent scratching the top cover Make sure that the carrying handle is attached with correct orientation as shown below Bottom Adjustable Tilt Foot See p...

Страница 13: ...t green continually it indi cates that the lamp mode is set to Eco See the Lamp Indicator section on page 56 for more details 5 VIDEO Button Press this button to select a video source from aVCR DVD pl...

Страница 14: ...sound from the cur rently selected source COMPUTER VIDEO or S VIDEO Output sound level can be adjusted in accor dance with the sound level of the internal speaker Note that this cannot be used as a h...

Страница 15: ...the supplied remote mouse receiver See page 34 You can use these buttons to scroll the viewing area of the window or to move to the previous or next slide in PowerPoint on your computer 7 MENU Button...

Страница 16: ...he Picture adjustement menu to adjust Wall Color Picture Management Brightness Contrast Sharpness Color and Hue See pages 40 to 41 20 HELP Button Provides the information on the current signal and pro...

Страница 17: ...Remove both old batteries and install new ones AAA Ensure that you have the batteries po larity aligned correctly 3 Slip the cover back over the bat teries until it snaps into place Do not mix differ...

Страница 18: ...enu pressing this button will close the menu 6 SOURCE Button Press this button to select a video source such as a PC VCR or DVD player Each time this button is pressed the input source will change as...

Страница 19: ...according to your local regulations Operating Range for Wireless Remote Control Battery Installation 1 Push the catch to the right and remove the battery holder 2 Remove the old Lithium coin cell and...

Страница 20: ...or x Connect your computer or video equip ment to the projector See pages 17 to 21 c Connect the supplied power cable See page 22 NOTE Ensure that the power cable and any other cables are disconnected...

Страница 21: ...s a guide 25 300 240 200 180 150 120 100 60 40 80 D i s t a n c e U n i t m i n c h Lens center 0 6 2 3 1 0 3 7 1 4 5 6 1 9 7 6 2 4 9 5 2 9 1 1 4 3 6 1 4 3 4 4 1 7 2 4 9 1 9 1 5 8 2 2 9 7 3 2 8 7 AC I...

Страница 22: ...reen Size B C Wide Tele D Diagonal Width Height mm 730 720 870 870 1060 1170 1420 1770 2150 2130 2590 2370 2880 2490 3020 2670 3240 2970 3600 3580 4330 4480 5420 5380 6520 5980 7240 6280 7610 7190 870...

Страница 23: ...e used at temperatures between 41 F 5 C and 95 F 35 C Do not expose the projector to moisture dust or smoke This will harm the screen image Ensure that you have adequate ventilation around your projec...

Страница 24: ...not supplied to connect to your Mac s video port IBM VGA or Compatibles Notebook type or Macintosh Notebook type Connecting your PC or Macintosh computer to your projector will enable you to project y...

Страница 25: ...s connection NOTE Audio signal is not available for this connection 1 Turn off the power to the projector and your video equipment 2 Use the NEC ADP SC1 SCART adapter and a commercially available SCAR...

Страница 26: ...your projector to simultaneously view on a monitor the RGB analog image you re projecting To do so 1 Turn off the power to your projector monitor and computer 2 Use a 15 pin cable to connect your moni...

Страница 27: ...connect your DVD player to the COMPUTER IN connector on the projector For a DVD player without component video Y Cb Cr output use common RCA cables not provided to connect a composite VIDEO output of...

Страница 28: ...t or one end of an S Video cable to the S Video output connector on the back of your VCR or laser disc player connect the other end to the appropriate video input on your projector Connect one end of...

Страница 29: ...ble to the projector First connect the supplied power cable s two pin plug to the AC IN of the projector and then connect the other plug of the supplied power cable in the wall outlet Make sure that t...

Страница 30: ...e POWER ON button the POWER button on VT570 VT47 on the remote control for a minimum of 2 seconds The POWER indicator will turn to green and the projector will become ready to use After you turn on yo...

Страница 31: ...1 COMPUTER 2 ON STAND BY SELECT ENTER EXIT MENU UP MAGNIFY PAGE OFF POWER ON PIC MUTE DOWN SOURCE PIC MUTE SELECT NOTE Immediately after turning on the projector screen flicker may occur This is not...

Страница 32: ...the COMPUTER 1 2 COMPONENT VIDEO or S VIDEO buttons Selecting from the Source List VT570 VT47 1 Press and quickly release the SOURCE button on the remote control The Source list will be displayed SOU...

Страница 33: ...tor will search for the next available input source Each time you press and hold the SOURCE button for a minimum of 1 second the source will change as follows VT570 Computer 1 Computer 2 Video S Video...

Страница 34: ...justable Tilt Foot Levers 4 Lower the front of the projector to the desired height and release the Adjustable Tilt Foot Lever to lock the Adjustable tilt foot There is approximately 10 degrees of up a...

Страница 35: ...ng to obtain the best focus Zoom VT670 VT570 VT470 Use the ZOOM lever to finely adjust the image size on the screen VT47 Use the Digital ZOOM button on the projector cabinet to electronically enlarge...

Страница 36: ...Auto Keystone Correction feature can cause an image to be slightly blurred because the correction is made electroni cally Manual Keystone Correction You can also correct the vertical keystone distor t...

Страница 37: ...30 3 Projecting an Image Basic Operation 5 Press the MENU button to close the menu NOTE You can save the changes using the Keystone Save feature when you turn off the projector See page 42...

Страница 38: ...function also adjusts the clock phase to reduce video noise dot interference or cross talk This is evident when part of your image appears to be shimmering This adjustment may be necessary when you co...

Страница 39: ...or 30 seconds after the projector is turned off AC IN ZO OM FO CU S After Use Preparation Make sure that the projector is turned off 1 Unplug the power cable 2 Disconnect any other cables 3 Retract ad...

Страница 40: ...T570 and VT47 VOLUME S VIDEO ASPECT HELP FREEZE PICTURE 1 2 Enlarging and Moving a Picture VT670 VT470 only ENTER EXIT MENU UP MAGNIFY PAGE OFF POWER ON PIC MUTE DOWN You can enlarge the picture up to...

Страница 41: ...22 feet When connecting using the USB terminal For PC the mouse receiver can only be used with a Windows 98 Me XP or Windows 2000 operating system NOTE In Windows XP if the mouse cursor will not move...

Страница 42: ...MUTE SELECT 2 Press the SELECT buttons on the remote control or the projector cabinet to highlight the menu for the item you want to adjust or set ENTER EXIT MENU UP MAGNIFY PAGE OFF POWER ON PIC MUT...

Страница 43: ...remote control or the projector cabinet The on screen slide bar will show you the amount of increase or decrease Changes are stored until you adjust it again EXIT Return to the previous menu 6 Repeat...

Страница 44: ...maining countdown time when the Off Timer is preset Solid triangle Indicates further choices are available A highlighted triangle indicates the item is active Tab Indicates a group of features in a di...

Страница 45: ...Fran ais Italiano Espa ol Portugu s Nederlands Language 2 Svenska Norsk Suomi Cesky Magyar Polski T rk e Language 3 Dansk Menu Color Select Color Monochrome Menu Display Time Manual Auto 5 sec Auto 15...

Страница 46: ...fault Current Signal All Data Clear Filter Usage Clear Lamp Hour Meter Information Page1 Remaining Lamp Time Lamp Hour Meter Filter Usage Projector Usage BIOS Version Firmware Version Data Version Pag...

Страница 47: ...ight blue Sky blue Light rose Pink Using Picture Management Picture Management This option allows you to adjust neutral tint for yellow cyan or magenta There are 5 factory presets optimized for variou...

Страница 48: ...mode is recommended for Dynamic Creates a high contrast picture Black Detail Emphasizes detail in dark areas of the picture Natural Natural reproduction of the picture Adjusting White Balance Brightn...

Страница 49: ...l Normal Standard 4 3 Aspect When 16 9 is selected from the source i e DVD player the following selections will display Normal 16 9 image displayed in 4 3 mode Wide Zoom Cinema Native Left and right s...

Страница 50: ...fter the countdown is complete NOTE To cancel the preset time select Off for the preset time or turn off the power When the remaining time reaches 3 minutes before the projector is turned off the Proj...

Страница 51: ...s are Manual Auto 5 sec Auto 15 sec and Auto 45 sec The Auto 45 sec is the factory preset Selecting a Color or Logo for Background Background Use this feature to display a black blue screen or logo wh...

Страница 52: ...will display the Keyword input screen Unless the correct keyword is entered the projector cannot project an image To enable the Security function 1 Select Advanced Security and press the button to sel...

Страница 53: ...r is turned on the projector will display a blue background To display an image at this time press the MENU button to display the Keyword input screen The Keyword confirmation screen will be displayed...

Страница 54: ...you wish to cool down the temperature inside the projector quickly select High NOTE Select High if you continue to use the projector for consecutive days Selecting Signal Format Signal Select Compute...

Страница 55: ...can automatically make adjustment in two ways Normal and Fine Off The RGB image will not be automatically adjusted You can manually optimize the RGB image Normal Default setting The RGB image will be...

Страница 56: ...for long cable runs Menu Descriptions Functions Information Displays the status of the current signal remaining lamp lamp filter projector usage time hours and version information The Information has...

Страница 57: ...mp Hour Meter and Clear Filter Usage Resetting the Filter Usage Hours Clear Filter Usage Resets the filter usage back to zero Selecting this option displays submenu for a confirmation Select Yes and p...

Страница 58: ...dirty or clogged your projector may overheat CAUTION Turn off the projector turn off the main power switch and unplug the projector before replacing the filter Only clean the outside of the filter cov...

Страница 59: ...g 2 Clean the cabinet periodically with a damp cloth If heavily soiled use a mild detergent Never use strong detergents or solvents such as alcohol or thinner 3 Use a blower or lens paper to clean the...

Страница 60: ...ing Leaving finger prints in the glass surface might cause an unwanted shadow and poor picture quality The projector will turn off and go into stand by mode after 2100 up to 3100 hours in Eco mode hou...

Страница 61: ...revent the risk of electrical shock Do not attempt to circumvent this interlock 4 Insert a new lamp housing until the lamp housing is plugged into the socket CAUTION Do not use a lamp other than the N...

Страница 62: ...not displayed If this happens do the following while in standby condition to clear values for the Remaining Lamp Time and the Lamp Hour Meter For VT670 VT470 press the HELP button on the remote contro...

Страница 63: ...On 0 5 sec Of 4 cycle 0 5 sec On 0 5 sec Off 6 cycle 0 5 sec On 0 5 sec Off Normal Lamp cover error or lamp housing error Temperature error Fan error Lamp error Re firing the lamp The projector is co...

Страница 64: ...ower management software See also the next page When one of the following happens the Lamp mode automatically changes from Normal to Eco When there are no signals blue or black screen To return to the...

Страница 65: ...happen deactivate the notebook PC s LCD screen when the projector display is in use Each notebook PC has a different way of deactivate reactivate the local LCD screens as described in the previous ste...

Страница 66: ...70 VT570 VT470 Tele 9 5 9 9 Wide 11 5 12 0 VT47 14 0 14 6 Keystone Correction 30 Vertical auto Electrical Inputs VT670 VT570 VT470 2 RGB Component D Sub 15 Pin 1 S Video DIN 4 Pin 1 Video RCA 2 L R RC...

Страница 67: ...kg Environmental Considerations Operational Temperatures 41 to 95 F 5 to 35 C 20 to 80 humidity non condensing Storage Temperatures 14 to 122 F 10 to 50 C 20 to 80 humidity non condensing Regulations...

Страница 68: ...TER 1 COMPUTER 2 ON STAND BY ZOOM FOCUS SELECT AC IN AUDIO OUT AUDIO S VIDEO IN COMPUTER 2 IN VIDEO IN COMPUTER 1 IN MONITOR OUT PC CONTROL L MONO R AUDIO L MONO R AUDIO 112 5 4 4 260 10 2 20 3 0 8 64...

Страница 69: ...UTER ON STAND BY ZOOM FOCUS SELECT AC IN 112 5 4 4 260 10 2 20 3 0 8 64 6 2 5 294 11 6 71 5 2 8 ZOOM AUDIO S VIDEO IN VIDEO IN COMPUTER IN MONITOR OUT PC CONTROL L MONO R AUTO ADJ AUDIO Lens center Le...

Страница 70: ...dix Only COMPUTER 1 input connector supported on VT670 VT570 VT470 Pin No RGB Signal Analog YCbCr Signal 1 Red Cr 2 Green or Sync on Green Y 3 Blue Cb 4 Ground 5 Ground 6 Red Ground Cr Ground 7 Green...

Страница 71: ...280 1024 69 89 65 18 HP 1280 1024 78 125 72 01 SUN 1280 1024 81 13 76 11 VESA 1280 1024 79 976 75 03 VESA 1280 1024 91 146 85 02 SXGA 1400 1050 HDTV 1080p 1920 1080 67 5 60 Progressive SDTV 576i 625i...

Страница 72: ...trol Codes VT47 Function Code Data POWER ON 02H 00H 00H 00H 00H 02H POWER OFF 02H 01H 00H 00H 00H 03H INPUT SELECT COMPUTER 02H 03H 00H 00H 02H 01H 01H 09H INPUT SELECT VIDEO 02H 03H 00H 00H 02H 01H 0...

Страница 73: ...66 7 Appendix 1 2 5 4 3 6 7 8 To RxD of PC PC Control Connector DIN 8P To TxD of PC To GND of PC NOTE Pins 2 3 5 6 and 8 are used inside the projector...

Страница 74: ...WER OFF Button You can use this button to turn your projector off NOTE To turn off the projector press the POWER OFF button twice 6 MAGNIFY Buttons Use these buttons to adjust the image size The image...

Страница 75: ...t Sharpness Color Hue 17 SOURCE Button Use this button to select a video source such as a PC VCR or DVD player Press and release this button quickly to display the Source List Each time this button is...

Страница 76: ...stance of about 22 feet 7 m and within a 60 degree angle of the remote sensor on the projector cabinet The projector will not respond if there are objects between the remote control and the sensor or...

Страница 77: ...R To disable the laser pointer set the function switch to Off Decide whether to enable or disable laser then set the switch as necessary using the tip of a thin ball point pen On this model the other...

Страница 78: ...s turned off only models with the Power Management function Sleep Timer is turned off only models with the Sleep Timer function Video and Audio Image is too dark Remains unchanged even though you adju...

Страница 79: ...le Model number Length inch m Distribution amplifier Model number Switcher Model number Adapter Model number Projector PC DVD player Installation environment Screen size inch Screen type White matte B...

Страница 80: ...el name serial number and name of the store of purchase are not indicated on the warranty or have been altered 2 Problems or damage caused by dropping or shocks during ship ment or movement by the cus...

Страница 81: ...Hong Kong Ltd Address 11th Floor Tower B New Mandarin Plaza 14 Science Museum Road Tsim Sha Tsui East Kowloon Hong Kong Telephone 852 2369 0335 Fax Line 852 2795 6618 Email Address esmond_au nechk nec...

Страница 82: ...riod I also confirm following information is correct Regards Application Sheet for TravelCare Service Program P 1 Country product purchased User s Company Name User s Company Address Phone No Fax No U...

Страница 83: ...problem Enduser is required to fill in Application Sheet Enduser needs to confirm the availability of the Service to NEC Au thorized Service Stations 3 Loan Only For this service NEC Authorized Servi...

Страница 84: ...roduct consult the dealer from whom you purchased the product 2 Whenever warranty service is required the original dated invoice or a copy must be presented as proof of warranty coverage In order to o...

Страница 85: ...B Peripheral VT670 VT570 VT470 VT47 We hereby declare that the equipment specified above conforms to the technical standards as specified in the FCC Rules This device complies with Part 15 of FCC Rule...

Отзывы: