

NEC Display Solutions of America, Inc.
OL-V463 Installation Guide
10 Point Touch Overlay for the V463
Rev 1.0
www.necdisplay.com
OL-V463
3
6.0
Integration Procedure
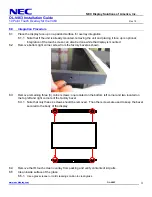
6.1
Place the display face up on a padded surface for overlay integration
6.1.1
Note that if the unit is already mounted, removing the unit and placing it face up is optional;
integration of the touch screen can also be done while the display is mounted
6.2
Remove bottom right corner screw from the factory bezel as shown.
6.3
Remove remaining three (3) corner screws; one located on the bottom left corner and two located on
the top left and right corners of the factory bezel.
6.3.1
Note that only these 4 screws should be removed. The other screws are used to keep the bezel
secured to the body of the display
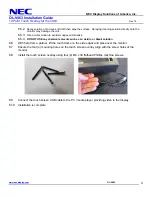
6.4
Remove the IR touch screen overlay from packing and verify contents of kit parts.
6.5
Clean inside surface of the glass.
6.5.1
Use a glass cleaner or mild cleaning solution to clean glass.


