E – 29
Menu Descriptions & Functions
Source Select
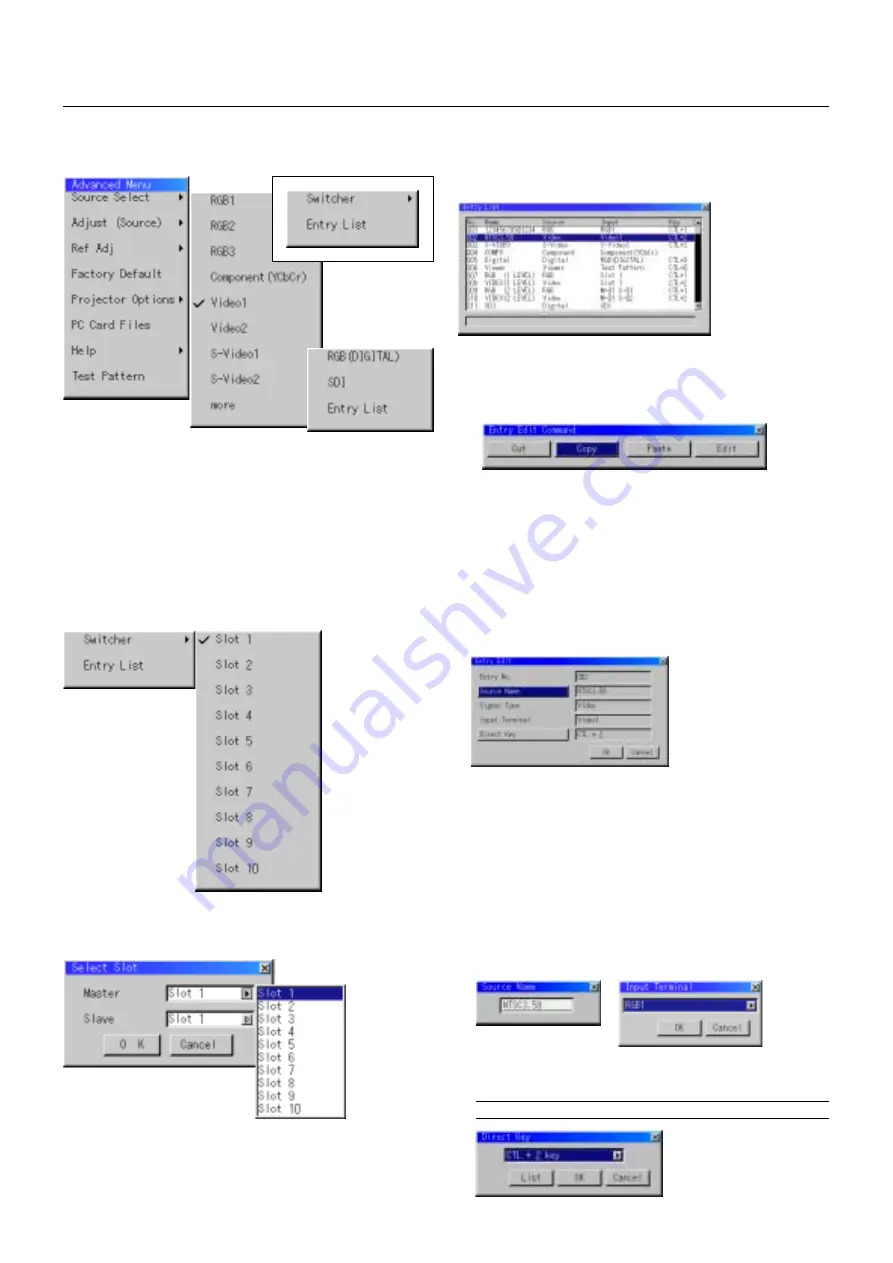
Use the SELECT
▲
or
▼
button to select the master slot number from
1 to 10 and then the slave slot number from 1 to 10 on the Select Slot
menu. Select OK and press ENTER.
To close the window without storing the settings, select Cancel and
press ENTER.
Entry List
Displays the list of the entry signals. Use the
▲▼
buttons on your re-
mote control or the projector cabinet to select the signal and press the
ENTER button on the remote control or the projector cabinet to project
the image of the selected source.
Use the SELECT
▲
or
▼
button to select the desired slot number from
1 to 10 of the ISS-6020 Swicher and press ENTER.
When using with two or more Switcher ISS-6020:
Swicher
You can select the slot number from 1 to 10 of the Switcher(s) ISS-
6020.
When using with a single Switcher ISS-6020:
Enables you to select a video source such as a VCR, DVD player, laser
disc player, computer or document camera depending on what is
connected to your inputs.
Press the up/down buttons on your remote control or the projector cabi-
net to highlight the menu for the item you want to adjust.
* RGB1,2,3
* Component (YCbCr)
* Video 1, 2
* S-Video 1, 2
* RGB (Digital)
* SDI
Select "Direct Key" and press ENTER to display the Direct Key win-
dow.
You can assign specific remote keys for direct signal input selection.
NOTE: Existing direct key settings are overwritten with new settings.
Entry Edit Command
You can edit the signal on the entry list.
To do so:
While pressing and holding CTL, press ENTER on the remote control to
display the Entry Edit Command window.
* Cut Enables you to remove a selected signal from the list and place
it on the "clipboard" in the projector.
* Copy Enables you to copy a selected signal from the list and place it
on the "clipboard" in the projector.
* Paste Enables you to paste the signal placed on the "clipboard" to
any other line of the list. To do this, select "Paste" and then select the
line number you want to paste to. Last press ENTER.
* Edit Enables you to change source name or assign the direct key.
* The following buttons are not available for the currently projecting
signals:
1) The Cut and Paste buttons on the Entry Edit Command screen
2) The Input Terminal button on the Entry Edit screen
When complete, select OK and press ENTER. To exit without stor-
ing the settings, select Cancel.
Select "Source Name" and press ENTER to display the Source Name
Edit window. You can change source name on this window.
Select "Input Terminal" and press ENTER to display the Input Termi-
nal window. You can change input terminal on this window.
RGB1, RGB2, RGB3, and RGB(DIGITAL) can be selected for RGB
signals; RGB1, RGB2, Component, and RGB(DIGITAL) can be se-
lected for component signals; Video 1/2, S-Video 1/2 , and
RGB(DIGITAL) can be selected for Video and S-Video signals.
To return to the original Video signal after the video signal has been
changed to the RGB signal, enter the signal into the Entry List as a
new one.
Содержание Nighthawk XT4100
Страница 2: ...XT5100 XT4100 High Light Output Projection System User s Manual ...
Страница 54: ...Printed in Japan 7N8P0541 ...


