1.
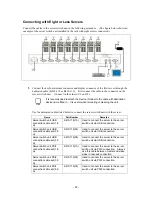
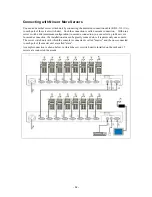
Connect the seven servers to the ports 1 through 7 of the master side according to the
procedures in "Connecting Eight or Less Servers" described earlier. (Connect in order of
①
and
②
.)
AC cords for the server switch unit, the servers, and the console must be connected later.
2.
Connect the connector on the port 8 of the master side to the KB, Mouse, and CONSOLE
connectors on the console port of the slave unit with dedicated cable (K410-119(1A)).
Connect the slave side first. (Connect in order of
③
and
④
.)
3.
Connect the eight servers to the slave side according to the procedures in "Connecting Eight
or Less Servers" described earlier. (Connect in order of
⑤
and
⑥
.)
Tips
If you want to add more slave units, repeat steps 1 through 3 described above.
Use the port 7, 6, 5, ..., 1 of the master unit in order when adding the slave
unit.
Notice
The server switch unit of the slave side cannot connect with another (the third)
slave unit.
4.
After completing the connection of the server switch unit with servers, connect the keyboard,
mouse, and display unit to the KB, MOUSE, and CONSOLE connectors on the master unit.
(Connect
⑦
in the figure above.)
5.
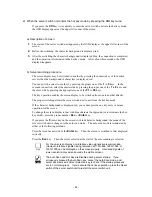
At last, connect the power cords of the servers and the display unit and the AC cord of the
server switch unit to AC outlets. (Connect
⑧
in the figure above.)
6.
Fix the dedicated cables and AC cords with the attached tie wraps.
7.
After confirming that all the connections are valid, start the servers sequentially.
8.
Select each of the servers to check that it is started normally and set correctly.
If the keyboard, mouse, and/or display monitor are not set correctly, set and start each device
again.
-
53
-
Содержание N8191-09
Страница 6: ...シリーズ サーバスイッチユニット Server Switch Unit ユーザーズガイド User s Guide ...
Страница 21: ... xv ...

