background image

59

Camera (M5)

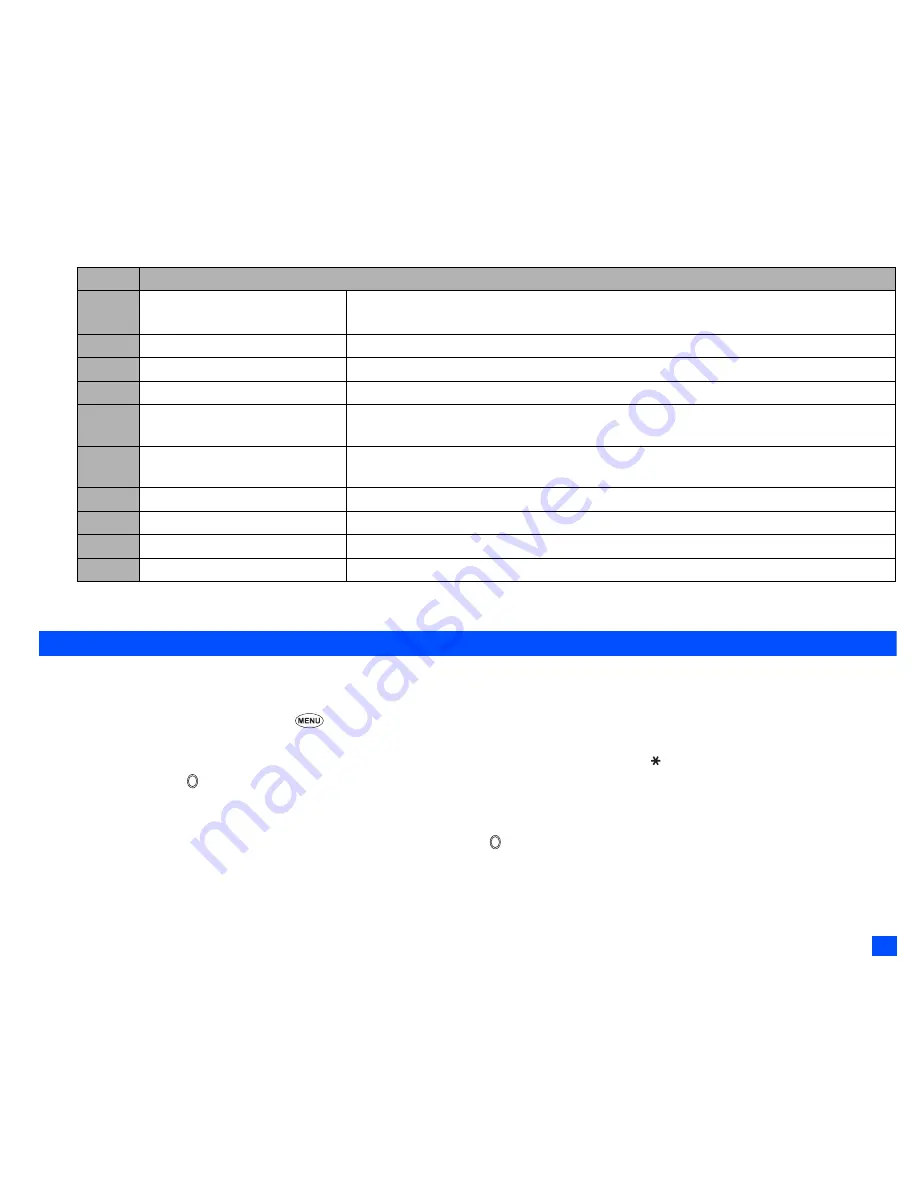
Camera Options menu (after taking a picture)

2

Depending on the conditions, some options may be displayed in gray and not be available.

Recording a video (M52)

Recording a video

,

To record a video, keep your phone open at all time. Unlike taking a picture, you cannot record a video while the phone is closed. 

Press and hold 

Side up

 then 

SK2

,


or  

5 2 

➔ 

Look into the view finder screen and adjust the camera position.

2

When you highlight Video on the Camera screen, pressing 

SK1

 creates a desktop icon of the video function on the standby screen. 

2

You can switch the camera view finder screen between the main-LCD and the 2nd-LCD by pressing  .

To start recording, 


or 

Side up


 The progress bar will show the ratio of how much you have recorded already.

2

While recording, be careful not to cover the mouthpiece of your phone as it is used as the microphone to record sound along with the video.

2

While recording, the key tones are deactivated.

Move the camera to capture the scenes you want 


To stop recording, 


or the 

Side up

.

2

After the set video file size is reached, the recording automatically stops.

2

After recording, 

SK1

 to replay the recorded video, and 

SK2

 to send the video file attached to a message.

No.

Camera Options menu (after taking a picture)

1

Save current

Saves the currently displayed picture in the folder selected as Save in setting.

2

In Burst mode, only the highlighted picture is saved.

2

Save all

Saves all pictures taken in Burst mode.

3

Create message

Creates a new message with the file attached.

4

Set as wallpaper

Sets the picture to be the main-LCD or 2nd-LCD wallpaper.

5

Display as normal image/

Display as mirror image

Selects whether to display the taken picture as a normal or mirror image on the main-LCD 

preview screen when you select the 2nd-LCD as a camera view finder in Single mode.

6

Save as mirror image

Saves the picture as a mirror image when you select the 2nd-LCD as a camera view finder in 

Single mode.

7

Thumbnail view

Selects whether to display the pictures taken in the Burst mode as thumbnails or slides.

8

Automatic save

Selects whether to save taken pictures automatically or not.

9

Save in

Selects the folder (preset or created) where the taken picture will be saved.

0

Pictures

Opens Pictures in My data.

Содержание N500i

Страница 1: ...th to clean the phone Do NOT use a dry cloth or electrostatically charged cloth Do not use chemical or abrasive cleaners as these could damage the case Remember to recycle the cardboard packaging supplied with this phone is ideal for recycling Do not leave the battery pack empty or disconnected for a long time otherwise some data may be initialized Your phone contains metal which may cause you an ...

Страница 2: ...pulation The guidelines were developed by independent scientific organizations such as ICNIRP International Commission on Non Ionizing Radiation Protection through periodic and thorough evaluation of scientific studies The limits include a substantial safety margin designed to assure the safety of all persons regardless of age and health and to account for any variations in measurements Examples o...

Страница 3: ...JV Lite2 is a registered trade mark or trademark of ACCESS COl LTD in Japan and selected countries world wide Proprietary notice contains Macromedia Flash Player technology by Macromedia Inc Copyright 1995 2005 Macromedia Inc All rights reserved Macromedia Flash and Macromedia Flash are trademarks or registered trademarks of Macromedia Inc in the United States and other countries This product feat...

Страница 4: ...titles Some titles in this manual contain information on how to access the functions In these titles M stands for the numbers indicate the menu shortcut numbers see Overview of menu function on page xi for details and three periods indicate that there are more operations described in the paragraph Reading the procedures Highlight means to use the 4 way navigation keys to move the area emphasized w...

Страница 5: ...ber Press the appropriate number to jump straight to a next menu The row colour is changed when selected e g to activate deactivate a facility Help icons Displayed when you can use the key represented by these icons see page viii Next menu icon Displayed when you can press or the shortcut number to show the next menu Page scroll bar Displayed when youcanpress to scroll to the next page Shortcut me...

Страница 6: ...eft or Right key and Select key Up key Down key Left key Right key Select key Symbols used in the user s manual Symbols on the keys Main LCD Send key Softkey2 SK2 Phonebook key End on off key Alphanumeric keys Mouthpiece 2nd LCD LED light Camera Rear cover Speaker Clear CLR Back key Softkey1 SK1 Menu key Earphone 4 way navigation key Select key Charger connector cover Internal antenna Side down ke...

Страница 7: ...he standby screen Powering off 5 CLR Cancelling the Cell Broadcast message display 33 Deleting all the automatically displayed desktop icons 18 Deleting character or returning to the previous screen Deleting all characters when you enter text 1 Entering phone numbers 5 Calling the Voice mail centre 55 2 to 9 Entering phone numbers 5 One touch dial to the corresponding number in the phonebook SIM 7...

Страница 8: ...le and i mode PDP Context is active Indicates that the i mode connection is carried out Indicates that the i mode lock is on 2 No icon appears when the phone is outside the GSM network service area or when the phone is in the GSM network service area and GPRS EDGE is not attached Indicates that Bluetooth is set to on Bluetooth is in operation Indicates the line status No ALS or ALS Line 1 ALS Line...

Страница 9: ...his icon blinks while buffering pausing or stopping the download Indicates the video is played in normal enlarged screen size Displays the current volume level The 0 is mute and 9 is the maximum When the streaming video player is in operation Indicates the video is playing on pause stopped Indicates the video type is on demand stored on a server and played by your request or broadcast currently br...

Страница 10: ... No ALS or ALS Line 1 ALS Line 1 and 2 ALS Line 2 Indicates the Bluetooth is on Bluetooth is in active Indicates the signal strength level Appears when you are outside the service area Indicates that the phone is in the Meeting Pocket Car mode 2 No icon appears for the Normal mode When 2nd LCD is used as the camera view finder screen Indicates the battery level Indicates the battery charging statu...

Страница 11: ...n 2 With the Main menu screen displayed 0 to display your own number Key Main menu Second level menu 1 Settings Phone Phone modes Main LCD 2nd LCD Power saving Calls Security Network Reset settings 2 Message Inbox Drafts Outbox Sent Folder1 Folder2 CB Key Main menu Second level menu 7 Java Programs Prog backlight 8 Accessory Music player MP3 player Calculator Clock alarm Scheduler ToDo list Notepa...

Страница 12: ...ing Started 1 Basic Calls Phone Use 5 Text Entry 15 Desktop icons 18 Settings M1 20 Message M2 27 i mode M3 34 Phonebook M4 49 Camera M5 56 My data M6 61 Java M7 68 Accessory M8 69 Bluetooth M80 79 Index 84 ...

Страница 13: ...ncy calls 7 Last number redial 7 One touch dial 7 Fast dialling 7 Displaying your own phone number M0 M416 8 Voice recall 8 Options menu during a call 8 Putting a call on hold 9 Mute 9 Call transfer 9 Multi party calls 9 Recording a call 10 Scratchpad number 10 Call options M43 11 Call settings M16 12 International dialling codes 14 Roaming 14 Text Entry 15 Mode change 15 T9 English text input 15 ...

Страница 14: ...otes on using the camera 56 Taking a picture M51 57 Recording a video M52 59 My data M6 61 Videos M61 62 Sounds M62 62 Pictures M63 63 MP3 M64 65 File selector Options menu 65 Java M7 68 Programs M71 68 Prog backlight M72 69 Accessory M8 69 Music player M81 69 MP3 player M82 70 Calculator M83 71 Clock alarm M84 72 Scheduler M85 73 ToDo list M86 74 Notepad M87 76 Voice memo M88 77 Currency M89 77 B...

Страница 15: ...alls on some networks unless a valid SIM card is fitted Be sure to turn the phone off before inserting and removing a SIM card Otherwise damage to the SIM card can occur Inserting a SIM card Be sure to turn the phone off before removing the battery pack While pressing down the areas marked with of the rear cover as indicated by arrow slide the rear cover about 3 mm in the direction of arrow with y...

Страница 16: ... removed push the short and straight end of the SIM card with your thumb to slide it gently in the direction of arrow Lift the SIM card after it is completely removed from the holder Be careful not to damage electric parts of the SIM holder when removing a SIM card Rear cover bout 3 mm Battery Finger tab Holder SIM card About 3 mm Check that there is no gap between the rear cover and the phone bod...

Страница 17: ...t of the charger connector Make sure to press both buttons when disconnecting the charger plug from the charger connector If you pull the charger plug forcibly without pressing the buttons damage to the charger connector can occur The icons show the charging status of battery Fast battery charging Slow battery charging while the phone is in use Battery charging stopped due to overheat Using any ba...

Страница 18: ...full rate speech will affect both standby and talk times Checking the battery Check icon at the top of the standby screen The number of blocks on the icon shows the charge of your battery pack Full battery power Partial battery power Low battery power Battery empty Low battery alarm When the battery voltage falls below the working level a low battery warning is displayed on the screen accompanied ...

Страница 19: ...ter the international dialling code see page 14 2 Use the full STD area code even if you are calling to a person in the same town If the numbers are too long to be displayed within one line after pressing excess part is deleted and is added at its end 2 The main LCD display shows the strength of the radio signal that links your phone to the network The maximum signal strength is shown by 4 shaded ...

Страница 20: ...dset and Bluetooth headset at the same time the wired headset will work partially only its button will work Accepting an incoming call While receiving an incoming call or SK1 2 When you use the headset you can also accept an incoming call by pressing the button on it 2 When Auto answer function see page 22 is set to on and a headset is connected to the phone the incoming call is automatically acce...

Страница 21: ...s M43 on page 11 One touch dial One touch dial for the phonebook SIM is available by pressing and holding the number keys between 2 and 9 2 A number for the One touch dial corresponds to the location number in the phonebook SIM 2 One touch dial is available only for the phone numbers with the location number 2 to 9 stored in the phonebook SIM Fast dialling You can make a call to the phone number i...

Страница 22: ...omatically Options menu during a call During a call to display the options menu No Options menu during a call 1 Main menu Displays the Main menu screen See Overview of menu function on page xi for details 2 Hold Retrieve Puts the call s on hold or retrieves the call s 3 Mute Unmute Mutes or unmutes your voice to all active calls 4 Transfer call Enables to transfer the call and connect other partie...

Страница 23: ...sfer the call and connect the two parties then you can drop from the line while leaving those two calls active To transfer the call 4 2 After dropping from the call with the other two parties if you have a call waiting you can proceed the call with it Call transfer facility is SIM dependent Multi party calls If your SIM card is multi party enabled you can make a conference call to more than one ca...

Страница 24: ...ty call highlight the party you wish to disconnect 8 2 You can disconnect a specific party on the multi party calls only when you are a host of the multi party calls Multi party call facilities are network dependent Recording a call You can record the conversation during the call During a call press and hold or 7 to display the Voice memo screen SK1 to start the recording SK1 to pause and SK2 to s...

Страница 25: ...ur phone SK1 1 to reset the duration of the total dialled calls 2 to reset the duration of the total received calls or 3 to reset the duration of all calls 6 Charge info Displays the charge information Advice of Charge AoC The AoC facility is SIM card and network dependent 2 To reset the display to zero set the maximum charges or edit the unit price you may be prompted to enter the PIN2 code 1 Tot...

Страница 26: ...existing phone number If you have made any mistake highlight the appropriate field SK1 to clear any mistakes If the settings are correct There will be a short delay while the network sends the divert status of your phone There may be an additional charge for this service depending on your network No Missed calls Received calls Dialled calls Options menu 1 Call Calls the current number 2 Create mes...

Страница 27: ...s SK1 To merge the calls SK2 see Multi party calls on page 9 To end the current call To retrieve the held call SK1 Auto redial M163 With the auto redial facility your phone will redial a number up to 10 times if the first attempt fails A tone will be heard at each redial attempt Your phone cannot connect a call if the other party is busy or if there are network problems Pressing SK2 during a redia...

Страница 28: ...y you are dialling from For example a typical UK number of 0131 1234567 is entered as Roaming You will be charged for calls forwarded to you while roaming The roaming facility enables you to use your phone in many parts of the world and pay all charges through your normal service provider Your network operator usually has agreements with named networks in other countries so that automatic roaming ...

Страница 29: ...mode T9 English text Normal text ABC Numeric input T9 English text input Your phone incorporates T9 Text Input enabling fast easy and intuitive text input For each letter to be keyed in you only need to press the alphanumeric key once The screen will display the word you may require based on the internal English dictionary of your phone With a text entry screen displayed SK1 until the entry mode i...

Страница 30: ...eactivates T9 for you to spell the word in Normal text input The spell mode ends when you key in 0 to enter a space or SK1 T9 SK2 Dismiss Cancels the T9 matching word list SK2 Next or Displays the next candidate or Places the cursor 0 to 9 press and hold Inserts the number CLR Deletes any character Toggles between lower case shift upper case for one letter and caps lock permanent upper case press ...

Страница 31: ...ey allocations Whenever you need to enter text for messages storing names with numbers etc successive presses of an alphanumeric key will display different characters Pressing in T9 English text input or Normal text ABC input toggles between lower case shift upper case for one letter and caps lock permanent upper case When a text entry screen is displayed pressing SK1 enables you to select Normal ...

Страница 32: ...e displayed on the lower row of the desktop icon area Icon name Image Description Missed call Displayed when there is a new entry in the Missed calls list Missed message Displayed when there is a new message you have not acknowledged Missed Mail Displayed when there is a new Mail you have not acknowledged Icon name Image Description Icon name Image Description Phone number Displays a dialer screen...

Страница 33: ... case 2 When you create a desktop icon of an image file or notepad file the file will be automatically protected The default title will be the file name Even if this title is changed the original file name will remain the same 2 Each manually created desktop icon has a title that you can edit Activating a desktop icon Highlight the required desktop icon 2 If you do not press any key for three minu...

Страница 34: ...hange the volume 2 Answer options 1 Any key answer On Any key except SK2 the Side keys is valid to answer a call Off Only and SK1 are valid to answer a call 2 Ring silencer On Pressing one of the Side keys stops the ringer sound and the vibrator while receiving a call with the phone closed 2 This function cannot be used if the Side keys are locked 3 Fold answer On You can answer an incoming call b...

Страница 35: ... 5 Set time format Selects the time display format from 12 hour or 24 hour 6 Set timezone Sets the timezone A is placed on the currently selected timezone Highlight the required timezone SK1 to save the change 2 If the highlighted timezone has Daylight Saving a check box will be displayed at the bottom of the screen to activate deactivate the setting 7 Set start day Selects whether to start the we...

Страница 36: ...and a Bluetooth hands free kit however the volume setting for the speaker of the phone is used 3 SMS tone Selects the ringtone for incoming SMS messages See Sounds M62 on page 62 for details 4 SMS tone volume Sets the sound volume for incoming SMS messages 5 Mail tone Selects the ringtone for incoming Mail or MMS messages See Sounds M62 on page 62 for details 6 Mail tone volume Sets the sound volu...

Страница 37: ...y on the 2nd LCD from Clock Event Clock only Event only or Off 2 Wallpaper Selects a picture file to use as the background for the 2nd LCD 3 Clock selection Selects the type of clock to be displayed on the 2nd LCD 2 When selecting Digital 2 clock no icon will be displayed in the standby screen of the 2nd LCD 4 Incoming call No Turns on off the function to display the incoming call number on 2nd LC...

Страница 38: ...ne can be used at all If the PIN code is not entered not even incoming calls can be answered Entering your PIN code incorrectly 3 times not necessarily in the same session will invalidate the correct PIN code In such a case you will have to contact your service provider for a PUK code to unblock your SIM card 2 Some SIM cards are set up so that PIN number entry cannot be turned off 2 When SIM PIN ...

Страница 39: ...ly 2 Upon power up you are prompted to enter the security code if the Phone lock was active when the phone was powered down 5 Bar calls You can bar the following calls made received on your phone all outgoing dialled calls international outgoing dialled calls international outgoing dialled calls except to home all incoming received calls or Incoming received calls when roaming Bar calls facilities...

Страница 40: ...options Information in Charge info Phonebook All Phonebook entries The settings for Groups Accessory All Schedule ToDo Notepad and Voice memo entries All the settings other than Clock alarm Play list for MP3 player View events for Scheduler Sort for ToDo and Timer setting and My phone settings for Bluetooth i mode All Bookmarks Saved pages Go to webpage and Mail settings All the i mode related set...

Страница 41: ...When you receive an MMS message you will be notified by a message from the MMS centre You can either automatically or manually receive the contents of an MMS message MMS facility is available from the Mail screen under the i mode facility For details on the mail service see i mode M3 on page 34 The Message Services are network dependent Sending Receiving messages While an SMS message is being sent...

Страница 42: ...es are saved See Cell broadcast M27 on page 33 for details Icon type Icons Descriptions Icon type Icons Descriptions Message type icons SMS message Read Unread status icons New Unread message s Incomplete SMS message Read message s Storing location icons Highlighted message stored in SIM Filtering status icons SMS messages filtered by status incomplete Highlighted message stored in the phone memor...

Страница 43: ...s stored at the SMS centre while trying to deliver the message 2 CB settings 1 Enable 1 to receive none 2 to receive all or 3 to receive CB messages of registered Cell Broadcast Message Identifiers CBMI To add or delete CBMI highlight 3 SK1 SK1 or 2 2 Languages Selects which language to receive the cell broadcast messages in 3 View msg status Displays the information on the number of messages in t...

Страница 44: ...d message Inbox Sent Folder1 Folder2 and Drafts only Edit Edits the highlighted message Drafts and Outbox only Resend Resends the highlighted message in the folder Outbox only The entire message or only the packets that failed to reach the recipient s can be sent No Message view Options menu 1 Reply Replies to the sender of the highlighted message 2 Reply all Replies to the sender and all other re...

Страница 45: ...d E Email address highlighted and U URL highlighted P E U Option mode Options menu 1 1 Add to phonebook Adds the highlighted phone number or Email address to a phonebook 2 Dial phone number Dials the selected phone number 1 Add to bookmark Adds the highlighted URL to the bookmarks 2 Go to URL Activates the web browser to access the highlighted URL 3 2 3 Create message Creates a new message with th...

Страница 46: ...ions may be displayed in gray and not be available Message edit Options menu No Message composer Options menu 1 Add Edit Adds or edits a recipient phone number or a message 2 Preview msg Displays a message preview screen 3 Delete Deletes the highlighted recipient message or object 4 Delete all Deletes all the recipients 5 Save Saves the message in Drafts folder 6 Phonebook Displays the phonebook l...

Страница 47: ...cursor position 2 You can also activate the Highlight mode by pressing and holding 2 This function can only be used when text has been entered 2 To toggle the Highlight mode on off SK1 and to go back to the normal mode CLR To display the following Highlight mode Options menu 1 Text colour Selects the colour of text and background 2 Text format Selects the font size small normal or large and font s...

Страница 48: ...need to set the homepage URL in Home page beforehand see Set homepage on page 42 Display a web page SK2 6 1 to key in the address or 2 to select an address in the history Reload the current page While browsing a webpage 1 Display the URL of the current page While browsing a webpage 2 Bookmark a web page With the web page you want to bookmark displayed 1 Display a bookmarked web page SK2 and 5 whil...

Страница 49: ...nloading While browsing a webpage highlight the link to the video to download After download is completed 1 to play again 2 to save or 3 to display detailed information on the video To cancel the download before downloading is complete SK2 or CLR 2 If the download is interrupted you can resume downloading the same video from where it was interrupted The download may start from the beginning for so...

Страница 50: ...stination Change to To Cc Bcc To delete an already set addressee highlight the To field Del address Key in the subject Highlight the Subject field key in the subject Key in the message Highlight the Message field key in the message To attach a header Attach header To attach a signature Attach sign Attach a file if necessary Highlight the Attachment field select a file to attach from the My data sc...

Страница 51: ...a in the text field on the slide 2 Add Overwrite Delete image Adds overwrites or deletes the image file in the image field on the slide 3 Add Overwrite Delete audio Adds overwrites or deletes the sound file in the sound field on the slide 4 Add Overwrite Delete video Adds overwrites or deletes the video file on the slide Exit Shifts to the Compose MMS screen Save Saves the currently created MMS Pr...

Страница 52: ...ight or width fits the corresponding side of the image video display area 4 Slice Displays the image video in the reduced size so that the shorter side of the height or width fits the corresponding side of the image video display area Options Sets the length of time a slide is displayed and sets the beginning and end times for text image or sound within that slide display time 2 You cannot set the...

Страница 53: ...laying 2 You can change the font size of mail text by pressing and holding the and enlarges the font size while reduces it i mode screen From the i mode screen you can change the i mode related settings of your phone 3 The i mode screen will be displayed Add To Cc Bcc Adds a To Cc Bcc field Change to To Cc Bcc Changes the highlighted Cc Bcc To field to a To Cc Bcc field Del address Deletes a desti...

Страница 54: ...ollowing settings 1 Access point 2 i mode server IP address HTTP Port No SSL Port No 3 Portal server i mode server URL 4 Mail 5 User data User name Password 6 Streaming Proxy IP address Port No 3 i mode lock Locks the i mode function including mail MMS No i mode menu screen menus Sheet 1 of 3 1 iMenu Accesses the iMenu screen see iMenu screen on page 42 2 Mail Displays the Mail screen on which you...

Страница 55: ... icon Creates a desktop icon of the URL of the selected history Create message Creates a message with the URL of the selected history in the text Delete one Deletes the highlighted address Delete all Deletes all the addresses in the list 3 Go to home Displays the homepage set in Home page of Settings See page 42 2 This menu is not available if Set homepage of i mode menu screen is not set 0 Back R...

Страница 56: ...n 2 Load images Sets whether to display images contained in web pages 3 Wrap text Sets whether to display text as is on web pages and mail attachment text or wrap it to fit your phone s screen 4 Certificates Displays the certificate information and validates invalidates a certificate 5 Send terminal info Sets whether to display a confirmation message before sending the terminal information to the ...

Страница 57: ...rrent page Bookmarks Displays the Bookmark list 2 This option is displayed only when one or more bookmarks are registered Save image Saves an image on the current page 2 This option is displayed only when one or more images are displayed on the current screen Save page Saves the current page Add to phonebook Saves the phone number displayed in the current page in the phonebook 2 This option is dis...

Страница 58: ...d mails except protected mails MMS Delete all Deletes all the mails MMS Title sort Sorts the received mails MMS by title Address sort Sorts the received mails MMS by address Date sort Sorts the received mails MMS by date Inbox details Options menu Reply Replies to the received mail MMS Reply quoted Replies to the received mail quoted Reply all Replies to the sender and all the recipients of a mail...

Страница 59: ...nt Options menu 1 Copy text Copies the text data on the slide 2 Save image Saves the image file on the slide 3 Save audio Saves the audio file on the slide 4 Save video Saves the video file on the slide 5 Save selection Saves the highlighted phone number Email address or URL to the phonebook or bookmarks 6 Create message Creates a message to the destination in the slide text 7 Play slide Plays the...

Страница 60: ...the copy mode in the subject part Play attachment Plays the attachment content based on the content setting see Play attachment on page 45 Browse attachment Plays the attachment content manually see Browse attachment on page 45 Protect On Off Protects or unprotects the received mail MMS 5 Draft Displays the unsent and the saved draft mail MMS Draft Options menu 1 Delete one Deletes the selected ma...

Страница 61: ...ieve a mail after receiving the incoming mail notification 2 When set to on your phone will automatically receive mail If set to off you will have to manually retrieve from your i mode service provider using the Check new mail of Mail screen menus see Check new mail on page 46 6 Receive attachment Sets the attachment file type that can be received Highlight the file type to place a check 7 Attachm...

Страница 62: ... web page You can save up to 50 bookmarks and use them for easier accesses Certificate information If you are displaying a Secure Sockets Layer SSL page designed to enable safe data transmission you will be able to see its certificate information IP Information Provider Your IP provides you the i mode sites programs Home page A web page that is set in your profile as the page to connect to when yo...

Страница 63: ...e number of phone numbers that can be stored on a SIM card depends on the SIM card capability Phonebook Phone Up to 500 personal data can be stored in your phone memory Each personal data is given a location number 1 to 500 and it can be allocated to a group To each personal data you can set the following 7 phone numbers Home Mobile Work Data Fax Other phone x 2 2 Email addresses 2 descriptive inf...

Страница 64: ...ptions M43 4 3 to display the Call options screen 2 For details on the Call options screen see Call options M43 on page 11 Phonebook list Options menu 4 1 and the appropriate key for the desired directory or until the required directory is displayed Highlight the required personal data No Phonebook list Options menu 1 Add new Adds a new personal data to Phone SIM FDN 2 Edit Displays the data edit ...

Страница 65: ... colour select LED field 1 Highlight the desired colour To select the CLI picture select Picture field 1 for Picture Highlight the desired picture To select the ringer select Ringer field 1 for Sound or 2 for Video Highlight the desired ringtone or video SK1 to set the change 2 If the personal settings for the LED colour CLI picture or the ringer are also set they have priority over those of the G...

Страница 66: ...hone number Email address of the highlighted member 7 Sort Sorts the personal data in the order of alphabets or location number 2 Sorting may take time depending on the number of personal data entries the number of characters contained in each entry and the type of language 1 Alphabetic Sorts the personal data alphabetically 2 You can jump directly to a name beginning with specific characters by p...

Страница 67: ... to add the current personal data to Voice recall functions Adding a Voice recall recording Highlight the Voice tag field 1 Say the name you wish to record as a voice tag Say the name again for confirmation according to the displayed message Playing a Voice recall recording Highlight the Voice tag field 2 Deleting a Voice recall recording Highlight the Voice tag field 3 2 Up to 10 voice tags can b...

Страница 68: ...opriate key for the desired directory or until the required directory is displayed Highlight the required personal data list of data 3 to copy or 4 to move For copying 1 to copy the highlighted personal data or 2 to copy all the personal data in the current list Press the appropriate key for the desired destination SIM Phone FDN Own number or Voice mail number 2 If you copy or move from phonebook ...

Страница 69: ...s Set up Call diversion see Call diversion M161 on page 12 for details When you receive a call set to be diverted the call will be diverted to the voice mail centre Retrieving a Voice mail 2 This function is available when the Voice mail number has been set 4 1 7 Highlight the required line 2 You can also retrieve a voice mail by pressing and holding 1 from the standby screen 2 To set up the line ...

Страница 70: ... Precautions when taking pictures recording videos 2 You cannot switch the camera s shutter sound off The shutter makes a clicking sound when you take a picture or start end a video recording even when the phone is in Meeting mode 2 Avoid camera shake Moving the phone when you take a picture will result in a blurred image Hold the camera firmly to keep it still when you take a picture or use the a...

Страница 71: ...mode the saved files will be named by the default file names plus a consecutive two digit number at the end 2 If a call comes in while you are checking or saving a photographed image image storage is cancelled When this occurs the next time you select camera function a message appears to say that you have an image that was not stored allowing you to check and store the image 2 Before taking a pict...

Страница 72: ...r to use a frame when taking pictures and sets the desired frame with which a picture will be taken 7 Self timer Self timer cancel Activates or deactivates the self timer function 8 Sound settings Selects the Shutter sound and Self timer sound 9 Pictures Opens Pictures in My data 0 Other settings Add desktop icon Creates a desktop icon of the camera function on the standby screen Automatic save Se...

Страница 73: ...2 After the set video file size is reached the recording automatically stops 2 After recording SK1 to replay the recorded video and SK2 to send the video file attached to a message No Camera Options menu after taking a picture 1 Save current Saves the currently displayed picture in the folder selected as Save in setting 2 In Burst mode only the highlighted picture is saved 2 Save all Saves all pic...

Страница 74: ...that was not stored allowing you to check and store the video 2 Before recording a video you can switch to the camera function by pressing SK2 This use of SK2 however is invalid if the self timer function is activated Operations when recording a video To turn the light on or off SK1 or Side down 2 Take care not to hold the light too close to your or other people s eyes when the light is lit To zoo...

Страница 75: ...nification from 1x to 5x for Sub QCIF and from 1x to 4x for QCIF Camera Activates the camera function Flicker control Selects 50Hz 60Hz or Auto to prevent flickers when taking a picture under a fluorescent light 0 Switch finder Selects whether to display the viewfinder on the Main LCD or the 2nd LCD No Video recorder Options menu after recording a video 1 Save Saves the currently displayed video 2...

Страница 76: ...own playlist see Music player M81 on page 69 Operations while replaying video To stop SK2 To pause SK1 or While pausing SK1 or again to restart and continue the replay To fast forward rewind or or again to cancel fast forwarding rewinding and continue the replay To enlarge the replay screen size for Sub QCIF only To adjust the volume Side keys To display the previous next file or 2 You cannot fast...

Страница 77: ...t 1 3 Select the image size A frame indicating the cut area appears on the preview screen Move the frame position SK1 if the image is favorable 2 When you select Free a cross indicator appears on the preview screen Move it to the point to start a frame and to confirm the position Then expand the frame into the required size and to confirm Reducing the image size Highlight or display the image file...

Страница 78: ... your phone and the printer with the USB cable Prepare the printer ready for printing referring to its manual Check the print detail screen displayed To print as seen on the detail screen SK1 To edit the print detail and then print on the print detail screen to display the Options menu Edit the detail using the Options menu SK1 2 The Options menu may change depending on the connected printer 2 If ...

Страница 79: ... the user title or name of the selected folder or file Set protection Sets the protection settings of the selected folder or file on off Cut Cuts the selected picture into Sub QCIF 128x96 2nd LCD 128x128 QCIF 176x144 Main LCD 176x220 or Free Reduce Reduces the selected picture to fit within Sub QCIF 128x96 2nd LCD 128x128 QCIF 176x144 or Main LCD 176x220 Rotate Rotates the selected picture Stamp t...

Страница 80: ...ia Bluetooth Sends the selected MP3 through Bluetooth to other devices or a cellphone 3 Create message Creates a new message with the file attached 2 This function is not available for the MP3 files 4 Delete item Deletes the selected file and folder 5 Delete all Deletes all the files in the current list 6 Copy item Copies the selected file or folder to the selected folder 7 Copy all Copies all the...

Страница 81: ...nfo column Sets whether to display the column on the list screen and the information to be shown there None No column showing Size Approximate size of the file Type File type 2 You can also change the information on the column by pressing without displaying the Options menu Thumbnail view Displays the files as thumbnails Flat view Displays the list of all the stored files regardless of the folder ...

Страница 82: ...he software is running as data to that point may not be saved 2 While the software is active the Java operation icon is displayed see page viii Java System menu 7 1 Highlight an application 2 Depending on the conditions some options may be displayed in gray and not be available Application menu 7 1 Highlight an application you want to run SK1 No System menu 1 Description setting Selects whether to...

Страница 83: ...s of My data to the Playlist see Videos M61 on page 62 or change the order of the video files within the Playlist 8 1 SK1 to play After playing SK2 to stop To pause SK1 or While pausing SK1 or again to resume playing To change the volume Side keys To play the previous file To play the next file or To play from the beginning of the music being played 2 When there are no video files saved in the Pla...

Страница 84: ...ist Displays a list of video files in the order in which they are played 2 You can save up to 30 video files in the Playlist depending on the size of each file 2 The video files that are deleted from Video of My data or erroneous video files are displayed in gray and cannot be played to display the Playlist Options menu below or SK1 to add an video file 1 Add item Adds an video file in your phone ...

Страница 85: ...ist Options menu below or SK1 to add an MP3 file 1 Add item Adds an MP3 file in your phone to the Playlist 2 Move item Moves the highlighted MP3 file in the Playlist 3 Delete item Deletes the highlighted MP3 file from the Playlist 4 Delete all Deletes all the MP3 files from the Playlist 5 View detail Displays the properties file name title artist name and recording time of the highlighted MP3 file...

Страница 86: ...utomatically switches itself on and sounds the alarm or vibrates at the specified time 2 You can stop the alarm tone or vibration by pressing any key Key Operation Key Operation Addition Subtraction Multiplication Division Equals to SK2 Memory Store Memory Addition SK1 Memory Recall Memory Cancel Press twice Percent Inversion Exit calculator Decimal Point CLR Delete digit if held all clear Clock a...

Страница 87: ...hlight a day SK1 to display the previous monthly weekly view screen or SK2 to display the next monthly weekly view screen to display the day s schedule list screen To display the previous next day s schedule list screen or to display the detail screen of the highlighted schedule Setting the reminder again When the scheduler reminder is set off or and SK2 to select the time to remind again Schedule...

Страница 88: ...events all the public private events or all the events to delete 5 Go to date Displays the selected date 6 Monthly calendar Weekly calendar Switches the weekly view screen to the monthly view screen or the monthly view screen to the weekly view screen 2 You can select Sunday or Monday to start the week from Set start day on page 21 7 View summary Displays the number of used and available entries 8...

Страница 89: ...s private L D ToDo Options menu 1 4 Add new Adds a ToDo task see Adding a new ToDo task on page 74 1 Status Changes the completion status of the highlighted ToDo task 2 2 Edit Edits the highlighted ToDo task see Adding a new ToDo task on page 74 3 Delete Deletes ToDo task s Press the appropriate keys for the ToDo task category the currently selected ToDo task all the public private ToDo tasks all ...

Страница 90: ...lder or file on off 2 Use item Add desktop icon Creates a desktop icon of the selected file on the standby screen Send via Bluetooth Sends the selected file via Bluetooth to other devices or a cellphone 3 Create message Creates a new message with the highlighted text note 4 Delete item Deletes the selected file or folder if it is unprotected 5 Delete all Deletes all the notes unprotected from the ...

Страница 91: ... of the file Type File type 2 You can also change the information on the column by pressing without displaying the Options menu Flat view Displays the list of all the stored files regardless of the folder hierarchy Save options Saves the current option settings Reset options Resets the option settings No Voice memo setting 1 Record Records a voice memo SK1 to start recording 2 You can finish recor...

Страница 92: ...s function can update such data between your phone and PC 2 Data should comply with vCard 2 1 vCalendar 1 0 specification 2 You cannot synchronize the phonebook data stored in the SIM card Connect your phone with your PC via a USB cable Activate the software on PC side and prepare for synchronization for details refer to the manuals of the software 8 Select the data type Phonebook Scheduler or ToD...

Страница 93: ...anual 2 Depending on the connection status a Bluetooth device may not function correctly In such a case retry operation from the device side or switch your phone off and on 2 There may be Bluetooth devices that cannot be connected to your phone Bluetooth setting 8 0 1 No Bluetooth setting 1 Bluetooth On Bluetooth Off Activates or deactivates Bluetooth function 2 If you switch the phone off while B...

Страница 94: ...ce enter the same arbitrary number to your phone and the device A passcode is a number from 4 to 16 digits 5 Active device Displays the information on the device in connection 6 Disconnect Ends the Bluetooth connection in progress No Device list Option menu 1 Rename Edits the name of the highlighted device 2 Protect Unprotect Protects or unprotects the highlighted device 3 Delete device Deletes th...

Страница 95: ...incoming call press the button on the headset hands free kit To switch the headset hands free kit call to your handset call during a call 9 2 You cannot deactivate Bluetooth during a call To end the call or end from the headset hands free kit Using your phone as Bluetooth modem 2 For details of dial up connection settings consult your Internet service provider Pair the Bluetooth device and your ph...

Страница 96: ...ooth devices If the device is found the list of found Bluetooth devices will be displayed Highlight the device from the list The phone starts connecting to the device If the device accepts the connection the data will be sent If your phone has already had access to other Bluetooth devices through Bluetooth file transfer or file browsing service after selecting Send via Bluetooth the screen is disp...

Страница 97: ...older in your phone 8 0 2 the waiting data screen is displayed Browse your phone from other Bluetooth device 2 While using File browsing service to receive the data from other Bluetooth devices your phone can only accept the data for Notepad or My data Videos Sounds Pictures MP3 2 The connection from other Bluetooth devices is accepted only when the waiting data screen is displayed 2 While using F...

Страница 98: ...18 Dialled calls list 12 Download 34 E Earphone setting 22 Earphone type 21 Emergency calls 7 Ending a call 6 F Fast dialling 7 FDN 25 49 File browsing service 83 Flicker control 58 61 Fold answer 20 Frame 64 Frequency band 15 Function key LED 24 G General care i Greetings 23 Groups 51 GSM viii H Hands free kit 79 Headset 21 79 Highlight mode 33 Holding a call 9 Homepage 48 I Icons viii 80 81 i mo...

Страница 99: ... a call 10 Redial blacklist 11 Rejecting an incoming call 6 Reset settings 25 Ring silencer 20 Ringer 22 Ringer volume 22 Roaming 14 S Saved pages 48 Scheduler 73 Scratchpad number 10 SDN 49 Security 24 Security code 24 Service tone 22 Settings 20 Shortcuts selection xi Side key lock 20 SIM card 1 SIM card insertion 1 SIM card removal 2 Site program 47 SMS messages 27 SMS tone 22 SMS tone volume 2...

Отзывы: