background image

English-40

Mail Setting

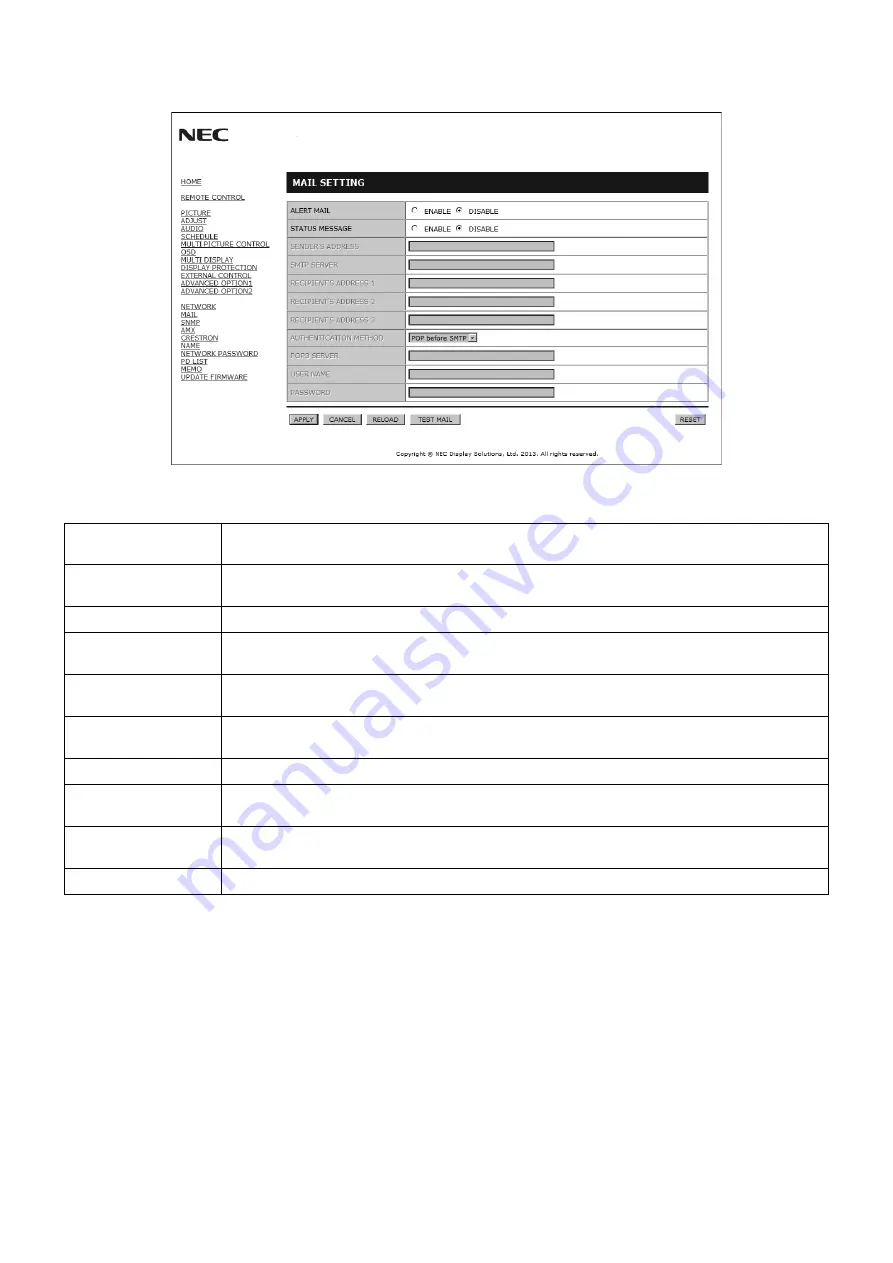
Click “MAIL” on the left side of HOME.

This option notifi es your computer of an error message via e-mail when using wired LAN. An error message notifi cation will be 
sent when an error occurs in the monitor.

ALERT MAIL

Checking [ENABLE] will turn on the Alert Mail feature.
Checking [DISABLE] will turn off the Alert Mail feature.

STATUS MESSAGE

Checking [ENABLE] will turn on the STATUS MESSAGE  feature.
Checking [DISABLE] will turn off the  STATUS MESSAGE  feature.

SENDER’S ADDRESS

Type in the senders address. Up to 60 alphanumeric and symbols characters can be used.

SMTP SERVER

Type in the SMTP server name to be connected to the monitor.
Up to 60 alphanumeric characters can be used.

RECIPIENT’S 
ADDRESS 1 TO 3

Type in your recipient’s address. Up to 60 alphanumeric and symbols characters can be used.

AUTHENTICATION 
METHOD

This selects the authentication method of the e-mail transmission. 

POP3 SERVER

This specifi es the address of the POP3 server that is used in the authentication of the e-mail. 

USER NAME

This sets the user name for logging into the authentication server when authentication is required 
for the e-mail transmission. Up to 60 alphanumeric characters can be used.

PASSWORD

This sets the password for logging into the authentication server when authentication is required for 
the e-mail transmission. Up to 60 alphanumeric characters can be used.

TEST MAIL

Click this button to send a test mail to check if your settings are correct.

NOTE: 

•  If you execute a test, you may not receive an Alert mail. 
  Should this happen, check if the network settings are correct.
•  If you entered an incorrect address in a test, you may not receive an Alert mail. 
  Should this happen, check if the Recipient’s Address is correct.

TIP: 

For Control command diagram, please see fi le “External_Control.pdf” on the CD-ROM.

Содержание MultiSync X651UHD-2

Страница 1: ...MultiSync X551UHD MultiSync X651UHD 2 Please find your model name in the label on the backside of monitor Large Format Display User s Manual...

Страница 2: ...odes English 16 Power Indicator English 17 Initial settings English 17 Using Power Management English 17 MULTI PICTURE MODE English 17 Aspect English 17 INPUT CONFIGURATION English 18 Information OSD...

Страница 3: ...encouraged to try to correct the interference by one or more of the following measures Reorient or relocate the receiving antenna Increase the separation between the equipment and receiver Connect the...

Страница 4: ...een included Therefore it should be read carefully in order to avoid any problems CAUTION CAUTION Please use the power cord provided with this monitor in accordance with the table below If a power cor...

Страница 5: ...se condensation If condensation happens let the monitor stand unplugged until there is no condensation Connecting to a TV Cable distribution system should be grounded earthed in accordance with ANSI N...

Страница 6: ...Screw with washer M4 x 10 x 1 X651UHD 2 x 3 X551UHD Video Signal Cable DisplayPort cable Wireless Remote Control and AAA Batteries Setup Manual Video Signal Cable Mini DisplayPort to DisplayPort cable...

Страница 7: ...ion Please note the following when mounting on wall or ceiling When using mounting accessories other than those that are NEC approved they must comply with the VESA compatible FDMlv1 mounting method N...

Страница 8: ...ok the part 1 of logo plate into the bezel and press in 2 mm 3 6 mm Mounting location The ceiling and wall must be strong enough to support the monitor and mounting accessories DO NOT install in locat...

Страница 9: ...long end of the feet face forward For X651UHD 2 use the ST 651 Install the stand in the direction of the arrow which is imprinted on the surface of the stand 5 Ventilation Requirements When mounting...

Страница 10: ...nu Remote control sensor and Power Indicator Receives the signal from the remote control when using the wireless remote control See also page 11 Glows green when the LCD monitor is in active mode Glow...

Страница 11: ...Port IN To input DisplayPort signals Internal speaker Internal External speaker switch Internal speaker External speaker NOTE Please power off the monitor when you use the Internal External speaker sw...

Страница 12: ...the adjustment level within OSD menu settings Small screen which adjusted PIP mode moves left or right and increases or decreases the size SET POINT ZOOM button Makes selection Activates POINT ZOOM f...

Страница 13: ...picture mode STILL CAPTURE button Captures still picture NOTE This function is released when selecting MULTI PICTURE MODE TEXT TICKER SCREEN SAVER POINT ZOOM IMAGE FLIP except for NONE SUPER in INPUT...

Страница 14: ...ed beneath the LCD monitor so as not to scratch the panel 2 Install the remote control batteries The remote control is powered by two 1 5V AAA batteries To install or replace batteries A Press and sli...

Страница 15: ...ust the screen See pages 23 and 24 Make adjustments of the screen display position when necessary 9 Adjust the image See page 23 Make adjustments such as backlight or contrast when required 10 Recomme...

Страница 16: ...SELECT 2 Input signal name Connecting audio terminal Input button in remote control AV DisplayPort DPORT DPORT DisplayPort DVI1 DVI D1 DVI HD DVI 3 HDMI DVI DVI1 LINE IN DVI1 DVI2 DVI D2 DVI HD DVI 3...

Страница 17: ...ormation about your computer s video output requirements and any special identification or configuration your monitor s image and monitor may require Input TMDS signals conforming to DVI standards To...

Страница 18: ...ator will turn green while powered on and will turn red or amber while powered off NOTE The Main Power Switch must be in the ON position in order to power up the monitor using the remote control or th...

Страница 19: ...in active mode 2 Without any option with factory settings Initial settings Setting LAN POWER see page 28 and POWER SAVE see page 27 windows appear the first time the power is on These settings are onl...

Страница 20: ...PUT CONFIGURATION HDMI OFF HDMIx4 PRESET1 HDMIx2 PRESET1 HDMIx2 PRESET2 HDMI DVI OFF HDMIx2 PRESET1 DVI OFF DVIx2 PRESET1 INPUT CONFIGURATION See page 29 Information OSD The Information OSD provides i...

Страница 21: ...dows operating systems and digital cameras Recommended setting for general color management Adobe RGB SIM Provides a standard color space used in high end graphics applications such as professional di...

Страница 22: ...used to illustrate the view of those with a color vision deficiency It is not their actual view The simulation is a reproduction of those with a strong color vision mode of type P type D or type T Peo...

Страница 23: ...ANDARD CINEMA CUSTOM1 CUSTOM2 HIGHBRIGHT The type of PRESET PRESET PURPOSE HIGH BRIGHT Highest brightness setting STANDARD Standard setting sRGB Standard color space used for the Internet Windows oper...

Страница 24: ...CARBON FOOTPRINT 86 0 Input source Main Menu Icons Main Menu Item Sub Menu Key Guide Adjustment Settings Remote Control Press UP or DOWN button to select sub menu Press SET POINT ZOOM Press UP or DOW...

Страница 25: ...MA Special gamma for certain types of movies Raises the dark parts and lowers the light parts of the image S Curve DICOM SIM DICOM GSDF curve simulated for LCD type PROGRAMMABLE1 2 3 A programmable ga...

Страница 26: ...REO adjust the balance of L R volume Press button to move the stereo sound image to right Press button to move the stereo sound image to left CENTER STEREO TREBLE To accentuate or reduce the high freq...

Страница 27: ...Active Picture size Press the SET POINT ZOOM button to adjust picture size Press or CH to expand Press or CH to reduce NOTE This function is not available when MULTI PICTURE is 4 PICTURES PBP Depends...

Страница 28: ...gnal is out of range An interval between 3 to 10 seconds for the Information OSD to appear is available ON 3 SEC COMMUNICATION INFO MONITOR ID and IP ADDRESS will be displayed when the remote control...

Страница 29: ...TION 1 PRESET1 2 PRESET2 2 which you prefer to be unlocked The unselected buttons are locked When LOCK is selected all INPUT buttons are locked POWER ON DELAY Adjusts the delay time between being in s...

Страница 30: ...COLOR EXTERNAL CONTROL NETWORK INFORMATION Displays current network settings IP ADDRESS SETTINGS NOTE When changing the LAN SETTING you need to wait several seconds until the LAN SETTING is applied I...

Страница 31: ...ut is changed When INPUT CONFIGURATION is ACTIVE SUPER is not available When SUPER is active MULTI PICTURE MODE TEXT TICKER STILL POINT ZOOM are not available This function should be chosen after all...

Страница 32: ...WARNING If OPTION POWER is OFF a warning message appears when monitor power is turned off NOTE Warning message does not appear when monitor power is turned off by OFF TIMER setting or SCHEDULE setting...

Страница 33: ...se when ambient lighting level is low BACKLIGHT level set for the monitor to use when ambient lighting level is high BACKLIGHT range dark bright room bright condition Screen Backlight value by MODE2 I...

Страница 34: ...ghost image of a previous image remains visible on the screen Unlike CRT monitors LCD monitors image persistence is not permanent but constant images being displayed for a long period of time should...

Страница 35: ...See page 27 Point the remote control towards the remote sensor of the desired monitor and press the REMOTE ID SET button The MONITOR ID number is shown on the display when your remote control is in ID...

Страница 36: ...it to the connectable monitors When manually specify the ID number or control by the specified ID number please execute AUTO ID see page 27 previously Main Monitor Sub Monitors Connector Connector IN...

Страница 37: ...32C input output below To control a monitor please use the control command Instructions for the control command can be found on the CD included with the display The file is called External_control pdf...

Страница 38: ...0 36 30 30 30 30 34 03 76 0d or 01 30 41 30 45 30 41 02 31 31 30 36 30 30 30 34 03 76 0d Input Source Select HDMI1 01 30 41 30 45 30 41 02 30 30 36 30 30 30 31 31 03 72 0d or 01 30 41 30 45 30 41 02 3...

Страница 39: ...will vary depending on the version of browser Please refer to the help files and the other information provided in your software Access is gained to the HTTP server function by starting the Web brows...

Страница 40: ...monitor has been configured in the HOSTS file of the computer being used you can then access the network settings of the display via that host name using a compatible browser Example 1 When the host n...

Страница 41: ...cted to the monitor when MANUAL is selected for IP SETTING NOTE Set as 0 0 0 0 to delete the setting DNS Set for IP ADDRESS setting of DNS server AUTO Automatically assign an IP address of DNS server...

Страница 42: ...be used AUTHENTICATION METHOD This selects the authentication method of the e mail transmission POP3 SERVER This specifies the address of the POP3 server that is used in the authentication of the e m...

Страница 43: ...the temperature that the user had specified condition DISPLAY PROTECTION FAN CONTROL COOLING FAN AUTO Reconfirm the setting condition from OSD DISPLAY PROTECTION FAN CONTROL or please contact your sup...

Страница 44: ...rap Community name The default setting of community name is public It is read only You can set community names for up to 3 settings Trap Sending error message to specified address when an error occurs...

Страница 45: ...RESTRON Setting Click CRESTRON on the left side of HOME CRESTRON ROOMVIEW compatibility The monitor supports CRESTRON ROOMVIEW allowing multiple devices connected in the network to be managed and cont...

Страница 46: ...ASSWORD Set a password for PJLink A password must be 32 characters or less Do not forget your password However if you forget your password consult with your dealer HTTP PASSWORD Set a password for HTT...

Страница 47: ...s that are daisy chained Only the master monitor can show the list Memo Setting Click MEMO on the left side of HOME Set a title and message TITLE A title must be 24 characters or less MESSAGE A messag...

Страница 48: ...OM will be FULL image The magnifier icon does not move to no image area POINT ZOOM will be released after changing input signal or power off POINT ZOOM will be released when changing ASPECT setting du...

Страница 49: ...ation even while the monitor is off Some menu of OSD you can set by this function NOTE Sensor position See page 8 and 9 Please contact your supplier for detailed information Function name Setting Copy...

Страница 50: ...that allow the monitor to shift to a lower power consumption level when on but not in use saving two thirds of your monitor energy costs reducing emissions and lowering the air conditioning costs of t...

Страница 51: ...and using a moving screen saver at regular intervals whenever the screen is idle or turning off the monitor when not in use Image is blinking If you use a repeater distributor long cable this may cau...

Страница 52: ...n when direct sunlight or strong illumination strikes the remote control sensor of the LCD monitor or when there is an object in the path SCHEDULE OFF TIMER function is not working properly The SCHEDU...

Страница 53: ...L R 0 5 Vrms HDMI Connector Digital Audio PCM 32 44 1 48 KHz 16 20 24bit DisplayPort Connector Digital Audio PCM 32 44 1 48 KHz 16 20 24bit LINE OUT Stereo Mini Jack Analog Audio Stereo L R 0 5 Vrms S...

Страница 54: ...0 5 Vrms HDMI Connector Digital Audio PCM 32 44 1 48 KHz 16 20 24bit DisplayPort Connector Digital Audio PCM 32 44 1 48 KHz 16 20 24bit LINE OUT Stereo Mini Jack Analog Audio Stereo L R 0 5 Vrms Speak...

Страница 55: ...e http www nec display com in Japan or http www necdisplay com in USA Energy Saving This monitor features an advanced energy saving capability When a Display Power Management signal is sent to the mon...

Страница 56: ...low applicable legislation or agreement you may have The mark on electrical and electronic products may only apply to the current European Union Member States Outside the European Union If you wish to...

Отзывы: