background image

page 2.30

2. Installation

iS15-2K

 Cinema Projector: User Manual

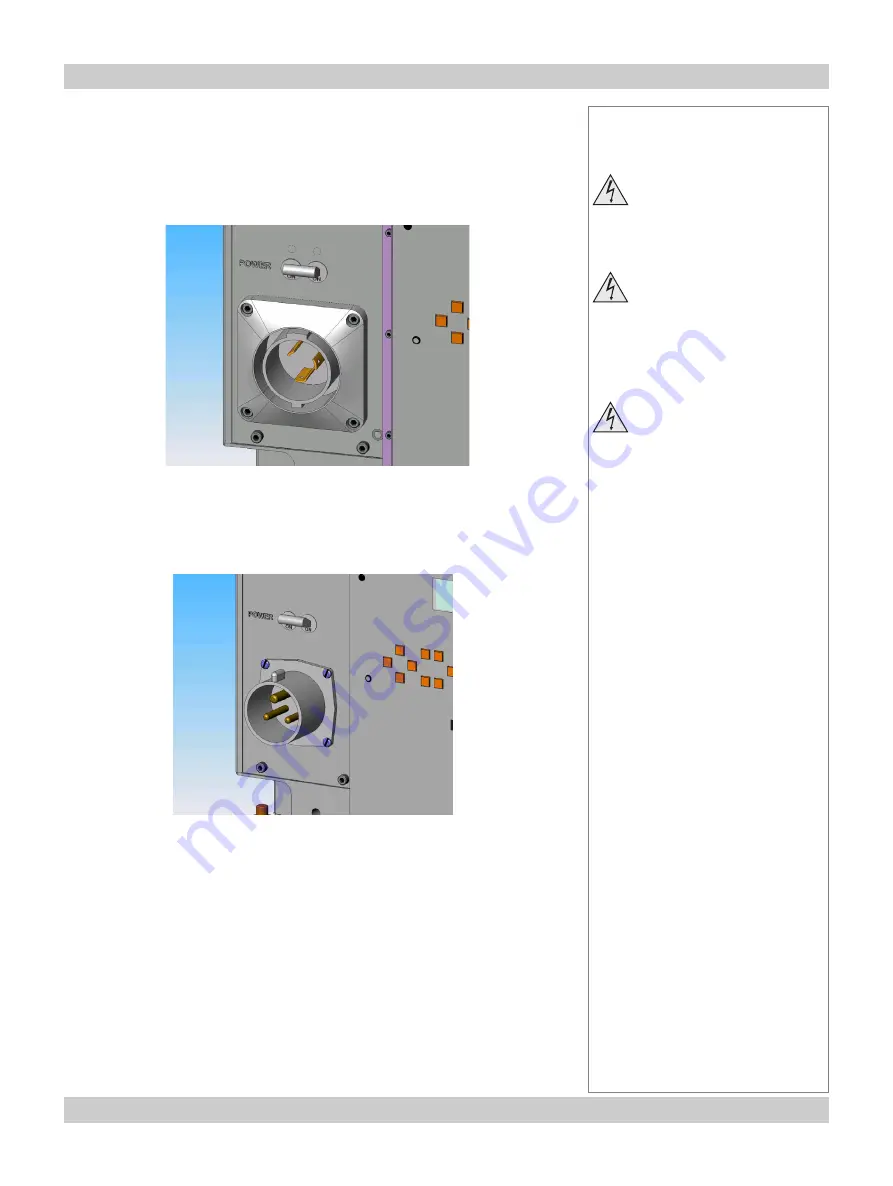
Power connections

USA power input

Make sure the main power switch is off before connecting the power cable.

Firmly push in the 

Hubbell 

connector, then turn clockwise to lock.

Rest of World power input

Make sure the main power switch is off before connecting.

Lift the lid of the 

C-form

 connector then firmly push in the connector.

Notes

Use only the power cable

provided.

Ensure that the power outlet

includes a Ground
connection, as this
equipment MUST be earthed.

Handle the power cable

carefully and avoid sharp
bends. Do not use a damaged
power cable.

Содержание iS15-2K

Страница 1: ...iS15 2K Super High Brightness Digital Cinema Projector User Manual 104 597A ...

Страница 2: ...iS15 2K Cinema Projector User Manual ...

Страница 3: ...s the instructions are closely followed NOTE this symbol indicates that there is some important information that you should read Trademarks IBM is a registered trademark of International Business Machines Corporation Macintosh and PowerBook are registered trademarks of Apple Computer Inc Other product and company names mentioned in this user s manual may be the trademarks of their respective holde...

Страница 4: ...acement Warranted lamp life is determined by the reading on the Lamp hours meter on the face of the Lamp module NOT the reading available via the Information menus Xenon lamps produce high intensity light Do not look directly at the light coming from the lamp housing or the lens or allow items such as magnifying lenses to be placed in the light path This could result in serious eye damage Do not t...

Страница 5: ...p duct box in section 6 Installation The projector weighs over 100kg 200lbs Use safe handling techniques when lifting the projector Before installation make sure that the surface that is to support the projector is capable of supporting the combined weight of the projector and lens see specification for exact weights Do not place heavy objects on top of the projector chassis The projector chasis i...

Страница 6: ...ave taken advice from your Network Manager If you make a mistake it is possible that you will lose contact with the projector Always double check your settings before pressing the APPLY button Always keep a written note of the original settings and any changes you have made Software update should NOT be carried out except by or with the supervision of certified service personnel WARNING TO CALIFOR...

Страница 7: ... operate this equipment This equipment has been tested and found to comply with the limits for a Class A digital device pursuant with Part 15 of the FCC Rules These limits are designed to provide reasonable protection against harmful interference when the equipment is operated in a commercial environment This equipment generates uses and can radiate radio frequency energy and if not installed and ...

Страница 8: ...Useful lens formulae and constants 2 16 Fitting the projection lens 2 17 Calibrating the lens 2 17 Shifting the image 2 18 Fitting the anamorphic lens 2 19 Adjusting the anamorphic lens 2 20 Positioning the screen and projector 2 21 Mounting the projector 2 22 Levelling 2 22 Fitting the lamp duct box 2 23 Connecting the projector 2 24 Typical connections 2 24 Cinema Inputs SMPTE 292 HD SDI 2 26 DV...

Страница 9: ...5 4 Lamp hours meter 5 4 Cleaning the projector and lens 5 5 6 Appendix 6 1 Troubleshooting 6 2 Specifications 6 4 Part numbers 6 4 Optical 6 5 Physical 6 5 Electrical 6 5 Control Inputs 6 5 Cinema Inputs 6 6 DVI D Inputs 6 8 Projection lens data 6 9 Connections 6 10 Cinema Input SMPTE 292 HD SDI connection 6 10 DVI D Input connection 6 11 LAN connection 6 12 Serial control input 6 13 Remote Contr...

Страница 10: ...page viii Contents iS15 2K Cinema Projector User Manual ...

Страница 11: ...Introduction Contents 1 Introduction 1 1 What s in the box 1 2 Key features of the projector 1 3 Getting to know the projector 1 4 Chassis lamp lens and filter 1 4 Connection panels input and control 1 5 ...

Страница 12: ...mation about lenses see Using the anamorphic lens and Choosing the projection lens in Section 2 Installation and Specification Lens data in 6 Appendix Important Information 104 598 User manual 104 597 2 x DVI D cable 2 m LA00205 or 73893286 Remote control 7N900122 Remote control cable 2m 7N520019 and 16m 73499217 PC adaptor card 79646181 dummy PC adaptor card 24FT8871 Memory card 7N960191 or Proje...

Страница 13: ...al images with unprecedented clarity and precision The integrated Series iS15 2K harnesses the power of Texas instruments new 2048x1080 pixel HPO DMD sTM delivering a greyscale and contrast previously unknown in movie theatres With the security of de encryption to decode digital movie material protection is ensured right up to the point it turns into light A Sub title engine enables sharp text sca...

Страница 14: ... section 2 Installation and section 6 Specification Do NOT open the lamp compartment door whilst a film is being shown safety interlocks on the door will shut down the projector without warning Warranted lamp life is determined by the reading on the Lamp hours meter on the face of the Lamp module shown here NOT the reading available via the Information menus Lens Air filter Lamp compartment Lamp m...

Страница 15: ...how to use the control panel see section 4 Controlling the projector For information about how to connect the projector see Connecting the projector in section 2 Installation and Connections in section 6 Appendix Power connection Power switch Control panel LCD screen Control connections PC adaptor card slot Input connections ...

Страница 16: ...page 1 6 1 Introduction iS15 2K Cinema Projector User Manual ...

Страница 17: ... height image no anamorphic lens 2 13 5 4 full height image no anamorphic lens 2 14 Method two Choosing a lens by calculation 2 15 Useful lens formulae and constants 2 16 Fitting the projection lens 2 17 Calibrating the lens 2 17 Shifting the image 2 18 Fitting the anamorphic lens 2 19 Adjusting the anamorphic lens 2 20 Positioning the screen and projector 2 21 Mounting the projector 2 22 Levellin...

Страница 18: ...y or stretched vertically by an anamorphic lens when filmed When the anamorphic lens is deployed the image will be restored to its correct aspect ratio In this configuration the 2 35 1 format can use the full height of the DMD and no zooming will be necessary between this and other image formats Notes For more information on how to connect the projector see Connecting the projector later in this s...

Страница 19: ...n If you have insufficient height or width you will have to reduce the overall image size in order to display the full image on your screen Notes 1 2 3 4 5 6 7 8 9 10 Screen width Screen height 1 85 1 2 35 1 Aspect ratio 10 9 8 7 6 5 4 3 2 1 2 35 1 aspect ratio W H x 2 35 H W x 0 43 2048x1080 native resolution W H x 1 9 H W x 0 53 1 85 1 aspect ratio W H x 1 85 H W x 0 54 16 9 aspect ratio W H x 1...

Страница 20: ... into width and height in inches or metres at various aspect ratios 2 35 1 aspect ratio W D x 0 92 in D x 023 m H D x 0 39 in D x 01 m 2048x1080 native resolution W D x 0 88 in D x 022 m H D x 0 47 in D x 012 m 1 85 1 aspect ratio W D x 0 88 in D x 022 m H D x 0 48 in D x 012 m 16 9 aspect ratio W D x 0 87 in D x 022 m H D x 0 49 in D x 0125 m 1 66 1 aspect ratio W D x 0 86 in D x 022 m H D x 0 52...

Страница 21: ...e screen height without needing to zoom the projection lens Example If the anamorphic lens is not available Where the mix of images to be displayed includes 2 35 1 format then all other images will need to be zoomed to 80 6 871 1080 in order to maintain the same screen height As this is only just within the range of the available zoom lenses some compromise will be necessary to pick a suitable scr...

Страница 22: ...able for use with the projector Which lens you choose will depend on the screen size image aspect ratio and projection distance If the mix of images to be displayed includes images of varying aspect ratio then you should base your choice of lens on the widest image that is to be projected Method one using the lens charts For the image sizes listed below use one of the charts on the following pages...

Страница 23: ...6 Lens charts Native resolution 2048x1080 no anamorphic lens Use the chart below to choose which lens best suits your application example For a screen width of 15m at a distance of 25m the 1 45 1 8 1 lens would be best suited For the same screen size at a distance of 32m the 1 8 2 4 1 lens would be best suited if you need to be more precise then use the calculations on the page immediately followi...

Страница 24: ...34 note these two lenses overlap 2 2 3 0 1 zoom lens 102 935 3 0 4 3 1 zoom lens 102 936 2 35 1 full width image with anamorphic lens Use the chart below to choose which lens best suits your application if you need to be more precise then use the calculations on the page immediately following the lens charts Lens charts continued 10 15 20 25 30 35 40 45 metres 33 49 66 82 98 115 131 148 feet Throw...

Страница 25: ...tely following the lens charts Lens charts continued 10 15 20 25 30 35 40 45 metres 33 49 66 82 98 115 131 148 feet Throw distance TRF see page 15 1 feet metres feet metres 42 13 98 30 35 11 82 25 28 9 66 20 21 6 49 15 14 4 33 10 7 2 16 5 Screen height Screen width 2 35 1 full width image without anamorphic lens Where the mix of images to be displayed includes 2 35 1 format and there is no anamorp...

Страница 26: ...lap 2 2 3 0 1 zoom lens 102 935 3 0 4 3 1 zoom lens 102 936 1 85 1 full height image no anamorphic lens Use the chart below to choose which lens best suits your application if you need to be more precise then use the calculations on page 5 Lens charts continued 10 15 20 25 30 35 40 45 metres 33 49 66 82 98 115 131 148 feet Throw distance TRF see page 15 1 025 feet metres feet metres 53 16 98 30 44...

Страница 27: ...lap 2 2 3 0 1 zoom lens 102 935 3 0 4 3 1 zoom lens 102 936 16 9 full height image no anamorphic lens Use the chart below to choose which lens best suits your application if you need to be more precise then use the calculations on page 5 Lens charts continued 10 15 20 25 30 35 40 45 metres 33 49 66 82 98 115 131 148 feet Throw distance TRF see page 15 1 1 07 feet metres feet metres 55 17 98 30 46 ...

Страница 28: ...the lens charts see the first chart The lenses available and their part numbers are listed below 1 45 1 8 1 zoom lens 102 933 1 8 2 4 1 zoom lens 102 934 note these two lenses overlap 2 2 3 0 1 zoom lens 102 935 3 0 4 3 1 zoom lens 102 936 Lens charts continued 10 15 20 25 30 35 40 45 metres 33 49 66 82 98 115 131 148 feet Throw distance TRF see page 15 1 14 feet metres feet metres 59 18 98 30 49 ...

Страница 29: ...rlap 2 2 3 0 1 zoom lens 102 935 3 0 4 3 1 zoom lens 102 936 Lens charts continued 4 3 full height image no anamorphic lens Use the chart below to choose which lens best suits your application if you need to be more precise then use the calculations on page 5 10 15 20 25 30 35 40 45 metres 33 49 66 82 98 115 131 148 feet Throw distance TRF see page 15 1 42 feet metres feet metres 73 22 98 30 61 19...

Страница 30: ...rlap 2 2 3 0 1 zoom lens 102 935 3 0 4 3 1 zoom lens 102 936 Lens charts continued 5 4 full height image no anamorphic lens Use the chart below to choose which lens best suits your application if you need to be more precise then use the calculations on page 5 10 15 20 25 30 35 40 45 metres 33 49 66 82 98 115 131 148 feet Throw distance TRF see page 15 1 52 feet metres feet metres 78 24 98 30 66 20...

Страница 31: ...be more precise then use the calculations below Identify actual width of the image in pixels Calculate the Throw Ratio Factor TRF DMD width 2048 Image width in pixels Identify the screen width required Identify the throw distance required Throw distance calculations are based on the distance from the outer end of the lens which will vary from lens to lens Once a lens has been chosen the figures ca...

Страница 32: ...idth in pixels image width in pixels Therefore Screen width Throw distance from outer end of lens Throw ratio x TRF Throw distance Screen width x Throw ratio x TRF The throw distance calculated above is to the outer end of the lens For each lens the nominal distance between the front of the projector and the outer end of the lens lens extension will be as listed below lens extension 1 45 1 8 1 zoo...

Страница 33: ...to the projector or the zoom drive lever is operated the calibration procedure MUST be carried out See Using the Menus in Section 4 Controlling the projector Be careful not to scratch the lens surfaces If you do accidentally touch a lens then clean the surface using a lens paper The zoom drive mechanism should always be set to the engaged position even when using the non zoom lens as it provides a...

Страница 34: ... not use the full height or width extra shift will be possible up to the limit of the lens mount movement It is physically possible to shift the lens further than this up to the number of pixels shown in the diagram to the right However There will be some distortion of the image beyond the ranges specified above Due to internal hardware layout the shift towards the upper right is limited as shown ...

Страница 35: ...e projection lens should be fitted and adjusted before fitting the anamorphic lens into the lens holder For more information on adjusting the projection lens see Displaying a test pattern and Adjusting the projected image in section 3 Getting started If the projection lens has not already been fitted fit it now and adjust the position and focus This will ensure that the lens is in the right positi...

Страница 36: ...ings are in contact with the horizontal support Vertical position Adjust the two screws ensuring that after adjustment both screws are in contact with the lens holder Horizontal position Two microswitches are located at each end of the lens carriage on the side nearest the projector The central bracket determines the horizontal position of the lens when the lens is moved into position Adjust the p...

Страница 37: ...r extra mirrors or equipment However you must ensure that there is sufficient distance behind the screen for the projector to be correctly located Rear installation is generally more complicated and advice should be sought from your provider before attempting it Notes The projector should be installed as close to the power outlet as possible The power connection should be easily accessible so that...

Страница 38: ...TION AT THE FRONT OF THIS MANUAL The projector weighs over 100kg 200lbs Use safe handling techniques when lifting the projector Make sure that the surface that is to support the projector is capable of supporting the combined weight of the projector and lens see specification for weights Do not place heavy objects on top of the projector chassis The projector chasis is NOT capable of withstanding ...

Страница 39: ...w holes in the lamp compartment door Standard 200mm ducting can be used to connect the box to the projection room air extraction system Notes If the projector must be mounted close to people or heat sensitive equipment then external ducting will be required to remove the hot exhaust air safely Installation of the lamp duct box should be carried out ONLY by certified service personnel Duct box fixi...

Страница 40: ...age 2 24 2 Installation iS15 2K Cinema Projector User Manual Connecting the projector Typical connections HD SDI source DVI D source DVI A or B SDI A or B LAN 1 or 2 USB B PC Control RS232 Remote Control ...

Страница 41: ...Specification in section 6 Appendix For more information about control input connections see the following pages and also Connections in section 6 Appendix For more information about controlling the projector from a computer see your provider Control inputs Cinema inputs SDI A and SDI B DVI D inputs A and B LAN 1 and LAN 2 I L and EXT I L PC adaptor card slot Remote control 2 Remote control 1 PC c...

Страница 42: ...t free communication between source and projector Belden 8281 or equivalent with 75ohm BNC Fitting a ferrite core clamp Fit a ferrite core clamp to each SDI cable used Prise open the catches to open the clamp Position the clamp close to the projector end of the SDI cable and close it firmly around the cable so that the catches snap shut Fasten a cable tie close to the clamp to ensure that the clam...

Страница 43: ... automatically configure itself to suit the projector If not then you should refer to the documentation supplied with the DVI source to manually set the resolution to 2048 x 1080 or the nearest suitable setting Notes For more information about input connectors see Connections in section 6 Appendix For more information about supported input formats see Specification in section 6 Appendix Cable comp...

Страница 44: ...or active green all interlocks closed projector inactive amber an internal interlock is open Lamp off and projector in standby EXT I L can be connected to the output contacts of a theatre safety system If the projector is not connected to a theatre safey system EXT I L must be shorted by a wire link otherwise the projector will go into the inactive state The EXT I L indicator above the connector b...

Страница 45: ...n using a standard RS232 cable not supplied PC Control T Service or Installation personnel can use this serial connection to perform advanced setup functions General Purpose Input Output GPIO For future expansion PC adaptor card slot A PC adaptor card can be inserted here including memory card for firmware updates supplied wireless network adaptor card to control the projector from a computer Note...

Страница 46: ...or then turn clockwise to lock Rest of World power input Make sure the main power switch is off before connecting Lift the lid of the C form connector then firmly push in the connector Notes Use only the power cable provided Ensure that the power outlet includes a Ground connection as this equipment MUST be earthed Handle the power cable carefully and avoid sharp bends Do not use a damaged power c...

Страница 47: ... 3 2 Selecting a title 3 3 Displaying a test pattern 3 4 Adjusting the projected image 3 5 To adjust the position of the image on the screen 3 5 To adjust the size of the image on the screen 3 5 To adjust the focus of the image on the screen 3 5 Switching the power off 3 6 ...

Страница 48: ...by To switch the projector ON from Standby mode press the POWER button on the control panel or the POWER ON button on the remote control for two seconds After about 30 seconds the ON STANDBY indicator on the control panel will change to green and the display will show the lamp settings as follows Notes For more information about connecting the power cable see Power Connections in Section 2 Install...

Страница 49: ...s the MENU button on the control panel or on the remote control Press the SELECT or SELECT buttons until Source Select is displayed as shown below Press the SELECT button to see the first available title Press the SELECT or SELECT buttons until the LCD screen shows the name of the title you want to project Press the SELECT button or the ENTER button to select the title The mark shows that this is ...

Страница 50: ...the Source Select menu as described on the previous page Press the SELECT or SELECT buttons until Test Pattern is displayed as shown below Press the SELECT button or the ENTER button to select the Test Pattern menu OR Press the TEST button on the remote Control THEN Press the SELECT or SELECT buttons until the LCD screen shows the name of the Test Pattern you want to use Press the SELECT button or...

Страница 51: ...n press the and buttons To adjust the size of the image on the screen EITHER on the control panel press the ZOOM or ZOOM buttons OR on the remote control press CTL with the ZOOM or ZOOM buttons To adjust the focus of the image on the screen EITHER on the control panel press the FOCUS or FOCUS buttons OR on the remote control press CTL with the FOCUS or FOCUS buttons Notes For more detailed informa...

Страница 52: ...ndicator on the control panel will change to orange and flash on and off The display will show the Cooldown timer which will count down from 300 seconds to zero At the end of the cooling period the projector will go into Standby mode Push the main power switch downwards to switch off the power Disconnect the power cable Notes Always allow the lamp to cool for 5 minutes before Switching off the pow...

Страница 53: ...l panel 1 2 Using the remote control 1 3 Using the alpha numeric keys 1 3 Using the menus 1 4 At switch on 1 4 Navigation through the menu trees 1 5 Example Using the Information menus 1 6 Example Lens Calibration 1 7 Menu trees 1 8 Source Select menus 1 9 Configuration menus 1 10 Information menus 1 14 ...

Страница 54: ...es For information about how to connect the projector see Connecting the projector in section 2 Installation and Connections in section 6 Appendix For more information about how to use the menus see Using the menus later in this section For a full listing of all the menus see Menu trees later in this section When using any menu that requires text or numeric input you will need to use the remote co...

Страница 55: ...by Alpha numeric keys for text and numbers Test opens Test Pattern menu KEYST R AMP G ELIST B RGB Mute Press with CTL to turn off Red Green or Blue component of Test Pattern Press again to turn back on Menu selection buttons Lens Shift Press CTL and POSI LENS together release then use buttons to position the image on the screen Focus and Zoom Press with CTL to adjust focus and zoom HELP Direct Men...

Страница 56: ...ON button on the remote control for two seconds After about 30 seconds the ON STANDBY indicator on the control panel will change to green and the display will show the lamp settings as follows Notes None of the menus are ever displayed on the projection screen For a full listing of all the menus see Menu trees later in this section When using any menu that requires text or numeric input you will n...

Страница 57: ...ECT or buttons to show the other selections Press the SELECT button or ENTER button to choose Lamp Time Typical data entry screen Use the alphanumeric keys to enter new data see Using the remote control earlier in this section Press the UNDO button to return the setting to its previous value Press the SELECT button or CANCEL button to close the Projector IP Address display and return to the IP Add...

Страница 58: ...ailable Press the SELECT button or the ENTER button to open one of the menus for example the Information menu Press the SELECT button or CANCEL button to close the menu OR press the SELECT or buttons to show the sub menus available Press the SELECT button or the ENTER button to open one of the menus for example the Version menu Notes To return to the Main Menu at any time press the MENU button For...

Страница 59: ...enu select the Installation menu From the Installation menu select the Lens Calibrate menu From the Lens Calibrate menu select Zoom or Fixed Press the SELECT button or the CANCEL button to close the menu OR press the ENTER button to start then again to confirm If Zoom was selected the projector will calibrate the lens and initialise the lens memory If Fixed was selected then the zoom buttons will ...

Страница 60: ...t basic projector settings such as lamp setup shutter mode MMS control panel key lock GPIO control date time and ON OFF timer reset to factory defaults image orientation lens calibration and centering MCGD file creation test pattern setup turret control connection baud rate see pages 10 11 The Information menus allow you to access to lamp time BIOS firmware and data versions error codes IP address...

Страница 61: ...ser Manual 4 Controlling the projector Notes Direct Menu selection 1 Press the HELP Direct Menu selection button 2 Use the Alpha numeric keys to enter the menu number including any leading zeroes eg 005 3 Press Enter Source Select menus ...

Страница 62: ...2K Cinema Projector User Manual Notes Direct Menu selection 1 Press the HELP Direct Menu selection button 2 Use the Alpha numeric keys to enter the menu number including any leading zeroes eg 005 3 Press Enter page 11 page 11 Configuration menus ...

Страница 63: ... Controlling the projector Notes Direct Menu selection 1 Press the HELP Direct Menu selection button 2 Use the Alpha numeric keys to enter the menu number including any leading zeroes eg 005 3 Press Enter page 10 page 10 Configuration menus continued ...

Страница 64: ...page 4 12 4 Controlling the projector iS15 2K Cinema Projector User Manual page 13 page 13 Title Setup menus ...

Страница 65: ...4 Controlling the projector Notes Direct Menu selection 1 Press the HELP Direct Menu selection button 2 Use the Alpha numeric keys to enter the menu number including any leading zeroes eg 005 3 Press Enter page 12 page 12 Title Setup menus continued ...

Страница 66: ... HELP Direct Menu selection button 2 Use the Alpha numeric keys to enter the menu number including any leading zeroes eg 005 3 Press Enter Warranted lamp life is determined by the reading on the Lamp hours meter on the face of the Lamp module NOT the reading available via the Lamp menu shown here Information menus ...

Страница 67: ...5 Maintenance Contents 5 Maintenance 5 1 Changing the air filter material 5 2 Changing the lamp 5 4 Lamp hours meter 5 4 Cleaning the projector and lens 5 5 ...

Страница 68: ...ter out from under the front of the projector under the lens by pulling on the strap Inspect the foam sealing strips at the ends and sides of the filter If they are damaged then the whole filter should be replaced Dismantle the filter Remove the two screws securing the strap end of the frame HInge up the top of the frame and unhook from the bottom end Remove the filter material Notes The projector...

Страница 69: ...ire lattice must be against the sealing strip the wire lattice must face downwards the first pleat of material must overhang the strap end of the frame Re assemble the frame Hook the bottom end on first Re fasten the two screws at the strap end Push the replenished filter firmly back into the slot taking care to fit it the right way up as shown by the arrow Notes ...

Страница 70: ...e lamp for more than 750 hours as this may cause serious lamp failure damage the lamp module and cause extra cost on replacement Warranted lamp life is determined by the reading on the Lamp hours meter on the face of the Lamp module shown here NOT the reading available via the Information menus There are no user serviceable parts inside the lamp module The whole module should be replaced and retur...

Страница 71: ...on on the remote control for two seconds The ON STANDBY indicator on the control panel will change to orange and flash on and off The display will show the Cooldown timer which will count down from 300 seconds to zero At the end of the cooling period the projector will go into Standby mode Push the main power switch downwards to switch off the power Disconnect the power cable Clean the cabinet per...

Страница 72: ...page 5 6 5 Maintenance iS15 2K Cinema Projector User Manual ...

Страница 73: ...ion lens data 6 9 Connections 6 10 Cinema Input SMPTE 292 HD SDI connection 6 10 DVI D Input connection 6 11 LAN connection 6 12 10BaseT Unshielded Twisted Pair cable 6 12 Serial control input 6 13 Null modem cable 6 13 Modem settings 6 13 Remote Control 2 6 14 General Purpose Input Output GPIO 6 15 Dimensions 6 16 without anamorphic lens 6 16 Dimensions 6 17 with anamorphic lens fitted 6 17 ...

Страница 74: ...heck the lamp hours meter If the lamp has been in use for over 750 hours the lamp module should be changed See Section 5 Maintenance Changing the lamp The lamp may be faulty Check by fitting a new lamp module See Section 5 Maintenance Changing the lamp The lamp power may be turned down See Section 4 Using the menus Setup menu Check that the input source is switched on and connected to the projecto...

Страница 75: ...rojection distance See Section 1 Introduction Choosing a lens Check the image settings are set correctly See Section 4 Using the menus Setup menu Check that the projector is parallel to the screen Check that the screen is flat and securely mounted Check that the LAN or serial cable is connected correctly See this section 6 Appendix Connections If using a LAN check that the address setting is made ...

Страница 76: ...FT8871 Ferrite core clamps 61605095 This User Manual CD ROM 104 597 Important Information printed 104 598 Options Motorised Anamorphic Lens mount iS15AT 103 548 or 01165081 with associated Title memory for screen set ups Lamp duct box iS15DA 104 167 01165084 Lamp bulb 3kW without module iS15LP 103 239 or 01165080 Replacement parts Lamp module 3kW iS15LH 104 577 or 01165079 Air filter material iS15...

Страница 77: ...Contrast ratio Meets or exceed TI Cinema guidelines Pixel fill factor 87 Physical Operating Temperature 10 to 35 C Storage Temperature 10 to 50 C Thermal Dissipation 13640 BTU Operating Humidity up to 80 non condensing Weight 114kg 249lbs Electrical Mains voltage 200 240 VAC 10 48 62Hz single phase Power consumption 4000 W International Regulations Meets FCC Class A requirements Meets EMC Directiv...

Страница 78: ...be displayed at twice this rate Some single SMPTE 292 source formats that will be auto detected and displayed Source Source Source Vertical Scan Display Vertical Rate Standard Format Rate Hz Type Hz SMPTE 274M 1920 x 1080 24 23 98 Progressive 24 23 97 Hz Progressive 1920 x 1080 25 Progressive 25 Hz Progressive 1920 x 1080 30 29 97 Progressive 30 29 97 Hz Progressive 1920 x 1080 50 Interlaced 1 25 ...

Страница 79: ...91 667 1920 x 1080 2 113 800 1 78 1 48 47 95 1 718 750 1280 x 1024 1 346 680 1 25 1 50 1 650 000 1280 x 1024 1 346 680 1 25 1 60 59 94 1 375 000 1280 x 1024 1 346 680 1 25 1 72 1 145 833 1280 x 720 943 200 1 78 1 Note If the maximum number of active pixels is exceeded the electronics will truncate the excess data There may be image artifacts where this data truncation occurs Note For all dual chan...

Страница 80: ...t for Generic Inputs to DVI D Port Series 0 Port Source Vertical Clock Rate Scan Color Processing Display Protocol Format Rate max Type Space Path 1 Format DDWG DVI 1280 x 1024 23 61 Hz 82 5 Mhz Progressive RGB DLP CinemaTM 1280 x 1024 DDWG DVI 1280 x 1024 23 96 Hz 165 Mhz Progressive RGB Standard DLP TM 1280 x 1024 Note 1 Processing path selectable via software Format for Generic Inputs to DVI D ...

Страница 81: ... size 36 0mm dia 36 0mm dia 36 0mm dia 36 0mm dia Effective focal length 40 71 50 89mm 50 72 62 12mm 62 35 84 79mm 84 0 120 5mm 1 6 2 0in 2 2 5in 2 46 3 34in 3 31 4 74in Distortion 1 5 1 5 1 5 1 5 Transmission 88 avg 88 88 avg 88 avg Mechanical Lens extension 109mm 97mm 53mm 98mm 4 3in 3 8in 2 1in 3 9in Length 381mm 368 4mm 324 9mm 370 8mm 15in 14 5in 12 8in 14 6in Maximum diameter 139mm 139mm 139...

Страница 82: ...n Signal Ground SMPTE 292 HD SDI signals are very high speed digital signals which require better quality coaxial cable than conventional analogue video The data rate is 1 5 Gigabits per second In choosing cable length and connectors for any installation the frequency response loss in decibels should be proportional to 1 f from 1MHz to 1 5GHz The following or similar cable specification should be ...

Страница 83: ... 5 unused 6 DDC Clock 7 DDC Data 8 unused 9 TMDS Data 1 10 TMDS Data 1 11 TMDS Data 1 Shield 12 unused 13 unused 14 5 V Power 15 Ground 16 Hot Plug Detect 17 TMDS Data 0 18 TMDS Data 0 19 TMDS Data 0 Shield 20 unused 21 unused 22 TMDS Clock Shield 23 TMDS Clock 24 TMDS Clock Hot plug detect HPD is fully DVI compliant DVI sources detect the presence of a display device by providing 5V on pin 14 and...

Страница 84: ...lue 5 White Blue stripe 6 Green 7 White Brown stripe 8 Brown Notes For more information about connecting the projector including examples of control input configurations see Connecting the projector in 2 Installation As this projector incorporates a builit in hub only a standard uncrossed cable should be used to connect to an external hub network or computer top view of cable connector clip is und...

Страница 85: ... 2 3 TD TD 3 2 RD DTR 4 6 DSR GND 5 5 GND DSR 6 4 DTR RTS 7 8 CTS CTS 8 7 RTS Modem settings Baud rate 38 400 bps Data length 8 bits Parity none Stop bits one Handshaking Full duplex RTS CTS Xon Xoff not supported Notes For more information about connecting the projector see Connecting the projector in 2 Installation The projector is a DTE so use a straight cable to connect to a modem or a null mo...

Страница 86: ...external control mode OFF 3 4 short power ON 3 open power OFF 8 4 short shutter CLOSED 8 open shutter OPEN When GPIO control is enabled the remote shutter control on pin 8 will not work Notes For more information about connecting the projector see Connecting the projector in 2 Installation pin view of female connector ...

Страница 87: ...P 17 N C 18 Ext_TCODE_P 19 Ext_TCODE_SHIELD GPI Reccomended Operating Current 5mA Absolute Maximum Current 50mA Forward Voltage drop 5mA 1 1V GPO Absolute Maximum Current 50mA Notes For more information about connecting the projector see Connecting the projector in 2 Installation 20 Ext_GPIN_1_N 21 Ext_GPIN_2_N 22 Ext_GPIN_3_N 23 Ext_GPIN_4_N 24 Ext_GPIN_5_N 25 Ext_GPIN_6_N 26 Ext_GPIN_7_N 27 Ext_...

Страница 88: ...page 6 16 6 Appendix iS15 2K Cinema Projector User Manual Dimensions without anamorphic lens All dimensions in mm ...

Страница 89: ...page 6 17 iS15 2K Cinema Projector User Manual 6 Appendix Dimensions with anamorphic lens fitted All dimensions in mm ...

Страница 90: ...page 6 18 6 Appendix iS15 2K Cinema Projector User Manual ...

Отзывы: