3-10
Disassembly and Reassembly
Mini PCI Board
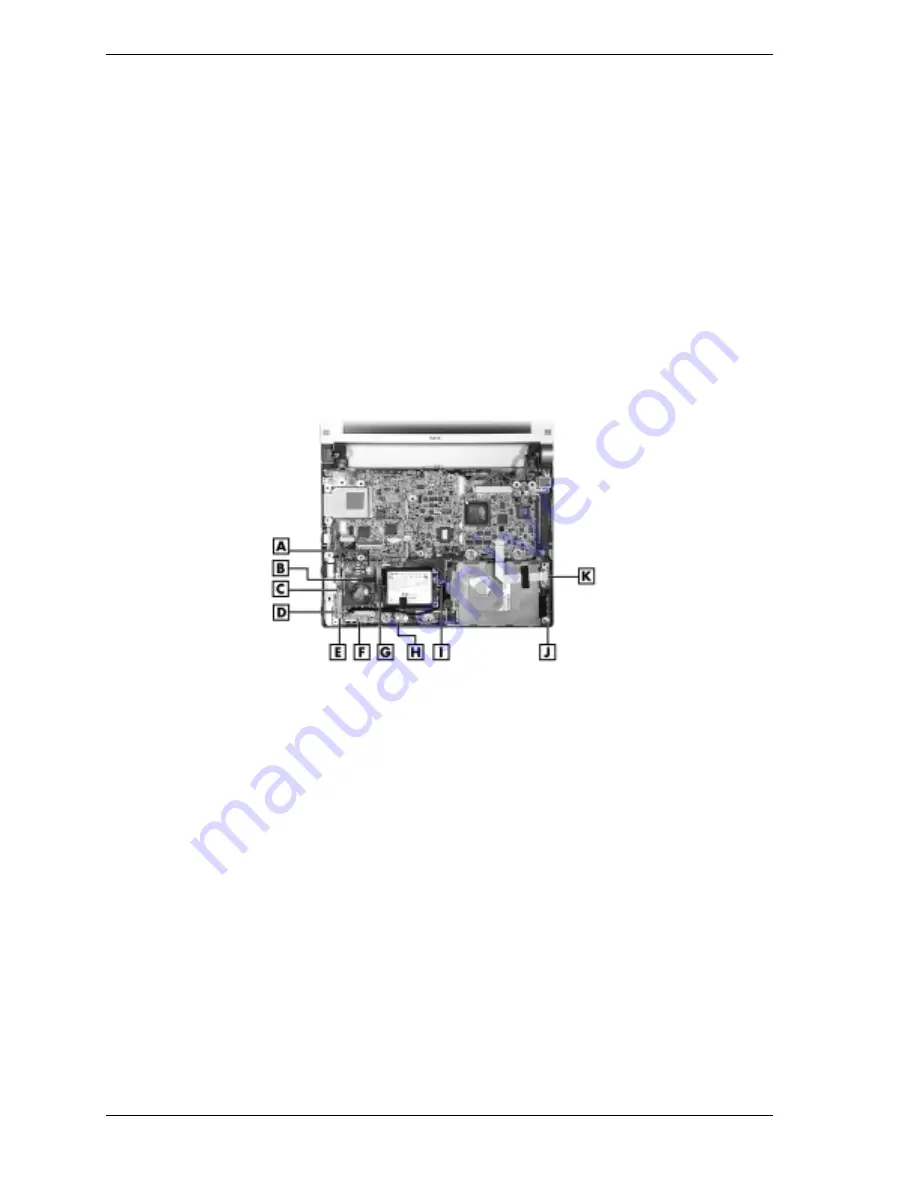
Remove the Mini PCI LAN/modem board as follows.
1.
Save any open files, exit Windows, turn off notebook power, close the LCD panel, unplug
the power cable, and disconnect any peripheral devices.
2.
Remove the secondary battery, hard drive cover, keyboard, and top cover assembly.
3.
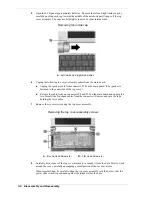
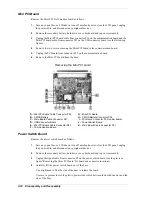
Unplug the Mini PCI board cable from connector P34 on the communication board and the
Mini PCI board cable from connector P43 on the USB connector board (see the following
figure).
4.
Remove the two screws securing the Mini PCI board to the communication board.
5.
Unplug the PCI board from connector P32 on the communication board.
6.
Remove the Mini PCI board from the base.
Removing the Mini PCI board
A
– Mini PCI Board Cable Connector P34
G
– Mini PCI Board
B
– CMOS Battery
H
– CMOS Battery Connector P36
C
– Main Board Cable Connector P41
I
– PCI Board Connector P32 (under board)
D
– USB Connector Board
J
– Power Switch Board
E
– Mini PCI Board Cable Connector P43
K
– Main Board Cable Connector P51
F
– Communication Board
Power Switch Board
Remove the power switch board as follows.
1.
Save any open files, exit Windows, turn off notebook power, close the LCD panel, unplug
the power cable, and disconnect any peripheral devices.
2.
Remove the secondary battery, hard drive cover, keyboard, and top cover assembly.
3.
Unplug the signal cable from connector P5 on the power switch board (see the previous
figure “Removing the Mini PCI board” for board and connector locations).
4.
Carefully lift the power switch board out of the base.
You might need to flex the side of the base to release the board.
Use care to prevent loss of the plastic power slide switch between the hard drive bay and the
side of the base.
Содержание DayLite Series
Страница 42: ...3 Disassembly and Reassembly Required Tools and Equipment Disassembly Reassembly ...
Страница 55: ...4 System Boards Mini PCI Board Power Switch Board USB Connector Board Main Board Communications Board ...
Страница 58: ...5 Illustrated Parts Breakdown Illustrated Parts Breakdown Parts List ...
Страница 65: ...7 Troubleshooting Problem Checklist Startup Problems Diagnostics ...
Страница 73: ...8 NEC Computers Information Services Service and Support Functions Technical Support ...
Страница 76: ...9 Specifications System Components Memory Map Interrupt Controllers ...
Страница 95: ...NEC Computers Inc 15 Business Park Way Sacramento CA 95828 819 200725 000 8 2001 819 200725 000 ...


