background image

2-16


System Configuration and Setup

Setting the DIP Switch

Several system settings, including BIOS Flash, are set through a six-position DIP switch located
on the bottom of the notebook, under the memory bay cover. The following list identifies each
switch, its default setting, and its function. Procedures for setting the switches follow the list.

Switch 1 — Password override, default setting is OFF. If the password is forgotten, change
the switch setting to ON and the current password is erased.

Switch 2 — Keyboard select; default setting is ON for U.S. 85 key keyboard and OFF for
European keyboard.

Switch 3 — Not assigned; default setting is OFF.

Switch 4 — Keyboard select 2; default setting is ON for US and OFF for European
keyboards.

Switch 5 — Reserved for factory use; default setting is ON. Off is for BIOS Flash.

Switch 6 — Logo select; default setting is OFF.

Use these steps to access the DIP switch in the memory bay and to set a switch.

1. 

Power off the system and disconnect any peripheral devices.

Electrostatic discharge (ESD) can damage hard drives, boards,

processor, and other system components. Before opening the system and handling system
components, attach an antistatic wrist strap to your wrist and to chassis ground (any unpainted
metal surface on the system) to avoid ESD damage.

Hold a board only by its edges. If removing a board, place it component-side up on a grounded,
static-free surface or in a static-free wrapper. If installing a new board, do not remove it from its
protective wrapper until you are ready to install it.

2. 

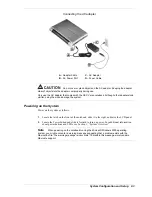
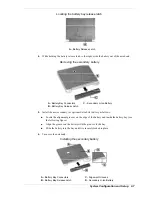
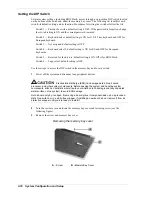
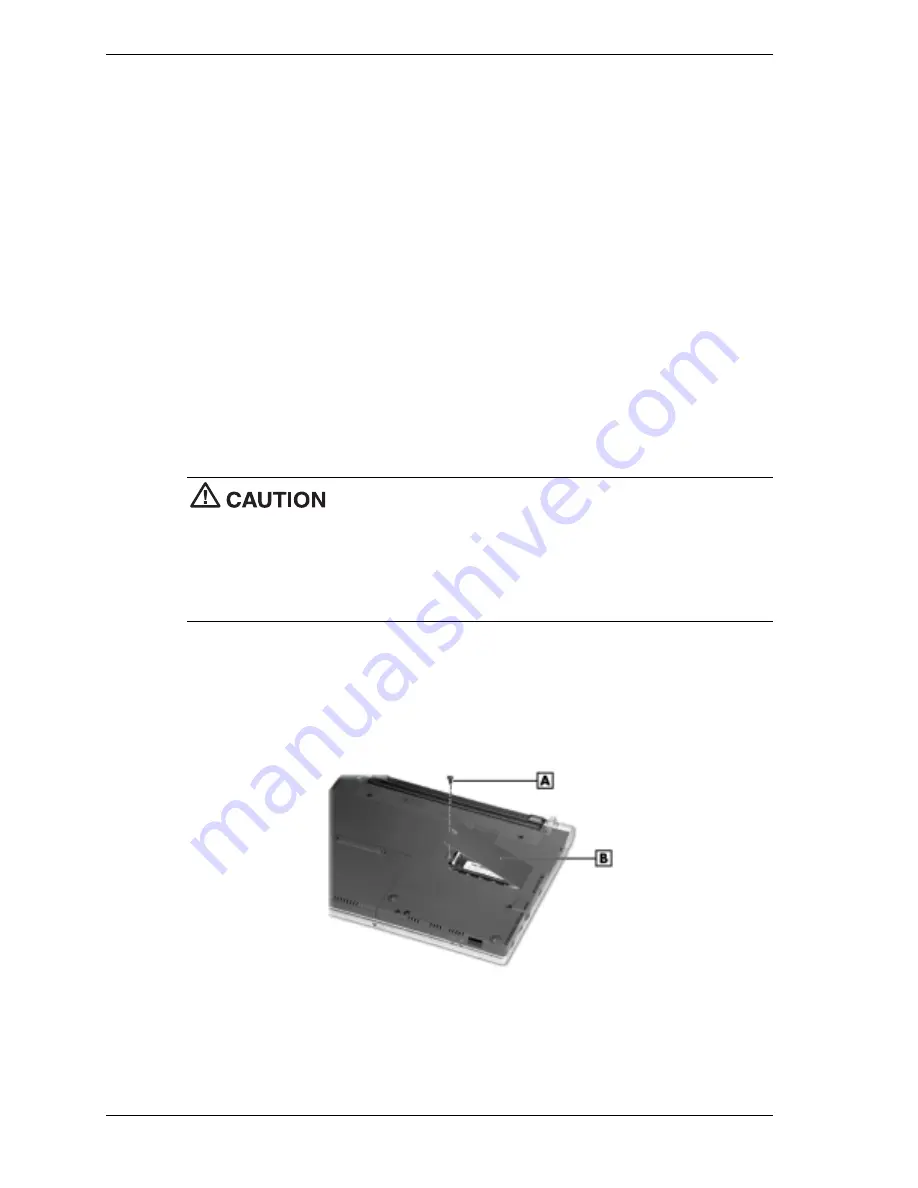
Turn the system over and locate the memory bay cover and fastening screw (see the
following figure).

3. 

Remove the screw and memory bay cover.

Removing the memory bay cover

A

 – Screw

B

 –Memory Bay Cover

Содержание DayLite Series

Страница 1: ... U ULTRA LTRA LTRA LTRAL L L LITE ITE ITE ITE D D D DAY AY AY AYL L L LITE ITE ITE ITE S E R V I C E A N D R E F E R E N C E S E R V I C E A N D R E F E R E N C E S E R V I C E A N D R E F E R E N C E S E R V I C E A N D R E F E R E N C E M A N U A L M A N U A L M A N U A L M A N U A L ...

Страница 2: ...ntation by customers of each product may vary the suitability of specific product configurations and applications must be determined by the customer and is not warranted by NEC To allow for design and specification improvements the information in this document is subject to change at any time without notice Reproduction of this document or portions thereof without prior written approval of NEC is ...

Страница 3: ...dapter 2 2 Powering on the System 2 3 Batteries 2 4 Extending Battery Life 2 4 Determining Battery Status 2 4 Low Battery Status 2 5 Charging the Battery 2 5 Secondary Battery Handling 2 5 Precautions 2 6 Replacing the Secondary Battery 2 6 BIOS Setup 2 8 BIOS Setup Main Menu 2 8 Main Menu 2 9 Advanced Menu 2 12 Security Menu 2 13 Boot Menu 2 14 Exit Menu 2 14 Updating the BIOS 2 15 Obtaining the ...

Страница 4: ...d 3 12 LCD Panel 3 13 Reassembly 3 13 4 System Boards Mini PCI Board 4 2 Power Switch Board 4 2 USB Connector Board 4 2 Main Board 4 3 Communications Board 4 3 5 Illustrated Parts Breakdown Illustrated Parts Breakdown 5 2 Parts List 5 3 6 Preventive Maintenance Cleaning the Exterior 6 2 Cleaning the Interior 6 2 Protecting the Hard Drive 6 2 Maintaining the Secondary Battery 6 3 7 Troubleshooting ...

Страница 5: ...Contents v 9 Specifications System Components 9 2 Memory Map 9 7 Interrupt Controllers 9 8 Glossary Index ...

Страница 6: ...etup and how to operate the notebook Chapter 3 Disassembly and Reassembly provides detailed instructions on how to disassemble the notebook Chapter 4 System Board Layout shows the system boards and the board connectors Chapter 5 Illustrated Parts Breakdown shows the Illustrated Parts Breakdown IPB and corresponding part numbers Chapter 6 Preventive Maintenance lists general notebook preventive mai...

Страница 7: ...ting system DRAM dynamic RAM DVD digital video disk ECC error checking and correction ECP enhanced capabilities port EDO extended data output EGA Enhanced Graphics Adapter EPP enhanced parallel port EPROM erasable and programmable ROM EVGA Enhanced Video Graphics Array F Fahrenheit FAX facsimile transmission FCC Federal Communications Commission FG frame ground FM frequency modulation FP fast page...

Страница 8: ...ROM QFP quad flat pack RAM random access memory RAMDAC RAM digital to analog converter RAS row address strobe RGB red green blue RGBI red green blue intensity ROM read only memory rpm revolutions per minute R read RTC real time clock R W read write S slave SCSI Small Computer System Interface SDRAM synchronous dynamic random access memory SG signal ground SIMM single inline memory module SPM stand...

Страница 9: ...1 System Overview About the NEC Versa Notebook Front Features Back Features Left Side Features Right Side Features Bottom Features Component Features Chipset Features ...

Страница 10: ...books are similar differing mainly in the type of LCD panel and in the type of primary and secondary batteries Additionally the NEC Versa DayLite notebook with the transflective LCD panel has an on off backlight switch on the side of the panel Each notebook features a Transmeta Crusoe TM5600 600 MHz microprocessor NEC VersaGlide Touchpad Peripheral Component Interconnect PCI architecture LCD panel...

Страница 11: ...nly Provides backlighting to the reflective LCD panel Switch up position is on down position is off Microphone Allows recording of monophonic sound directly into the notebook hard drive NEC VersaGlide Touchpad Move a fingertip over the VersaGlide Touchpad to control the position of the mouse pointer Use the selection buttons below the VersaGlide Touchpad to select menu items Speaker Provides mono ...

Страница 12: ...ing figure Feature descriptions are provided after the figure Keyboard A Function Keys D Cursor Control Keys B Numeric Keys E Control Keys C Windows keys Function keys Twelve function keys F1 through F12 are available on the keyboard These keys work together with the Fn key to activate special functions Several keys are preprogrammed with dual functions and some are printed in blue on the key Func...

Страница 13: ... again the keys revert to their normal functions as typewriter keys Cursor Control keys Cursor control keys let you position the cursor on the screen where you want On the screen the cursor is a blinking underline block or vertical line depending on the application The cursor indicates where the next text typed is inserted Windows keys In Windows use the following two keys to facilitate the work Q...

Страница 14: ...ty or less Battery Charging LED lights to indicate battery charging activity Lights amber when the primary battery is charging Blinks amber to indicate an error The primary battery is installed in the battery bay Lights green when the secondary battery is charging Blinks green to indicate an error The secondary battery is connected to the back of the system IR Port Use this infrared IR port to tra...

Страница 15: ...the notebook The LCD display and external monitor can be run simultaneously or run alone RJ 11 Jack Connects the internal modem to an analog telephone line USB Port The Universal Serial Bus USB port allows connection of up to 127 USB equipped peripheral devices printers monitors scanners etc LAN Cable Jack optional If the system has this feature the system ships with a local area network LAN adapt...

Страница 16: ...y mode the Power button must be slid to the right to resume operation The BIOS parameter System Switch must be set to Sleep Put the unit in Standby mode when it s necessary to be away from the system for a short period of time and want to return to where you left off Standby mode shuts down all devices in the system while retaining data and system status Go to Start Shut Down Standby to put the sy...

Страница 17: ...ective notebook uses a 12 cell battery The NEC DayLite XGA transflective notebook uses a 9 cell battery The primary battery is built into the back of the LCD panel Secondary Battery A removable secondary Li Ion 3 cell battery is installed in the battery bay to help prevent data loss An optional Extra Life Li Ion battery can be installed in the battery bay in place of the standard secondary battery...

Страница 18: ...anufacturer Description TransMeta TM5600 Crusoe TransMeta 600 MHz CPU 82440MX Intel System Controller FDC37N869 Standard Microsystems Super I O SM721 Silicon Motion Video EV1938 Creative Technology Audio 29F004TC 90 ROM BIOS M38813M4 Mitsubishi Keyboard Controller TI PCI 1420 Texas Instruments PCI CardBus Controller ...

Страница 19: ...2 System Configuration and Setup Power Sources BIOS Setup Updating the BIOS Transmeta LongRun Utility NEC Customize Utility Application and Driver CD Product Recovery CD ...

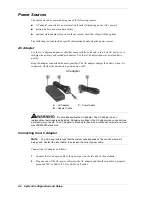
Страница 20: ...ter charges the battery when it is connected whether the notebook is powered on or off AC adapter A AC Adapter C Power Cable B Adapter Cable Do not disassemble the AC adapter The AC adapter has no replaceable or serviceable parts inside Dangerous voltage in the AC adapter can cause serious personal injury or death The AC adapter is intended for use with a notebook computer and must meet EN609050 s...

Страница 21: ...stem Powering on the System Power on the system as follows 1 Locate the latch on the front of the notebook slide it to the right and raise the LCD panel 2 Locate the Power button and slide it forward to turn on power For additional information about power buttons and LEDs see Section 1 System Overview Note When powering on the notebook running the Microsoft Windows 2000 operating system you might ...

Страница 22: ...ument You can use the LongRun utility to force the processor to run at a slower speed extending battery run time Note that add in PC Cards increase battery usage reducing battery run time Keep the notebook fully charged when working near available AC power Use the Fn F8 and Fn F9 function keys to control brightness Lowering brightness can extend battery life Disable the IR device port if not using...

Страница 23: ... secondary batteries by connecting the notebook to an AC power source It takes approximately 8 hours to fully charge the battery while the notebook is on and 4 5 hours while off To monitor the charging activity observe the battery charging LED on the front of the notebook The battery charging LED lights as follows Lights amber when the primary battery is charging Blinks amber if the primary batter...

Страница 24: ...s casing is discolored overheats or emits a foul odor Keep the battery dry and away from water Keep metal objects away from battery connectors Metal objects in contact with the connectors can cause a short circuit and damage If the battery leaks If the battery leaks onto skin or clothing wash the area immediately with clean water Battery fluid can cause a skin rash and damage fabric If battery flu...

Страница 25: ...y Bay Release Latch 5 Install the new secondary or optional Extra Life battery as follows Locate the alignment grooves on the edge of the battery and inside the battery bay see the following figure Align the grooves on the battery with the grooves in the bay Slide the battery into the bay until it is securely locked in place 6 Turn over the notebook Installing the secondary battery A Battery Bay C...

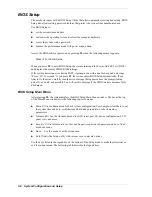
Страница 26: ...omatically If you want to fix the error carefully read the error message that appears above the prompt taking notes if you want and press F2 You will see this message if the CMOS battery becomes fully discharged BIOS Setup Main Menu After pressing F2 the system displays the BIOS Setup Main Menu window The bar at the top of the Main Menu window lists the following top level menus Main Use the Main ...

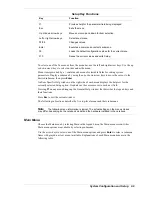
Страница 27: ...red submenu then press Enter An Item Specific Help window on the right side of each menu displays the help text for the currently selected Setup option It updates as the cursor moves to each new field Pressing F1 on any menu brings up the General Help window that describes the legend keys and their functions Press Esc to exit the current window The following subsections describe the five top level...

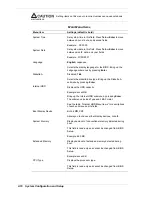
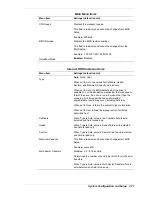
Страница 28: ...ive type Bring up the Diskette A submenu by pressing Enter Internal HDD Displays the HDD capacity Example xxxxx MB Bring up the Internal HDD submenu by pressing Enter The submenus include Type and LBA Format See the table Internal HDD Menu Items for descriptions of each submenu and its fields Boot Display Device Both LCD CRT Allows you to choose either display devices or both System Memory Display...

Страница 29: ...format the drive If a drive is run in a mode other than the mode in which it was partitioned and formatted unpredictable results may occur including data loss When set to None informs the system to ignore this drive When set to User allows the manual entry of all fields described next Cylinders When Type is Auto value in the Cylinders field is auto detected and field is read only Heads When Type i...

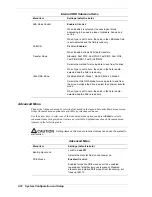
Страница 30: ...data to and from the drive Autotype the drive to select the optimum transfer mode When Type is set to Auto the value in the field is auto detected and the field is read only Advanced Menu Choose the Advanced menu by selecting Advanced in the legend bar on the Main menu screen Other Advanced menu options are available by selecting submenus Use the arrow keys to select one of the Advanced menu optio...

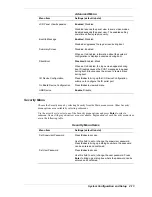
Страница 31: ... I O Device Configuration submenu to configure the IR serial port On Board Device Configuration Press Enter to view submenu USB Device Enable Disable Security Menu Choose the Security menu by selecting Security from the Main menu screen Other Security menu options are available by selecting submenus Use the arrow keys to select one of the Security menu options and press Enter to select a submenu I...

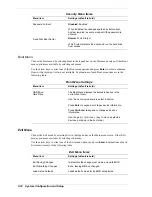
Страница 32: ...Menu Settings Menu Item Settings default is bold USB Drive Hard Drive The Boot Menu displays the bootable devices in the current boot order Use the up or down arrows to select a device Press Enter to expand or collapse device information Press Ctrl Enter to expand or collapse all device information Use the plus or minus key to move a selected device up or down in the boot order Exit Menu Choose th...

Страница 33: ...able the BIOS Flash Setting Obtaining the BIOS Update Contact NEC Computers Support Services to obtain the BIOS Update Diskette Or you can download the BIOS update from the NEC Computers web site see Section 8 for web site information Download the BIOS Update onto a diskette Preparing the BIOS Update Diskette Once the BIOS Update Diskette is available either from NEC Computers or downloaded you mu...

Страница 34: ...e default setting is ON Off is for BIOS Flash Switch 6 Logo select default setting is OFF Use these steps to access the DIP switch in the memory bay and to set a switch 1 Power off the system and disconnect any peripheral devices Electrostatic discharge ESD can damage hard drives boards processor and other system components Before opening the system and handling system components attach an antista...

Страница 35: ...nected Document all customized BIOS settings 2 Power on the notebook with the BIOS Update diskette in the drive The computer boots and automatically loads the utility A message similar to the following appears The NEC BIOS Update Utility should not be used to modify the BIOS in a Versa system which is docked If your Versa is docked please exit the BIOS Update Utility power down and undock your Ver...

Страница 36: ...ation If the system is in an idle state or doing processing that doesn t require faster clock speeds it automatically lowers to 300MHz If the system is completing more demanding tasks it adjusts up to a full 600MHz The ability to lower the processor speed results in longer battery life for your notebook The LongRun utility allows overriding the automatic adjustments by the processor You can Force ...

Страница 37: ...eed NEC wallpaper to set the NEC logo as the background image Follow these steps to use the NEC Customize utility 1 Double click the NEC Customize icon on the Windows desktop 2 From the display window select the desired option click Install and follow the prompts 3 For some of the selected options you are prompted to reboot the system 4 If necessary click Exit to close the NEC Customize screen aft...

Страница 38: ...otebook to its initial installation state as a last resort Check the problem checklist in Section 7 for information about solving problems before using the CD The Product Recovery utility provides options that either remove or replace existing files a process that might result in data loss Before using the Product Recovery CD enter the BIOS Setup utility and restore the BIOS default settings Save ...

Страница 39: ...nly use the Full Disk Drive restore option if the preinstalled software is unusable Use these steps to perform a Full Disk Drive restore 1 Check the Product Recovery CD title and make sure that it is the correct CD for the NEC Versa notebook and operating system 2 Power off the system before connecting the external CD ROM drive to the notebook 3 Put the CD into the CD ROM drive tray close the driv...

Страница 40: ...or the NEC Versa notebook and operating system 2 Power off the system before connecting the external CD ROM drive to the notebook 3 Put the CD into the CD ROM drive tray close the drive door and reboot the notebook 4 Read the License Agreement screen that appears Left click to accept the agreement You have the option of accepting or declining the agreement If you decline the recovery utility exits...

Страница 41: ...Reboot or press Alt R to reboot the notebook A series of hardware detection screens display the notebook reboots and the Windows Setup screen appears Follow the on screen instructions to set up Windows You are required to reenter the Microsoft license number ...

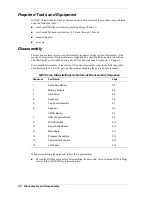
Страница 42: ...3 Disassembly and Reassembly Required Tools and Equipment Disassembly Reassembly ...

Страница 43: ...m unit are shown in Chapter 5 For complete disassembly of the system follow the disassembly order in the following table For disassembly of a specific part go the section containing the part removal procedure NEC Versa UltraLite DayLite Notebook Disassembly Sequence Sequence Part Name Page 1 Secondary Battery 3 3 2 Memory Module 3 4 3 Hard Drive 3 5 4 Keyboard 3 6 5 Top Cover Assembly 3 7 6 Speake...

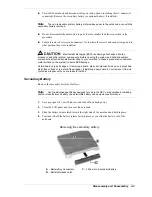
Страница 44: ...any unpainted metal surface on the system to avoid ESD damage Hold a board only by its edges If removing a board place it component side up on a grounded static free surface or in a static free wrapper If installing a new board do not remove it from its protective wrapper until you are ready to install it Secondary Battery Remove the secondary battery as follows Note Use the batteries specifically...

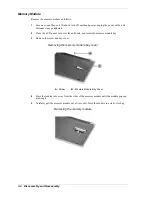
Страница 45: ...lose the LCD panel turn over the notebook and locate the memory module bay 3 Remove the screw and bay cover Removing the memory module bay cover A Screw B Memory Module Bay Cover 4 Press the locking tabs away from the sides of the memory module until the module pops up at an angle 5 Carefully pull the memory module out of its socket Store the module in a static free bag Removing the memory module ...

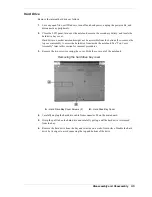
Страница 46: ...ess the hard drive from inside the notebook See Top Cover Assembly later in this section for removal procedures 3 Remove the two screws securing the cover Slide the cover out of the notebook Removing the hard drive bay cover A Hard Drive Bay Cover Screws 2 B Hard Drive Bay Cover 4 Carefully unplug the hard drive cable from connector P6 on the main board 5 Grasp the pull tab on the hard drive and c...

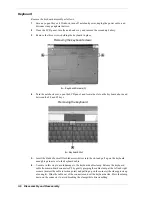
Страница 47: ...eyboard above and between the F8 and F9 keys Removing the keyboard A Keyboard Slot 5 Insert the blade of a small flat blade screwdriver into the slot and pull up on the keyboard enough to gain access to the keyboard cable 6 Use care in this step to avoid damage to the keyboard cable clamp Release the keyboard cable from main board connector P8 by gently grasping the cable clamp at the left and rig...

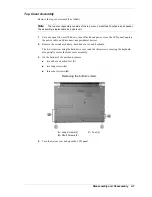
Страница 48: ...he LCD panel unplug the power cable and disconnect any peripheral devices 2 Remove the secondary battery hard drive cover and keyboard The two screws securing the hard drive cover and the three screws securing the keyboard also partially secure the front cover assembly 3 On the bottom of the notebook remove two adhesive backed feet C two long screws A three short screws B Removing the bottom screw...

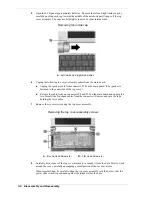
Страница 49: ...fastened to the underside of the top cover Release the cable locks on connectors P9 and P10 on the main board and unplug the two VersaGlide Touchpad cables from the connectors Remove and save the tape holding the two cables 7 Remove the six screws securing the top cover assembly Removing the top cover assembly screws A Round Head Screws 4 B Flat Head Screws 2 8 Carefully lift a corner of the top c...

Страница 50: ...he secondary battery hard drive cover keyboard and top cover assembly Note Be sure that the BIOS settings are recorded before removing the CMOS battery Any customized BIOS settings are lost when the CMOS battery is disconnected 3 Unplug the CMOS battery from connector P36 on the communication board see the following figure Removing the Mini PCI Board for connector location 4 Remove the CMOS batter...

Страница 51: ...tor P34 G Mini PCI Board B CMOS Battery H CMOS Battery Connector P36 C Main Board Cable Connector P41 I PCI Board Connector P32 under board D USB Connector Board J Power Switch Board E Mini PCI Board Cable Connector P43 K Main Board Cable Connector P51 F Communication Board Power Switch Board Remove the power switch board as follows 1 Save any open files exit Windows turn off notebook power close ...

Страница 52: ...lug the switch board cable from connector P16 on the main board 6 Remove the screws A B C on the figure fastening the main board to the base Removing the main board A Long Screws 2 E Switch Board Connector P16 B Short Black Screw 1 F LCD Panel Connector P2 C Short Silver Screw 1 G LCD Panel Connector P20 D Main Board 7 Carefully lift the main board off the base You might need to flex the sides of ...

Страница 53: ...or P32 Communication Board Remove the communication board as follows 1 Save any open files exit Windows turn off notebook power close the LCD panel unplug the power cable and disconnect any peripheral devices 2 Remove the secondary battery hard drive keyboard top cover assembly Mini PCI board USB connector board and main board 3 Unplug the following cables from the communication board see the prec...

Страница 54: ...and cable locations 5 On each side remove the screw securing the LCD panel hinge bracket to the base the following figure shows the left side hinge bracket and screw the right side is similar 6 Remove the LCD panel and place in a safe place Removing the LCD panel screw A Bracket Screw left side B LCD Panel Hinge Bracket left side Reassembly Reassembly is the reverse of the disassembly process Use ...

Страница 55: ...4 System Boards Mini PCI Board Power Switch Board USB Connector Board Main Board Communications Board ...

Страница 56: ...cover assembly The board is mounted on the right side of the notebook between the hard drive bay and the side of the base The following figure shows the board and its connectors and ports Power switch board A Main Board Cable Connector P51 C Headphone Jack P53 B Microphone Jack P52 USB Connector Board The USB connector board G7EWK A 2 3 is located under the top cover assembly The board is mounted ...

Страница 57: ...nnector P2 J Cable Connector P14 not used D USB Port P4 K Keyboard Cable Connector P8 E PC Card Bay L Cable Connector P19 not used F Power Switch Board Cable Connector P16 M Monitor Connector Port P15 G VersaGlide Touchpad Cable Connector P9 N USB Board Cable Connector P5 Communications Board The communications board G7EWK B A 1 3 is located under the top cover assembly The board is connected to t...

Страница 58: ...5 Illustrated Parts Breakdown Illustrated Parts Breakdown Parts List ...

Страница 59: ...ltraLite DayLite notebook computers illustrated parts breakdown IPB is shown in the following figure See the table Field Replaceable Parts List later in this chapter for a list of field replaceable unit FRU parts NEC Versa UltraLite DayLite Notebook illustrated Parts Breakdown ...

Страница 60: ...ssembly 9 Speaker Assembly 10 128 MB Memory Module 11 Communications Board G7EWKBA 1 3 12a 12b Top Cover VersaGlide Touchpad 13 Keyboard 14 LCD Panel shown for reference purposes only 15 Secondary Battery 3 Cell 16 Outer and Inner LCD Hinge Caps left and right 17 Mini PCI LAN Modem Board Modem Cable 18 Mini PCI LAN Modem Board LAN Cable 19 Mini PCI LAN Modem Board 20 Dummy PC Card 21 Power Switch ...

Страница 61: ...cklight LCD Panel DayLite Reflective LCD Panel DayLite Transflective LCD Panel UltraLite Backlight LCD Cable DayLite Reflective LCD Cable DayLite Transflective LCD Cable UltraLite Backlight Inverter DayLite Transflective Inverter Speaker Bracket Speaker Cable Auto Adapter Auto Adapter DC Cable Microphone and Cable Assembly Item not shown on IPB ...

Страница 62: ...6 Preventive Maintenance Cleaning the Exterior Cleaning the Interior Protecting the Hard Disk Drive Maintaining the Secondary Battery ...

Страница 63: ...If necessary use a small soft bristle brush to clean between the keys 5 Periodically use a head cleaning diskette in the USB diskette drive to prolong the life of the drive and to help maintain data integrity Do not use abrasive head cleaning kits kits without cleaning solution Cleaning the Interior Clean the interior of the notebook as follows 1 Remove the front cover and VersaGlide assembly keyb...

Страница 64: ...d the battery for evidence of corrosion and oxide build up Observe the following precautions when handling the secondary battery Observe the safety precautions outlined under Secondary Battery Handling in Section 2 System Configuration and Setup Do not drop the secondary battery or subject it to excessive shock and vibration Do not expose the secondary battery to direct sunlight moisture chemical ...

Страница 65: ...7 Troubleshooting Problem Checklist Startup Problems Diagnostics ...

Страница 66: ...d into a working electrical outlet Test the outlet by plugging in a lamp or other electrical device Check that all cables are securely plugged in Check that the display setting is configured correctly Check that the display s brightness control is adjusted properly If using battery power check that the secondary battery is properly inserted and fully charged Troubleshooting Problem What to Do The ...

Страница 67: ...artup Problems The notebook displays an invalid configuration error message at power on and when there are the following conditions current configuration information doesn t match configuration information stored in Setup such as when an internal option is added notebook loses configuration information If either condition is true the notebook displays an invalid configuration information message T...

Страница 68: ...ory on the main board is different than the amount in CMOS RAM Run Setup to reset the value CMOS Time and Date Not Set Run Setup to set the time and date Diskette Boot Failure The boot diskette is corrupt It cannot be used to boot the notebook Use another boot disk and follow the on screen instructions DMA Error Error in the DMA controller Replace the CMOS battery DMA 1 Error Error in the first DM...

Страница 69: ...and try rebooting If you still get a beep code go to the section If You Need Assistance at the end of this chapter Beep Codes are listed in the following table Beep Codes Number of Beeps Error Description 1 Refresh Failure The memory refresh circuit on the main board is faulty 2 Parity Error Parity error in the first 64 KB of memory 3 Base 64 KB Memory Failure Memory failure in the first 64 KB 4 T...

Страница 70: ...y battery is the correct type charged properly and is inserted correctly Power LED is on but no display and notebook does not turn on Check if the memory module is inserted properly Check that the CPU is inserted properly Replace the memory module CPU or main board Display on the LCD can not be read Adjust the brightness Check if the installed driver is correct and resolution is set according to t...

Страница 71: ... all internal devices Replace the main board USB diskette drive does not work Check if the diskette drive option is set properly in BIOS Setup Check if the diskette USB cable is connected properly Check that the diskette is not faulty Replace the USB diskette drive Replace the main board Hard drive malfunction Check if the hard drive is set properly in BIOS Setup Check that the hard drive interfac...

Страница 72: ...er is properly installed Check if the VersaGlide Touchpad cable is firmly connected to P18 on the main board Replace the front panel and VersaGlide Touchpad assembly Replace the main board USB port does not work Check if the USB controller in BIOS Setup is enabled Check the USB device connection Unplug and reseat the device Check if the USB port driver and the USB device driver are installed Repla...

Страница 73: ...8 NEC Computers Information Services Service and Support Functions Technical Support ...

Страница 74: ...can use these services to obtain information about the system at any time day or night seven days a week NEC Computers Web Site If you have access to the Internet via a network or a modem connection you can access the NEC Computers web site You can do this through a commercial online service or through your Internet account The NEC Computers web site contains general information about NEC Computer...

Страница 75: ...e a response to your questions within one business day NEC Computers Technical Support Services NEC Computers also offers direct technical support through its Technical Support Center NEC Computers technical support is for U S and Canadian customers only international customers should check with their sales provider Direct assistance is available 24 hours a day 7 days a week Call the NEC Computers...

Страница 76: ...9 Specifications System Components Memory Map Interrupt Controllers ...

Страница 77: ...em memory approximately 16 MB of total system memory shared with video Cache Memory L1 64 KB code and 64 KB data 8 16 way set associate write back data L2 512 KB built in 4 way operates at full core speed 4 GB cacheable range Read Only Memory 2 MB x 8 bit Flash ROM Calendar Clock Year month day hour minute second maintained by internal back up battery Input Output I O Facilities Integrated industr...

Страница 78: ...tive 10 4 inch high resolution active matrix transmissive reflective XGA 1024 x 768 resolution TFT display Colors 32 bit Graphics ATI RAGE MOBILITY M graphics accelerator with 4 MB VRAM and 2X AGP graphics capability Keyboard Membrane 86 keys with country specific QWERTY key layout Function keys 12 keys Cursor Control keys 8 functions on 5 keys arrow keys arranged in inverted T layout Numeric keyp...

Страница 79: ... PC Card Slots One 32 bit card slot for a Type II card 5 V or 3 3 V interface 32 bit CardBus support External 24X Maximum 10X Minimum Variable Speed USB CD ROM Drive Type 5 inch CD ROM Pack Average Data Transfer Rates 1545 KB second to 3600 KB second Burst Transfer Rate 16 7 MB second PIO mode4 DMA mode Average Access Time 190 ms Random 350 ms Fullstroke Photo CD Compatibility Single Session Multi...

Страница 80: ...Lithium Polymer UltraLite Reflective 12 cell Lithium Polymer Secondary Battery 3 cell Lithium Ion 10 9 volts 2000 mAh Recharging Time Approximately 8 hours when the system is on 4 5 hours when off Dimensions Width 10 4 in 264 mm Depth 8 3 in 211 mm Height 1 06 in 27 mm Weight 3 3 lb 1 39 kg without external drives Recommended Environment Operation Temperature 41 F to 95 F 5 C to 35 C Relative Humi...

Страница 81: ...FFFE 0000H FFFF FFFFH 128K Upper ROM System and Video BIOS FFFC 0000H FFFD FFFFH 128K Lower ROM Power Management BIOS FFFA 0000H FFFB FFFFH FFF8 0000H FFF9 FFFFH 128K 128K New Extended Area FFF0 0000H FFF7 FFFFH 512K 1MB Extended BIOS 512KB 0A00 0000H 0BFF FFFFH Up to 176MB Extended Memory 000F 0000H 000F FFFFH 000E 0000H 000E FFFFH 64K 64K System BIOS 128K 000A 0000H 000B FFFFH 128K Video Buffer ...

Страница 82: ...th a cascade connection of 8259INTC x 2 The table shows default interrupt level assignments 0 through 15 in order of decreasing priority Priority Name Device 0 IRQ00 Internal Timer 1 1 IRQ01 Keyboard 2 IRQ02 PIC 3 IRQ08 Real time Clock 4 IRQ09 SCI CardBus Modem LAN 5 IRQ10 Video 6 IRQ11 Sound 7 IRQ12 Mouse 8 IRQ13 Coprocessor 9 IRQ14 IDE Controller 10 IRQ15 Free 11 IRQ03 or IRQ04 Free Infrared Por...

Страница 83: ...Bps B base RAM Area of system memory between 0 and 640 kilobytes available to the user for operating system and application programs BIOS Basic Input Output System A collection of primitive computer routines usually burnt into ROM that controls the real time clock keyboard disk drives video display and other peripheral devices bit Binary digit The smallest unit of computer data bits per second bps...

Страница 84: ...een image using tiny dots called pixels See also LCD cursor A movable image on the display screen that indicates where the next entered data appears D diskette A thin flexible platter coated with a magnetic material for storing information diskette drive A magnetic drive that writes on and retrieves data from a diskette DSTN Double Scan Super Twisted Nematic A type of technology used in some NEC V...

Страница 85: ...t Drive Electronics A hard disk drive type that has controller electronics built into the drive and delivers high throughput interface A connection that enables two devices to communicate interrupt A special control signal from an I O device that diverts the attention of the microprocessor from the program to a special address K kilobyte KB 1024 bytes L LAN Local Area Network LCD Liquid Crystal Di...

Страница 86: ...line N nonvolatile memory Storage media that retains its data when system power is turned off Nonvolatile memory in the NEC Versa is a complementary metal oxide semiconductor CMOS chip which is backed up by an internal battery The backup battery preserves the clock calendar data and system configuration parameters stored in CMOS See volatile memory O operating system Set of programs that manage th...

Страница 87: ...ed into the port to attach the device to the computer processor In a computer a functional unit that interprets and executes instructions prompt A special symbol indicating the beginning of an input line Also a message that appears on the screen indicating that the user must take a certain action Q QWERTY The QWERTY keyboard designed in the 1800s for mechanical typewriters refers to the first six ...

Страница 88: ...olution of 1024x 768 with up to 256 colors displayed simultaneously system board The main printed circuit board inside the system unit into which other boards and major chip components such as the system microprocessor are connected T TFT Thin Film Transistor A type of NEC Versa LCD color screen that supports 256 colors and provides exceptional screen display V VersaGlide A small touch sensitive p...

Страница 89: ...omputer without turning off the power through keyboard input pressing Ctrl Alt and Del keys simultaneously or the reset button The system returns to an initial or arbitrarily selected condition write To record or store information to a storage device ...

Страница 90: ...connector board 4 2 C Cache memory 9 2 Caps lock 1 4 Charging battery 2 5 Chipset features 1 10 Cleaning notebook exterior 6 2 notebook interior 6 2 CMOS battery 1 9 removal 3 9 Communication board removal 3 12 Communications board layout 4 3 Component features 1 9 Connecting AC adapter 2 2 Control keys 1 5 Cursor control keys 1 5 Customize Utility NEC 2 19 D Determining battery status 2 4 Diagnos...

Страница 91: ...2 13 Microphone 1 3 Mini PCI board layout 4 2 removal 3 10 Monitor port 1 7 N NEC VersaGlide Touchpad 1 3 NEC Computers email support 8 3 Technical support services 8 3 web site 8 2 NEC Customize Utility using 2 19 Num lock 1 4 Numeric keypad 1 5 O Operating status LEDs 1 3 P Partition Only restore 2 22 Parts list FRU 5 3 PC Card Slot 1 8 Ports DC power 9 3 headphones 9 3 infrared 9 3 LAN 9 3 micr...

Страница 92: ...battery 9 6 Mini PCI LAN modem combo 9 5 PC card slots 9 5 power 9 5 read only memory 9 2 secondary battery 9 6 speaker 9 3 system processor 9 2 Startup problems 7 3 Switch DIP 2 16 System dimensions 9 6 feet 1 9 weight 9 6 System features back 1 7 bottom 1 8 front 1 2 1 6 left 1 7 right side 1 7 System memory 9 2 T Technical support 8 2 Tools required disassembly 3 2 Top cover assembly removal 3 ...

Страница 93: ...mful interference to radio or television reception which can be determined by turning the equipment off and on the user is encouraged to try to correct the interference by one or more of the following measures Reorient or relocate the receiving antenna Increase the separation between the equipment and receiver Connect the equipment to an outlet on a circuit different from the one to which the rece...

Страница 94: ... y a replacement incorrect de la batterie Remplacer uniquement avec une batterie du même type ou d un type recommandé par le constructeur Mettre au rébut les batteries usagées conformément aux instructions du fabricant Battery Disposal The secondary battery is made of Lithium Ion Li Ion and the CMOS battery is made of Lithium Contact your local waste management officials for other information rega...

Страница 95: ...NEC Computers Inc 15 Business Park Way Sacramento CA 95828 819 200725 000 8 2001 819 200725 000 ...

Отзывы: