background image

19 

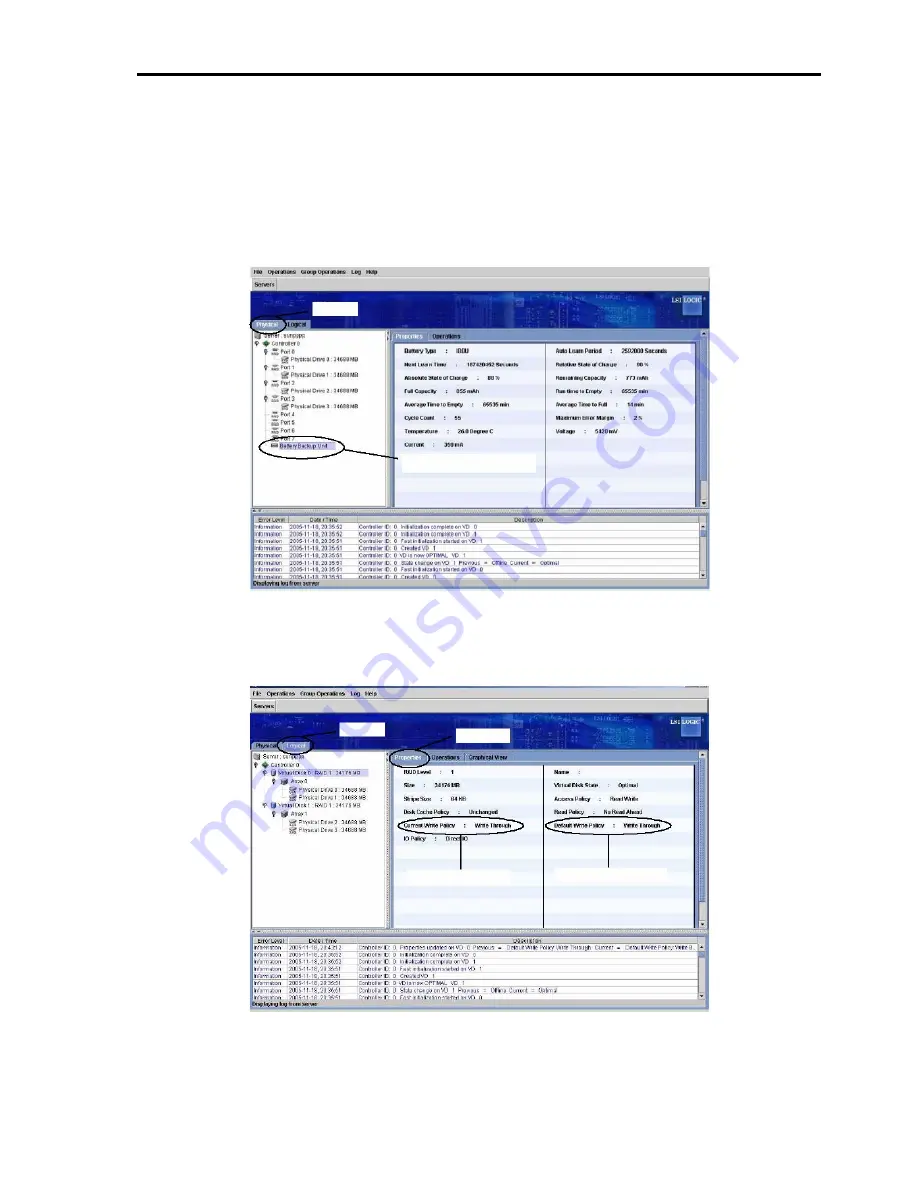
2. Utility Check 

After the installation, check the connections and the settings of the BBU using the disk array controller 
management utility "MegaRAID Storage Manager

TM

" (called MSM hereafter). 

1. 

Boot the OS and start MSM. 

2. 

Make sure that the "Battery Backup Unit" icon appears in the 

Physical tab

 of MSM. 


Physical 

"Battery Backup Unit" icon

3. 

Select the 

Logical tab

 in the left frame of the window, and then select each "Virtual Disk" under the 

Logical tab. 

4. 

Select the 

Properties tab

 in the right frame of the window, and confirm the setting for Default Write 

Policy. 


Logical 

Properties

Default Write Policy 

Current Write Policy

Содержание BBU

Страница 1: ... User Guide SA2500 WA2500 Battery Backup Unit for 8480E and 8408E DACs ...

Страница 2: ...This page is deliberately left empty ...

Страница 3: ... product However actual performance of each product is dependent upon factors such as system configuration customer data and operator control Since implementation by customers of each product may vary the suitability of specific product configurations and applications must be determined by the customer and is not warranted by NEC Computers Trademarks NEC ESMPRO NEC DianaScope NEC MWA and ExpressBu...

Страница 4: ...nd safely Read the guide thoroughly before handling it Also refer to this manual when you want to know how to use it or if some malfunction occurs Keep the manual handy for future reference We recommend you carefully read the Notes on Use section before handling the disk array controller For more information on the Disk Array Controller SAS to which the BBU is connected refer to the Disk Array Con...

Страница 5: ... that may cause minor personal injury including burns or property damage Precautions against hazards are presented with the following symbols The individual symbols are defined as follows Attention This symbol indicates a hazard An image in the symbol illustrates the hazard type Example Precaution against electric shock Prohibited Action This symbol indicates prohibited actions An image in the sym...

Страница 6: ...y Indicates that improper use may cause fumes or fire Prohibited Actions Indicates a general prohibited action that cannot be specifically identified Do not disassemble repair or modify the server Doing so may cause an electric shock or fire Mandatory Action Unplug the power cord of the server Not doing so may cause an electric shock or fire Indicates a mandatory action that cannot be specifically...

Страница 7: ...been used in the above conditions Do not use the product if you are aware of any suspect smoke odour or oise n If smoke odour or noise is present immediately switch off the unit and disconnect the power plug from the outlet Contact your sales agent Using the product in such conditions may cause a fire Keep needles or metal objects away from the server Do not insert needles or metal objects into th...

Страница 8: ... away from the power cord Do not twist the power cord Do not place any object on the power cord Do not bundle power cords Do not alter modify or repair the power cord Do not secure the power cord with staples or equivalents Do not use a damaged power cord Replace a damaged power cord with a new one of the same specifications Ask your sales agent for replacement Do not hold the power plug if your h...

Страница 9: ...resulting in a fire Also observe the following notes on using and connecting an interface cable Do not step on the cable Do not place any object on the cable Do not use the server with loose cable connections Do not use any damaged cable connector Make sure the cable is securely locked with the relevant screws Do not use or store the product in the place where corrosive gases exist Make sure not t...

Страница 10: ...use an electric shock even if the server is off powered CAUTION Make sure to complete installation Always connect the DC cable and or interface cable firmly An incompletely onnected cable may cause a contact failure resulting in smoke or fire c During Operation CAUTION Avoid contact with the server during thunderstorms Disconnect the power plug from the outlet when a thunderstorm is approaching If...

Страница 11: ... use the BBU If you ignore these notes your assets including important data and or other devices may be damaged The BBU is an additional battery exclusively designed for the Disk Array Controller SAS for which you purchased it It cannot be connected to any other disk array controllers The BBU is an extremely sensitive electronic device Take all the necessary precautions to avoid electro static dam...

Страница 12: ...en operating the product Check Items to be checked when operating the product Tips Information useful or convenient for you In the Package Check the package contents The package contains various accessories as well as the product itself Check with the packing list and make sure you have everything and that individual components are not damaged If you find any missing or damaged components contact ...

Страница 13: ...rasing the data To transfer or sell any software application that comes with the product to a third party the following requirements must be satisfied Transfer all the provided software applications and keep no backup copies Uninstall software applications before transferring the product Recycling and Disposal The battery pack of the BBU is equipped with a recyclable lithium ion battery To enable ...

Страница 14: ...12 2 Specifications 12 3 Installation Flow 13 4 Checking the Contents in the Package 13 5 Names and Functions of Sections 14 6 Installation Notes 15 Chapter 2 Installing the BBU 16 1 Installation Procedure 16 1 1 Checking the Cable 16 1 2 Putting Setup Date Label 17 1 3 Installing the BBU in the Disk Array Controller 17 1 4 Connecting the Cable 18 2 Utility Check 19 Chapter 3 Operation and Mainten...

Страница 15: ...antaneous power interruption in the WriteBack mode Backup up to 72 hours of the data in the disk array controller cache memory Improvement of reliability in WriteBack mode Use of rechargeable NiMH battery 2 Specifications Item Specifications Remarks Maximum data backup time 72 hours Full charge Outer dimension mm 39 width 133 depth 9 height Weight About 0 10 kg Battery capacity 4 22 Wh Normal oper...

Страница 16: ...ibes the connection checking procedure after the battery installation and the setting of the write cache mode Chapter 2 1 Installation Procedure Describes how to install the BBU 4 Checking the Contents in the Package The package contains the following items Check the contents to confirm you have all the necessary items before starting the installation job No Item Qty Remarks 1 Additional DAC batte...

Страница 17: ...ttery cable Used to connect the battery cell to the memory module 3 Memory connector Insert the connector into the memory slot of the disk array controller 4 Recycle and caution label This label is stuck on the battery pack It displays warning messages the battery type and the recycle symbol 5 Memory Memory module connected to the battery cell ...

Страница 18: ...install the BBU in the disk array controller Stick the label on the BBU surface for future reference 6 Installation Notes Do not lay the BBU on a metallic plate including the chassis of the server Do not hold the BBU if your hands are wet Failure to follow these recommendations could cause a short circuit on the battery ...

Страница 19: ...the installation of the BBU in the External SAS HDD Disk Array Controller 1 Installation Procedure Install the BBU in the disk array controller as described in the following procedure Check Before starting the installation job refer to the User Guides of the disk array controller and of the server 1 1 Checking the Cable Make sure that the cable is removed from both the battery cell and the memory ...

Страница 20: ... years we cannot guarantee that the maximum data backup time 72 hours can still be achieved Replace the battery pack as described in Chapter 3 Operation and Maintenance 1 3 Installing the BBU in the Disk Array Controller Install the BBU in the disk array controller as described in the following procedure 1 Open the lever securing the memory module of the disk array controller 2 Remove the memory m...

Страница 21: ...18 1 4 Connecting the Cable Connect the cable to the battery cell and the memory module ...

Страница 22: ... start MSM 2 Make sure that the Battery Backup Unit icon appears in the Physical tab of MSM Physical Battery Backup Unit icon 3 Select the Logical tab in the left frame of the window and then select each Virtual Disk under the Logical tab 4 Select the Properties tab in the right frame of the window and confirm the setting for Default Write Policy Logical Properties Default Write Policy Current Wri...

Страница 23: ...each Virtual Disk under the Logical tab 6 2 Select the Set Virtual Disk Properties under the Operations tab in the right frame of the window and change the Default Write Policy to Write Back 6 3 Repeat Steps 6 1 and 6 2 for all Virtual Disk under the Logical tab to change their Default Write Policy to Write Back Logical Operations Set Virtual Disk Properties Default Write Policy ...

Страница 24: ...d as Write Through on MSM You can check the charge status of the battery cell by selecting Relative State of Charge or Absolute State of Charge in Physical tab Properties on MSM If you changed the Write Policy from Write Through to Write Back MSM displays the correct message but the Windows Event Log application indicates that the change was made contrarily Tips For more information on the Write P...

Страница 25: ...luding voltage and temperature as a preventive maintenance You can use MegaRAID Storage Manager MSM to do so 2 2 BBU Life The BBU is equipped with a backup battery The battery life is about 2 years and varies depending on the environment of use and operating conditions Replace the battery with a new one after about two years starting from the installation of the BBU refer to the battery label put ...

Страница 26: ...U surface See Section 1 2 for details Remove any existing Setup Date label or make sure to stick the latest on top of the others Fill the year and month Example Y 2005 M 12 2 Exit from all applications and shut down the OS 3 Power off the server and remove all the power cords connected to the power unit from the receptacles 4 Remove the side cover as described in the server User Guide 5 Disconnect...

Страница 27: ...nce the OS has booted check whether the BBU is recognized correctly Refer to 2 Utility Check in Chapter 2 Installing the BBU Notice The battery cell you have purchased is not charged at all In this case the Current Write Policy in the Properties of the Logical tab is indicated as Write Through on MSM You can check the charge status of the battery cell by selecting Relative State of Charge or Absol...

Страница 28: ...This page is deliberately left empty ...

Страница 29: ... ...

Отзывы: