4 | Display User Interface
Display Menu
To open the Display Menu, press the
MENU
button. The Picture Menu displays by default, with details of
the current video input listed across the top of the menu above the menu tabs.
To select other menus, press the
or
buttons to highlight the menu tab, then press the
SCROLL
button to enter the menu.
To adjust a parameter, press the
SCROLL
button to move the row selection down to it, and then press the
or
buttons to adjust the parameter or to select a setting. Parameter adjustments are applied in real time while
changing values or settings.
The Display Menu automatically closes 30 seconds after the last action. It can also be closed by pressing the
MENU
button.
Note:
Grayed out descriptions indicate parameters not available for the current signal or input configuration.
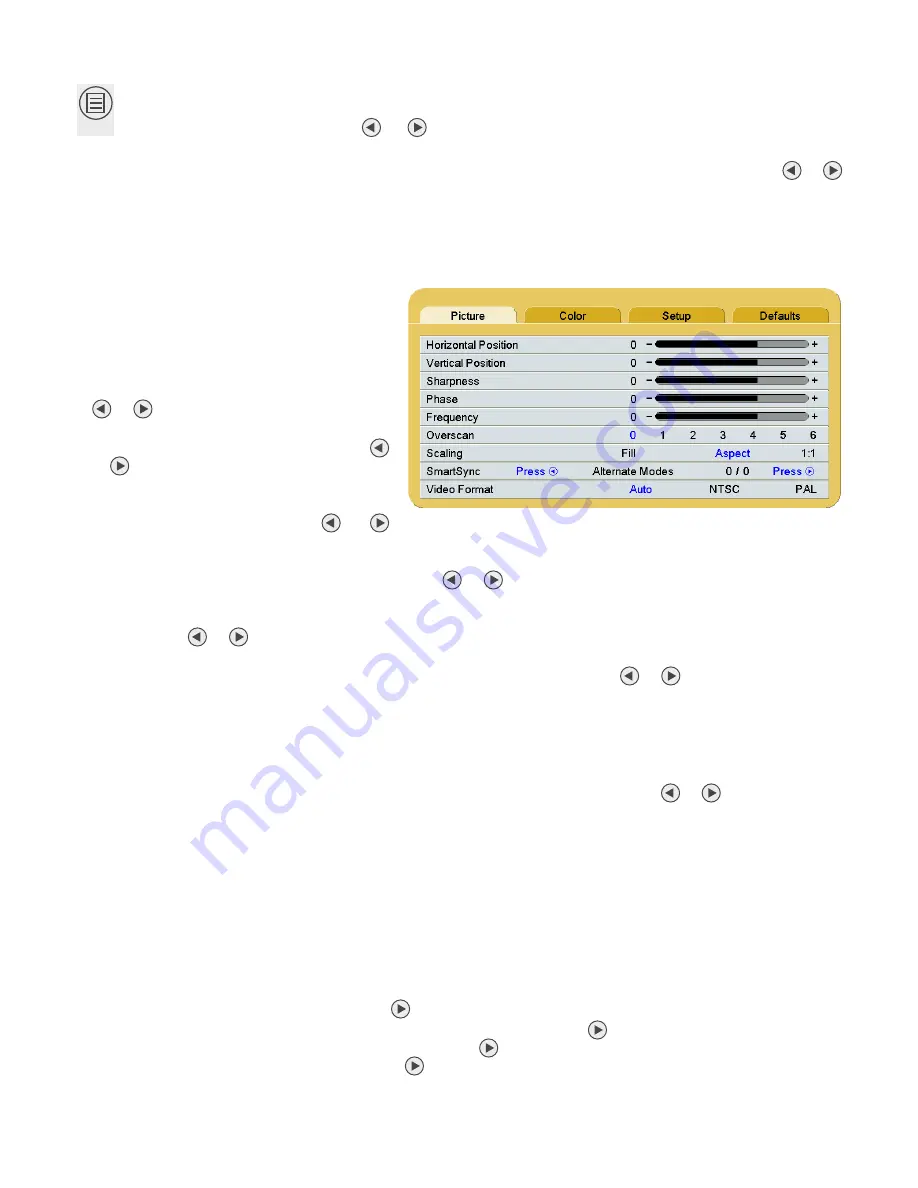
Picture Menu
Note:
Picture Menu display only those
parameters that apply to specific input
signals.
Horizontal Position
(All except DVI-D)
To horizontally center the image, press the
or
buttons.
Vertical Position
(All except DVI-D)
To vertically center the image, press the
or
buttons.
Sharpness
To adjust sharpness (edge enhancement) of
the displayed image, press the
or
buttons.
Phase
(VGA/RGBS, YPbPr only)
To adjust phase of the display pixel clock, press the
or
buttons.
Frequency
(VGA/RGBS, YPbPr only)
To adjust frequency of the display pixel clock until the image fills the screen horizontally, first set
Scaling
to
Fill
,
and press the
or
buttons.
Overscan
(Video)
Parameter enabled when the input is 16:9, 480P, 576P, or interlaced. Press the
or
buttons to select.
0
: The image is displayed at a size that fills the screen without losing any video information. Image could be
displayed as letterboxed, with black bars top and bottom or left and right.
1
,
2
,
3
,
4
,
5
or
6
: Incrementally enlarges and crops the centered image. As the image becomes larger, video
information is lost on all sides.
Scaling
(Graphics)
Parameter enabled when input signal is not 16:9, 480P, 576P, or interlaced. Press the
or
buttons to select.
Fill
: Expands the video image to fill the entire screen. The aspect ratio may not be accurately displayed.
Aspect
: Expands the video image until its largest dimension fills the screen while retaining the aspect ratio.
The image may be displayed as letterboxed, with black bars top and bottom or left and right.
1:1
: Displays the video data in its native size and aspect ratio. Image with aspect ratios different from that of
the display are letterboxed, with black bars top and bottom or left and right.
SmartSync™/Alternative Modes
(VGA/RGBS, YPbPr only)
NDS proprietary SmartSync technology examines incoming signals to automatically display the video image
in its proper format.
Alternative Modes are used to manually distinguish between modes whose timing characteristics are very
close.
SmartSync:
To enable SmartSync, press the
button.
Alternative Modes:
To make an Alternative Modes adjustment, press the
button. After selecting Alternative
Modes. the mode changes incrementally each time the
button is pressed until the selected mode equals
the maximum available. The next press of the
button restores the initial mode.
MENU
Содержание EndoVue 19"
Страница 1: ...EndoVue USER MANUAL ENGLISH ...
Страница 2: ......
Страница 4: ......
Страница 22: ...10 Connector Panel Overview ...
Страница 26: ...14 Troubleshooting ...
Страница 30: ...18 Electromagnetic Compatibility Tables ...
Страница 31: ......


