7
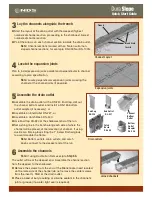
Install the rebar for each channel section assembled
n
Insert rebar into the Leveloc rebar support. Drive rebar straight into the ground about 6” to 12” or until rebar
is firmly held in place.
n
Set channel to desired grade level and align for straightness using string line.
n
Continue attaching pre-assembled channel sections and install rebar until run is complete.
n
Proceed with final adjustments for grade level and straightness using tie wire or self-tapping screws; secure
rebar to the LeveLoc rebar support.
3
Wire support
Screw support
6A
If using Ductile Iron Frame - assemble the channels
The outlet will be at the deepest end. Assemble the channel section from the deepest to the shallowest.
n
Remove all Blank Grate Inserts from the channel sections.
n
Place a bead of butyl caulking or silicone sealant in the joint or groove (if a water tight seal is required).
n
Snap the channel sections together in multiples of two.
n
Place the pre-assembled channel sections in the trench beginning with the outlet end.
n
Secure the Ductile Iron Frames to the channel using the DS-123 screws. Install iron grates using DS-225 screws.
n
Apply a covering or tape to the grates for protection and to prevent concrete from entering the channel.
Quick Start Guide
n
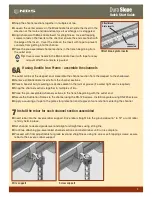
Snap the channel sections together in multiples of two.
n
Loosen the center screws on the Blank Grate Insert; slide the Insert in the
direction of the male end (downstream) so it overhangs or is staggered.
n
Align channel with Blank Grate Insert for straightness. Use self tapping
screws to fasten the Inserts to the channel; ensure the ends are flush with
the edge of the Insert. Cover the slots on the Insert with tape to prevent
concrete from getting into the channel.
n
Place the pre-assembled channel sections in the trench beginning from
the outlet end.
Tip:
Cover screw heads in the Blank Grate Insert with tape for easy
removal after the concrete is poured.
Offset blank grate inserts
Channels
connected
Offset Blank
Grate Inserts


