5
Assemble the drain outlet
n
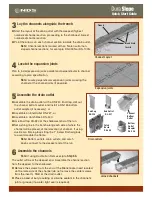
Assemble the drain outlet with a DS-224 End Cap, drill out
the channel bottom outlet, and install a DS-126 bottom
outlet adapter (if necessary), or
n
Assemble an End Outlet DS-227, or
n
Assemble a Catch Basin DS-340.
n
Use End Cap DS-224 at the shallowest end of the run.
n
Set a string line in the trench along each side of where the
channel will be placed, at final elevation of channel. If using
ductile iron frame, place string line 1" below finished grade
to accommodate the frame.
Note:
Bottom outlets, drain outlets, and catch
basins connect to the deepest end of the run.
4
Locate the expansion joints
Plan to install expansion joints parallel and perpendicular to channel
according to plan specification.
Note:
Locate perpendicular expansion joints crossing the
channel at the channel joints (if possible).
Drain outlets
Expansion joints
End Cap
DS-224
End Outlet
DS-227
Catch
Basin
DS-340
Bottom
Outlet
Adapter
DS-126
Channel
Bottom
Outlet
Quick Start Guide
3
Lay the channels alongside the trench
n
Start the layout at the drain outlet with the deepest (highest
numbered) channel section, proceeding to the shallowest (lowest
numbered) channel section.
n
Point the arrows on each channel section towards the drain outlet.
Note:
Channel sections marked with an N are neutral non-
sloped channel sections; for example, DS-090N or DS-100N.
Channel Layout
Blank Grate
Inserts
Trench
6
Assemble the channels
Note:
If using Ductile Iron Frames skip to
Step 6A
.
The outlet will be at the deepest end. Assemble the channel section
from the deepest to the shallowest.
n
Remove the screws from the end of the Blank Grate Insert located
on the male side of the channel (do not remove the center screws
from the insert). Start at the drain outlet.
n
Place a bead of butyl caulking or silicone sealant in the channel’s
joint or groove (if a water tight seal is required).
Joined channels


