background image

Installation Notes and Restrictions

2-33

Installing the Power Supply

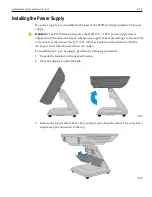
If a power supply is not installed in the base of the P1535 terminal, install a 19 V power
supply.

Caution:

The P1535 terminal requires the NCR 19 V or 24 V power supply that is

shipped with the terminal. Use of other power supply may cause damage to the unit. Do
not connect or disconnect the 19 V or 24 V Power Cable from the terminal with the
AC Power Cord still connected to an AC outlet.

To install the 19 V power supply, perform the following procedure:

1. Unpack the terminal in the desired location.

2. Pivot the display toward the back.

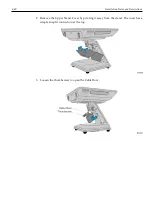
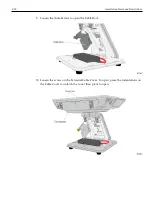
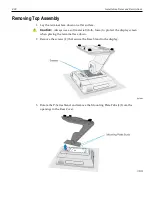
3. Remove the Upper Stand Cover by pivoting it away from the stand. The cover has a

simple snap fit connection at the top.

Содержание P1535

Страница 1: ...USER GUIDE NCR P1535 POS 7761 Release 1 1 BCC5 0000 5054 Issue C...

Страница 2: ...h NCR NCR s copyright notice must be included It is the policy of NCR Corporation NCR to improve products as new technology components software and firmware become available NCR therefore reserves the...

Страница 3: ...y replaced Replace only with the same or equivalent type as recommended by the manufacturer Discard used batteries according to the manufacturer s instructions Attention Il y a danger d explosion s il...

Страница 4: ...ll not fit the outlet have the proper outlet installed by a qualified electrician Improper connection of the equipment grounding conductor can result in a risk of electric shock The conductor with ins...

Страница 5: ...amages If you do not have access to a computer you may leave a voice message at 1 800 528 8658 USA or International 1 770 623 7400 When leaving a message please provide a phone number and or an email...

Страница 6: ...ocation in the store Description of the problem including any system error codes error condition or guidance to the area of failure The NCR Agent will provide you with a work order number which serves...

Страница 7: ...ions 14 Chapter 2 Hardware Installation Installation Restrictions 15 Installation Notes 16 Cable Restraint 16 Footprint 16 Power 16 Moisture 16 Touch Screen Cleaning 16 Magnetic Strip Reader MSR Clean...

Страница 8: ...rs 27 RJ12 Serial Port 28 RJ45 Serial Port 29 LAN 30 USB 3 0 Compliant Ports 31 Cash Drawer CD Port 32 Installing the Power Supply 33 Removing Top Assembly 38 Terminal with Expansion 39 Appendix A Pro...

Страница 9: ...2016 First Issue B July 2016 Updated for Release 1 1 Removed reference to VESA Mount C May 2017 Added the following updates Quickserve 24V PUSB 12V PUSB Dual CD 24V Expansion USB MSR with NCR Key And...

Страница 10: ...ood service environment The terminal utilizes a next generation Intel Celeron Processor N3160 Quad core 2 24 GHz The highly efficient processor offers great performance but with lower power consumptio...

Страница 11: ...characteristics for user as well as significantly increased bulb life for main display Integrated projected capacitive screen controller Flat front zero bezel modern design Capacitive screen offers g...

Страница 12: ...display Retail and Hospitality Hardened Design The retail and hospitality hardened design offers a spill resistant high impact enclosure that is built to withstand tough in store conditions with conti...

Страница 13: ...eading waiter keys Dallas and Addimat in one design Wireless Adapter Card Wireless network connection card in a PCIe half mini card form factor Wi Fi certified for 2 4 GHz and 5 GHz band WPA and WPA2...

Страница 14: ...Product Overview 1 5 Mounting Configurations...

Страница 15: ...1 6 Product Overview Expansion Options...

Страница 16: ...Product Overview 1 7 Customer Display Options...

Страница 17: ...1 8 Product Overview Right Side Features Port A...

Страница 18: ...Product Overview 1 9 Left Side Features Port B...

Страница 19: ...e Polycarbonate ABS impact resistant High Strength Blend Environmentally Sealed Camera High Speed USB 2 0 1920 x 1080 FHD 2 0 M Wireless Dual Stream Dual Band 802 11 ac a b g n 2x2 2 4 5 GHz Integrate...

Страница 20: ...Powered Port 24V Expansion B Serial Port 2 RJ12 12V USB Port USB 2 0 5V Expansion C Serial Port 1 RJ45 12V RTS and 5V DTR Power Over Ethernet PSE RJ45 Exar 10 100Mb 48V Typical Power IEEE 802 3af SIM...

Страница 21: ...37 mm x 375 mm 12 in x 17 2 in x 14 7 in Base Dimension L x W P Series Stand 229 mm x 235 mm 9 in x 9 25 in Tilt Angle 3 to 111 from vertical Terminal Weight 7 39 kg 16 3 lbs Note Varies by configurat...

Страница 22: ...cessed when the cable cover is opened or closed Bezel LED The Front Panel Bezel LED has multiple functions as defined below Color Description Black System OFF or No power Blue System ON Yellow System...

Страница 23: ...1 14 Product Overview Label Locations...

Страница 24: ...t locate the NCR P1535 POS where the power cord can be walked on Use a grounding strap or touch a grounded metal object to discharge any static electricity from your Body before servicing the NCR P153...

Страница 25: ...ply is a 24V 150 W external power brick rated for 110 V and 240 V auto sensing 50Hz or 60Hz Source power is drawn from a regular AC wall outlet The electronics are universal that is they will function...

Страница 26: ...y This works best and avoids chemicals which may damage the material An alternative is to use any type of household cleaner such as Formula 409 Fantastic Windex etc Use a soft rag cotton swab or somet...

Страница 27: ...e following when considering the terminal workplace Avoid direct glaring and reflective glaring light Locate the terminal in a controlled luminance surrounding When installed next to windows orient th...

Страница 28: ...Series Stand 7761 F172 Wall Mount 7761 K001 7761 K003 Space Pole Mount 1668 K104 7668 K105 1668 K106 The NCR P1535 POS comes fully assembled and ready to use All that is required is to connect the LAN...

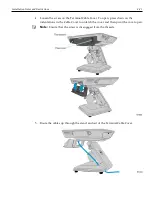
Страница 29: ...Installation Notes and Restrictions 2 Remove the Upper Stand Cover by pivoting it away from the stand The cover has a simple snap fit connection at the top 3 Loosen the thumbscrew to open the Cable D...

Страница 30: ...e Terminal Cable Cover To open press down on the indentations in the Cable Cover to unlatch the cover and then pivot the cover open Note Ensure that the screw is disengaged from the threads 5 Route th...

Страница 31: ...l cables to the I O Panel Note SIM cards must be inserted while the terminal is powered off 7 Install the Terminal Cable Cover and tighten thumbscrew to secure cover 8 Close the Cable Door and tighten...

Страница 32: ...on the bottom panel The other end of the 10 100 1000 Ethernet cable should be connected into your network hub Note You may need to consult with your business IT information technology representative t...

Страница 33: ...2 24 Installation Notes and Restrictions Installing a Transaction Printer Connect the printer to the USB port on the terminal...

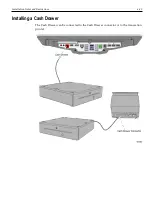
Страница 34: ...Installation Notes and Restrictions 2 25 Installing a Cash Drawer The Cash Drawer can be connected to the Cash Drawer connector or to the transaction printer...

Страница 35: ...he terminal or transaction printer cash drawer connector There are two versions of the Dual Cash Drawer Cable 1432 C516 0009 24 V 1432 C517 0009 12 V Note When connecting a single 12 V legacy cash dra...

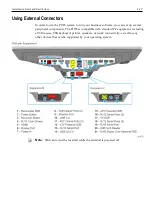
Страница 36: ...software you can set up several peripheral components The P1535 is compatible with standard PC equipment including a USB mouse USB keyboard printer speakers network connectivity as well as any other...

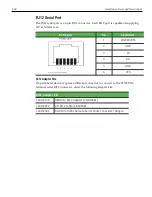
Страница 37: ...in Signal Name 1 POWER RTS 2 GND 3 TX 4 RX 5 GND 6 CTS RJ12 Adapter Kits If a peripheral device requires a different connector to connect to the P1535 POS terminal serial RJ12 connector order the foll...

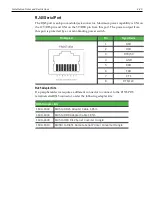
Страница 38: ...r switch Pin Diagram Pin Signal Name 1 DSR 2 DCD 3 DTR 5V 4 GND 5 RXD 6 TXD 7 CTS 8 RTS 12V RJ45 Adapter Kits If a peripheral device requires a different connector to connect to the P1535 POS terminal...

Страница 39: ...tegrated magnetic module and 2 LEDs The LED on the left is yellow and indicates Link Activity at 1GBit speed when lit flashing The LED on the right is green and indicates Link Activity at 10 100Mbit s...

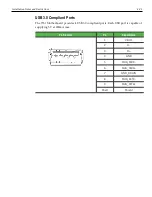
Страница 40: ...Compliant Ports The 7761 Motherboard provides 4 USB 3 0 compliant ports Each USB port is capable of supplying 5V at 900mA max Pin Diagram Pin Signal Name 1 VBUS 2 D 3 D 4 GND 5 StdA_SSRX 6 StdA_SSRX...

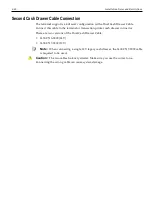
Страница 41: ...ports a 2 drawer configuration with a Dual Cash Drawer Cable Connect this cable to the terminal or transaction printer cash drawer connector Note When connecting a single 12 V legacy cash drawer the 1...

Страница 42: ...terminal Use of other power supply may cause damage to the unit Do not connect or disconnect the 19 V or 24 V Power Cable from the terminal with the AC Power Cord still connected to an AC outlet To in...

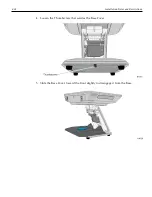
Страница 43: ...2 34 Installation Notes and Restrictions 4 Loosen the Thumbscrew that secures the Base Cover 5 Slide the Base Cover toward the front slightly to disengage it from the Base...

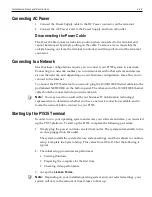
Страница 44: ...Installation Notes and Restrictions 2 35 6 Route the AC Power Cord up through the base of the stand 7 Attach the Power Cord to the Power Brick 8 Install the Power Brick in the Base...

Страница 45: ...tion Notes and Restrictions 9 Loosen the thumbscrew to open the Cable Door 10 Loosen the screw on the Terminal Cable Cover To open press the indentations on the Cable Cover to unlatch the cover then p...

Страница 46: ...ply cable to the Power In connector 12 Secure the excess power cables with a cable tie and place the cables behind the Cable Door 13 Close the Cable Door and tighten the thumbscrew to secure the door...

Страница 47: ...n a flat surface Caution Always use a soft material cloth foam to protect the display screen when placing the terminal face down 2 Remove the screws 2 that secure the Base Stand to the display 3 Rotat...

Страница 48: ...rminal with Expansion 1 Lay the terminal face down on a flat surface Caution Always use a soft material cloth foam to protect the display screen when placing the terminal face down 2 Remove the screws...

Страница 49: ...2 40 Installation Notes and Restrictions 3 Remove the stand and the Hinge Mount installed over the Expansion Board assembly 4 Remove the screws 4 that secure the Expansion Board assembly...

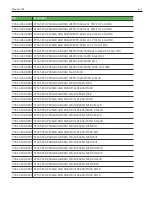
Страница 50: ...R7 64bit MSR Int2x20 7761 3009 8800 P1535 PCAP 120GB 4GB RAM WEPR7 64bit MSR Int2x20 7761 3010 8800 P1535 PCAP 40GB 8GB RAM WEPR7 64bit MSR Int2x20 7761 3011 8800 P1535 PCAP 120GB 8GB RAM WEPR7 64bit...

Страница 51: ...35 8801 P1535 PCAP 120GB 4GB RAM WEPR7 64bit MBlank Int2x20 EU Cord OM 7761 3036 8801 P1535 PCAP 60GB 4GB RAM WEPR7 64bit Mblank EU Cord OM 7761 3037 8800 P1535 PCAP 60GB 4GB RAM WEPR7 32bit MBlank 77...

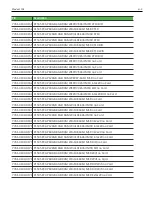
Страница 52: ...P1535 PCAP 120GB 4GB RAM Win10E 64bit MSR 7761 3100 0062 P1535 PCAP 60GB 8GB RAM Win10E 64bit MSR 7761 3100 0063 P1535 PCAP 120GB 8GB RAM Win10E 64bit MSR 7761 3100 0064 P1535 PCAP 60GB 4GB RAM Win10E...

Страница 53: ...GB RAM Win10E 64bit MSR Int2x20 SC 7761 3100 0091 P1535 PCAP 60GB 4GB RAM Win10E 64bit MSR RJ12 7761 3100 0092 P1535 PCAP 60GB 4GB RAM Win10E 64bit MSR UV 7761 3100 0134 P1535 PCAP 60GB 8GB RAM WEPR7...

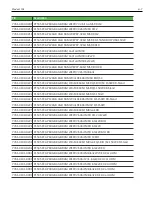
Страница 54: ...P 40GB 4GB RAM WEPR7 64bit MSR Int2x20 BIO no Cord 7761 3100 0165 P1535 PCAP 60GB 4GB RAM Win10E 64bit MSR no Cord 7761 3100 0166 P1535 PCAP 120GB 4GB RAM Win10E 64bit MSR no Cord 7761 3100 0167 P1535...

Страница 55: ...Blank Int2x20 no Cord 7761 3100 0193 P1535 PCAP 60GB 4GB RAM Win10E 64bit MBlank BIO no Cord 7761 3100 0194 P1535 PCAP 60GB 4GB RAM Win10E 64bit MBlank Int2x20 BIO no Cord 7761 3100 0195 P1535 PCAP 60...

Страница 56: ...CAP 60GB 4GB RAM Win10E 64bit MSR QS 150W 7761 3100 0223 P1535 PCAP 120GB 4GB RAM Win10E 64bit MSR QS 150W XR Stand 7761 3100 0224 P1535 PCAP 120GB 4GB RAM Win10E 64bit MSR QS 150W 7761 3100 0225 P153...

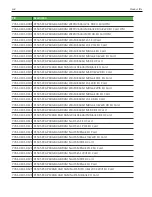
Страница 57: ...5 PCAP 60GB 4GB RAM Win10E 64bit MBlank Wifi EU Cord 7761 3101 0111 P1535 PCAP 60GB 4GB RAM Win10E 64bit MBlank XB EU Cord 7761 3101 0112 P1535 PCAP 60GB 4GB RAM Win10E 64bit 2n1 XB EU Cord 7761 3101...

Страница 58: ...WEPR7 64bit MBlank EU Cord OM 7761 3101 0145 P1535 PCAP 120GB 8GB RAM WEPR7 64bit MBlank EU Cord OM 7761 3101 0146 P1535 PCAP 120GB 8GB RAM Win10E 64bit 2n1 EU Cord 7761 3101 0147 P1535 PCAP 60GB 4GB...

Страница 59: ...CHINA 7761 3101 0176 P1535 PCAP 120GB 4GB RAM WEPR7 64bit MSR XD10 CHINA 7761 3101 0177 P1535 PCAP 40GB 8GB RAM WEPR7 64bit MSR XD10 CHINA 7761 3101 0178 P1535 PCAP 40GB 4GB RAM WEPR7 64bit MSR XD10 B...

Страница 60: ...M Win10E 64bit MSR XD10 BIO UK Cord 7761 3101 0200 P1535 PCAP 60GB 4GB RAM Win10E 64bit MSR XD10 BIO EU Cord 7761 3101 0201 P1535 PCAP 40GB 4GB RAM WEPR7 32bit MSR UK Cord 7761 3101 0202 P1535 PCAP 40...

Отзывы: