background image


28 


Document Number 

DCV-00470 

Date Released 

Jul. 2020 

Revision Number/Security level 

R03 S2 

Retrofit G6-300 + InvencoLink Wayne Vista 3V (US) Installation Guide 

i) 

Place the disposable drop cloths over any cables, connectors or boards in the vicinity of 
where the cuts will be made.  On Side B, take care to ensure no parts of the Computer 
Board are visible.  Use the magnets to secure the drop cloths in place so they will not 
move. 
 

j) 

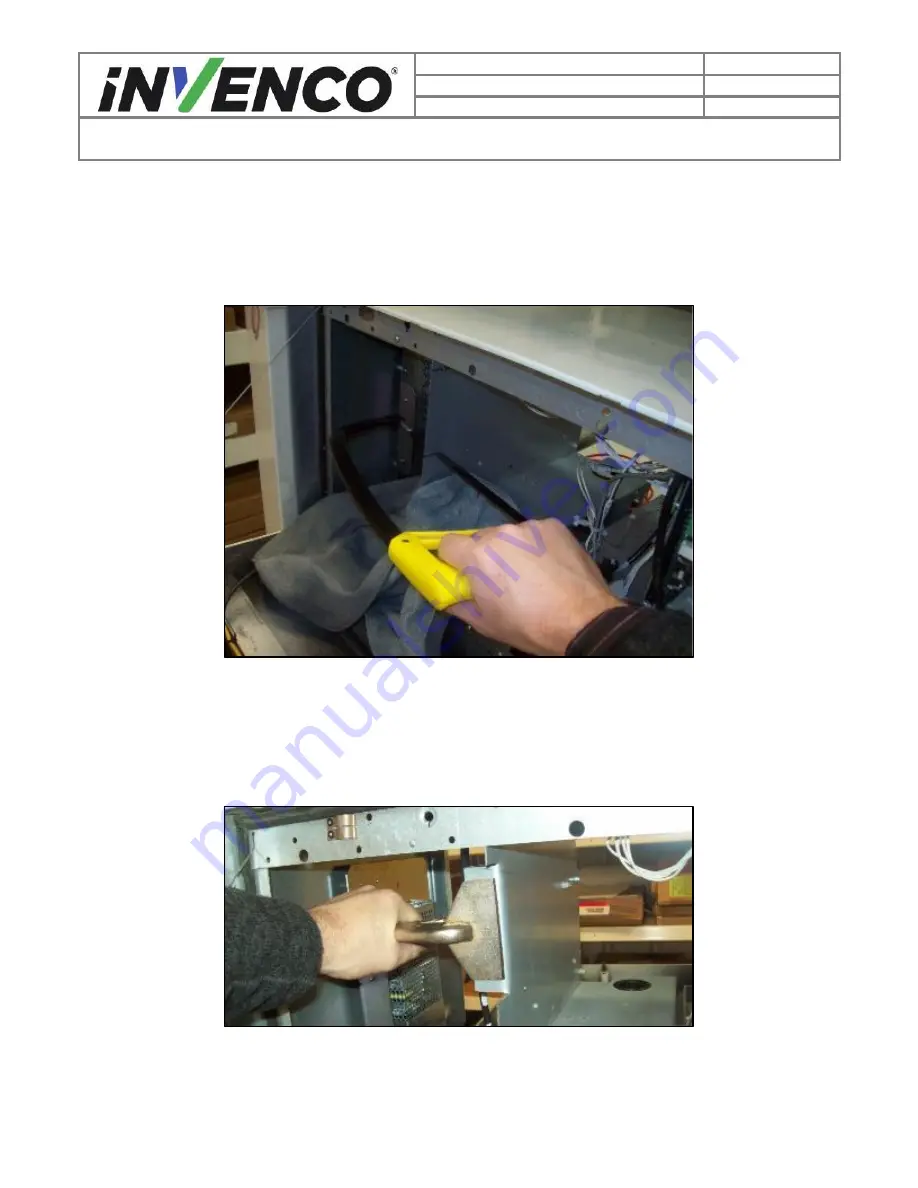
Use the hacksaw to cut along the lines indicated. 


Fig 4.12.2i 

 Make two hacksaw cuts where indicated on the decal. 


k) 

Use the 3” Wide Jaw Vice Grips to make the initial first fold. Bend the tab back as far as 
possible.  It may be easier to pull the Vice Grips from the other side of the dispenser to 
complete the return bend. 


Fig 4.12.2j 


Initial bend using 3” Wide 

Jaw Vice Grips.


Содержание Invenco 6005-0014-8801

Страница 1: ...Retrofit G6 300 InvencoLink Wayne Vista 3V US Installation Guide00 Kit Number 6005 0014 8801 B005 0000 2507 497 0526831 Issue C...

Страница 2: ...0 Date Released Jul 2020 Revision Number Security level R03 S2 Retrofit G6 300 InvencoLink Wayne Vista 3V US Installation Guide Retrofit G6 300 InvencoLink Wayne Vista 3V US Installation Guide Kit Par...

Страница 3: ...oved by UL 1 Michael Doh 09 Dec 2019 Corrected typing errors 2 Michael Doh 06 Apr 20 Updated panel assembly part number 3 Michael Doh 10 Jul 20 Updated the PSU assembly to CID2 PSU variant 2020 by Inv...

Страница 4: ...cal Shut Off Before Access 6 2 4 Evacuation Barricading and Shut Off 6 2 5 Read the Manual 6 2 6 Follow the Regulations 7 2 7 Replacement Parts 7 3 Safety Symbols and Terminology 7 3 1 Prevent Explosi...

Страница 5: ...ncoLink Converter before installation into the dispenser The process is covered in 4 2 Pre Installation Procedure of this instruction by reference to the instructions in that Kit For a double sided in...

Страница 6: ...refer to the pre installation procedure section 4 2 1 relating to the communication method parts G6 300 OPT Mounted on RFK Door RP00019 XX PSU plate with cables EZ0632 Sheet metal insulating cover ass...

Страница 7: ...these should they be required Locate the switch or circuit breakers that shut off all power to all fuelling equipment and dispensing devices 2 3 Total Electrical Shut Off Before Access Any procedure r...

Страница 8: ...ymbol is used in this manual and on warning labels to alert you to a precaution which must be followed to prevent potential personal safety hazard Obey safety directives that follow this symbol to avo...

Страница 9: ...with this requirement refer to information in the relevant manual and OSHA documentation 3 1 4 Working with Electricity Safety Ensure that you use safe and established practices in working with elect...

Страница 10: ...Invenco G6 300 OPT has UL File References of E469526 and E480135 and carries labels similar to these The Invenco Retro Fit Kit has UL File Reference of MH61528 3 2 Computer Programs and Documentation...

Страница 11: ...The Printer Bracket The Water Catch Tray The Q CAT Board or the dual CAT board Various Cable Assemblies 1 At the main disconnect panel disconnect all power to the dispenser and the pump servicing the...

Страница 12: ...encoLink Wayne Vista 3V US Installation Guide Fig 4 3 Wide Frame top Side A of Electronics Bezel Narrow Frame bottom 4 Lower the electronics head bezel by pulling the top forward until it fully rests...

Страница 13: ...vencoLink Wayne Vista 3V US Installation Guide Fig 4 5 Electronics Bezel in fully lowered position 6 For the Graphic Display Assembly Unplug the 8 pin display cable and the two wire ribbon cable that...

Страница 14: ...of both Graphics Display cables that will need unplugged 7 For the Single Line Display Unplug the 40 pin display cable and the two wire grey cable that are connected to the Single Line Display Assemb...

Страница 15: ...d mounting screws located along the bottom of the Graphic Display Assembly Fig 4 8a Fig 4 8a Location of the 3 screws that need removal Note There may be a variant design for the Card Reader Rain Catc...

Страница 16: ...tion of the ground strap screw 10 Remove the Display Assembly from the electronics head bezel by lifting the bottom of it up and out Set the assembly aside to be discarded Fig 4 10b Note For Narrow Fr...

Страница 17: ...020 Revision Number Security level R03 S2 Retrofit G6 300 InvencoLink Wayne Vista 3V US Installation Guide Fig 4 10a Remove Totalizer Window Screw Narrow Frame only Fig 4 10b Grab the card reader and...

Страница 18: ...CAT boards a Identify and locate the Q CAT boards It is fitted on the right hand side wall per each side If not present follow procedures for removing the Dual CAT board instead step 11 2 Fig 4 11 1a...

Страница 19: ...Jul 2020 Revision Number Security level R03 S2 Retrofit G6 300 InvencoLink Wayne Vista 3V US Installation Guide c This board is attached by 6 Philips head screws Undo the screws and remove and discard...

Страница 20: ...1 2 Dual CAT board a Identify and locate the Dual CAT board It is fitted on the printer mounting bracket Fig 4 11 2a Location of the Dual CAT board b Disconnect any cables connected to the dual CAT Bo...

Страница 21: ...ap fits Undo any screws and detach the snap fits remove and discard the Board Fig 4 11 2c Remove screws and snap fits 12 Printer and Bracket Removal There are several different printer variants that m...

Страница 22: ...er in Narrow Body Dispenser go to section 12 1 For RO2 or DW10 DW15 Printer in Narrow Body Dispenser go to 12 2 For Wide Body Dispensers For 883543 Printer in Wide Body Dispenser go to 12 3 For RO2 or...

Страница 23: ...yne Vista 3V US Installation Guide Fig 4 12 1a Disconnect Cables Fig 4 12 1b Disconnect Printer from Slide Rail c Remove screws X3 and Drawer Slide and discard Push back the spring at the back to reve...

Страница 24: ...sta 3V US Installation Guide d Mark the area of the edge of the bracket to be cut away Fig 4 12 1d Mark the area to cut away e Place the disposable drop cloths over the vicinity of where the cuts will...

Страница 25: ...edges from the hacksaw cut Fig 4 12 1g File off sharp edges onto the drop cloths h Remove the magnets Carefully fold up and dispose of the drop cloths with the metal filings held captive inside the f...

Страница 26: ...he Side Clip to be disengaged out of the Printer body b Once unclipped pull the Printer forwards and off the Mounting Bracket and lay face down on the Dispenser Door c Disconnect the Printer cables an...

Страница 27: ...uter Board from the bracket The Computer Board is held on with screws and three snap fits Retain the screws as the Computer Board will be reinstated later Fig 4 12 2e Temporarily detach the Computer B...

Страница 28: ...ta 3V US Installation Guide Fig 4 12 2f Disconnect cables on the Computer Board h Apply Decal DL0296 to the outside face of the Printer bracket This is used as a cutting and folding guide Align the fr...

Страница 29: ...ensure no parts of the Computer Board are visible Use the magnets to secure the drop cloths in place so they will not move j Use the hacksaw to cut along the lines indicated Fig 4 12 2i Make two hack...

Страница 30: ...allation Guide l Progressively flatten this bend using the Standard Vice Grips Work your way up and down the bend until it is flattened back on itself as much as possible Fig 4 12 2k Crimp bend flat u...

Страница 31: ...ve inside the folded cloth o Use Neodymium magnets inside a plastic bag to sweep over the area to pick up any excess metal filings Once picked up turn the bag inside out and dispose of the metal filin...

Страница 32: ...12 3b RO2 Printer Fig 4 12 3c DW10 DW15 Printer 12 3 883543 Printer Removal Wide Body a Pull the printer all the way forward and disconnect the cables Fig 4 12 3a b Push locking tab upwards to disconn...

Страница 33: ...S2 Retrofit G6 300 InvencoLink Wayne Vista 3V US Installation Guide Fig 4 12 3c Unscrew Printer Slide Rail Bracket and discard d Using Side Cutters remove both tabs off the Sheet Metal Insulating Cov...

Страница 34: ...ipped pull the Printer forwards and off the Mounting Bracket and lay face down on the Dispenser Door c Disconnect the Printer cables and remove the Printer for disposal Fig 4 12 4a Disengage the Side...

Страница 35: ...tion Guide Fig 4 12 4e Cut off bottom tab and discard 13 Heater Relocation Note This step only applies if a heater is installed in the narrow dispenser located at the lower side part of the compartmen...

Страница 36: ...board Fig 4 13a Disconnect power cable b Determine if the Large Heater or Small Heater is installed see Fig 4 13b and Fig 4 13c If a Large Heater is installed go to Step 13 1 If a Small Heater is ins...

Страница 37: ...vencoLink Wayne Vista 3V US Installation Guide Fig 4 13 1a Remove Screws Side A Fig 4 13 1b Remove Screws Side B b Relocate the Heater to the top center of the Dispenser attach the two screws where sh...

Страница 38: ...the Power Cable 13 2 Small Heater Relocation a Remove the Mounting Screws four screws and retain two of them to relocate the Heater Discard the other two Fig 4 13 2a Remove Screws Side A Fig 4 13 2b...

Страница 39: ...Jul 2020 Revision Number Security level R03 S2 Retrofit G6 300 InvencoLink Wayne Vista 3V US Installation Guide Fig 4 13 2c Screw Location Side A Fig 4 13 2d Screw Location Side B c Reconnect the Pow...

Страница 40: ...d Fig 4 14a Loosen water catch tray screws then remove the water catch tray by lifting it up and out of the electronics cabinet Set it aside to be discarded Fig 4 14b Fig 4 14b Removal of water catch...

Страница 41: ...ons methods are listed below UL Report Number Kit Part Number Retro Fit Kit Description MH61528 6009 0008 8801 InvencoLink DSP232 For Side B i e the second side you MUST have Side A i e the first side...

Страница 42: ...is the PSU Plate Assembly that has just had the InvencoLink converter installed a Place the plate up against the standoffs on the left side of the cavity b Secure the plate in place using four MS0154...

Страница 43: ...mporarily coil the loose ends of the four cables Black low voltage DC Green Yellow Earth and Yellow patch in the bottom of the pump cabinet Fig 6 3 Fig 6 3 Identifying Earth Ground and DC Cables 4 Unl...

Страница 44: ...oLink Wayne Vista 3V US Installation Guide Fig 6 4 Bringing the frame through the opening 5 Turn the RFK door thru 90 and while holding the OPT gently manipulate the RFK frame into a flatter position...

Страница 45: ...nstallation Guide Fig 6 5 Midway through seating the frame 6 Wiggle the RFK frame under the three lugs at the top taking care moving it past the pump door retainer cable fastening bolt on the left in...

Страница 46: ...20 Revision Number Security level R03 S2 Retrofit G6 300 InvencoLink Wayne Vista 3V US Installation Guide Fig 6 6b Close up of a lug 7 Wiggle the RFK frame carefully to move it under the frame of the...

Страница 47: ...nd press it down to seat it fully Fig 6 8 Seating the frame 9 Close the RFK door and lock it closed to prevent it swinging during the rest of the installation process 10 There will be an earth cable o...

Страница 48: ...evision Number Security level R03 S2 Retrofit G6 300 InvencoLink Wayne Vista 3V US Installation Guide Fig 6 10 Attach grounding cable 11 Temporarily detach the grounding nut from the Retrofit Kit Reta...

Страница 49: ...side of the Cover Fig 6 13 Draw cables through the slot on the right hand side of the Cover CAUTION Excess cabling must be organized as to not cause obstruction when opening and closing the dispenser...

Страница 50: ...e Fig 6 13a Low voltage DC Cable connection b Connect the EK0131 YELLOW patch cable into the correct sockets on the OPT The port numbers on the InvencoLink for the cable e g LAN 1 must match the side...

Страница 51: ...llation Guide Fig 6 13c Plug in earth cable 14 Bundle the connected cables with a cable tie as shown Fig 6 14 Bundle connected cables with a cable tie 15 Place Insulation Cover over top of the OPT Re...

Страница 52: ...rounding cables with nut 16 Screw the RFK frame and the Insulating Cover Shield to the pump door using three MS0145 8 3 8 sheet metal hex head screws and a nut driver You may have to press down on the...

Страница 53: ...tion Guide 17 For Narrow Frame Dispensers re install the Totalizer Window screw that was removed in Step 10 of the Disassembly Procedure Fig 4 10a Fig 6 17 Re installing Totalizer Window Screw 18 Re o...

Страница 54: ...hout placing undue strain on the cables or the connectors Fig 6 19 Cable tie cable bundle to Insulating Cover 20 Route the cable bundle around the corner of the Insulating Cover Shield using cable tie...

Страница 55: ...the relay board which is located at the bottom of the electrical enclosure both narrow and wide bodies This is the same as the distribution board from step 13 a of the disassembly If doing Side A that...

Страница 56: ...t G6 300 InvencoLink Wayne Vista 3V US Installation Guide Fig 6 25 Plug the double connector end of the EK0137 to the relay board 24 Connect the Plug removed in Step 22 into the Socket on the double c...

Страница 57: ...marked in disassembly Step 11 Fig 6 26a Two Wire Cable connected to Pump Loom b Route the EK0127 cable through the bottom of the pump cabinet to the EZ0632 PSU Plate Assembly that contains the Invenco...

Страница 58: ...een installed use cable ties to provide strain relief The rear of the G6 300 OPT has plastic loops close to the connectors that are intended to assist with this Also ensure that all cables are tidy an...

Страница 59: ...lied The G6 300 OPT takes a couple of minutes to complete its start up phase during which several information screens will be presented The terminal will display the following screen whilst attempting...

Страница 60: ...ce 1 Ensure the paper roll has a neat cut edge 2 Remove spindle from the paper holder position Note orientation of the spindle handle to left 3 Insert roll in place the paper tension flap is spring lo...

Страница 61: ...aper loaded correctly 6 Paper feed buttons are located on the top of the terminal Press either button to move the paper forward or back Press both buttons together to cut the paper 7 Use the paper fee...

Отзывы: