9
Installation instructions for the systems Naxpro
®
FD u. HD series
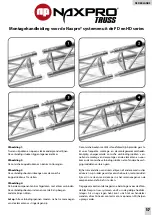
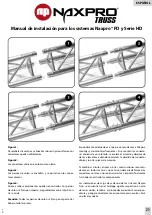
Figure 1:
Unpack trusses and align on a level surface. The connectors are
located in opposite direction of impact.
Figure 2:
The cone connectors are placed on one side.
Figure 3:
The connecting bolts are inserted and adjust the cone connec-
tor.
Figure 4:
Now, both components are frictionally connected together.
The connecting bolts are smashed in and being secured with an
R-clip against falling out.
Note: All pin connectors have to be firmly smashed in after con-
nection with the components.
Particularly suitable is the conical bolt with M8 thread for fre-
quent assembly and disassembly. Unilaterally preassembled
cone connectors accelerate the assembly and disassembly of
elements and prevent the loss of the cone connector and / or
other fasteners.
When assembling circles, ellipses or other structures we recom-
mend in any case not smashing in the conical bolt immediately,
but only after the successful assembly of the components.
For the load specifications of the individual Naxpro-Truss Sys-
tems, please refer to the respective valid main catalogue.
If you still have questions, please contact your local distributor
or contact us directly. We will be pleased to help you.
ENGLISH
Содержание SD Series
Страница 22: ...22 SQP1 VPLT...
Страница 25: ...25 Naxpro FD HD 1 2 3 4 R M8 Naxpro Truss...


