background image

5

22

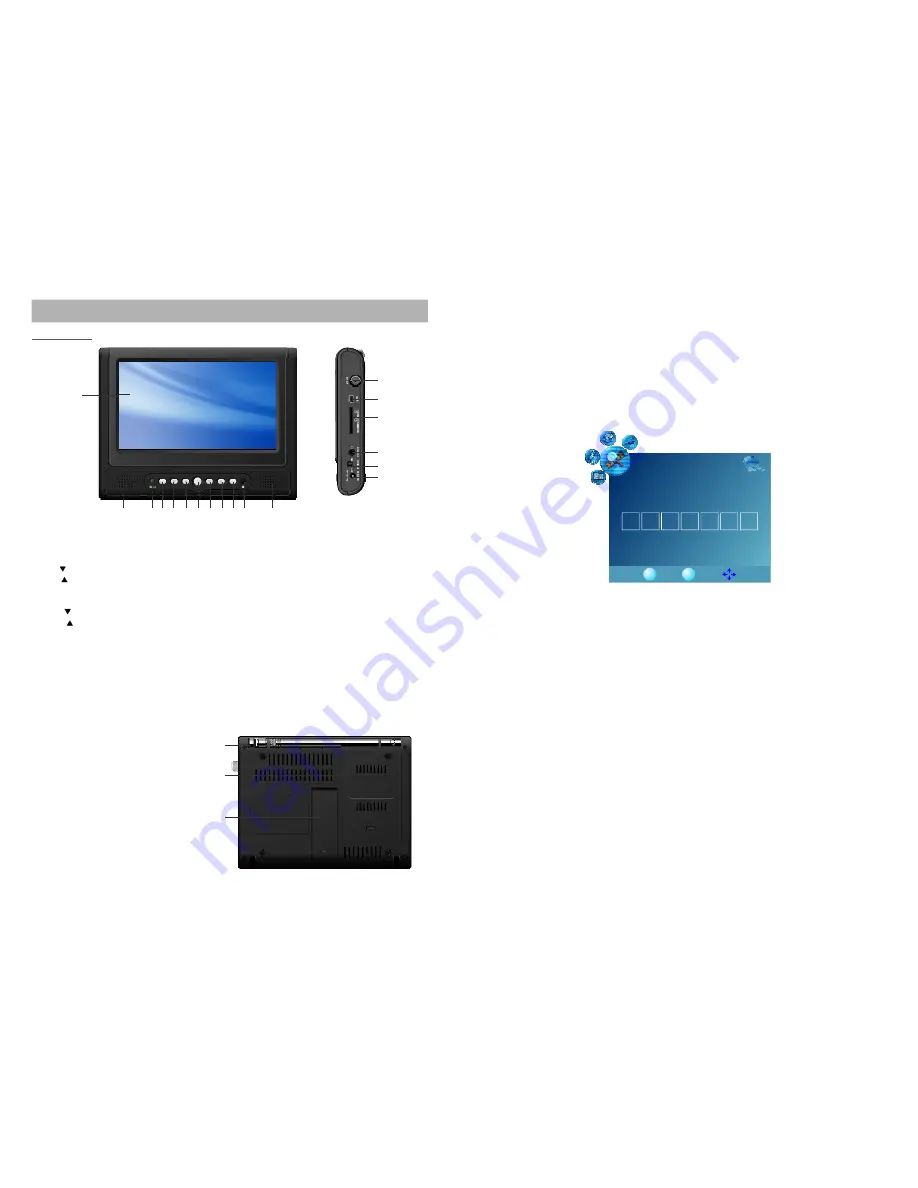
MAIN UNIT

GENERAL PARTS

-Pres s up o r down butto n to input sy mbol o r letter as desired.
-Pres s left or right button to en ter the previ ous or next i tem.
-Then the l abel will display on the sc reen u nder c hanne l numb er.

DTV Signal

-It is used t o disp lay the intens ity of the dig ital TV signa l.

Ch annel

MENU

EN TE R

C hann el Lab el

- It is us ed to set the chann el lab el as d esired .
- Press up or down b utton to sele ct and press AUTO /OK to enter :

C hanne l NO .

It is use d to sw ap se ttings b etwee n two chann els.
-P ress u p or d own bu tton to selec t it.
-P ress t he left butto n to sw ap the curre nt cha nnel n umber with t he pre vious c hanne l

s.

-P ress t he righ t butt on to s wap th e current ch annel numbe r with the ne xt cha nnel

s .

OPEN

CLOSE

CLOSE

CLOSE

OPEN

OPEN

OPEN

AUT O/ O K

MENU

VO L -

SWI TCH

VO L+

CH -

CH +

1.TF T DIS PLAY WINDO W
2.Bu ilt-in speak er
3.Po wer in dicat or/Cha rge in dicat or
4.MENU B utton
5.CH -/

B utton

6.CH +/

B utton

7.AU TO/O K Butt on

8.VO L-/ B utton
9.VO L+/ B utton
10.S WITC H Butt on

11.R emote cont rol sen sor
12.R IN ja ck
13.M INI US B slo t
14.S D/MM C/MS card s lot
15.P hone jack
16.P OWER ON/O FF SW ITCH
17.D C 5V I N

18.W ith te lesco ping a ntenn a
19.B attery cove r
20.S tand h older

- To ent er DTV menu settin g pag e(in D TV mo de).

- To sel ect pre vious chann el/file or mov e dow n.

-To se lect ne xt cha nnel/fi le or m ove u p.

-To enter into th e auto scan menu (in DTV mod e) or c onfirm a

sele ction.

-To ad just th e volu me low er or m ove l eft.

-To ad just th e volu me lou der or move right.

-Pr ess th is butto n to s witch t he uni t in MA IN ME NU pa ge,DT V

or FM Rad io.

-C onnec t to he adpho ne for privat e liste ning.

1

2

3 4 5 6

7 8 9 1 0 11

12

13

14

15

2

F

18

19

20

16

17

Содержание NT-7580

Страница 1: ...ion Manual BEFORE USING THIS PRODUCT READ UNDERSTAND AND FOLLOW THESE INSTRUCTIONS Save this booklet for future reference MODEL NO NT 7580 7 Widescreen Digital LCD Television with FM Radio and USB SD MMC Inputs ...

Страница 2: ...extremely dirty wipe clean with a cloth which has been dipped in a weak soap and water solution and wrung out thoroughly and then wipe again with a dry cloth Never use alcohol benzine thinner cleaning fluid or other chemicals And do not use compressed air to remove dust MAINTENANCE SPECIFICATIONS Specifications are subject to change without notice 3mW Color TFT LCD 7 inches 75 10W 480RGB H 234 V 0...

Страница 3: ...duct does not operate when used according to the operating instructions If the product has been dropped or damaged in any way Do not attempt to service the product take it to the electronics repair shop of your choice for any servicing or repair Do not overload wall outlets extension cords or integral convenience receptacles GENERAL TROUBLESHOOTING Check the following points before assuming malfun...

Страница 4: ...ed from 0 to 100 7 2 Set Brightness This item is used for adjusting the level of TFT Brightness The level can be adjusted from 0 to 100 7 2 3 Set Saturation This item is used for adjusting the level of TFT Saturation The level can be adjusted from 0 to 100 7 3 SET MENU 7 3 1 Menu Rise Effect This item is used for setting the menu rise effect you can choose Straight style and Whirl style 7 3 2 Menu...

Страница 5: ...e Note Before entering into the FM RADIO please insert the earphone to the phone jack first When using the earphone do not set the volume too loud that may damage your ear Please Insert Earphone will appear on the LCD screen until insert the earphone in the phone jack The screen will shut off after a certain time it depends on the setup of SET FM RADIO in SETTINGS of inactivity to help conserve ba...

Страница 6: ...hannel s OPEN CLOSE CLOSE CLOSE OPEN OPEN OPEN AUTO OK MENU VOL SWITCH VOL CH CH 1 TFT DISPLAY WINDOW 2 Built in speaker 3 Power indicator Charge indicator 4 MENU Button 5 CH Button 6 CH Button 7 AUTO OK Button 8 VOL Button 9 VOL Button 10 SWITCH Button 11 Remote control sensor 12 R IN jack 13 MINI USB slot 14 SD MMC MS card slot 15 Phone jack 16 POWER ON OFF SWITCH 17 DC 5V IN 18 With telescoping...

Страница 7: ...o select program forward To select program backward Used to directly input TV channels To adjust volume louder 1 MUTE 2 PICTURE 3 MENU 4 SLEEP 5 LEFT button 6 NUMERRIC BUTTONS 7 Button 8 VOLUME button 9 POWER button 10 MTS 11 ZOOM button 12 EXIT 13 EPG 14 UP button 15 ENTER button 16 RIGHT button 17 DOWN button 18 SWITCH button 19 INFO 20 CH 21 CH 22 BUTTON 23 VOLUME Button 1 2 3 4 5 6 7 8 9 10 11...

Страница 8: ...nected from the main unit before connecting to AC power source by AC power adaptor Read through the instructions before connecting other equipment CONNECTING TO AC POWER SOURCE To power outlet Main unit To DC IN 5V jack BASIC CONNECTION CONNECT EXTERNAL ANTENNA TO UNIT Install external antenna into antenna jack for best picture External antenna jack INSTALL BATTERY INSTALL BATTERY AS FOLLOWS 1 Pus...

Страница 9: ...N TV on Battery pack charging Power Cord connected Power Switch set to OFF Battery full Power Cord disconnected TV on running on battery power Power Cord connected TV on Battery full Charge Power Indicator Modes The Charge Power indicator light will illuminate differently depending on various operating modes as shown below Red indicator wink ceaselessly Extinguish When the low battery icon appear ...

Страница 10: ... work even when it is operated near the player replace the batteries Use two size AAA dry batteries Fig1 4 PRESS 3 OP EN OP EN OPEN OPE N OPEN PUSH 2 1 REMOTE CONTROL SENSOR Fig2 6m 30 P ICT URE MT S ZOOM M ENU S LEE P E PG E XIT ENTE R 1 3 4 5 6 8 9 0 VOLUME INFO CH CH S WITCH 2 3 4 5 6 7 7 7 8 8 9 7 7 0 7 7 7 7 7 M UT E POWE R 30 Press left or right button to enter audio setup page 2 AUDIO The B...

Страница 11: ...ress VOL VOL button to select and press AUTO OK or ENTER button to confirm 1 To exit the slideshow item and return to MAIN MENU page 2 To display the information of picture you select Press LEFT RIGHT button to select file as you desired and press AUTO OK or ENTER button to slideshow pictures Press UP DOWN button to select slideshow mode as desired press LEFT RIGHT button to play the previous or n...

Страница 12: ...nfirm Select the VIDEO item in the main menu press AUTO OK button to confirm Then press UP DOWN buttons to select desired file and press AUTO OK button to confirm In the VIDEO item it only supports video playing and the format is DAT MPEG AVI INFO INFORMATION It is used to display current program information Press INFO button the screen will display as below Current channel No No Event Information...

Страница 13: ...n to confirm 012 mnt mmc ribuluo mp3 When select music file 1 Press AUTO OK or ENTER button to play this file The screen will display as shown To play or pause the file To return to browse page Press LEFT or RIGHT button to select and press AUTO OK or ENTERbutton to confirm To adjust the volume level as desired and the level can be adjusted from 0 to 100 Keep pressing this button to select differe...

Страница 14: ...st stored will be played NOTE 1 You must scan channel before the first watching or there is no program shown 2 You can press the MENU button on the unit or EXIT button on the remote control to exit the AUTO SCAN page 3 Reception of TV signals depends on many factors if the signal is weak reception will be poor For better reception adjust the direction position of the antenna or relocate the TV Aft...

Отзывы: