background image

Page 18 

Naxa Electronics

On Placement 

•  Do not use the unit in places which are extremely hot, cold, dusty, or 

humid.

•  Place the unit on a flat and even surface.
•  Do not restrict the airflow around the unit by placing it in an area 

with poor ventilation, by covering it with a cloth, or by placing it on a 
carpet or other soft surface.

On Condensation 

•  When left in a heated room where it is warm and damp, water 

droplets or condensation may form inside the unit. When there is 
condensation inside the unit, the unit may not function normally. Let 
the unit stand 1 to 2 hours before turning the power on, or gradually 
heat the room up and dry the unit before use.

Should any trouble occur, disconnect the unit from power and refer ser-
vicing to qualified personnel.

PROTECT YOUR HEARING

Hearing experts advise against the constant use of personal stereos 
played at high volume. Constant exposure to high volumes can lead to 
hearing loss. If you should experience ringing in the ears or hearing loss, 
discontinue use and seek medical advice.

WARNING:

This product contains lead, a chemical known to the State of California to 
cause cancer and birth defects or other reproductive harm. Wash hands 

after handling. 

Important Safety Information

1.  Read Instructions: All the safety and operating instructions should be 

read before the product is operated.

2.  Retain Instructions: The safety and operating instruction should be 

retained for future reference.

3.  Heed Warnings: All warnings on the product and in the operating in-

structions should be adhered to.

4.  Follow Instructions: All operating and usage instructions should be 

followed.

5.  Cleaning: Unplug this product from the wall outlet before cleaning. 

Do not use liquid cleaners or aerosol cleaners. Use a damp cloth for 
cleaning.

6.  Attachments: Use only attachments recommended by the manufac-

turer. Use of other attachments may be hazardous.

7.  Water and Moisture: Do not use this product near water (e.g., near a 

bathtub, washbowl, kitchen sink, laundry tub, in wet basements, or 
near a swimming pool and the like).

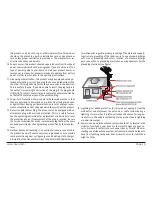
8.  Accessories: Do not place this product on an unstable 

cart, stand, tripod, bracket, or table. Use only with 
carts, stands, tripods, brackets, or tables recom-
mended by the manufacturer or sold with the 
product. Any mounting of the product should fol-
low the manufacturer’s instructions and should use a 
mounting accessory recommended by the manufactur-
er. A product and cart combination should be moved with care. Quick 
stops, excessive force, and uneven surfaces may cause the product 
and cart combination to overturn.

9.  Ventilation: Slots and openings in the cabinet are provided for ven-

tilation to ensure reliable operation of the product and to protect it 
from overheating. These openings should never be blocked by placing 

Содержание NS-439

Страница 1: ...Digital CD Microsystem with Bluetooth NS 439 Instruction Manual Please read carefully before use and keep for future reference...

Страница 2: ...0 CD Mode 11 Basic Operation 11 CD Functions 11 Program Operation 12 Radio Mode 12 Basic Operation 12 Preset Stations 13 Bluetooth Mode 13 Basic Operation 13 AUX Mode 14 Basic Operation 14 Setup Mode...

Страница 3: ...material at our website Come visit us on the web at www naxa com and see all that we have to offer In the Box Please take a moment to make sure that you have ev erything in the list below Although we...

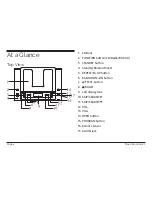
Страница 4: ...TION button CD Radio BT AUX 3 STANDBY button 4 Standby Bluetooth LED 5 REPEAT M UP button 6 RANDOM M DN button 7 FM ST button 8 BAND 9 LCD display lens 10 SKIP SEARCH 11 SKIP SEARCH 12 VOL 13 VOL 14 O...

Страница 5: ...www naxa com Page 5 Bottom View 18 AC IN jack 19 Speaker jacks 20 FM antenna 21 Wall mounting slots Digital Display...

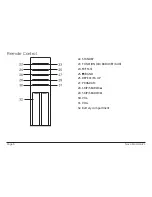
Страница 6: ...Page 6 Naxa Electronics Remote Control 22 STANDBY 23 FUNCTION CD RADIO BT AUX 24 FM ST 25 BAND 26 REPEAT M UP 27 PROGRAM 28 SKIP SEARCH 29 SKIP SEARCH 30 VOL 31 VOL 32 Battery compartment...

Страница 7: ...perate the remote within 15 feet of the sensor and at an angle of 60 degrees Batteries in the remote will last for approximately 6 months under normal use Replace the batteries if the remote control d...

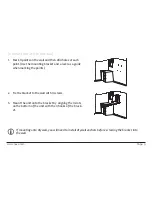
Страница 8: ...ing bracket on the stand while making sure that the screw hole positions are aligned with each other refer to the drawing below 2 Use two of the included screws to fix the bracket to the stand Mount t...

Страница 9: ...bracket and a level as a guide when marking the points 2 Fix the bracket to the wall with 4 screws 3 Mount the unit onto the bracket by aligning the 4 slots on the bottom of the unit with the 4 hooks...

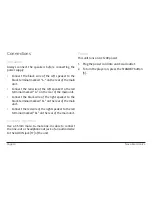
Страница 10: ...ain unit Connect the black wire of the right speaker to the black terminal marked R on the rear ofthe main unit Connect the red wire of the right speaker to the red terminal marked R on the rear of th...

Страница 11: ...ST again to resume playback Press BAND during playback to stop the disc Scan through the current track Press and hold SKIP SEARCH to scan through the current track in reverse Press and hold SKIP SEAR...

Страница 12: ...Program play will display the programmed track number Press BAND twice to clear the program list The pro gram list will also be cleared if you open the CD door or if the unit is unplugged Radio Mode L...

Страница 13: ...adio stations press REPEAT M UP or RANDOM M DN Bluetooth Mode Basic Operation This unit can stream audio wirelessly from devices that can transmit stereo audio with Bluetooth technology 1 Press FUNCTI...

Страница 14: ...ring again The unit can display and adjust the clock while in Bluetooth mode Refer to the section SETUP MODE for instructions AUX Mode Auxiliary Aux mode allows you to play and audio de vice e g MP3 c...

Страница 15: ...art to flash 12 H or 24 H 3 Press SKIP SEARCH or SKIP SEARCH to change between the two display modes then press PROGRAM to confirm The hour digit will flash 4 Press SKIP SEARCH or SKIP SEARCH to adjus...

Страница 16: ...tatic sprays benzene or thinners to clean your CDs To reduce the risk of scratches always put CDs back in their case after use Do not subject CDs to prolonged exposure to direct sunlight high humidity...

Страница 17: ...ade of the plug to the wide slot of the outlet and insert fully On Protection Against Laser Energy Exposure As the laser beam used in this product is harmful to the eyes do not attempt to disassemble...

Страница 18: ...tructions should be read before the product is operated 2 Retain Instructions The safety and operating instruction should be retained for future reference 3 Heed Warnings All warnings on the product a...

Страница 19: ...be equipped with an attachment plug with overload protection This is a safety feature See the operating instructions for replacement or directions to reset the protective device If replacement of the...

Страница 20: ...may result in fire electric shock or other hazards 22 Safety Check Upon completion of any service or repairs to this product ask the service technician to perform safety checks to ensure that the prod...

Страница 21: ...lutions Please refer to this guide before requesting service If you need further assistance please contact Naxa Technical Support www naxa com naxa_support Symptom Possible Solution The sound is disto...

Страница 22: ...REPEAT mode is off press RE PEAT to cancel The Function mode is not working Ensure that the CD Compartment lid is closed Try resetting the unit Switch the unit off and unplug it from power Wait three...

Страница 23: ...uctions in this manual Please also visit us on the web at www naxa com to get up to the minute news alerts and documentation for your device For additional assistance please contact Naxa Technical Sup...

Страница 24: ......

Отзывы: