background image

Page 6 

Naxa Electronics

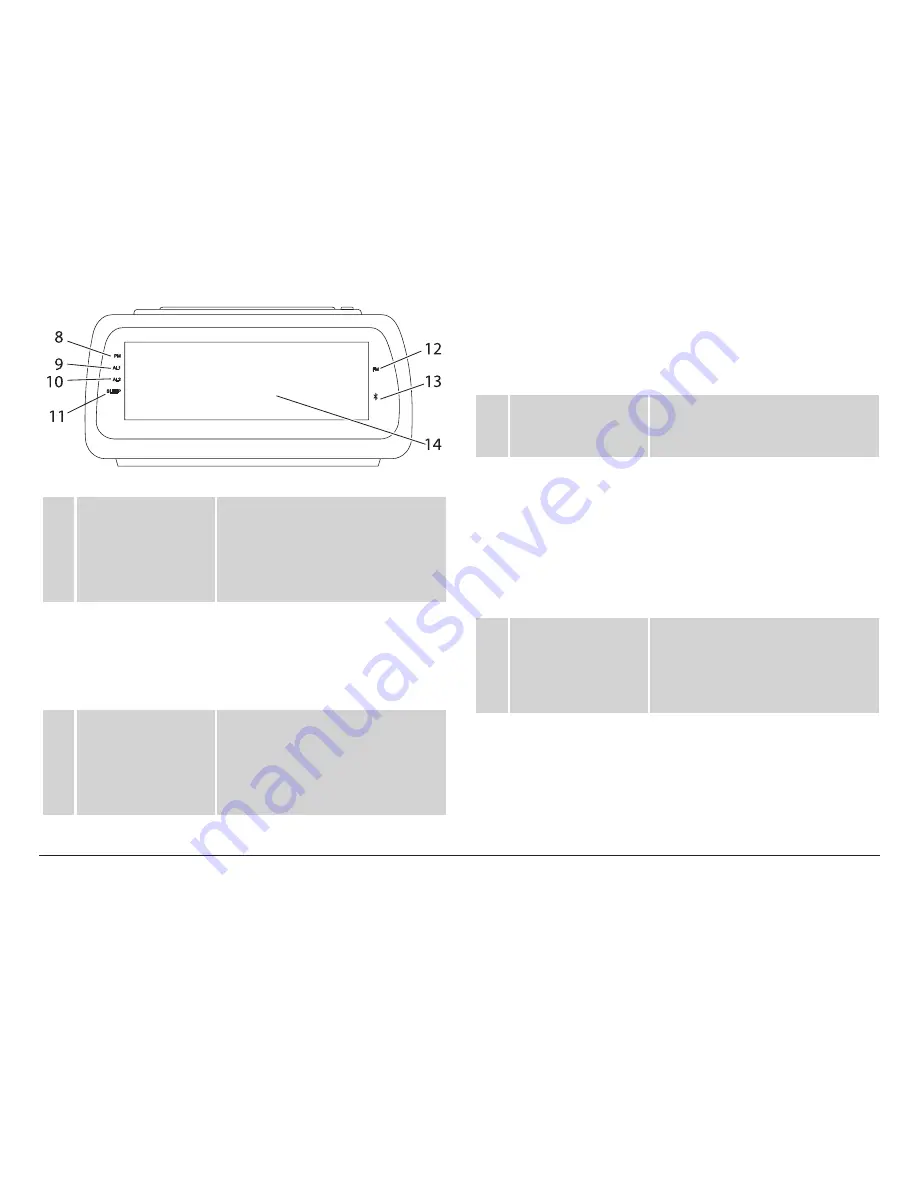
8

PM LED

On: The current time is within 
PM hours.
Off: The current time is within 
AM hours.

9

AL1 LED

On: The Alarm 1 timer is 
active.
Off: The Alarm 1 timer is 
inactive.

10 AL2 LED

On: The Alarm 2 timer is 
active.
Off: The Alarm 2 timer is 
inactive.

11

SLEEP LED

On: The Sleep timer is active.
Off: The Sleep timer is 
inactive.

12 FM LED

On: FM radio is active.
Off: FM radio is inactive.

13 Bluetooth LED 

Blinking: Bluetooth is active 
and ready to connect to a 
device (pairing mode).
On: Bluetooth is active and 
connected to a device.
Off: Bluetooth is inactive.

14 Display Screen

Jumbo easy to read LED 
screen displays the time, 
alarm timers, FM radio fre-
quency, and more.

Содержание NRC-180

Страница 1: ...Easy Read Dual Alarm Clock Radio with USB Charge Port NRC 180 Instruction Manual Please read carefully before use and keep for future reference ...

Страница 2: ...rm Wash hands after handling 1 Read these instructions 2 Keep these instructions 3 Heed all warnings 4 Follow all instructions 5 Do not use this apparatus near water 6 Clean only with dry cloth 7 Do not block any ventilation openings Install in accor dance with the manufacturer s instructions 8 Do not install near any heat sources such as radiators heat registers stoves or other apparatus includin...

Страница 3: ...sted and found to comply with the limits for a Class B digital device pursuant to Part 15 of the FCC Rules These limits are designed to provide reason able protection against harmful interference in a residential installation This equipment generates uses and can radiate radio frequency energy and if not installed and used in accor dance with the instructions may cause harmful interference to radi...

Страница 4: ...ck BT Press and hold to place the system in Pairing mode Standby Off Press and hold to set the clock time 2 VOL AL1 SET FM BT Press to decrease the volume level Standby Off Press to en able disable Alarm 1 Standby Off Press and hold to set Alarm 1 3 VOL AL2 SET FM BT Press to increase the volume level Standby Off Press to en able disable Alarm 2 Standby Off Press and hold to set Alarm 2 ...

Страница 5: ...Press and hold to scan for the next station on a higher frequency To cancel scan ning press again BT Press to skip to the next track When setting the clock or an alarm press to set the minutes 6 Press to turn the system on and to switch between FM BT function modes Press and hold to turn the system off 7 SNOOZE SLEEP DIMMER FM BT Press to set the Sleep timer Standby Off Press to change the intensi...

Страница 6: ...The Alarm 2 timer is inactive 11 SLEEP LED On The Sleep timer is active Off The Sleep timer is inactive 12 FM LED On FM radio is active Off FM radio is inactive 13 Bluetooth LED Blinking Bluetooth is active and ready to connect to a device pairing mode On Bluetooth is active and connected to a device Off Bluetooth is inactive 14 Display Screen Jumbo easy to read LED screen displays the time alarm ...

Страница 7: ...will automatically restore all settings 16 FM antenna Extend the wire antenna fully and position for optimal reception 17 USB charge port Convenient charge port provides power for your smartphone or other USB device 18 Power input DC 5V Connect to a power source with the included power adapter 19 3 5mm AUX input 3 5mm stereo connection for devices with 3 5mm line out or headphone output ...

Страница 8: ...rupted AC power Insert two UM 4 batteries AAA into the battery compartment Be sure to observe the proper po larity the and signs as indicated inside the battery compartment Setting the Clock While the system is in Standby mode i e the radio is off 1 Press and hold the PRESET TIME SET button The time will begin to flash on the display 2 Press the button to adjust the hour press the button to adjust...

Страница 9: ... forward only when being set if you pass the desired time continue pressing the button until the time cycles back around 3 When the correct alarm time is set press the VOL AL1 SET button to confirm or VOL AL2 SET for Alarm 2 4 To change the alarm type press the or button The available alarm types are bp Beeper S 1 Birds S 2 Waves S 3 Rainforest S 4 Thunder Radio frequency the current FM radio stat...

Страница 10: ...gnal 2 To tune to a preset station a Press the TIME SET button the display screen will flash with the current preset station number e g P02 b While the preset station number is flash ing press the or buttons to change the preset station L L Stations with a weak signal can only be tuned in manually Saving a Radio Station to Memory 1 Tune the radio to the frequency you want to save as a preset stati...

Страница 11: ...re 90 80 70 60 50 40 30 20 10 min or OFF 4 The radio will turn off automatically after the set time has elapsed Listening to Connected Bluetooth Devices Pairing a Device with Blue tooth A device must be paired with the system before us ing them together for the first time Press the button until the display screen shows bt and the Bluetooth LED is flash ing The system will automatically search for ...

Страница 12: ...on your device 2 Press and hold the MEM button until the Bluetooth LED flashes 3 Use your device to search for the Naxa NRC 180 again Using the Bluetooth Controls If your device supports Bluetooth remote functions you will be able to do the following it is connected to the system To do this do this Start pause or resume audio playback Press MEM Skip to the previous track Press Skip to the next tra...

Страница 13: ...then start playback 5 Press VOL AL1 SET to gradually increase the volume of the speaker to a comfortable level L L Use the connected AUX device to control all functions in AUX mode The speaker can only be used to adjust the volume Charging Your Devices Connect the standard end of a USB cable not in cluded to the USB port on the rear of the unit and connect the other end to the charging port of you...

Страница 14: ...ecifications Display Type LED 1 8 jumbo Speaker Type Mono Radio Tuner FM with digital preset tuning Alarm Clock Dual timer with optional nature sounds Input Bluetooth v2 1 EDR 3 5mm AUX audio USB Charge Port Yes DC 5V 1A Power Source AC 100 240V adapter 2 x AAA batteries clock backup not included Specifications are subject to change without prior notice ...

Страница 15: ...ructions in this manual Please also vis it us on the web at www naxa com to get up to the minute news alerts and documentation for your device For additional assistance please contact Naxa Technical Support NAXATechnical Support 2320 East 49th St Vernon CA 90058 http www naxa com naxa_support ...

Страница 16: ......

Отзывы: