background image

1

2

3

4

5

6

7

8

9

0

10

+

SLOW

NEXT

DISP

N/P

PLAY /PAUS E

ST OP

FF

FR

PREV

GOTO

REPE AT

A-B

ZOO M

STAN DBY

SETUP

SUB TITLE

SWITC H

TITLE

ENTER

VOL

VOL

CH

CH

ANGLE

PRO GRAM

MENU

TFT/TV MODE

AUDIO

EPG

INFO

CC

EXIT

ATSC

MUTE

IN VER SI ON USB/CARD/DVD

1

2

3

4

5

6

7

8

9

0

10

+

SLOW

NEXT

DISP

N/P

PLAY/PAUSE

STOP

FF

FR

PREV

GOTO

REPEAT

A-B

ZOOM

STANDBY

SET UP

SU BTIT LE

SW ITCH

TIT LE

ENTER

VOL

VO L

CH

CH

ANG LE

PR OGR AM

ME NU

TFT/TV MODE

AUDIO

EPG

IN FO

CC

EXIT

ATSC

MUT E

IN VERSION USB/CARD/DVD

11

22

1.GENERAL SETUP

Once the initial programming is entered it is

retained in memory until changed, the player
can always be operated under the same
conditions.

The settings will be retained in the memory

until the settings are changed even after
setting the player to the standby mode.

Common procedure for initial settings

1.Press SETUP button.

2.Use the navigation buttons to select

preferred item, and press ENTER button,
each screen for setting the value is displayed.
Then move the navigation button to set the
item and press ENTER button to confirm the
settings.

3.Press SETUP button to close setup menu in

any mode.

4.Use left/right navigation button to switch to

another main setup items

Initial Settings

PLAY/PAUSE

S ETU P

ENTE R

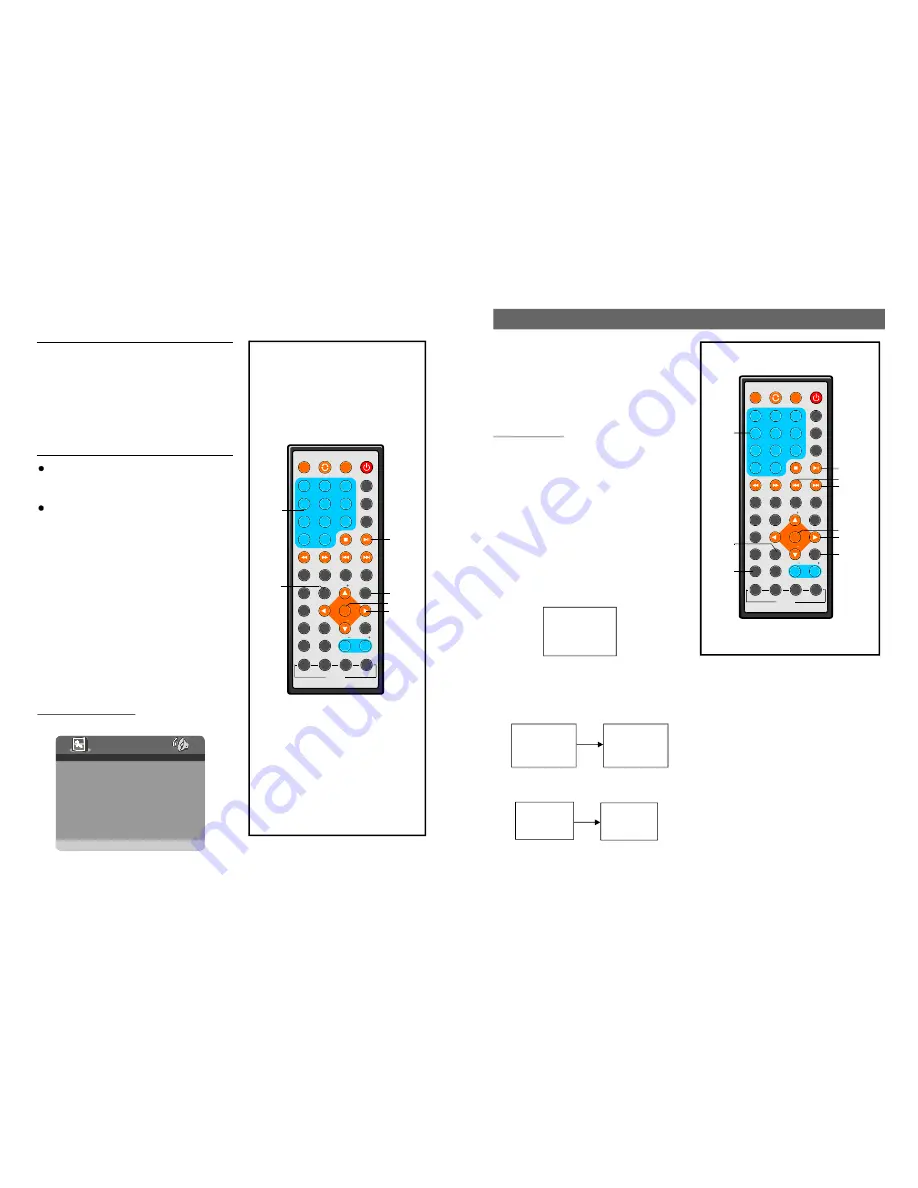
NAVIGATION
BUTTONS

NUMERIC
BUTTONS

Before enjoying DVD/Video CD/CD

The On-Screen menu language of the unit
has been factory pre-set to English. If you want
to change the menu language to other
language, please refer to "DVD operations /
Initial settings/ General setup / OSD lang . In
the explanation below it is assumed that English
has been selected as menu language.

1.Switch on the DVD player (power switch is

located on the right side of the unit.)

1).Make sure that all the connections

NOTE:

including connections to AC adaptor, other

AV equipment etc. have been completed

before switching the POWER knob to the
"ON"position..
2). After switching the unit "OFF" wait serval
seconds before turning the unit back "ON"
The unit may malfunction if the unit is
switched back "ON" immediately after
switching "OFF".If a malfunction occurs,
switch the unit "OFF" and wait serval
seconds before turning it "ON"again.

2.Press SWITCH button to set the unit in DVD

mode.

3. Push the open button to open the disc cover.

4. Place a disc onto the disc compartment. Hold the disc without touching either of its

surfaces, position it with the printed title side facing up, align it with the guides, and place
it in its proper position.

5. Close the disc cover, after closing the disc cover, play begins. The player starts to read

the disc immediately.

6. When a menu screen appears on the TV, move the navigation buttons or press the numeric
buttons to select preferred chapter number, then press ENTER button to play it.

7.Press NEXT or PREV button to play the nex tor previous chapter.
8.To stop play and return to the menu screen, press TITLE button, or MENU button.

OPEN

DVD- VIDEO

LOADING

1 CHAPTER

1

2 CHAPTER

2

3 CHAPTER

3

4 CHAPTER

4

3 CHAPTER 3

MENU

ENTER

TITLE

PLAY/
PAUSE

NEXT

PREV

NUMERIC
BUTTONS

NAVIGATION
BUTTONS

Basic Play

SWITCH

DVD OPERATIONS

--GENERAL SETUP PAGE--

TV DISPLAY

PS

ANGLE MARK

ON

OSD LANG

ENG

CAPTIONS

OFF

SCREEN SAVER

ON

DEFAULT

GOTO GENERAL SETUP PAGE

TV TYPE

NTSC

Some DVDs may contain scenes which have
been shot simultaneously from a number of
different angles. For these discs, the same
scene can be viewed from each of these
different angles using the ANGLE button.
Press ANGLE during play, number of angle
being played will be displayed in the screen,
press the button to change to different angles.

Viewing from different
angle (DVD only)

AN GLE

Содержание NPDT-951

Страница 1: ...NG THIS PRODUCT READ UNDERSTAND AND FOLLOW THESE INSTRUCTIONS Save this booklet for future reference INSTRUCTION MANUAL MODEL NO NPDT 951 9 Swivel Portable DVD Player with Digital TV Tuner and USB SD...

Страница 2: ...e The password for rating level has been forgotten Please contact your local sales dealer Angle cannot be changed This function is dependent on software availability Even if a disc has a number of ang...

Страница 3: ...Common Remedy No power Insert the AC adaptor securely into the power outlet The picture will be somewhat distorted at times this is normal Picture is distorted during rapid advance or rapid reverse N...

Страница 4: ...lid waste authority Battery Handling and Usage NOTE This style player contains rechargeable Lithium battery There is a CR 2025 battery for remote control DISC HANDLING AND MAINTENANCE Handling precaut...

Страница 5: ...wipe the discs using a circular motion circular scratches are likely to occur which will cause distortion ACCESSORIES Remote control with battery 1 Instruction manual 1 AC adaptor 1 Audio Video cable...

Страница 6: ...press left right button to set it ON or OFF 5 4 UNRATED Press up down button to select this item and prss left right button to set it ON or OFF 5 5 CHANGE PASSWORD It is used to change the password an...

Страница 7: ...ing CH or CH button Skip unskip a channel 1 Press up down button to select CHANNEL item then press left right button to select the channel backward forward you want to skip 2 Press up down button to s...

Страница 8: ...en DVD and TV mode 6 VOLUME button Press this button to turn down the volume 8 9 LCD ON OFF Press this button to turn on or turn off the lcd screen 10 VOLUME button Press this button to turn up the vo...

Страница 9: ...on to repeat playing sections between two specific points A B 26 REPEAT button Press this button to repeat playing one chapter or one title forDVD or repeat playing the current track or the whole trac...

Страница 10: ...than 8 hours to recharge battery Noises may be generated during recharging In this case use a more distant power socket Do not recharge or discharge battery near a heating element such as a heater or...

Страница 11: ...TO AV OUT JACK SD MMC MS USB AV OUT PHONE OFF ON POWER IN PUT 9 12V SD MMC MS USB AV OUT PHONE OFF ON POWER INPUT 9 12V 2 AUDIO SETUP AUDIO SETUP PAGE SPEAKER SETUP GOTO AUDIO SETUP PAGE EQUALIZER 2...

Страница 12: ...te control is used If the remote control fails to work even when it is operated near the player replace the battery Use one type CR2025 battery REMOTE CONTROL PREPARATION Battery installation Insert t...

Страница 13: ...e that all the connections NOTE including connections to AC adaptor other AV equipment etc have been completed before switching the POWER knob to the ON position 2 After switching the unit OFF wait se...

Страница 14: ...nguage 2 Press SUBTITLE button continuously to change language or turn off NOTE When no subtitles are recorded press this button will not work CHANGING SUBTITLE LANGUAGE Changing subtitle language DVD...

Страница 15: ...01 124 NAVIGATION BUTTONS 4 Press NEXT or PREV button to turn the current menu page to the next or previous menu page 5 Press REPEAT button to change play mode SHUFFLE all the files will be randomly s...

Страница 16: ...CHAPTER ELAPSED T 02 03 C 07 28 0 01 53 DISPLAY OFF T TITLE NO C CHAPTER Number DVD disc VCD disc TC T 02 03 0 19 20 TR T 02 03 1 17 00 DISPLAY OFF DC T 02 03 0 19 20 DR T 02 03 1 17 00 T R T 02 03 0...

Страница 17: ...page on the screen you can select any track to play by using numeric buttons When PBC is ON there will be a menu page on the screen and you can select any track on the menu to play NEXT PREV 1 Insert...

Страница 18: ...return to folder selection or STOP button to enter preview mode Press REPEAT button to change play mode Once a folder and file is selected the picture is loaded onto the screen NOTE The time to load...

Отзывы: