background image

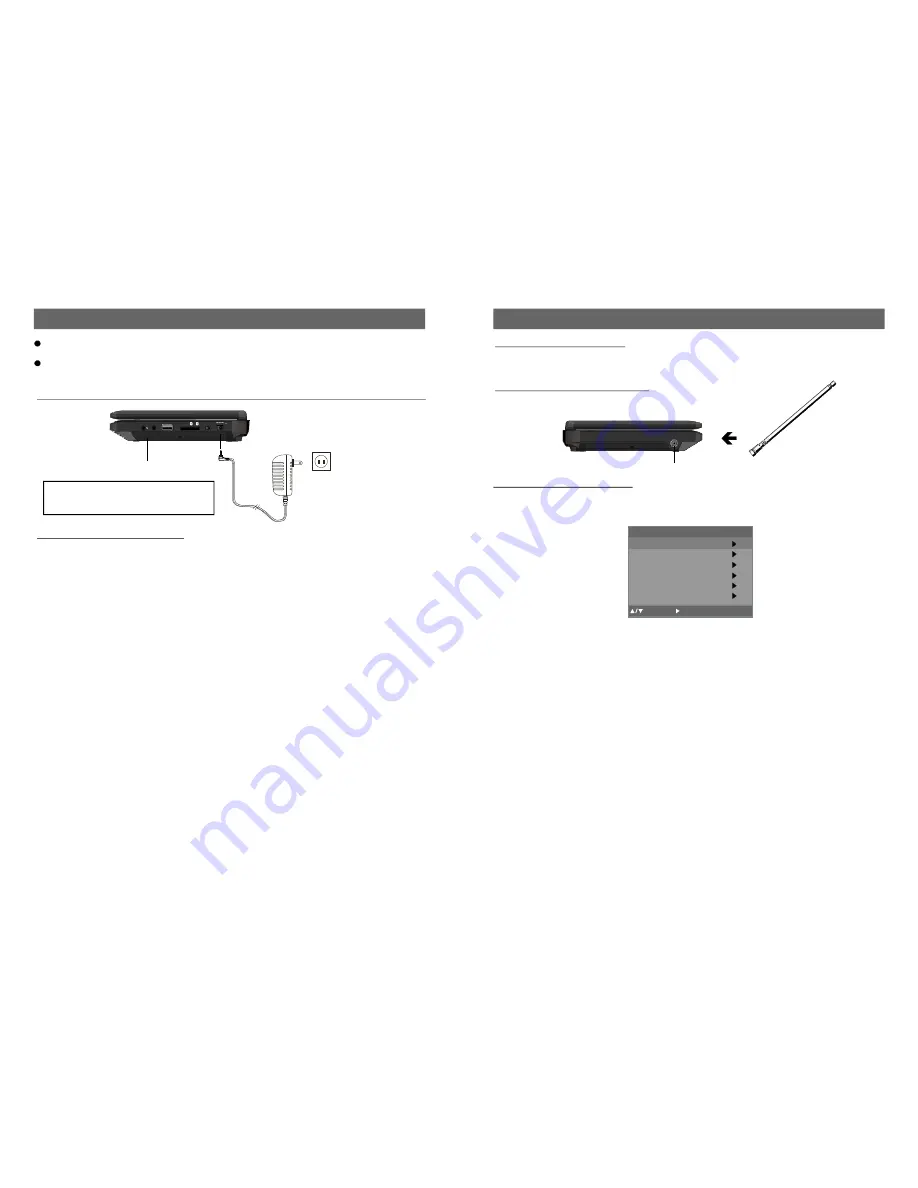
RF IN

SD/MMC

MS

USB

AV OUT

PHONE

OFF

ON

POWER

INPUT 9-12V ---

25

8

TV OPERATIONS

TURN ON THE UNIT

1. Push POWER switch at the right side of the unit to turn on the unit.
2. Press SWITCH button to set the unit in TV mode.

ANTENNA OPERATION

EXTERNAL ANTENNA

Install external antenna into antenna jack for best reception.

BASIC CONNECTION

.

Connecting to AC power source

NOTE:

Before connecting to AC power, push the
POWER ON/OFF switch to OFF.

AC adaptor

To power outlet

Main unit

Ensure all the cables are disconnected from the main unit before connecting to AC power
source .
Read through the instructions before connecting other equipment.

Rechargeable Battery Use

The player built-in a chargeable Lithium battery.

1.Charge the battery

-Connect the adaptor to the DC 12V IN jack, then set the unit in POWER ON mode (THE
PLAYING MODE)for fully charge.
-Set in POWER ON mode and press the STANDBY button (THE STANDBY MODE) or
set in POWER OFF mode for fully charge.
And the indicator is red during charging; it gets green when charging is completed.

2.Time to recharge the battery

Charge the built-in battery pack 8 hours before using the player for the first time.
Recharge and playback time depends on battery pack capacity and the temperature condition.
Generally speaking, The battery needs to be charged about 4 hours.

3.Using and Maintaining Rechargeable Battery

O

-.The normal working condition temperature is: 0 ~45 C ;
-.Always unplug AC/DC power supply for the unit whenever not playing.

NOTE: A new battery pack which has not been used or one which has not been used for more
than a month, may appear to not recharged enough , this is due to the characteristic of this
battery and is not a malfunction. In this case, recharge it two or three times before the first use

and it needs more than 8 hours to recharge battery.
Noises may be generated during recharging. In this case, use a more distant power socket.
Do not recharge or discharge battery near a heating element such as a heater or direct sunlight.

BASIC OPERATIONS

1. Press CH + button to enter next channel.
2. Press CH - button to enter previous channel.
3. Press numeric but tons on the remote control directly to select program what you want.
Example: Track 9, press "9" three seconds later, it will automatically switch to track 9,
or press ENTER button to confirm directly.
Track 12,press "1 " and "2", three seconds later, it will automatically switch to track12,or press
ENTER button to confirm directly.
Note: If one frequence dot has more than one channel, for example, you want select
<CH 14 NO.2>, Press 1 and 4, then press right navigation button and input 2.Press ENTER
button to confirm. Once the input is done, it will start broadcasting the selected channel
immediately.

SELECT WANTED PROGRAM

AUTO SEARCHING

Before normal watching you must search effective channels first.
-Press MENU button on remote control, the screen will display:

-Select AUTO SEARCH item, press right button to enter this item.
-Set the SOURCE TYPE what you want. Select START SEARCH item then press right to start
to search channels automatically. Wait for several minutes until searching finished, then the
first searched channel will be played.

NOTE:

You must do auto search again after different system selection according to your area.

:Up /Down

MENU:Go Back

:Sel ect

Main Menu

Auto Search
CH Setup

CC Setup

EAS Setup

Program Control

System Setup

External antenna jack

MUTE CONTROL

Press the MUTE button to mute the sound, press it again to switch ON the sound.

NOTE:

When the unit is in Mute mode, pressing VOL+ button will switch ON the sound and turn

it up, pressing VOL- button will switch ON the sound and turn it down.

VOLUME CONTROL

1. Press the VOL+ or VOL- to adjust the level of currently volume.
2.The level of VOLUME can be adjust from 0-40.

Содержание NPDT-951

Страница 1: ...NG THIS PRODUCT READ UNDERSTAND AND FOLLOW THESE INSTRUCTIONS Save this booklet for future reference INSTRUCTION MANUAL MODEL NO NPDT 951 9 Swivel Portable DVD Player with Digital TV Tuner and USB SD...

Страница 2: ...e The password for rating level has been forgotten Please contact your local sales dealer Angle cannot be changed This function is dependent on software availability Even if a disc has a number of ang...

Страница 3: ...Common Remedy No power Insert the AC adaptor securely into the power outlet The picture will be somewhat distorted at times this is normal Picture is distorted during rapid advance or rapid reverse N...

Страница 4: ...lid waste authority Battery Handling and Usage NOTE This style player contains rechargeable Lithium battery There is a CR 2025 battery for remote control DISC HANDLING AND MAINTENANCE Handling precaut...

Страница 5: ...wipe the discs using a circular motion circular scratches are likely to occur which will cause distortion ACCESSORIES Remote control with battery 1 Instruction manual 1 AC adaptor 1 Audio Video cable...

Страница 6: ...press left right button to set it ON or OFF 5 4 UNRATED Press up down button to select this item and prss left right button to set it ON or OFF 5 5 CHANGE PASSWORD It is used to change the password an...

Страница 7: ...ing CH or CH button Skip unskip a channel 1 Press up down button to select CHANNEL item then press left right button to select the channel backward forward you want to skip 2 Press up down button to s...

Страница 8: ...en DVD and TV mode 6 VOLUME button Press this button to turn down the volume 8 9 LCD ON OFF Press this button to turn on or turn off the lcd screen 10 VOLUME button Press this button to turn up the vo...

Страница 9: ...on to repeat playing sections between two specific points A B 26 REPEAT button Press this button to repeat playing one chapter or one title forDVD or repeat playing the current track or the whole trac...

Страница 10: ...than 8 hours to recharge battery Noises may be generated during recharging In this case use a more distant power socket Do not recharge or discharge battery near a heating element such as a heater or...

Страница 11: ...TO AV OUT JACK SD MMC MS USB AV OUT PHONE OFF ON POWER IN PUT 9 12V SD MMC MS USB AV OUT PHONE OFF ON POWER INPUT 9 12V 2 AUDIO SETUP AUDIO SETUP PAGE SPEAKER SETUP GOTO AUDIO SETUP PAGE EQUALIZER 2...

Страница 12: ...te control is used If the remote control fails to work even when it is operated near the player replace the battery Use one type CR2025 battery REMOTE CONTROL PREPARATION Battery installation Insert t...

Страница 13: ...e that all the connections NOTE including connections to AC adaptor other AV equipment etc have been completed before switching the POWER knob to the ON position 2 After switching the unit OFF wait se...

Страница 14: ...nguage 2 Press SUBTITLE button continuously to change language or turn off NOTE When no subtitles are recorded press this button will not work CHANGING SUBTITLE LANGUAGE Changing subtitle language DVD...

Страница 15: ...01 124 NAVIGATION BUTTONS 4 Press NEXT or PREV button to turn the current menu page to the next or previous menu page 5 Press REPEAT button to change play mode SHUFFLE all the files will be randomly s...

Страница 16: ...CHAPTER ELAPSED T 02 03 C 07 28 0 01 53 DISPLAY OFF T TITLE NO C CHAPTER Number DVD disc VCD disc TC T 02 03 0 19 20 TR T 02 03 1 17 00 DISPLAY OFF DC T 02 03 0 19 20 DR T 02 03 1 17 00 T R T 02 03 0...

Страница 17: ...page on the screen you can select any track to play by using numeric buttons When PBC is ON there will be a menu page on the screen and you can select any track on the menu to play NEXT PREV 1 Insert...

Страница 18: ...return to folder selection or STOP button to enter preview mode Press REPEAT button to change play mode Once a folder and file is selected the picture is loaded onto the screen NOTE The time to load...

Отзывы: