background image

Page 20 

Naxa Electronics

the Radio, tune to the station that you want to re-
cord.

3. 

Get the target ready. Load a blank cassette tape into 

the Cassette compartment [25].  Optionally, cue the 
tape to the point that you want to record to with the 
TAPE   or TAPE   keys [29, 28].

ѥ

L

The exposed magnetic tape of the cassette 
should face down.

ѥ

ѥ

Take up any slack in the tape before load

-

ing the cassette into the compartment. 

Turn the cassette reel with your finger or a 
pencil until the tape is taut.

4.  Start recording. When you are ready to record, 

press the TAPE   key [26] together with the TAPE   

key [27]. (For CD/MP3/USB/AUX, start playback).

ѥ

ѥ

Do not force the 

TAPE 

 key down if you 

detect resistance! If you cannot press the 

TAPE 

 key down, the cassette tape may 

be record-protected. Refer to the section 

“Record Protection” to learn more.

5.  Stop recording. Press the TAPE   key [30] to stop 

recording. 

ѥ

L

You may also pause recording by pressing 

the 

TAPE 

 [31] key. Depress the 

TAPE 

 key 

again to resume recording.

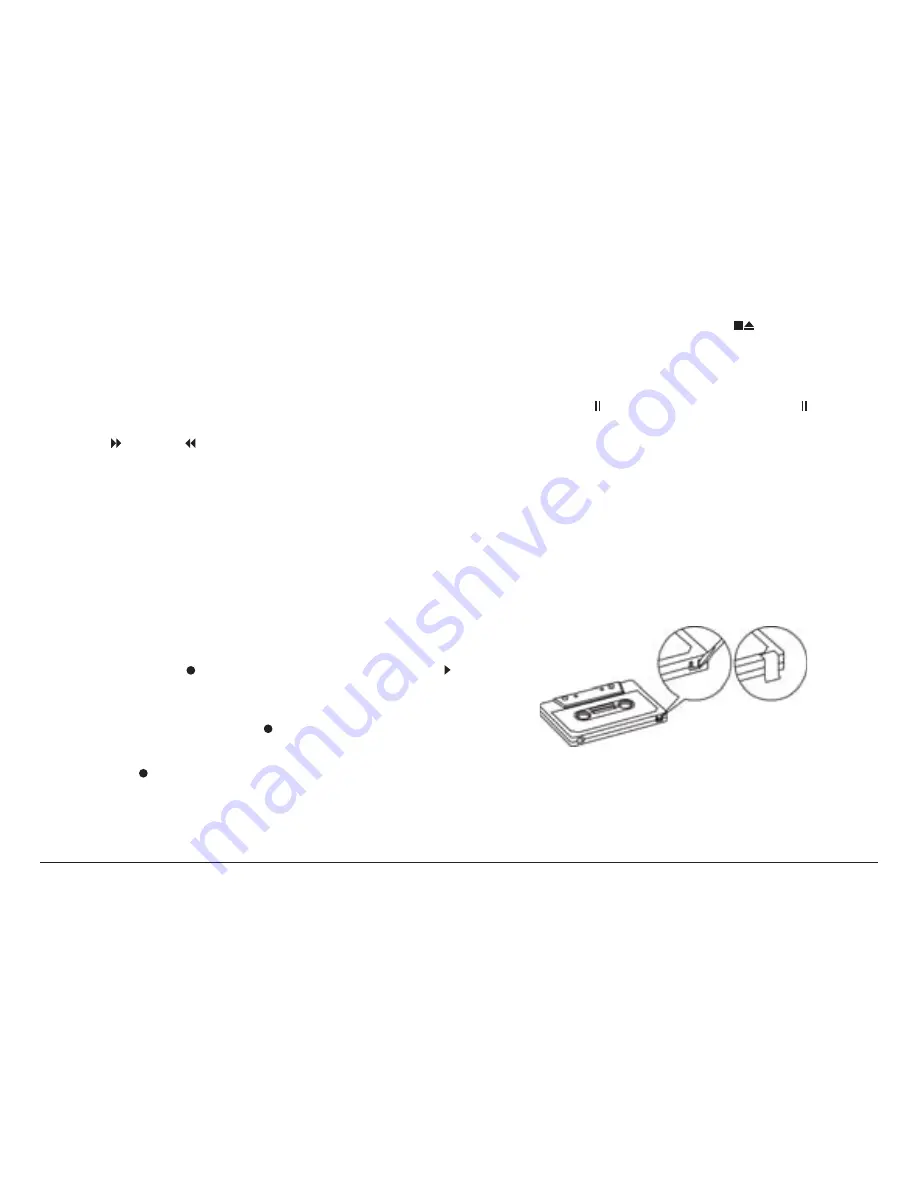
Record Protection

Protect your cassette tape from accidental erasure 
with the Record Protection tab.
1.  Locate the tab on your cassette tape. It can be found 

on the long side of the cassette, opposite the side 
with the exposed tape (see the illustration below).

Record Protect Tab for Side “A”

Содержание NPB-428

Страница 1: ...Portable MP3 CD USB Player with Stereo Radio Cassette Recorder NPB 428 Instruction Manual Please read carefully before use and keep for future reference ...

Страница 2: ...ons 14 Turning the Unit On and Off 14 Adjusting the Volume 14 Bass Boost 14 Using the Radio 14 Using the CD MP3 Player 15 About Compact Discs 15 Loading a Disc 15 Playing a Disc 16 Repeat Random Intro Playback 17 Programming a Playlist 18 Using the Cassette Player 18 About the Cassette Keys 18 Playing a Cassette Tape 18 Recording to Cassette Tapes 19 Record Protection 20 Caring for the Cassette Me...

Страница 3: ...cumentation and other product material at our website Come visit us on the web at www naxa com and see all that we have to offer In the Box Please take a moment to make sure that you have ev erything in the list below Although we make every ef fort to ensure that each Naxa device is securely packed and sealed we know a lot can happen in between us and you If anything is missing check back with you...

Страница 4: ...hes as instruct ed in manual Beforeturning onthe powerforthe firsttime make sure that the power cord is properly installed Store your tapes or CD in a cool area to avoid dam age from heat CAUTION TO REDUCE THE RISK OF ELECTRIC SHOCK DO DOT REMOVE COVER OR BACK NO USER SER VICEABLE PARTS INSIDE REFER SERVICING TO QUALI FIED SERVICE PERSONNEL WARNING Remove batteries if exhausted oriftheywill not be...

Страница 5: ...2 Handle Raise the handle to transport the unit safely and easily 3 CD compartment Load compact discs here The label side should face up 4 CD door latch Press here to open close the door of the CD compartment 3 Never open the compartment while a CD is playing or spinning 5 Speakers Full range drivers deliver powerful stereo sound ...

Страница 6: ...flash memory devices It is not designed to charge high power devices 10 VOLUME dial Turn to adjust the volume level 11 FUNCTION switch Set the switch to the position of the desired function mode 12 BAND switch Set the switch to the desired radio band 13 AUX Input jack Play audio from a device that is con nected to this 3 5mm input jack 14 Remote sensor Detects signals from the remote control 15 LC...

Страница 7: ... FOLD 10 key FOLD Skip to the previous folder MP3 only 10 Press to skip 10 tracks back 21 key Stop Press to stop CD MP3 USB playback 22 USB key Play Pause Press to start pause or re sume CD MP3 USB playback USB Press and hold to switch to USB mode 23 key Next Forward Next Press to skip to the next track Forward Press and hold to scan quickly forward through the current track 24 key Previous Revers...

Страница 8: ... Play Press play to start tape playback 28 TAPE key Rewind Press to rewind the tape when playback is stopped 29 TAPE key Fast forward Press to fast forward through the tape when playback is stopped 30 TAPE key Stop Press to stop tape playback Eject When playback is stopped press to open the cassette compartment 25 31 TAPE key Pause Press to pause tape playback or recording Depress the key again to...

Страница 9: ...nit 34 Battery compartment Load 8 UM 1 D size batteries into the compartment for portable power 35 Speaker input L Plug in the speaker cable from the left speaker here 36 Speaker input R Plug in the speaker cable from the right speaker here 37 AC Voltage switch Available only on models that support dual voltage Make sure the switch is correctly set to match your household power supply ...

Страница 10: ...SB playback CD USB Press and hold to switch between CD MP3 and USB mode 10 MP3 Press to skip 10 tracks forward Skipping 10 tracks will only work on media that contain more than 10 MP3s e g MP3 CDs USB flash drives PROG P MODE While playback is stopped press to enter Program mode in order to create a custom CD MP3 USB playlist During playback press to change the CD MP3 USB play mode i e repeat rand...

Страница 11: ...from each other as possible in order to increase stereo separation Attaching the Speakers 1 Position the speaker next to the main unit so that The top of the speaker rises one inch above the top of the main unit and The four hooks on the main unit sit flush inside the rectangular indent on the speaker 2 Slowly slide the speaker down until the retaining tab on the speaker clicks into the speaker la...

Страница 12: ...the retaining tab down towards the speaker 2 Slide the speaker up and then away from the main unit Connecting the Speakers Plug the speaker cables running from the back of each speaker to the left and right speaker inputs 35 36 found on the back of the unit ...

Страница 13: ...tch 2 Push gently on the switch with a flat head screw driver to set it 3 Replace the battery compartment lid 4 Connect the AC power socket 32 to a household power socket with the included power cord Battery Power Install 8 UM 1 D size batteries to enjoy music wher ever you are 1 Remove the lid from the battery compartment 34 found on the back of the main unit 2 Load eight D size batteries taking ...

Страница 14: ...Bass Boost is turned on lowerthevolume gradually Using the Radio Set the FUNCTION switch 11 to the RADIO position to start using the radio 1 Select a frequency band Set the BAND switch 12 to the AM FM or FM ST position L L Select the FM band mono when tuning to a station with a weak signal Select the FM ST stereo band when the signal is strong The FM ST indicator 8 will light when the tuner is loc...

Страница 15: ...her object Loading a Disc 1 Open the CD compartment 3 Press down on CD door latch 4 to release the spring latch 2 Load a compatible disc Place the CD into the com partment 3 with its label facing up 3 Close the CD compartment 3 Lower the door and push down on it at the CD door latch 4 Make sure that the spring latch catches and secures the door in place 4 The player will attempt to read the disc o...

Страница 16: ...hange tracks accordingly Press the FOLD 10 key 20 to skip 10 tracks backward The LCD screen 15 will change tracks accordingly L L Skipping 10 tracks will only work on media that contain more than 10 MP3s e g MP3 CDs USB flash drives To scan through a track at high speed Press and hold the key 23 during playback Play will advance quickly through the current track release the key to resume playback ...

Страница 17: ...ll replay all tracks on the CD until play is stopped To repeat all tracks in a folder press the PROG P MODE key 19 until the REPEAT FOLDER indica tor appears steady on the LCD screen 15 L L This option will only work with media that contain MP3s organized within folders di rectories e g MP3 CDs USB flash drives This option will not work when playing a regular audio CD To randomize the track order ...

Страница 18: ...lete then press the PROG P MODE key 19 to finish the playlist 6 Press the USB key 22 Play will start from the first track in the playlist 7 Press the key 21 to stop the programmed play list Open the CD compartment 3 to delete the program and return to normal playback Using the Cassette Player Set the FUNCTION switch 11 to the TAPE position to start using the cassette tape player About the Cassette...

Страница 19: ...playback Press the TAPE key 27 6 Adjust the volume Turn the VOLUME dial 10 to adjust the volume to a comfortable level 7 To stop playback press the TAPE key 30 L L Your player is equipped with Auto Stop When the end of the tape is reached the player will automatically stop the tape and all keys will be deactivated Recording to Cassette Tapes You can record from different sources to cassette tape R...

Страница 20: ... press the TAPE key 26 together with the TAPE key 27 For CD MP3 USB AUX start playback ѥ ѥ Do not force the TAPE key down if you detect resistance If you cannot press the TAPE key down the cassette tape may be record protected Refer to the section Record Protection to learn more 5 Stop recording Press the TAPE key 30 to stop recording L L You may also pause recording by pressing the TAPE 31 key De...

Страница 21: ...pening Caring for the Cassette Mechanism Cassette care and cleaning products are available for purchase from local and on line retailers The tape head and pinch wheel capstan assemblies need to be cleaned after every 10 hours of use 1 Erase head 2 Record Play head 3 Capstan 4 Pinch roller L L Press the PLAYkey 27 to get better access to the heads and roller in orderto clean them ѥ ѥ The erase head...

Страница 22: ...AUX Input jack 13 found on the front of the player 2 Prepare the player Set the FUNCTION switch 11 to the CD MP3 USB AUX position Turn the VOLUME dial 10 to lower the volume level 3 Prepare the audio source Start playback on the device Set the volume level of the device to ap proximately 80 of its maximum 4 Adjust the final volume Turn the VOLUME dial 10 of the player to set the volume to a comfor...

Страница 23: ... ON when the disc compartment door is still open If the unit is not to be used for a long period of time make sure that all power sources are disconnected from the unit Remove all batter ies from the battery compartment and unplug the AC DC adapter from the wall outlet Make it a practice to remove the AC DC adapter by grasping the main body and not by pulling the cord This unit employs a laser The...

Страница 24: ...ss proper ventilation is provided or the manufacturer in structions have been adhered to 10 Power Sources This product should be operated only from the type of power source indicated on the rating label If you are not sure of the type of power supply to your home consult your product dealer or local power company For products intended to operate from battery power or other sources refer to the ope...

Страница 25: ...y kindon the product 19 Servicing Do not attempt to service this product yourself as open ing orremoving covers may expose you to dangerous voltage or other hazards Refer all servicing to qualified service personnel 20 Damage Requiring Service Unplug this product from the wall outlet and referservicing to qualified service personnel under the follow ing conditions a when the power supply or plug i...

Страница 26: ...io frequency energy and if not installed and used in accordance with the instructions may cause harmful interference to ra dio communications However there is no guarantee that interference will not occur in a particular installation If this equipment does cause harmful interference to radio or television reception which can be de termined by turning the equipment off and on the user is encouraged...

Страница 27: ...Disc Optical pickup 3 beam laser Frequency response 100 16 000 Hz Cassette Recording system 2 tracks 2 channel stereo Bias system DC bias Frequency response 125 6 300 KHz Wow and Flutter 0 35 WRMS JIS Audio Power output Max 5 W total 2 5 W x 2 Input 3 5mm AUX Note Product are improved continuously We reserve the right to modify the product and specifications without prior notice ESD Remark In case...

Страница 28: ...structions in this manual Please also visit us on the web at www naxa com to get up to the minute news alerts and documentation for your device For additional assistance please contact Naxa Technical Support NAXATechnical Support 2320 East 49th St Vernon CA 90058 http www naxa com naxa_support ...

Страница 29: ...www naxa com Page 29 ...

Страница 30: ......

Отзывы: