background image


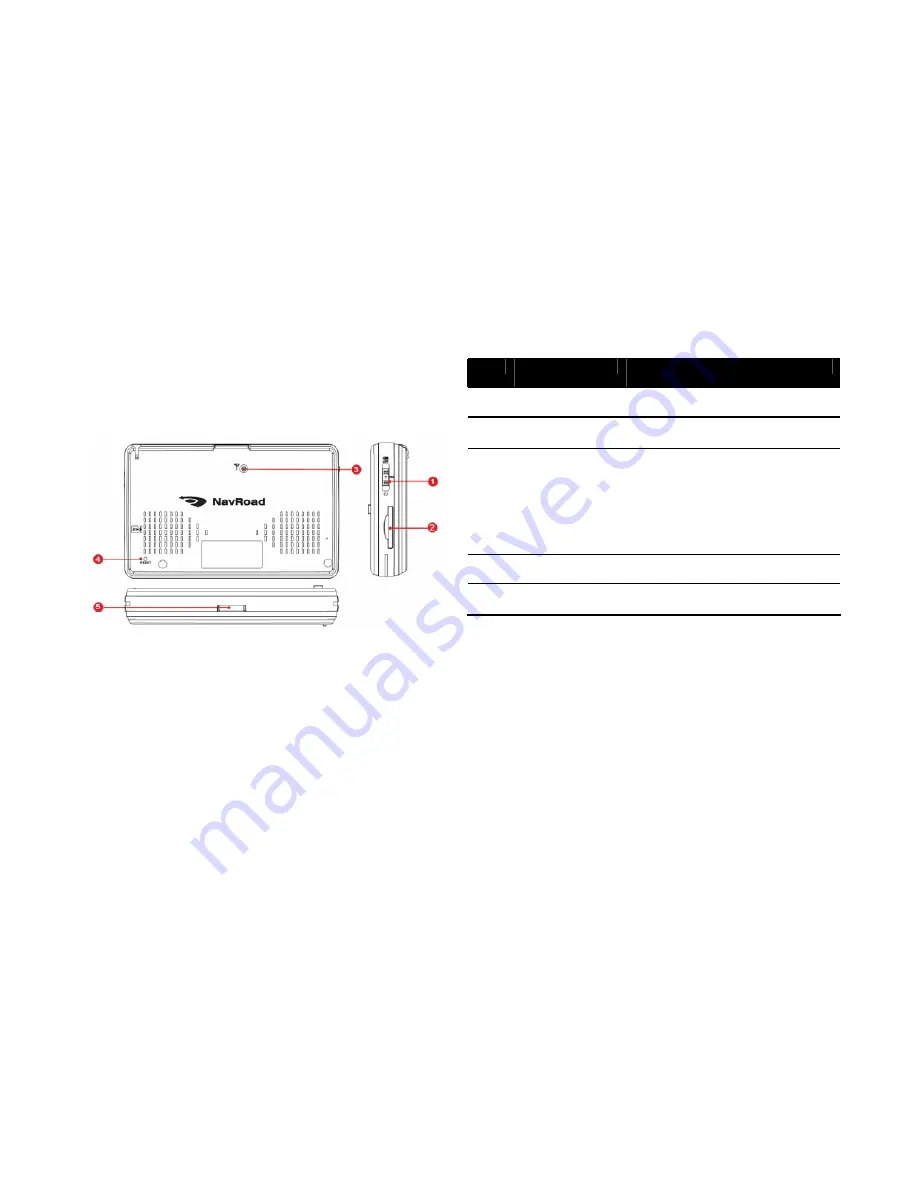
Rear, Right and Bottom, Side Components.   


Ref

Component 

Description 

Power Button 

Turns on and off the device. 

SD Slot 

Accepts a SD card for accessing 
date such as MP3 music. 

3 External 

Antenna

Connector 

This Connector(under rubber dust 

cover) allows use of an optional 
external GPS antenna with 
magnetic mount, which may be 
positioned on top of the car for 
better GPS signal reception in areas 
with poor reception. 

Reset Button 

Restarts your device(soft reset) 

Docking Port 

This port should be connected with 
docking cradle.   


Содержание NR430BT

Страница 1: ...NR430BT User s manual ...

Страница 2: ...e express written consent of NavRoad Copyright 2006 NavRoad All rights reserved Table of Contents 1 Safety Information 1 1 Caution 1 2 Normal Care 2 Product Information 2 1 Package Contents 2 2 Installing to the Vehicle 3 Basic Operations 3 1 Getting Start 3 2 Main Screen 3 3 Phone 3 4 Music 3 5 Photos 3 6 Movies 3 7 Settings 4 Service Support 4 1 Technical Support 4 2 Registration 4 3 Maintenance...

Страница 3: ...is in a bag Chapter 1 Safety Information 5 Do not attempt to repair the device If device is damaged or is in a wet environment replace the device immediately 6 About the battery Use only the original factory approved charger A Lithium battery is built in to the device To prevent fire or skin burns do not disassemble pierce impact or expose the battery to fire The battery will crack explode or rele...

Страница 4: ...erate the touch screen never attempt this while operating a vehicle Clean the touch screen using a soft clean lint free cloth Use water isopropyl alcohol or eyeglass cleaner if needed Apply the liquid to the cloth and gently wipe the touch screen Protecting your NavRoad NR430BT Do not expose the unit to water or other forms of moisture the NavRoad NR430BT is not waterproof Do not store the unit wh...

Страница 5: ...2 1 Package Contents Please check the contents in the Box Manual SD card with navigation software and maps Chapter 2 Product Information depends on version 5 ...

Страница 6: ...ssociated with damage to your vehicle or vehicle s occupants as a result of how you choose to mount the NavRoad NR430BT 1 Attach the windshield mount to the back of the docking cradle 2 Press the windshield mount to the glass and slide the locking lever toward the glass 3 Insert the NavRoad NR430BT onto the docking cradle 4 Plug the power cable into rear dc input of the docking cradle as shown 5 P...

Страница 7: ...n Your NavRoad NR430BT must be outside to locate your current position The first time you start your NavRoad it can take up to 5 minutes to find your current position If it takes longer than 5 minutes make sure that you are in an open place without tall buildings or trees around you In the future your position will be found much faster normally within a few seconds Once your NavRoad has located yo...

Страница 8: ...the screen with your fingertip to select menu commands 5 Charge Indicator Glows in bright Red to indicate that the battery is charging and turns green when the battery is fully charged 6 MIC This is for receiving voice 7 Hand String Hole Hand string attaches to this hole 8 Headphone Connector Connects to stereo headphones 9 Mini USB Connector Connects to the USB cable for home charging or Sync 10 ...

Страница 9: ... MP3 music 3 External Antenna Connector This Connector under rubber dust cover allows use of an optional external GPS antenna with magnetic mount which may be positioned on top of the car for better GPS signal reception in areas with poor reception 4 Reset Button Restarts your device soft reset 5 Docking Port This port should be connected with docking cradle 9 ...

Страница 10: ...the NavRoad device 2 Push Button This button is working for disconnect with NavRoad Device 3 DC Input DC 5V input 4 TMC Connector The TMC Traffic Message Channel module for receiving TMC information 5 Audio out External Sound output 6 External MIC Connector External MIC input for better voice receiving in hand free calling 10 ...

Страница 11: ...Bluetooth radio turns on 2 If this is the first time you use the program your device will switch to Pair Mode and wait for the pairing action from your mobile phone maximum for 4 minutes The connection will be established as long as you initiate the pairing process 3 If prompted to enter the pincode or passkey on your mobile phone tap the passkey specified by the NavRoad NR430BT dhe default is 123...

Страница 12: ...ired mobile phone will replace the oldest one The Phone program cannot access the data such as the phone book and call history stored in a connected mobile phone 3 3 3 Placing a Call After pairing with your mobile phone you can place a call using any of the four buttons Call Call History and Redial on the Phone main screen By tapping the Call button on the Phone main screen you can enter the telep...

Страница 13: ...coming outgoing or missed to view the last 20 calls of the selected type With an item selected you can tap to dial the number to delete the item To clear all items in the current list tap Redial Tap the Redial button on the Phone main screen to dial the last number you called or received 3 3 4 Operations During a Call During a call four functions are available If you need to input other numbers su...

Страница 14: ...you To end the mute mode tap the same button again Tap to end the call Tap to switch the call to your mobile phone To switch back to your device tap the same button again 3 3 5 Receiving a Call When you have a call after pairing with a mobile phone the device rings and displays the Incoming Call screen To accept the call tap To reject the call tap To mute the ring tone before receiving or rejectin...

Страница 15: ...ap Connect from Phone main screen to search for nearby devices 2 The device list appears on the screen Tap the target device from the list of the devices 3 Tap the device you want to use as a Hands Free or a Headset 4 When prompted to enter the passkey in your mobile phone Please input the passkey requested by the NavRoad and tap OK Viewing Active Connections After starting Phone menu tap Connect ...

Страница 16: ...ur device incorporates Bluetooth wireless communications technology Devices with Bluetooth capabilities can exchange information over a distance of bout 10 meters 30 feet without requiring a physical connection Preference allows you to configure and use the Bluetooth capabilities of your device Starting and Exiting Preference 1 Tap the Phone button on the Main Screen and then the Preference button...

Страница 17: ... available options are Home Number Allows you to edit the your home number Auto Answer You can tell your NR430BT to answer every call automatically after a certain time Ring Tone You can select one ring tone from 3 kinds of ring tone which like to hear 3 4 Music 3 4 1 Starting and Exiting Music Player Music turns your device into a Music player It features Playback of MP3 files Basic Playback cont...

Страница 18: ... MP3 files ready on a storage card 3 4 3 Playing MP3 Files 1 If your files are in a storage card insert the card into your device 2 Tap the Music button on the Home screen to start the program 3 The program will search for the MP3 files in your device and in the storage card When MP3 files are detected they will be showed to the play list 4 To start the playback tap Select button from the MP3 file...

Страница 19: ...vious or next file Volume Increase or decrease the volume The indicator on the panel shows the current volume level Exit Close the program and return to the Home screen Playback Mode Cycle through the following modes Repeated playback of the all files in the folder Single playback of the current folder Repeated playback of current file Repeated playback of all files in random order 19 ...

Страница 20: ...ictures in the list view You can press the Up or Down arrow button to go to next or previous page 3 5 4 Viewing a Picture in Full Screen When you tap or a picture once in the list view the picture is displayed in full screen To go back to the list view tap anywhere on the screen to display the Picture list view screen 3 5 6 Viewing the Slideshow To view the slideshow of all your pictures use one o...

Страница 21: ...it the program tap 3 6 2 Preparing the Movie Files for Your Device Before using the program have the Movie files ready on a storage card 3 6 3 Playing Movie Files 1 If your files are in a storage card insert the card into your device 2 Tap the Movie button on the Main menu to start the program 3 The program will search for the Movie files in the storage card When Movie files are detected they will...

Страница 22: ...Stop Stop the playback RWD F FWD Play Rewind or Fast Forward Previous Next Play the previous or next file Volume Increase or decrease the volume The indicator on the panel shows the current volume level Exit Close the program and return to the Home screen 3 7 Settings 3 7 1 Starting and Exiting Settings You can customize the system settings such as backlight brightness volume and language Once you...

Страница 23: ...ons describe the various buttons and their functions 3 7 2 Information 1 Tap the Settings button on the Main menu 2 Tap the Information button 3 7 3 Start Settings 1 Tap the Settings button on the Main menu 2 Tap the Start Settings button 23 ...

Страница 24: ...cations by tapping their appropriate icon You can select other application on the device or SD card by tapping Then you can select the application from the list and tap OK to confirm 3 Move the knob along the track bar to adjust the volume To decrease the volume move the knob to the left To increase the volume move the knob to the right 24 ...

Страница 25: ...htness 1 Tap the Settings button on the Main menu 2 Tap the Brightness button 3 Click or to adjust the brightness of the backlight To darken the backlight move the knob to the left To lighten the backlight move the knob to the right 3 7 6 Change Language NOTE To change the language of the Map navigation software use Map settings 1 Tap the Settings button on the Main menu 2 Tap the Language button ...

Страница 26: ...the remaining power of your battery You can set a timer to automatically turn off your device when it is idle for a set period of time automatically dim the LCD display when it is idle for a set period of time 3 7 8 Touch Screen You can calibrate the touch screen if it is not responding accurately to your taps 1 Tap the Settings button on the Main menu 2 Tap the Calibration button 3 Tap to start t...

Страница 27: ...new target Repeat each time to complete the calibration process 6 When completed within 5 seconds tap no 6 3 7 9 Date Time settings To set Date Time and Timezone tap the time display at the upper right corner of the display Set all required information and tap OK to confirm 27 ...

Страница 28: ... please note the following while using and storing Chapter 4 Service Support Keep dry This product is not waterproof If it comes into contact with water spray or is submerged it will seriously damage the components resulting in irreversible damage Do not drop the unit If violently impacted or shocked serious damage may be caused Avoid sudden temperature changes Condensation may occur when entering...

Страница 29: ...n a dry box is recommended Please do not keep the product in the following environments 1 Unventilated and humid locations 2 In a car window that is exposed to excessive amounts of sunlight 3 In an environment where humidity is over 80 Troubleshooting Info Power cannot startup insufficient battery charge please connect to the adapter and restart system No screen displayed After powering up if the ...

Страница 30: ...n Rechargeable Li Polymer 1800mAh up to 4 h 30 min Display 4 3 QVGA TFT LCD Resolution 480 x 272 px 16 millions colors Audio Built in speakers built in microphone Bluetooth Spec v1 1 v1 2 v2 0 Compliant Connectors 3 5 mm stereo earphones jack External GPS antenna Mini USB Docking station connectors TMC antenna External microphone External speakers Chapter 5 Fact Sheet Charger Dimensions W x H x D ...

Страница 31: ...equipment may generate or use radio frequency energy Changes or modifications to this equipment may cause harmful interference unless the modifications are expressly approved in the instruction manual The user could lose the authority to operate this equipment if an unauthorized change or modification is made CE USER INFRMATION Hereby WIDER Corp Declares that this Bluetooth M N NR430BT is in compl...

Отзывы: