background image

M-Nav 750 | User Manual

16

4.6 Driver 

Logoff

If you had to enter your Driver PIN and your work status details (as described in Section 4.2) 
before you could use the M-Nav 750, you must use Logoff when you have fi nished work.

Note:

 These screens appear only if your fl eet administrator has setup the Driver Logon and Driver 

Status functions in the OnlineAVL2 application.

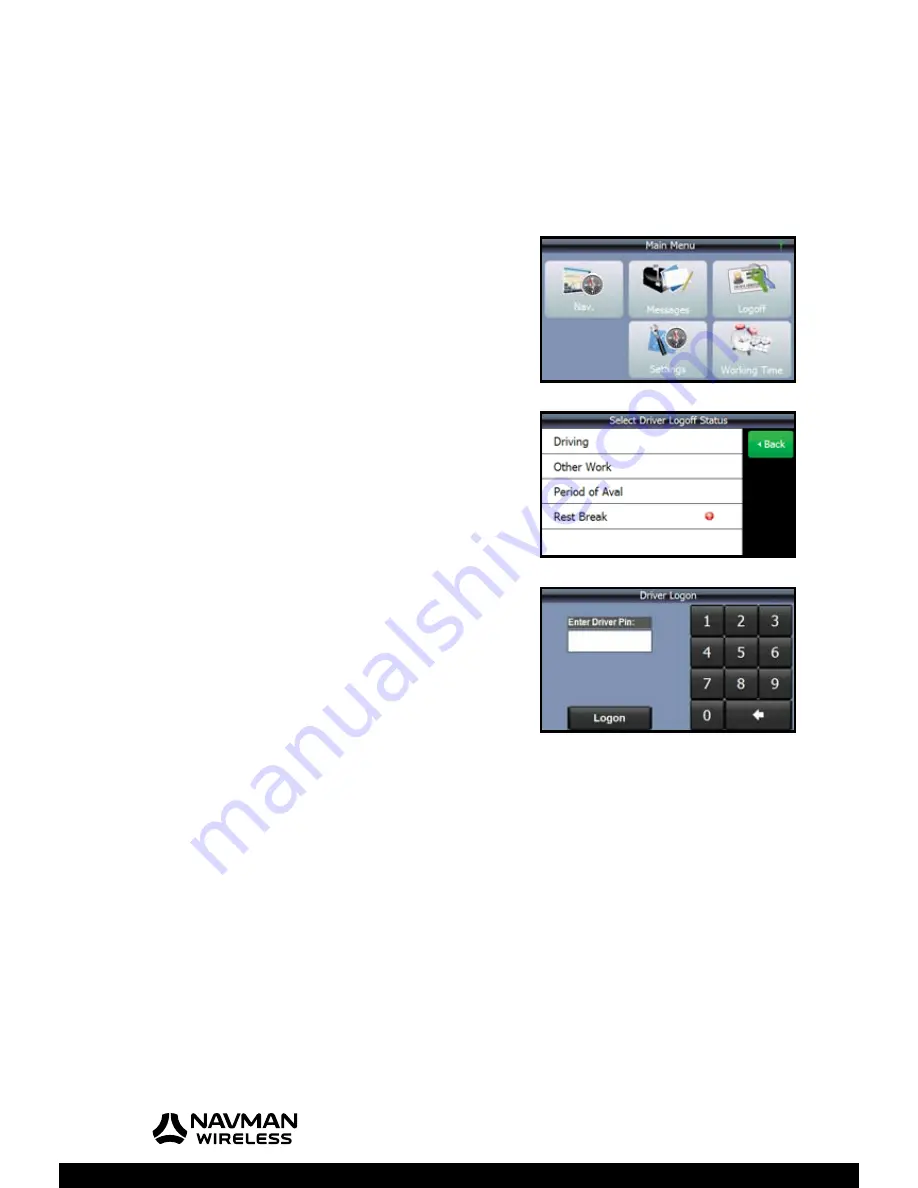
To log off, press the Hot Button on the top of the M-Nav 750 
to display the ‘Main Menu’.

Touch 

Logoff

.

When the ‘Select Driver Logoff Status’ screen appears, touch 
the description that best describes your current status (e.g. 

Rest Break

).

You are logged out automatically and the ‘Driver Logon’ 
screen is displayed.

Содержание M-Nav 750

Страница 1: ...User Manual M Nav 750 GPS TRACKING AND FLEET MANAGEMENT SOLUTIONS...

Страница 2: ......

Страница 3: ...ning screens 12 4 2 Driver Logon Status 13 4 3 Vehicle Inspection 13 4 4 Check the GPS Status 14 4 5 Check the Qube Tracking Device Status 15 4 6 Driver Logoff 16 5 Messages 17 5 1 Types of Message 17...

Страница 4: ...38 8 5 Save a Route 38 8 6 Add a Detour to Avoid an Area 39 8 7 Use a Saved Route 39 8 8 Delete a Saved Route 40 8 9 Delete a Route 40 9 Route Information 41 9 1 Show an Overview of this Route 41 9 2...

Страница 5: ...ags or other safety equipment Consult the vehicle manual to ensure the mounting location is safe if necessary Do NOT enter navigation data or other information into the M Nav 750 while you are driving...

Страница 6: ...useful resource along or nearby the route such as a fuel location or a post of ce You can add a POI to your route as a via point Via Point A speci c location that you want to visit along the route A v...

Страница 7: ...An optional Permanent Installation Kit enables you to install the M Nav 750 onto any hard surface such as the top of the dashboard which has a good view of the sky Contact your supplier for more info...

Страница 8: ...M Nav 750 User Manual 8 2 3 M Nav 750 Parts Familiarise yourself with the parts of your M Nav 750 before starting the installation 1 4 6 7 8 2 3 5 9 10 11 14 15 16 13 12...

Страница 9: ...battery has discharged the splash screen will be displayed instead 7 Hot button Press to return to the Main Menu 8 Internal GPS antenna Approximate position of the internal GPS antenna that is built i...

Страница 10: ...shown to form the docking cradle 3 2 Windscreen Installation Note Some windscreens contain areas of tinted glass that may interfere with the GPS signal Do not mount the M Nav 750 in these areas Read...

Страница 11: ...nd then push the M Nav 750 gently back until it snaps into place with an audible click IMPORTANT The M Nav 750 must be in the docking cradle and connected to the Qube tracking device in order for you...

Страница 12: ...er the splash screen just touch the language you want to use then touch Accept Note You can con gure your M Nav to choose this language automatically at start up see Section 10 9 Note The country map...

Страница 13: ...ber then touch Logon If the Select Driver Logon Status screen appears touch the description that best describes your current status e g Other Work Note Driving is the default Driver Logon Status Just...

Страница 14: ...To check the status of the GPS signal at any time press the Hot Button on the top of the M Nav 750 to display the Main Menu Touch Nav The map is displayed This example shows a default map view speci c...

Страница 15: ...you and your eet administrator to send and receive messages to each other see Section 5 To check the status of the Qube tracking device at any time just press the Hot Button on the top of the M Nav 7...

Страница 16: ...reens appear only if your eet administrator has setup the Driver Logon and Driver Status functions in the OnlineAVL2 application To log off press the Hot Button on the top of the M Nav 750 to display...

Страница 17: ...ies ready for pick up from the workshop or a message that you send e g completed job Route to messages A message from your eet administrator with an embedded GPS location you can use for navigation to...

Страница 18: ...on on the top of the M Nav 750 to display the Main Menu The number of unread stored messages is shown in the top left corner of the screen In this example there are 3 unread messages Touch Messages Th...

Страница 19: ...nt to use a canned template see the next section The reply is displayed on the screen Touch Send to send the reply immediately A beep sounds when the reply is sent and the message icon is updated on y...

Страница 20: ...ic keyboard and the character keyboard You can also touch the large white up arrow to toggle between lower and uppercase characters To create a capital at the beginning of a sentence press the outline...

Страница 21: ...tely The updated Message List is displayed Note The OnlineAVL2 application records the time that the message was deleted 5 7 Show a Message Location Note This section assumes that the route to message...

Страница 22: ...message is already displayed on the M Nav 750 Touch Go to exit from Messages and navigate to the location mentioned in the route to message The M Nav 750 immediately calculates the new route starting...

Страница 23: ...it your own preferences Note After a time the icons become transparent so that you can see more of the map but they are still active When you touch the screen the icons are shown in solid colour again...

Страница 24: ...p that shows an enlarged view of your next manoeuvre and the distance to it Touch the icon in the upper left corner to hide or show the mini map DTG Distance To Go to the next via point ETA Estimated...

Страница 25: ...e Volume just touch the Volume icon on the map to temporarily increase the volume of the spoken directions one step at a time You can also set then save the volume at a speci c level or mute it To set...

Страница 26: ...matically by your M Nav 750 To show the map in night vision mode press the Hot Button on the top of the M Nav 750 to display the Main Menu Touch Nav to display the map Touch Menu Touch the down arrow...

Страница 27: ...whenever you want by touching 123 or ABC in the lower right corner Touch the large white arrow in the blue box if you want to toggle between lowercase and uppercase characters If you make a mistake y...

Страница 28: ...lighted in blue in the address box just touch the white arrow in the red box to clear it Touch Find The M Nav searches for the street address and displays the results Sometimes there are multiple matc...

Страница 29: ...On the Find address menu touch Find postal code Enter the postal code using the onscreen keyboard then touch Find A list of matches is displayed Touch the correct match The navigation map displays th...

Страница 30: ...shown using the onscreen keyboards Touch Find Note if you are entering a Latitude and Longitude use the format WGS 84 decimal degrees e g 42 091172 A list of matches is displayed Note Sometimes there...

Страница 31: ...ious entry is highlighted in blue in the address box just touch the white arrow in the red box to clear it Touch Find A list of matches is displayed Note Sometimes there are multiple matches If necess...

Страница 32: ...the previous sections if necessary Touch Navigate to Note Your M Nav must be receiving a GPS signal so that it can calculate the route from your present location See Section 4 4 if necessary The M Na...

Страница 33: ...o 8 3 if necessary or if you have visited the location recently touch My recent destinations Touch the location that you want to set as home It is displayed on the map Touch More Select Set as Home A...

Страница 34: ...f you have visited the location recently touch My recent destinations Touch the location that you want to make a favourite It is displayed on the map Touch More Select Add to Favourites The onscreen k...

Страница 35: ...you can save it see Section 8 5 You can also nd out more about the route before you start your journey see Section 9 8 1 Plan a Route from Any Location You can plan a route in advance with the M Nav 7...

Страница 36: ...ons as via points to visit along the route or to detour to To add a location as a via point touch Menu to display the Navigation main menu Touch Find location Find and display the location of the rst...

Страница 37: ...ed Use the down arrow and up arrow to scroll to the correct category if necessary Touch the category e g Parking The M Nav 750 immediately searches for places in that category then displays a list of...

Страница 38: ...listed in the order that you added them to the route but this may not be the most ef cient order in which to visit them To re order the via points you can either touch any via point to display a list...

Страница 39: ...ely calculates a detour for the speci ed distance and displays it on the map 8 7 Use a Saved Route To use a saved route press the Hot Button on the top of the M Nav 750 to display the Main Menu Touch...

Страница 40: ...ist of options Touch Delete this trip Amessageasksyoutocon rmthatyouwanttodeletetheroute Touch Yes to con rm The route is immediately deleted and an updated list of your saved routes is displayed 8 9...

Страница 41: ...displayed Touch Trip Overview A map of the complete route with any via points is displayed Zoom in to see more detail if necessary 9 2 Demonstrate this Route Note This section assumes that the M Nav 7...

Страница 42: ...e Note This section assumes that the M Nav 750 has calculated the route and is showing it on the map Touch Route The Trip menu is displayed Touch Manoeuvres list A preview of all the manoeuvres along...

Страница 43: ...pe Vehicle Type The M Nav 750 can calculate your routes in three different ways depending on your choice Fastest route The speediest route tends to use motorways when possible Shortest route The short...

Страница 44: ...alculating the routes Note This option may not be available in your market Contact your supplier for more information Press the Hot Button on the top of the M Nav 750 to display the Main Menu Touch Na...

Страница 45: ...the cargo type that is selected Touch a cargo type to change the current setting When you have nished touch Back to specify more truck attributes or Close to save the settings automatically and re di...

Страница 46: ...This section assumes that no current route is displayed on your M Nav 750 Press the Hot Button on the top of the M Nav 750 to display the Main Menu Touch Nav to display the map Touch Route to display...

Страница 47: ...y with the new distance units 10 6 Set Date Time Formats To set the date format press the Hot Button on the top of the M Nav 750 to display the Main Menu Touch Settings to display the Settings menu To...

Страница 48: ...time from GMT at 15 minute increments You must use either a geographic time zone OR a custom time zone You cannot use both To set the geographic time zone or a custom time press the Hot Button on the...

Страница 49: ...e Use custom time zones option must be ON Touch the current time zone setting e g GMT 12 A list of time offsets is displayed Use the up arrow or down arrow to nd the time offset you want to use then t...

Страница 50: ...menu described in the previous section whenever you switch on the M Nav 750 To change the current Choose Language at Startup setting press the Hot Button on the top of the M Nav 750 to display the Ma...

Страница 51: ...ctory default settings press the Hot Button on the top of the M Nav 750 to display the Main Menu Touch Settings to display the Settings menu Touch System The System screen is displayed Use the up arro...

Страница 52: ...port navmanwireless com au Website www navmanwireless com au Navman Wireless NZ Navman New Zealand 7 11 Kawana Street Northcote PO Box 340 184 Birkenhead 0746 Auckland NEW ZEALAND Tel 64 9 481 0500 Fa...

Страница 53: ...M Nav 750 User Manual 53 Notes...

Страница 54: ...M Nav 750 User Manual 54 Notes...

Страница 55: ......

Страница 56: ...MAN000002 Rev A Lat 42 6 16 98 N Lon 87 49 29 27 W...

Отзывы: