background image

36

NAVMAN


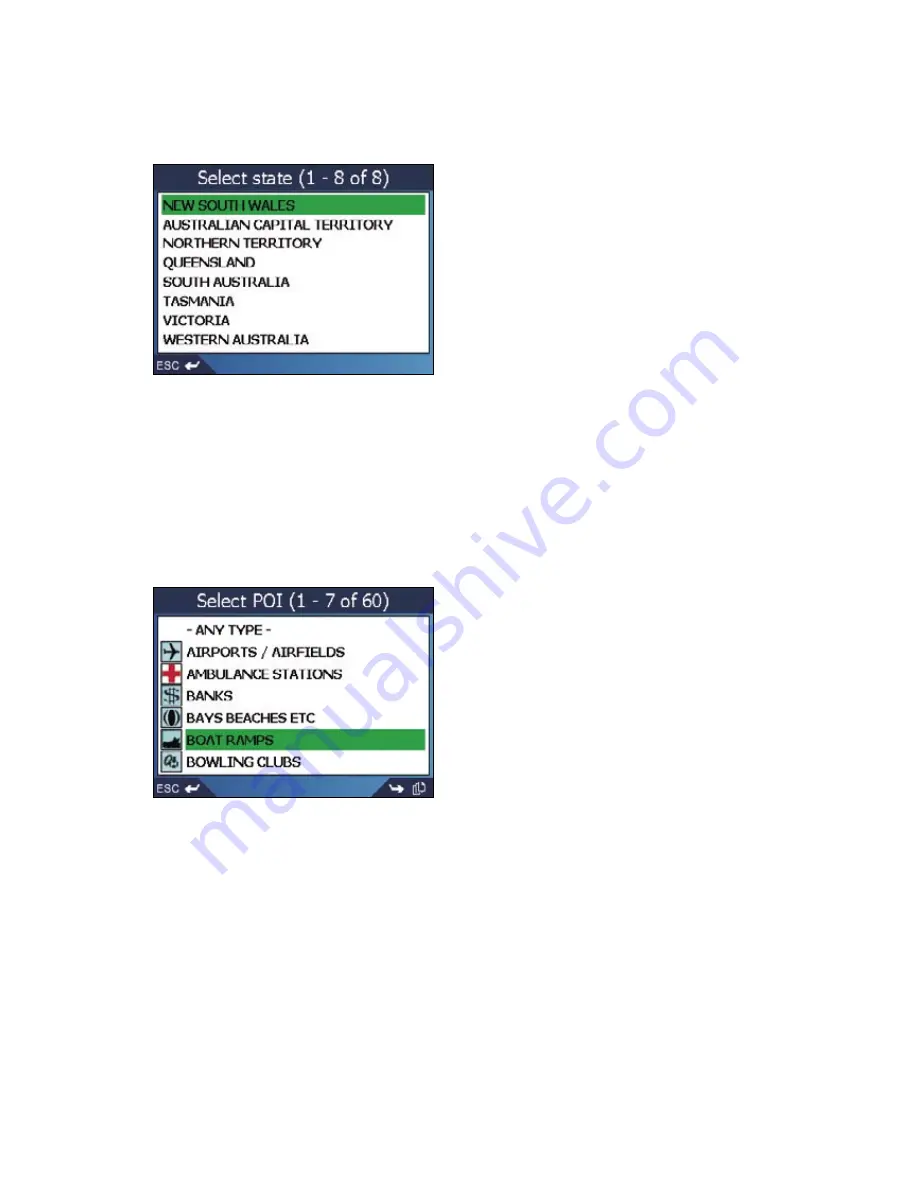
Step 3: Select the State of Destination

If you only have the map of one state installed and selected, that state is selected for your destination by 
default and cannot be changed. Go to Step 4.


a.  Select a state using the 

8-way toggle

. Press 

OK

 to select from 

the list. The Destination screen will display.


Step 4: Select the Type of POI

Note:

 To narrow the search for a type of POI, you can first search by Town or City.

a.  From the Destination screen, select Find Point of Interest, then press 

OK

.  

The Select POI screen will display.


Содержание M-Nav 650

Страница 1: ...M Nav 650 User Manual English Europe Australia New Zealand...

Страница 2: ...2 NAVMAN...

Страница 3: ...6 6 2 Receiving Messages 16 6 3 Sending a Message 17 6 4 Reading Messages 17 6 5 Reading Editing Sent Messages 18 6 6 Going to a Message Location 18 To navigate immediately to the message location 19...

Страница 4: ..._______________________________ 59 16 1 Saving a Favourite 59 16 2 Saving a Favourite from the 2D Map Screen 60 16 3 Editing the Name of the Favourite 61 16 4 Deleting a Favourite 62 16 5 Navigating t...

Страница 5: ...tructed view of the sky For more information about GPS and your M Nav see Section 5 1 2 Safety Notice WARNING In a vehicle it is your sole responsibility to place secure and use the M Nav in a manner...

Страница 6: ...6 NAVMAN...

Страница 7: ...cup ballfoot b Locking nut c Socket clip d Baseplate e Retainer ring f Screw plate g Adhesive tape h Alcohol swab i 3 x Screws j 3 x Screw caps Mounting brackets Documentation including User Manual Qu...

Страница 8: ...ious screen or deletes the last text character on the Keyboard screen hold down for longer to delete a whole line at once 5 8 way toggle Selects Main Menu options keyboard characters and Preferences m...

Страница 9: ...dcasts voice commands and warnings Use Volume button to adjust 2 Power LED Lit when receiving power 3 Qube Power and Data Socket Connection socket for power and data from the Navman Halo Qube 4 USB So...

Страница 10: ...Suction Mount Choose a position on the windshield that is clearly visible to the driver without obstructing the view of the road Slip the locking nut over the ballfoot Snap the socket clip onto the ba...

Страница 11: ...the lever down 4 Use the baseplate and screws supplied to x the M Nav base into the dashboard 5 Slip the locking nut over the ballfoot with the at side facing upwards 6 Snap the socket clip onto the b...

Страница 12: ...lip Position the two locating tabs on the underside of the M Nav into the corresponding slots on the clip Snap the upper side of the M Nav into the clip Connect the M Nav to your Halo Qube GPS device...

Страница 13: ...OK Press to go to the next screen The Warning screen will display Step 2 Warning Screen Read the warning message Select Accept then press OK to con rm that you understand The rst Tutorial screen will...

Страница 14: ...a selection by pressing OK The Route Information option is only available when a route has been calculated See Section 12 6 for more information 4 2 To put the M Nav in Standby Mode Press for three se...

Страница 15: ...detailed information on your current GPS x see Section 17 8 5 2 Modem Signal Strength The lower left corner of the display also indicates the Qube modem signal strength No Signal The M Nav is unable...

Страница 16: ...ceiving Messages When a text message is sent to you a New Message alert will be displayed no matter what screen you are currently viewing Using the 8 way toggle select EITHER Cancel to remove this scr...

Страница 17: ...creen will display 3 Using the 8 way toggle either modify an existing template or compose a new message For details on how to use the Keyboard screen see Section 7 2 4 Select Send Press OK The message...

Страница 18: ...ou wish to read or re send Press OK The Create Message screen will display You may re send this message or edit it For details on how to use the Keyboard screen see Section 7 2 If you wish to send thi...

Страница 19: ...s location select Go Press OK The 2D Map screen will display The route is calculated and the M Nav guides you to the location Note Message Locations are also easily added to Multi stop Trips allowing...

Страница 20: ...two case studies to help guide you through setting your destination 7 1 Destination Screen The Destination screen is used to select your destination by area street postal code ZIP code Point of Inter...

Страница 21: ...y layouts see Section 17 As you select each character the rst two results will display Press to see more search results Use the 8 way toggle to move around the Keyboard screen To select a character or...

Страница 22: ...a larger area in less detail press To display your destination on the 2D Map screen select the preview map then press OK The 2D Map screen will display To save your destination as a Favourite select S...

Страница 23: ...f searching for Fred Archer Way search by Fred Example 3 If searching for Franz Grillparzer Strasse search by Franz Streets Named After People Italy In Italy if a street name is a person s name includ...

Страница 24: ...this is the rst time you are setting your destination and you have maps from more than one country installed and selected then the Select Country screen will display instead of the Destination screen...

Страница 25: ...will display b Use the Keyboard screen to nd the area of your destination For information on using the Keyboard screen see Section 7 2 The Destination screen will display Step 4 Find the Street of Des...

Страница 26: ...ll display Note If Enter house number option is not displayed house numbers are not available for your selected street Select Go to centre of street then press OK to display the Preview screen Go to s...

Страница 27: ...press OK The 2D Map screen will display To save the destination as a Favourite select Save then press OK The New Favourite screen will display See Section 16 To change your destination press ESC The D...

Страница 28: ...m this procedure the Destination screen will open as expected ii If this is the rst time you are setting your destination and you have maps from only one country but more than one state installed and...

Страница 29: ...a Select a state using the 8 way toggle Press OK to select from the list The Destination screen will display Step 4 Find the Town or City of Destination a From the Destination screen select Find town...

Страница 30: ...n using the Keyboard screen see Section 7 2 The Destination screen will display Step 6 Find the House Number of Destination a From the Destination screen select Enter house number then press OK The Ke...

Страница 31: ...the 3D Map screen select Go then press OK The 3D Map screen will display To display the destination on the 2D Map screen select the preview map then press OK The 2D Map screen will display To save the...

Страница 32: ...estination screen will display Important Note If this is the rst time you are setting your destination and you have maps from more than one country installed and selected then the Select Country scree...

Страница 33: ...select Find Point of Interest then press OK The Select POI screen will display b Select a POI type using the 8 way toggle Press OK to select from the list The Keyboard screen will display c Use the K...

Страница 34: ...preview map then press OK The 2D Map screen will display To save the destination as a Favourite select Save then press OK The New Favourite screen will display See Section 16 To change your destinatio...

Страница 35: ...you perform this procedure the Destination screen will open as expected ii If this is the rst time you are setting your destination and you have maps from only one country but more than one state ins...

Страница 36: ...t and cannot be changed Go to Step 4 a Select a state using the 8 way toggle Press OK to select from the list The Destination screen will display Step 4 Select the Type of POI Note To narrow the searc...

Страница 37: ...lect Go then press OK The 3D Map screen will display To display the destination on the 2D Map screen select the preview map then press OK The 2D Map screen will display To save the destination as a Fa...

Страница 38: ...aller area in greater detail press To display a larger area in less detail press 2 Press OK to display cross hair on the 2D Map screen To remove the cross hair press ESC 3 Use the 8 way toggle to plac...

Страница 39: ...i stop trips each with up to 14 destination points 11 1 Case Study 1 Europe and New Zealand This case study will show you how to set a multi stop trip by selecting your country then area then street t...

Страница 40: ...Country of Your Destination Point If you only have the map of one country installed and selected that country is selected for your destination point by default and cannot be changed Go to Step 3 a Fr...

Страница 41: ...creen will display b Use the Keyboard screen to nd the area of your destination point For information on using the Keyboard screen see Section 7 2 The Destination screen will display Step 4 Find the S...

Страница 42: ...tion screen select Enter house number then press OK The Keyboard screen will display Note If Enter house number option is not displayed house numbers are not available for your selected street Select...

Страница 43: ...ints Select a destination point to move using the 8 way toggle Press OK to select from the list The Preview screen will display Select Move then press OK The Multi stop Trip screen will display Use th...

Страница 44: ...anada and USA only For navigating in Europe and New Zealand see Section 11 1 Step 1 Start Your Multi stop Trip a From the Main Menu select the Multi stop Trip option The Multi stop Trip screen will di...

Страница 45: ...lay b Select a country using the 8 way toggle Press OK to select from the list The Destination screen will display If you only have the map of one state installed and selected that state is selected f...

Страница 46: ...yboard screen will display b Use the Keyboard screen to nd the town or city of your destination For information on using the Keyboard screen see Section 7 2 The Destination screen will display Step 5...

Страница 47: ...on screen select Enter house number then press OK The Keyboard screen will display Note If Enter house number option is not displayed house numbers are not available for your selected street Select Go...

Страница 48: ...r of your destination points Select a destination point to move using the 8 way toggle Press OK to select from the list The Preview screen will display Select Move then press OK The Multi stop Trip sc...

Страница 49: ...ip Next Dest then press OK The next destination point will be skipped and the route recalculated to the following destination point 11 4 Adding Message Locations to Multi stop Trips Message Locations...

Страница 50: ...s OK or when a route has been calculated press to cycle through the screens Use the 8 way toggle to move around the map To display a smaller area in greater detail press To display a larger area in le...

Страница 51: ...p summary press OK 12 3 Message and Look Screen The Message and Look screen allows you to skip through your messages while providing guidance feedback When a route has been calculated press from the 3...

Страница 52: ...display Access to this screen is controlled by the Settings Display screen To view the Next 4 Turns screen when a route has been calculated press to cycle through the screens The next instruction Dir...

Страница 53: ...your current route and lets you skip a trip destination point or cancel a route The screen is only available from the Main Menu when you are navigating a route Main Menu Route Information Show Route S...

Страница 54: ...aining to your destination If you are navigating a multiple destination trip the information displayed will relate to your next destination point Skip Next Destination Select Skip Next Dest then press...

Страница 55: ...display at the bottom of the 2D Map screen 5 Press OK The Pop up menu will display 6 You can choose one of the following options Menu Option Description Navigate To Calculates a route from your curren...

Страница 56: ...correct size and position using the 8 way toggle Press OK to enable the Avoid Area Deleting an Avoid Area From the Main Menu screen select Map then press OK The 2D Map screen will display Press OK an...

Страница 57: ...creen 4 Press OK The Pop up menu will display 5 Select Set as Start Location then press OK The Pop up menu will close 15 2 Select Destination Point Set a destination either by using the Destination sc...

Страница 58: ...tions 1 Press to display the Main Menu screen 2 From the Main Menu screen select Preferences then press OK 3 From the Preferences screen select Routing then press OK The Routing screen will display 4...

Страница 59: ...n Section 11 until the Preview screen is displayed 2 Select Save then press OK The New Favourite screen will display 3 To change the name of the Favourite select the Name box then press OK The Enter t...

Страница 60: ...creen will display 16 2 Saving a Favourite from the 2D Map Screen From the Main Menu select Map then press OK The 2D Map screen will display Press OK to display the cross hair Position the cross hair...

Страница 61: ...ess OK After you have entered a name for the Favourite select Enter then press OK The New Favourite screen will display 7 Complete one of the following To save as a favourite select Save as Favourite...

Страница 62: ...then press OK After you have entered a name for the Favourite select Save then press OK The New Favourite screen will display 5 Complete one of the following To save as a favourite select Save as Favo...

Страница 63: ...n Menu select Go To then press OK 2 From the Go To screen select Favourites then press OK The Favourite screen will display 3 Select a Favourite using the 8 way toggle then press OK The Preview Favour...

Страница 64: ...e M Nav can heat up when the Brightness scale enters the red zone To reduce the risk of over heating avoid red brightness levels where possible 17 2 Volume 1 Press and hold the Volume button to displa...

Страница 65: ...aced roads select the Avoid unsurfaced roads check box avoid ferries select the Avoid ferries check box receive a warning if your route includes toll roads select the Toll roads check box to display a...

Страница 66: ...cheme used for voice guidance during navigation select your preferred voice scheme from the Language box using the left and right sides of the 8 way toggle 4 To enable Voice guidance instructions duri...

Страница 67: ...n check box enable access to the Next 4 Turns screen select the Display Next 4 Turns screen check box change the colour scheme select your preferred scheme from the Map colour scheme box using the lef...

Страница 68: ...disable other POI types such as schools 1 From the Main Menu select Preferences then press OK 2 From the Preferences screen select Maps then press OK 3 From the Maps screen select Points of Interest...

Страница 69: ...On the Safety Alerts screen select Active POI then press OK The Select Active POI screen will display 3 Use the 8 way toggle to select a custom POI type then click OK The POI Activation Settings scree...

Страница 70: ...sing the left and right buttons on the 8 way toggle Select Save then press OK The Safety alerts screen will display Note The GPS signal alert will be active when a Speed alert is selected enable a vis...

Страница 71: ...way toggle to select Save then press OK The Main Menu screen will display Clear Data 1 From the Main Menu screen select Preferences Press OK The Preferences screen will display 2 From the Preferences...

Страница 72: ...The circle on the right side of the screen displays green when there is a valid x 2D or 3D and red when no x is available A x will be obtained more quickly if the vehicle is stationary than if it is...

Страница 73: ...want to Then change the Position format select either the Decimal degrees or the Degrees minutes seconds option change the local time offset select the offset from the Coordinated Universal Time UTC...

Страница 74: ...n press OK The Startup screen will display 4 Complete the following If you want to Then display the Tutorial on startup select the Tutorial screen check box display the Language Selection screen on st...

Страница 75: ...etects the ignition state If the Qube reports the ignition state ON the M Nav turns on If the Qube reports the ignition state is OFF the Qube is running from the vehicle battery the M Nav enters Stand...

Страница 76: ...RAAT BN BG DR LN MKT PK PL SQ STWG STR Belgium French AVENUE BOULEVARD CHAUSS E IMPASSE MONT MONTAGNE PLACE ROUTE ROUTE NATIONAL RUE SQUARE AVE BVD CH IMP MT MT PL RTE RN R SQ Belgium German CHAUSSEE...

Страница 77: ...ALE SUPERSTRADA VIA VIALE C DA C SO FR LGO P ZA P LE SS SS V VL Luxembourg ALL E AVENUE BOULEVARD CHAUSS E DOMAINE FAUBOURG IMPASSE MONT MONTAGNE PASSAGE PLACE QUARTIER ROND POINT ROUTE ROUTE NATIONAL...

Страница 78: ...CALLEJ N CAMINO CARRETERA GLORIETA PASEO PLAZA RAMBLA RONDA AVE C CJ CM CR G P O P RBLA RD Switzerland German BOULEVARD CHAUSSEE PLATZ STRASSE BVD CH PL STR Switzerland French AVENUE CHAUSS E IMPASSE...

Страница 79: ...navman com Website www navman com NAVMAN DISCLAIM ALL LIABILITY FOR ANY USE OF THIS PRODUCT IN A WAY THAT MAY CAUSE ACCIDENTS DAMAGE OR VIOLATE THE LAW Compliance This device complies with part 15 of...

Страница 80: ...80 NAVMAN Notes...

Страница 81: ...M Nav 650 User Manual 81 Notes...

Страница 82: ...82 NAVMAN...

Страница 83: ......

Страница 84: ...MN000285A...

Отзывы: