background image

NAVCAM

PRO

USER


MANUAL


6


Crashcam

PRO


(Navcam

PRO)


Manual


Ver


3.0


09/2013


WHAT DO THE LED ICONS MEAN? 

ICON


Definition


Green


dot


Not


recording.


Standby


mode

Red


dot


Video


is


Recording

Satellite


icon


GPS


location


fixed


and


tracking


Question


mark


GPS


location


not


found


(eg;


if


indoors)

Red


dot


flashes


twice


Bump


warning


video


auto

copy


Speed


camera


warning


Manual


input


speed


limit


warning


Manual


speed


camera


warning


Out


of


memory


(Overwrite


old


files)


Green/Red


Traffic


Light


The


Stop


&


Go


function


is


active (if


blinking


the


device


is


searching)

Coffee


cup


icon


The


fatigue


alarm


is


active


and


you


have


been


driving


for


more


than


the


(user)


set


time


10


in


red


circle


icon


The


speed


sign


detect


feature


is


active

Microphone


Microphone


is


on


(if


with


red


line


– mic


is


off)

Green


“headlight”


icon


Night


time


or


dark


outside


– lights


on


reminder

LED


Constant


flashing


Insert


an


SD


card


SD


card


out


of


memory


(format


your


SD


card


or


remove


the


autobump


save


files)


SD


card


is


not


compatible


(check


the


speed


class


/


capacity


of


the


Card)


Temperature


warning


(auto


shut


down)


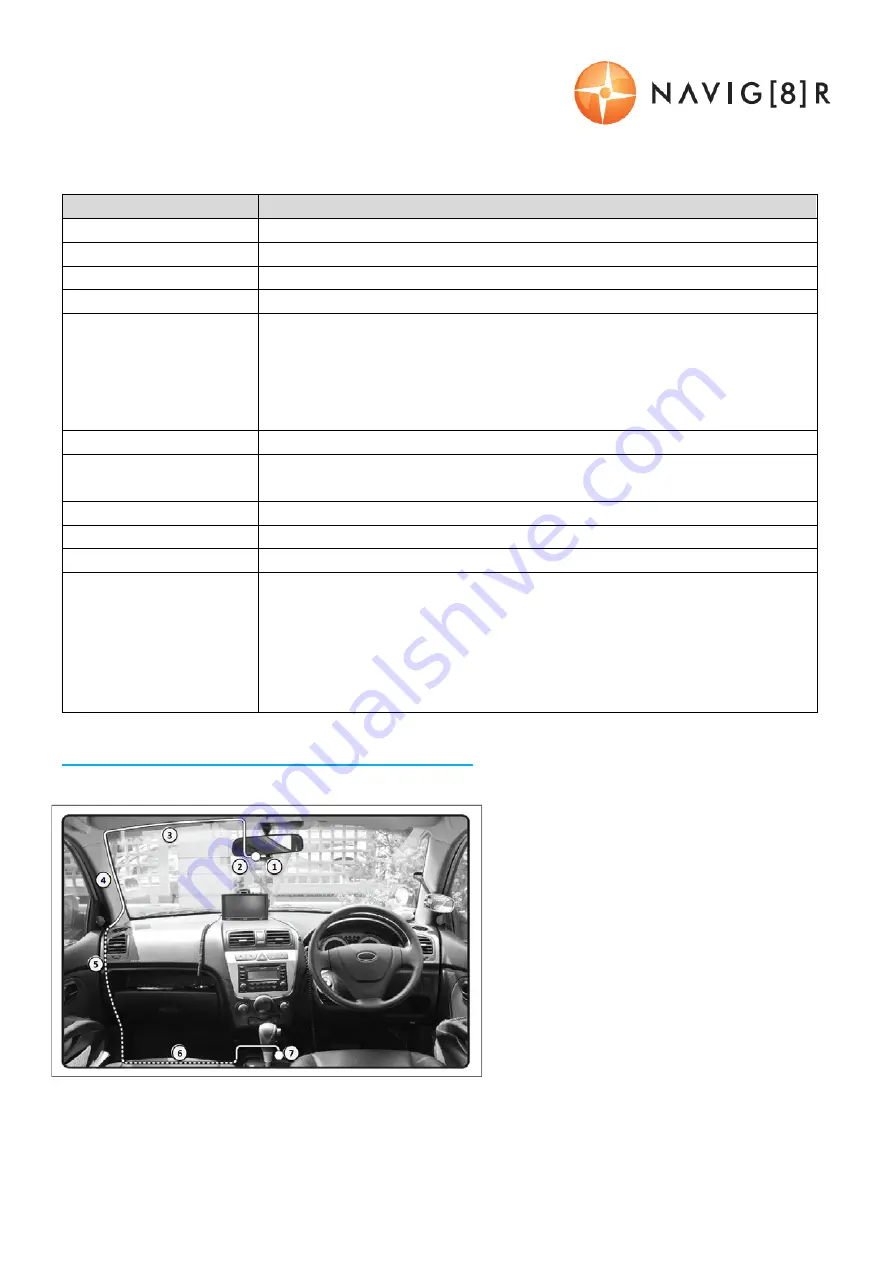
Connecting the CRASHCAM-PRO in the Car 

1,


2:


12/24v


DC


cable


routed


behind


rear


vision


mirror


3:


Cable


hidden


behind


roof


lining


/


sun


visor


4:


Cable


hidden


behind


the


“A”


pillar


moulding


(beware


of


airbag


equipped


cars)


5:


Cable


is


routed


beside


the


dashboard


/


near


the


door


hinges


6:


Cable


is


passed


under


the


passenger


carpet


(or


under


the


dashboard)


7:


12/24v


DC


plug


is


connected


to


the


car’s


12v


“cigarette


socket”.


1

2

3

4
5

6

7

Содержание Crashcam-PRO

Страница 1: ...NAVCAM PROUSER MANUAL 1 Crashcam PRO Navcam PRO Manual Ver 3 0 09 2013 Note The Product Name is Crashcam FHD PRO The Model Number for warranty service and ordering is Navcam PRO...

Страница 2: ...Attaching the adhesive pads to the backing plate 7 Attaching the mounting bracket 8 Adjusting the camera view 8 Power on off auto on off 9 auto record when turned on 9 Operating the Crashcam Pro for t...

Страница 3: ...designed to be mounted on a vehicle windscreen as high as possible to ensure a maximum viewpoint Please ensure that any attached cables are secured and will not cause the device to fall The Crashcam P...

Страница 4: ...NAVCAM PROUSER MANUAL 4 Crashcam PRO Navcam PRO Manual Ver 3 0 09 2013 CAMERA BUTTON AND HARDWARE OVERVIEW...

Страница 5: ...ng Mode Enter Play Menu for video playback In Play Settings mode Up Arrow Setting down arrow In Recording Mode Enter settings menu In Play Settings mode Down Arrow Mode OK In Recording Mode Screen Off...

Страница 6: ...et time 10 in red circle icon The speed sign detect feature is active Microphone Microphone is on if with red line mic is off Green headlight icon Night time or dark outside lights on reminder LED Con...

Страница 7: ...ignition the camera turns off as well Note if you are not confident in doing this yourself it is recommended that you seek the assistance of an automotive electrician Note Do not remove the inline tra...

Страница 8: ...rehand If using the optional windscreen suction mount you wont need the adhesive backing plate ADJUSTING THE CAMERA VIEW Ensure the camera has a clear field of view ahead of the vehicle No more than o...

Страница 9: ...the Crashcam Pro is turned on either by pressing the power button or via the auto on feature the device will automatically begin recording To stop recording press the Settings button or turn the power...

Страница 10: ...p or delete self input speed cam data locations Driver Fatigue Alarm Set to off 30min 1hr 2hr 4hr reminds you to take a break Remind Lights Select on off for a lights on reminder when dark Stop and Go...

Страница 11: ...p sensitivity is selectable via the Menu so that the file being recorded is not overwritten in the cycle record process Note You can save a maximum of 10 locked files which are indicated in the displa...

Страница 12: ...or a compatible MOV media player or an image viewer for images PLAYBACK ON TV WITH HDMI Connect the Crashcam Pro to a HDMI equipped TV or AV monitor with a mini HMDI to HDMI cable not included Turn o...

Страница 13: ...QUICK GUIDE INSTALLING THE SOFTWARE Step 1 Install the software disc and click the Installation icon or view the user manual Step 2 To install the software Please click Install Navig8r Crashcam Pro bu...

Страница 14: ...ING THE SOFTWARE Upon launching the software the Navig8r welcome screen will briefly pop up The main viewing screen will then appear Note Please click and drag the screen dividers if you can not see t...

Страница 15: ...tion 2 Google Map display 3 Video playback screen 4 Tool bar 5 Speed G sensor 3 Axis display 6 XY coordinate file name path display time 6 1 2 3 4 5 Maximise Minimise Screen Capture Screen shot of vid...

Страница 16: ...grees C The date time is incorrect Reset the date time in the settings menu Otherwise check the time settings to see if it is set by GPS If the battery runs completely flat then the date time will nee...

Страница 17: ...d stamp Supported on video Power off auto save Yes Current file will auto save when power is turned off Auto power on off Yes when ignition turned on off Lens High quality multiple glass lens elements...

Страница 18: ...for the road will be displayed So the driver can see the actual road speed limit which the camera is set to trigger on HDMI Video TV Output For AV output to a TV Connect directly to a HDMI equipped TV...

Страница 19: ...n assessment based on the date of manufacture the condition of the Laser Product and the type of defect Step 2a Contact your place of purchase They will assess the nature of the fault and refund or re...

Отзывы: