background image

Cabling Instructions

July 6, 2020

4-3

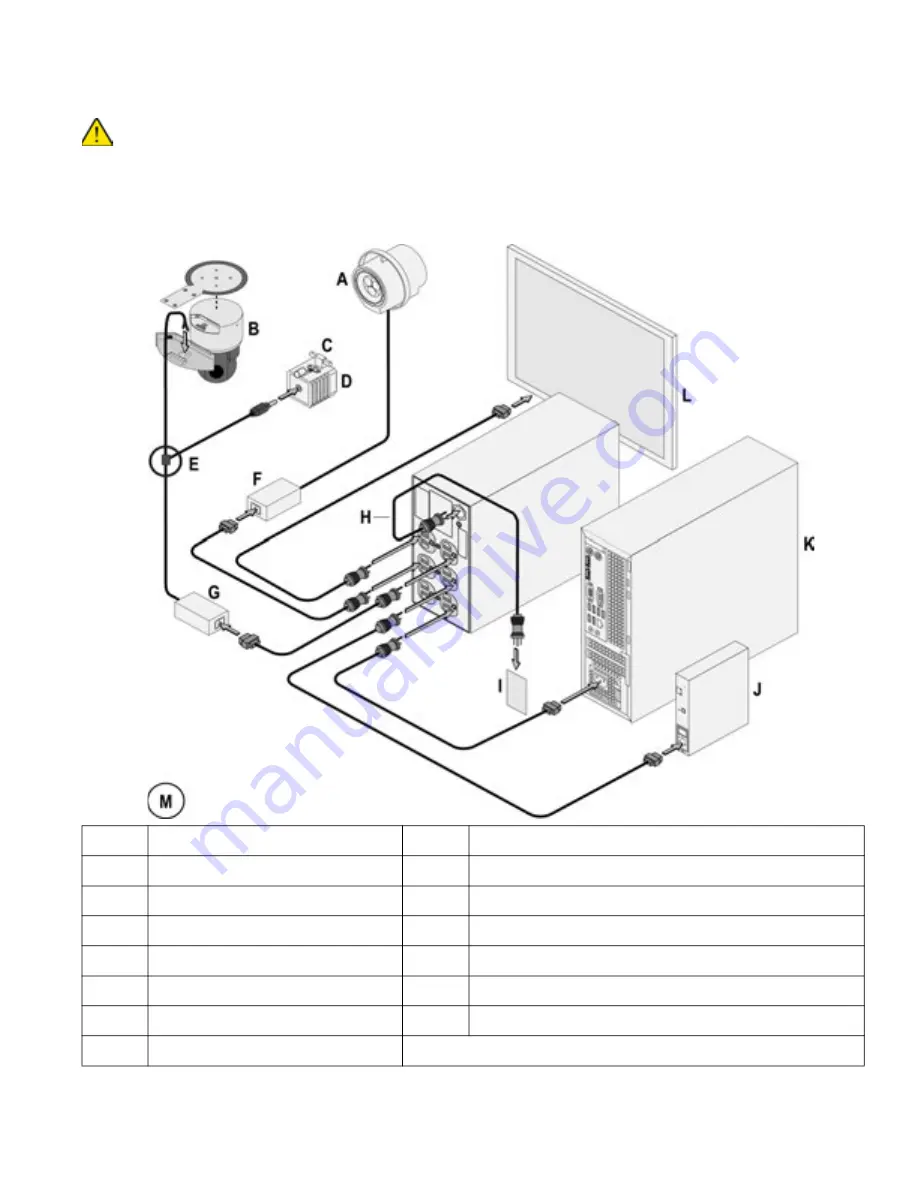
System power cables connections - 

Natus ErgoJust LTM


Ensure that the ISO or UPS is disconnected (unplugged) from the MAINS power source before connecting power cables to 

the system components. 

NOTE:

ISO is shown in the example below.

See the cable routing diagram on the next page.

Figure 1: Cabling the system components power.

Legend Description

Legend Description

A

Natus Photic Stimulator (option)

H

ISO or UPS

B

Video camera

I

MAINS

C

Microphone

J

Natus Amplifier Base Unit (right side)

D

IR Light

K

Computer

E

Cable splitter

L

Monitor

F

Power supply

M

Connectors and device styles may vary from those shown.

G

Power supply

Содержание ErgoJust LTM

Страница 1: ...Natus ErgoJust LTM and ErgoJust ICU Cart Instructions For Use Natus ErgoJust LTM cart Natus ErgoJust ICU cart 019667 Rev 07...

Страница 2: ......

Страница 3: ...5304 Toll Free US Canada 800 303 0306 Technical Support Email OTS natus com Customer Service Email Oakville_Customer_Service natus com Website www natus com Publisher s notice Part 019667 Rev 07 Natus...

Страница 4: ...ous incident that has occurred in relation to ErgoJust LTM and ErgoJust ICU carts should be reported to Natus Medical Incorporated and the competent authority of the Member State in which the user and...

Страница 5: ...ies 1 13 Natus ErgoJust ICU cart weight capacities 1 13 Cleaning instructions 1 14 Natus ErgoJust LTM and ErgoJust ICU cart 1 14 Preventive maintenance 1 14 General Use Basic Natus ErgoJust LTM cart s...

Страница 6: ...Mount the IR light to the video camera 3 26 3 Mount the microphone option 3 26 Mounting the display monitor All in One computer Natus ErgoJust LTM and ErgoJust ICU 3 28 Adjusting the handle height Na...

Страница 7: ...or uninterruptible power supply UPS and basket s for clinical supplies The Natus ErgoJust ICU cart is ideal for EEG monitoring applications in an Intensive Care Unit ICU It offers the same features as...

Страница 8: ...y cables until all components have been mounted Chapters 3 and 4 describe where to connect and how to route cables Some components may have been factory mounted and cabled on the cart The cabling diag...

Страница 9: ...identify potentially dangerous or destructive conditions and procedures This symbol denotes a warning or important information that should not be missed Read all warnings and cautions carefully before...

Страница 10: ...thorized representative in the European Community Indicates the Authorized representative in the European Community ISO 15223 1 Symbol 5 1 3 Medical devices Symbols to be used with medical device labe...

Страница 11: ...he rating plate that the equipment is suitable for direct current only to identify relevant terminals ISO 60601 1 Table D 1 8 Medical electrical equip ment Part 1 General requirements for basic safety...

Страница 12: ...any location other than the cart handle Impact hazard Indicates a potential personal injury due to impact Pinch hazard Keep hands and fingers clear off moving parts or between the moving and stationa...

Страница 13: ...edical equipment such as a cardiac pacemaker or other electrical stimulators simultaneously to the same patient may constitute a safety hazard The Natus ErgoJust LTM system is not defibrillator proof...

Страница 14: ...minimize lift tension 3 After removing or adding equipment adjust lift tension to compensate for weight of new load Do not load cart below minimum or above maximum weight capacities Do not mount a di...

Страница 15: ...rt over cords or uneven dirty wet or sloping surfaces Do not move cart by pushing on the display Stored energy hazard Failure to heed the following warnings may result in serious Personal Injury and d...

Страница 16: ...ISO or UPS requirements The Natus ErgoJust LTM and Natus ErgoJust ICU cart must be used with a Natus approved ISO or UPS to provide electrically isolated power to all system devices Please contact Nat...

Страница 17: ...Sleep Acquisition Desktop 110V Small form factor only EXP1058 EEG Sleep Acquisition Desktop 220V Small form factor only 105075XL 24 FP Monitor or equivalent monitor that meets size and weight requirem...

Страница 18: ...ials components and substances that may be hazardous and present a risk to human health and the environment when WEEE is not handled correctly Therefore end users also have a role to play in ensuring...

Страница 19: ...m weight capacities Natus ErgoJust ICU cart weight capacities Figure 1 shows the maximum weight limitations for the All in One computer holder and work surface Figure 1 Natus ErgoJust ICU cart maximum...

Страница 20: ...instrument and may be performed by the user For this cart preventative maintenance consists of periodically cleaning and inspecting the exterior of the instrument It is recommended that all repairs be...

Страница 21: ...July 6 2020 2 1 Chapter 2 General Use This chapter shows how to adjust the various components on the Natus ErgoJust LTM and Natus ErgoJust ICU carts...

Страница 22: ...r supply option G Wheel lock 4 H Natus Photic Stimulator option I PTZ or HD PTZ video camera J IR light and microphone K Natus Amplifier Base Unit L Video pole M Bottom mast N Basket O Second basket o...

Страница 23: ...o Camera IR Light and Microphone or Fixed Zoom Video Camera G Wheel lock 4 H Fixed Zoom Video Camera I IR Light J Microphone K Natus Amplifier Base Unit L Video pole M Bottom mast N Basket O Second ba...

Страница 24: ...s been positioned at the desired location lock all four caster wheels in place before using it Locking unlocking the wheels The left rear caster wheel locking lever is colored blue and has three posit...

Страница 25: ...er the work surface Figure 2 Adjusting the work surface height Extending the keyboard tray Natus ErgoJust LTM cart only 1 Place your hands below the keyboard tray and lift slowly upward to extend the...

Страница 26: ...the Natus ErgoJust LTM cart keyboard tray Figures 4a and 4b 2 Place your hands below the keyboard tray and lift slowly upward to tilt the tray upwards Figure 4c Figure 4a Adjust the Natus ErgoJust LTM...

Страница 27: ...left or right handed mouse operation Natus ErgoJust LTM cart only The mouse holder may be mounted on either the left or right side of the work surface for left or right handed mouse operation 1 Using...

Страница 28: ...your hands below the monitor and pull upwards to raise the monitor Figure 1 2 Place your hands on top of the monitor and push downwards to lower the monitor Figure 1 Raising the monitor NOTE The keyb...

Страница 29: ...s connected to the All in One computer have freedom of motion before rotating it The monitor can be tilted 20o 5o to help reduce glare and accommodate viewing while in the sitting or standing position...

Страница 30: ...wheels to transport the cart 2 Push the display monitor down to it s lowest position 3 Disconnect the power cord from the ISO or UPS and secure the cord to the cart 4 Raise locking levers on all four...

Страница 31: ...he installer should ensure All cables are routed neatly and secured using the cable management facilities provided The system is connected to a suitable wall socket outlet with a proven protective ear...

Страница 32: ...cart is equipped with a height limiter on the mast below the Keyboard tray Figure 2 This height limiter is designed to guard against the Keyboard tray from coming in contact with the equipment install...

Страница 33: ...Figure 1 Keyboard location NOTE The Natus ErgoJust LTM cart is equipped with a height limiter on the mast below the Keyboard tray Figure 2 This height limiter is designed to guard against the Keyboar...

Страница 34: ...ting the video pole to avoid injury or damage to the equipment 1 Remove the optional Natus Photic Stimulator Natus ErgoJust LTM 1 Lock the swivel arm in the folded position Figure 1 2 Wrap the Velcro...

Страница 35: ...ables Natus ErgoJust LTM and ErgoJust ICU 1 Unplug the video camera cable Figure 1 2 Unplug the video camera and IR light power cables Figure 1 Unplug video camera cable and video camera and IR light...

Страница 36: ...3 Removing the video pole mounted with the Fixed zoom video camera Natus ErgoJust ICU 3 Cut and remove the tie wraps shown below Figure 1 Figure 1 Remove the tie wraps Legend Description A To PC B Ti...

Страница 37: ...era cable Figure 2 5 Unplug the video camera and camera control cables Figure 2 Unplug the video camera signal cable and the video camera control and power cables Legend Description A To Video Camera...

Страница 38: ...power supply from the ISO UPS Figure 3 7 Carefully remove the Video camera power supply cable from the channel Figure 3 Unplug the video power supply and remove the video power cable from the channel...

Страница 39: ...bottom mast Figure 1 when remounting the video pole Figure 1 Proper mounting plates orientation 8 Loosen the four video pole mounting screws sufficiently to allow the video pole to be lifted away fro...

Страница 40: ...the Video Pole mounting screws were removed instead of loosened when the Video Pole was removed Improper positioning of the two mounting brackets will allow the Video Pole to separate from the bottom...

Страница 41: ...bracket 3 If necessary repeat steps 1 and 2 for the second bracket 2 Mount the video pole IMPORTANT Press all four screws inwards until they are tight against the Video Pole Figure 3 when performing t...

Страница 42: ...to the bottom mast ensuring that both brackets slide inside the two slots Figure 4 Figure 4 Proper placement of the mounting brackets inside the bottom mast slots Bracket positioned correctly inside t...

Страница 43: ...the Video Pole is seated correctly on the lower mast 5 Tighten all four screws until they are firm against the Video Pole Figure 6 Figure 6 Tighten all four video pole mounting screws 6 Wiggle the Vid...

Страница 44: ...g knobs Figure 1 NOTE There are two securing knobs on the other side of the computer cage which are not shown in Figure 1 If necessary use these two knobs to adjust the height computer cage 2 Slide th...

Страница 45: ...e ISO or UPS Natus ErgoJust LTM and ErgoJust ICU 1 Carefully set the ISO or UPS and cage on the cart base and slide the ISO or UPS into the cage Figure 1 Figure 1 2 Verify Bracket 1 is positioned prop...

Страница 46: ...nd ensure none of the cables are pinched between the cage and cart 5 Carefully tilt the ISO or UPS and cage upright and feed the power cable bundle from the ISO or UPS though the cage s cable cutout E...

Страница 47: ...Stimulator power cable between the ISO or UPS cage and cart post Figure 5 Figure 5 7 Secure the ISO or UPS cage using the two screws provided Figure 6 Figure 6 Legend Description A Photic Stimulator p...

Страница 48: ...SO or UPS main cage Figure 7 Figure 7 Slide ISO or UPS cage rear cover into place 9 Secure the rear cover to the ISO or UPS main cage using three screws Figure 8 Figure 8 Secure the rear cover to the...

Страница 49: ...mulator mounting post into the accessory bar Figure 1 It may be located on either side of the main post 2 Tighten the securing knob to secure the post 3 Route the power cable down to the cart base and...

Страница 50: ...on the video pole side quick disconnect bracket Figure 1 and slide the Amplifier Base Unit downward until the locking pin snaps into the quick disconnect bracket locking hole 2 To remove the Base Uni...

Страница 51: ...Figure 1 and set the cable channel cover aside Figure 1 Removing the cable channel cover With an assistant hold on to the IR Light and Microphone during the next step to guard against dropping the IR...

Страница 52: ...camera 1 Install and tighten the four Video Camera mounting screws Figure 1 Figure 1 Mounting the Video Camera Mounting the PTZ or HD PTZ camera option Natus ErgoJust ICU This procedure describes how...

Страница 53: ...nd HD PTZ video camera 2 Mount the IR light and microphone 1 Unscrew the cable channel mounting knob Figure 1 and set the cable channel cover aside Figure 1 Removing the cable channel cover With an as...

Страница 54: ...he Fixed zoom video camera option Natus ErgoJust ICU This procedure describes how to mount the Fixed zoom video camera IR light and microphone on the Natus ErgoJust ICU cart Figure 1 Figure 1 Fixed zo...

Страница 55: ...the video camera Figure 2 With an assistant hold on to the video camera during the next step to guard against dropping the camera 2 Attach the video camera mount to the video camera bracket Figure 2...

Страница 56: ...amera 1 Mount the IR light to the video camera Figure 3 Figure 3 Mounting the IR light 3 Mount the microphone option 1 Unscrew the cable channel mounting knob Figure 4 and set the cable channel cover...

Страница 57: ...t to the video pole using the bolt washer and nut provided Figure 5 3 Secure the microphone to the microphone bracket using the two nuts provided Figure 5 Mounting the microphone bracket and microphon...

Страница 58: ...or or Natus ErgoJust ICU All in One computer to the video pole with the four thumbscrews provided Figure 1 Figure 1 Mounting the All in One computer Adjusting the handle height Natus ErgoJust LTM and...

Страница 59: ...sket down 3 Carefully pull downward on the basket until the other side is free from the handle and set the basket aside NOTE Do NOT remove the screws in the next step or the handle securing plate will...

Страница 60: ...tly away from the handle and swing the bottom of the basket B towards yourself until both basket mounting tabs snap free from the two mounting holes Figure 1 Figure 1 Removing the basket from the hand...

Страница 61: ...basket on the next page 1 Loosen the four handle screws and slide the handle up and out from the bottom mast Figure 1 Figure 1 Loosen the four mounting screws 2 Remove the screws from the handle mount...

Страница 62: ...racket a Slide the handle mounting plates into the bottom mast grooves b Adjust the height of the handle as desired and tighten all four of the mounting plates screws 4 Install the new basket 4 Insert...

Страница 63: ...s into the mounting hole Figure 5 Figure 5 Pry the left side inward and push up the left side of the basket 6 Bend the middle of the basket A slightly away from the handle and swing the bottom of the...

Страница 64: ...rom the bottom mast which may damage system components or cause an injury 1 Place one of the brackets inside the video pole with the indented side positioned against the video pole as shown in Figure...

Страница 65: ...rming the next step This is necessary to position both brackets properly in order to slide the brackets into both grooves on the bottom mast Figure 3 Press in all four screws tight to the Video Pole 5...

Страница 66: ...four screws until they are firm against the Video Pole Figure 5 Figure 5 Tighten all four video pole mounting screws 7 Wiggle the Video Pole There should not be any movement If the Video Pole moves th...

Страница 67: ...d Microphone cables feed through the video pole which may require removing the cable channel cover to access the cables 1 Unscrew the cable channel mounting knob Figure 1 and set the cable channel cov...

Страница 68: ...Natus ErgoJust LTM and ErgoJust ICU Cart Instructions For Use 3 38 July 6 2020 Blank Page...

Страница 69: ...em components Legend Description Legend Description A Monitor H Swivel arm B Video camera I Natus Photic Stimulator control panel C Microphone J Natus Amplifier Base Unit right side D IR Light K Natus...

Страница 70: ...oJust LTM Figure 1 Signal and control cable routings Legend Description Legend Description A Video camera G Monitor B IR Light and Microphone H Keyboard C Amplifier Base Unit right side I Mouse D Vide...

Страница 71: ...NOTE ISO is shown in the example below See the cable routing diagram on the next page Figure 1 Cabling the system components power Legend Description Legend Description A Natus Photic Stimulator optio...

Страница 72: ...escription A Natus Photic Stimulator option I MAINS B Video Camera J Computer C IR Light and Microphone K IR Light and Microphone power supply D Natus Amplifier Base Unit L Photic Stimulator power sup...

Страница 73: ...l and control cable routing diagram on the next page Figure 1 PTZ and HD PTZ option signal and control cable connections Legend Description Legend Description A PTZ HD PTZ Video Camera F To network B...

Страница 74: ...Figure 1 PTZ and HD PTZ video option signal and control cable routings Legend Description Legend Description A PTZ HD PTZ Video Camera G Cable channel B IR Light and Microphone H Keyboard C Natus Amp...

Страница 75: ...ystem components See the PTZ and HD PTZ video option power cable routing diagram on the next page Figure 1 PTZ and HD PTZ video option power cable connections Legend Description Legend Description A A...

Страница 76: ...Natus ErgoJust ICU Figure 1 PTZ and HD PTZ video option power cable routings Legend Description Legend Description A PTZ HD PTZ Video Camera F Cable bundle B IR Light and Microphone G All in One comp...

Страница 77: ...e next page Figure 1 Fixed zoom video option signal and control cable connections Legend Description Legend Description A Microphone G Keyboard B Do not connect power to these two inputs H To Network...

Страница 78: ...ErgoJust ICU Figure 1 Fixed zoom video option signal and control cable routings Legend Description Legend Description A Fixed zoom Video Camera G Keyboard B IR Light H Cable bundle C Microphone I All...

Страница 79: ...atus ErgoJust ICU cart cables as shown below after cabling the system components Figure 1 Figure 1 Securing the cables with tie wraps Legend Description Legend Description A To PC E Cable bundle B Tie...

Страница 80: ...e system components See the Fixed zoom video option cable routing diagram on the next page Figure 1 Fixed zoom video option power cable connections Legend Description Legend Description A Do not conne...

Страница 81: ...Figure 1 Fixed zoom video option power cable routings Legend Description Legend Description A Fixed zoom Video Camera F Cable channel B IR Light G Cable bundle C Microphone H All in One Computer D Na...

Страница 82: ...Natus ErgoJust LTM and ErgoJust ICU Cart Instructions For Use 4 14 July 6 2020 Blank page...

Страница 83: ...Installation Fixed zoom video option Mounting the microphone option 3 26 ErgoJust ICU cart system component identification 2 3 ErgoJust ICU cart weight capacities 1 13 ErgoJust LTM cart accessories 1...

Страница 84: ...ol convention description 1 3 Symbols 1 4 T Technical support 1 a Trademarks 1 b Transporting the Natus ErgoJust LTM and ErgoJust ICU cart 2 10 U Using this manual 1 2 V Voltage requirements 1 10 Comp...

Страница 85: ...t clinical and technical field support network in Neuro Sleep and customized service con tracts that include preventative maintenance visits and computer upgrades Natus Medical Incorporated DBA Excel...

Страница 86: ......

Отзывы: