background image

CHORD


Mode

 has one inactive (

Off

) and two active states, which are described in detail below:

Off

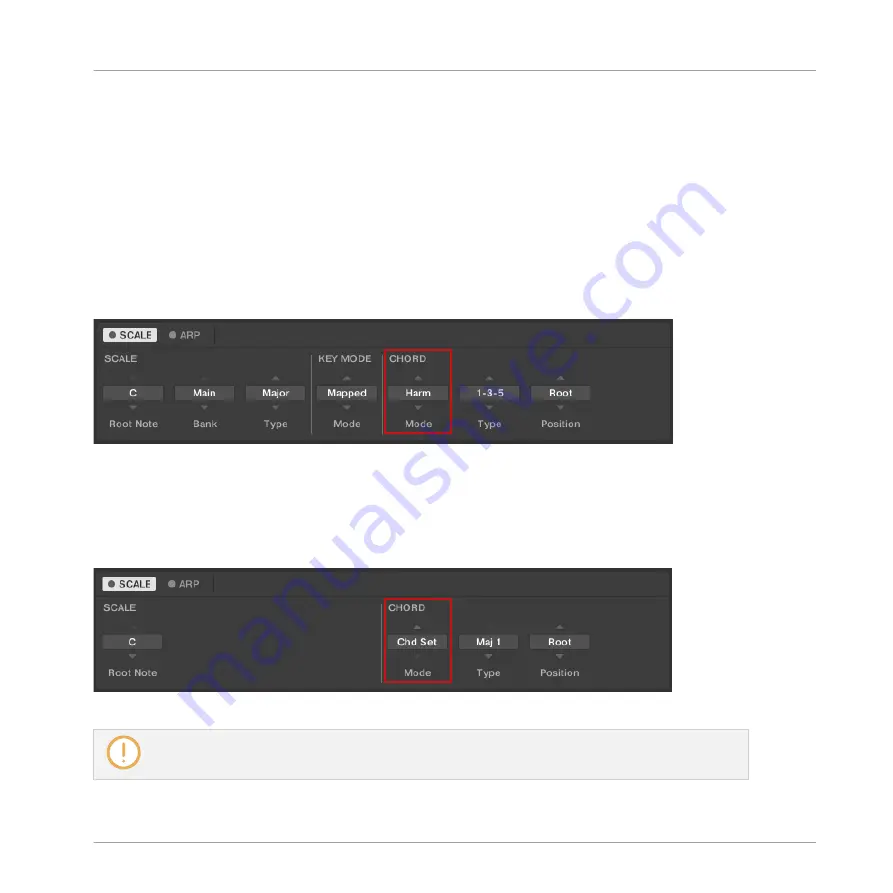
Harm

Chd Set

Harm

If 

CHORD


Mode

 is set to 

Harm

, the 

CHORD


Type

 menu allows you to specify the interval of

notes in the selected 

SCALE


Type

 that will constitute the chord: E.g., a triad in the form of the

root note, the third note, and the fifth note (

CHORD


Type

 value 

1-3-5

).

The 

CHORD

 parameter 

Mode

, set value 

Harm

.

Chd Set

If 

CHORD


Mode

 is set to 

Chd Set

, the 

CHORD


Type

 menu allows you to choose from a selec-

tion of major and minor chords depending on the current 

Root Note

.

The 

CHORD

 parameter 

Mode

, set value 

Chd Set

.

The 

SCALE  Type

  and 

KEY  MODE

  parameters  are  not  available  when 

CHORD  Mode

  is  set  to

Chd Set

.

Smart Play – Playing and Editing Scales and Chords

Setting the CHORD Parameters


KOMPLETE KONTROL A-Series - Manual - 123

Содержание A Series

Страница 1: ...MANUAL ...

Страница 2: ...n Cubase and Nuendo are registered trademarks of Steinberg Media Technologies GmbH ASIO is a trademark and software of Steinberg Media Technologies GmbH Mac macOS GarageBand Logic iTunes and iPod are registered trademarks of Apple Inc registered in the U S and other countries Windows Windows Vista and DirectSound are registered trademarks of Microsoft Corporation in the United States and or other ...

Страница 3: ... 7 15 Shibuya ku Tokyo 150 0001 Japan www native instruments co jp NATIVE INSTRUMENTS UK Limited 18 Phipp Street London EC2A 4NU UK www native instruments co uk NATIVE INSTRUMENTS FRANCE SARL 113 Rue Saint Maur 75011 Paris France www native instruments com SHENZHEN NATIVE INSTRUMENTS COMPANY Limited 5F Shenzhen Zimao Center 111 Taizi Road Nanshan District Shenzhen Guangdong China www native instru...

Страница 4: ...tting up Host Integration 18 3 3 1 Setting up Apple Logic Pro X and GarageBand 19 3 3 2 Setting up Ableton Live macOS 19 3 3 3 Setting up Ableton Live Windows 21 4 Software Overview 24 4 1 Header 25 4 2 Browser 27 4 2 1 Library Pane 28 4 2 2 Product Selector 30 4 2 3 Files Pane 32 4 3 Perform Panel 34 4 4 Plug in Panel 34 4 5 Plug in Chain Panel 36 4 6 Plug in Area 37 5 Keyboard Overview 38 5 1 Pe...

Страница 5: ... Preferences 54 6 5 1 Preferences Audio Page 54 6 5 2 Preferences MIDI Page 57 6 5 3 Preferences General Page 58 6 5 4 Preferences Library Page 60 6 5 5 Preferences Plug ins Page 65 6 6 Loading a Plug in in Default State 68 7 Browsing the Library 70 7 1 Browser Basics 71 7 1 1 Product Types Instrument and Effect 71 7 1 2 About the Library and Meta Information 71 7 1 3 Browsing the Library vs Brows...

Страница 6: ...the Results List 91 7 9 3 Removing Preset Files from the Favorites 92 7 10 Performing a Text Search 93 7 11 Displaying Preset File Information 93 7 12 Auditioning your Preset Files 94 8 Working with Effects 95 8 1 Opening the Plug in Chain Panel 95 8 2 Adding Effects 96 8 3 Selecting Plug in Slots 99 8 4 Reordering Effects 99 8 5 Scrolling the Plug in Chain 100 8 6 Bypassing Effects 101 8 7 Removi...

Страница 7: ...0 6 2 SCALE Bank and Type 113 10 7 Setting the KEY MODE Parameter 120 10 8 Setting the CHORD Parameters 122 10 8 1 CHORD Mode 122 10 8 2 CHORD Type 124 10 8 3 CHORD Position 128 11 Smart Play Playing and Editing Arpeggiator Sequences 129 11 1 Playing Arpeggiator Sequences 130 11 2 Editing the Arpeggiator 131 11 3 MAIN Parameters 132 11 3 1 MAIN Mode 132 11 3 2 MAIN Type 133 11 4 RHYTHM Parameters ...

Страница 8: ...leting User Preset Files from the User Library 145 12 3 Editing the Tags and Properties of User Preset Files 146 12 4 Working with the Files Pane 149 12 4 1 Additional Results List Features List in the Files Pane 150 12 4 2 Navigating to File Locations with the Location Bar 151 12 4 3 Navigating to Recent File Locations 152 12 4 4 Working with File Location Favorites 153 12 5 Loading VST Plug ins ...

Страница 9: ... IDs for the Perform Panel 163 14 Host Integration 165 14 1 Integration with MASCHINE 165 14 2 Integration with Apple Logic Pro X and GarageBand 166 14 3 Integration with Ableton Live 170 Index 174 Table of Contents KOMPLETE KONTROL A Series Manual 9 ...

Страница 10: ...ith KOMPLETE KONTROL s unique Scale engine and Arpeggiator We hope you enjoy this fantastic instrument as much as we do The team at Native Instruments 1 1 Document Conventions This document uses particular formatting to point out special facts and to warn you of poten tial issues The icons introducing the following notes let you see what kind of information can be expected The speech bubble icon i...

Страница 11: ...epts are printed in bold References to keys on your computer s keyboard you ll find put in square brackets e g Press Shift Enter Single instructions are introduced by this play button type arrow Results of actions are introduced by this smaller arrow Naming Convention Throughout the documentation we will refer to KOMPLETE KONTROL keyboard or just keyboard as the hardware controller and KOMPLETE KO...

Страница 12: ...function as indented your system needs to meet certain re quirements The latest KOMPLETE KONTROL system requirements and compatibility informa tion is available here https www native instruments com komplete kontrol a25 a49 a61 specifications KOMPLETE KOMPLETE KONTROL is optimized for use with KOMPLETE SELECT KOMPLETE and KOM PLETE ULTIMATE The latest KOMPLETE system requirements and compatibility...

Страница 13: ...ailable The KOMPLETE KONTROL A Series keyboardsare now available and fully supported by the KOMPLETE KONTROL software Creating local copies of Preset Files You can now create local copies of Instrument and Effect Presets by dragging and dropping the Preset from the KOMPLETE KONTROL s Browser to the desktop New Features in KOMPLETE KONTROL 2 0 4 KOMPLETE KONTROL A Series Manual 13 ...

Страница 14: ... once before using the plug in within your DAW for the first time and after installing new Instruments and Effects The KOMPLETE KONTROL stand alone application directly communicates with your audio and MIDI interfaces which you can configure in the KOMPLETE KONTROL Preferences When KOMPLETE KONTROL is used as a plug in within a host the communication with your audio and MIDI interfaces is managed ...

Страница 15: ... the included USB cable to the USB socket on the rear panel of the keyboard 2 Attach the computer end of the USB cable to an available USB 2 0 or later port on your computer The keyboard is now detected by the operating system Setting up KOMPLETE KONTROL Connecting the Keyboard to the Computer KOMPLETE KONTROL A Series Manual 15 ...

Страница 16: ...ng Audio Interface 1 In the KOMPLETE KONTROL menu click on Edit Preferences to open the Preferences 2 Click on Audio to display the Audio page 3 Select the hardware driver supported by your audio interface from the Driver drop down menu 4 Select the audio interface from the Device drop down menu 5 Under Routings select the left and right output channels of your audio interface you want to use for ...

Страница 17: ... on Input to display the available devices for incoming MIDI signals 3 Click the checkbox representing your keyboard e g Komplete KontrolA25 MIDI to acti vate incoming MIDI signals from the keyboard Setting up KOMPLETE KONTROL Setting up the Stand Alone Application KOMPLETE KONTROL A Series Manual 17 ...

Страница 18: ... required for using KOMPLETE KONTROL s Smart Play features with other MIDI instruments 3 3 Setting up Host Integration KOMPLETE KONTROL integrates with a number of hosts to facilitate a fluent workflow for per forming and recording music with your KOMPLETE KONTROL Library Setting up KOMPLETE KONTROL Setting up Host Integration KOMPLETE KONTROL A Series Manual 18 ...

Страница 19: ...When the message OSC app KOMPLETE KONTROL A Series wants to connect to Logic Pro X GarageBand appears on screen click OK The KOMPLETE KONTROL stand alone application must be opened once before using the plug in within your DAW for the first time and after installing new Instruments and Effects For a detailed overview of Integration controls for Logic Pro X GarageBand refer to 14 2 In tegration wit...

Страница 20: ...he following folder Macintosh HD Library Application Support Native Instru ments Host Integration Ableton Live 2 Copy the KOMPLETE KONTROL VST adg file to the clipboard 3 Paste the file you have copied to the clipboard into your Ableton Live Instrument Rack folder By default this folder is located here Macintosh HD Users Username Music Ableton User Library Presets Instruments Instrument Rack Confi...

Страница 21: ... For a detailed overview of Integration controls for Ableton Live refer to 14 3 Integration with Ableton Live 3 3 3 Setting up Ableton Live Windows Ableton Live must be configured for advanced integration with KOMPLETE KONTROL Installing the MIDI Remote Script The MIDI Remote Script allows Ableton Live to recognize KOMPLETE KONTROL as a control surface It must be copied into Live s MIDI Remote Scr...

Страница 22: ...Remote Script and the Instrument Rack file are installed in the correct loca tion you need to add KOMPLETE KONTROL as a control surface in Ableton Live s preferences 1 Launch Ableton Live 2 In Ableton Live go to the Preferences and open the MIDI Sync tab 3 Assign a free Control Surface slot to KOMPLETE KONTROL by selecting it from the drop down menu 4 Leave both the Input and the Output for the KO...

Страница 23: ...For a detailed overview of Integration controls for Ableton Live refer to 14 3 Integration with Ableton Live Setting up KOMPLETE KONTROL Setting up Host Integration KOMPLETE KONTROL A Series Manual 23 ...

Страница 24: ...and Master Volume controls as well as options to show and hide user interface areas For more information refer to 4 1 Header 2 Plug in area Shows your loaded Instrument or Effect and lets you control it directly in the software For more information refer to 4 6 Plug in Area 3 Browser Lets you browse for Instruments and Effects and manage all your Preset files For more information refer to 4 2 Brow...

Страница 25: ...ton Shows or hides the Perform panel which gives you access to the pa rameters of the Scale engine and the Arpeggiator The Perform panel button lights up blue when the Scale engine and or the Arpeggiator are enabled For more information refer to 4 3 Perform Panel 6 Plug in panel button Shows or hides the Plug in panel which allows you to customize the parameter mapping for the Control section on t...

Страница 26: ...st transport and this feature is greyed out For more information refer to 6 3 Transport and Tempo 11 Tempo control Lets you adjust the tempo in BPM beats per minute For more informa tion refer to 6 3 Transport and Tempo 12 Master Volume control Lets you adjust the overall output volume of KOMPLETE KON TROL The meter shows the current peak level of the output signal For more information refer to 6 ...

Страница 27: ... Library pane together with the Product selector and of the Files pane which are explained in the following overviews For more information on using the Browser and managing your Preset files refer to 7 Brows ing the Library 8 Working with Effects respectively 12 Managing the Library Software Overview Browser KOMPLETE KONTROL A Series Manual 27 ...

Страница 28: ...is is determined automatically by the currently selected Plug in slot in the Plug in chain For more information on switching between Product Types refer to 7 1 1 Product Types Instrument and Effect 3 Content selector The Globe icon selects factory content and the User icon selects user con tent Only Preset files of the selected content type are displayed in the Results list 8 For more information ...

Страница 29: ...r the search results by Favorites When enabled only favorite Preset files are displayed in the Results list 8 For more information refer to 7 9 Working with Fa vorites 8 Results list Displays all Preset files that match your entered search criteria For more infor mation refer to 7 3 Loading Preset Files 9 Control bar Provides useful tools when browsing and editing the KOMPLETE KONTROL Li brary The...

Страница 30: ...a particular Product and Banks of Instruments 3 2 1 The Product selector 1 Product selector header The header displays the selected Product If there is no selection it shows a generic label All Instruments or All Effects A click on the header opens or closes the Product selector Software Overview Browser KOMPLETE KONTROL A Series Manual 30 ...

Страница 31: ...dor selector the Product list is sorted by the follow ing categories DRUMS PERCUSSION SAMPLED INSTRUMENTS SYNTHESIZERS NO CATEGORY If Vendor is selected in the Category Vendor selector the Product list is sorted by the names of the manufacturers For more information refer to 7 5 Filtering Preset Files by Product and 7 6 Filtering Prod uct Preset Files by Bank Software Overview Browser KOMPLETE KON...

Страница 32: ...ane contains following elements 2 3 5 6 1 4 The Files pane in the Browser 1 Files Displays the Files pane For more information refer to 12 4 Working with the Files Pane Software Overview Browser KOMPLETE KONTROL A Series Manual 32 ...

Страница 33: ... Locations 5 Results list Displays the content files and folders of the folder shown in the Location bar Only files compatible with KOMPLETE KONTROL are displayed For more information refer to 12 4 1 Additional Results List Features List in the Files Pane 6 Control bar Provides useful tools when browsing your file system The Information button i displays additional information about the selected f...

Страница 34: ... s parameters See 11 Smart Play Playing and Editing Arpeggiator Sequences for details 3 Parameter pages If multiple pages of parameters are available you can switch between them here For more information refer to 10 Smart Play Playing and Editing Scales and Chords 4 4 Plug in Panel The Plug in Panel lets you view and customize the parameters mapped to the Control section on the KOMPLETE KONTROL ke...

Страница 35: ...The Plug in Panel For more information refer to 9 4 Customizing Parameter Mappings using the Plug in Panel Software Overview Plug in Panel KOMPLETE KONTROL A Series Manual 35 ...

Страница 36: ...eate the Plug in chain The arrangement of the Plug ins is customizable but the first Plug in slot always has to have an Instrument loaded 1 2 Overview of the Plug in Chain Panel 1 Plug in chain Displays the loaded Instrument and Effects 2 Plug in slot Each Plug in slot represents a Plug in and displays the Product s name and im age Use the Plug in slots to directly load Plug ins bypass Effects and...

Страница 37: ...controlled directly on the computer screen or from the keyboard Parameter changes are mutually reflected by both the displays on the key board and the Instrument s user interface in the Plug in area For most Instruments additional views are available that give you access to another set of controls See 6 1 Instrument Views for details The Plug in area displaying the Instrument Form Software Overvie...

Страница 38: ...Beyond the keybed all KOMPLETE KONTROL key boards come with identical features The keyboard is equipped with the following sections Top View 1 10 2 9 3 4 5 8 7 6 KOMPLETE KONTROL A25 top view 1 Perform and Edit section Lets you edit and control the Smart Play features e g playing scales chords and arpeggiator sequences The settings made in the Perform and Edit section are reflected in the display ...

Страница 39: ...odula tion parameters of the loaded Instrument The left Modulation Wheel called Pitch Wheel lets you adjust the pitch of the loaded Instrument The right Modulation Wheel called Modulation Wheel lets you adjust the default modulation parameter of the loaded Instrument 8 Transpose buttons Transpose the keybed up or down by an octave or set the note velocity for all keys to a fixed value of 127 When ...

Страница 40: ...t Allows you to attach a Kensington Lock to secure your device from theft 2 Foot Pedal socket Connects a sustain or expression pedal 3 USB connector Connects the keyboard to your computer with the supplied USB cable Keyboard Overview KOMPLETE KONTROL A Series Manual 40 ...

Страница 41: ...the Scale engine pa rameters For more information refer to 10 Smart Play Playing and Editing Scales and Chords 3 ARP Edit Switches the Arpeggiator on or off and lets you edit the Arp parameters For more information refer to 11 Smart Play Playing and Editing Arpeggiator Sequences 4 IDEAS Opens the Ideas view in MASCHINE when used as a plug in For more information refer to 14 Host Integration 5 QUAN...

Страница 42: ...ches between standard and loop playback 2 METRO Switches the metronome on or off 3 TEMPO Lets you tap in the tempo 4 STOP Stops playback 5 REC Count in REC Count in switches record on or off SHIFT REC Count in switches the count in on or off 6 PLAY Restart PLAY Restart starts playback SHIFT PLAY Restart starts playback from the beginning Keyboard Overview Transport Section KOMPLETE KONTROL A Serie...

Страница 43: ...KONTROL as a plug in in MASCHINE holding TRACK presents you with the Track view in the displays When using KOMPLETE KONTROL as a plug in in a host without advanced integration this button lets you switch between KOM PLETE KONTROL instances and MIDI Mode For more information refer to 14 1 Integration with MASCHINE 4 4 D encoder The 4 Directional Push Encoder referred to as the 4 D encoder combines ...

Страница 44: ...nstrument and Effect Parameters 5 4 Transpose Buttons Transpose Buttons The OCTAVE Fixed Velocity down button transposes the entire keybed one octave down Us ing SHIFT OCTAVE Fixed Velocity sets the note velocity for all keys to a fixed value of 127 The OCTAVE Key Mode up button transposes the entire keybed one octave up Using SHIFT OCTAVE Key Mode switches between playing a single sound chromatic...

Страница 45: ...in fi ner detail The three possible Instrument views are Default View Additional View and Edit View which can be selected directly in the KOMPLETE KONTROL menu Instrument views in the KOMPLETE KONTROL menu Alternatively you can switch between Default View and Additional View by clicking on the View button in the Header icon All Instrument parameters can be controlled at all time from the KOMPLETE ...

Страница 46: ...POLYPLEX in Default View 6 1 2 Additional View Most NKS Instruments have more parameters that can be displayed at once in small surface and therefore come with a second Additional View The Additional View can give you access to detailed edit controls or to a completely different set of controls altogether depending on the loaded Instrument Global Controls and Preferences Instrument Views KOMPLETE ...

Страница 47: ...L Menu and the application menu you can also do this by clicking the button in the KOMPLETE KONTROL header Clicking it again will return to the Default View The button opens and closes the Additional View Global Controls and Preferences Instrument Views KOMPLETE KONTROL A Series Manual 47 ...

Страница 48: ...REAKTOR PLAYER This gives you access to all the flexible controls and features you would normally have when using KONTAKT or RE AKTOR in stand alone mode POLYPLEX in Edit View Edit view enables you to access files that cannot be loaded from the KOMPLETE KONTROL Brows er e g KONTAKT Multis which can be loaded from the KONTAKT Browser in edit view Global Controls and Preferences Instrument Views KOM...

Страница 49: ... key board automatically switches between controlling the KOMPLETE KONTROL software and MIDI mode depending on the content of the selected track If you select a track that hosts the KOMPLETE KONTROL plug in the keyboard automati cally switches to this instance of the KOMPLETE KONTROL software This allows you to immediately control all of your Product s parameters from the keyboard If you select a ...

Страница 50: ...D encoder To display and switch between KOMPLETE KONTROL instances from the keyboard follow the instructions below 1 Press SHIFT INSTANCE to show all active instances of the KOMPLETE KONTROL soft ware on the keyboard displays 2 Use the 4 D encoder to select an instance 3 Press the 4 D encoder to switch to the selected instance You can now control the selected instance of the KOMPLETE KONTROL softw...

Страница 51: ...ntrols in KOMPLETE KONTROL 1 Play button Starts and stops the internal clock This can be used to control the playback of sequenced KONTAKT and REAKTOR Instruments 2 Reset button Resets the internal clock to its start position Consequently sequencers in KONTAKT and REAKTOR Instruments will start their playback from the beginning The same applies to the Arpeggiator 3 Tempo control Sets the tempo in ...

Страница 52: ...PLAY Restart will start playback from the beginning When the internal clock is stopped pressing SHIFT PLAY Restart allows you to reset the internal clock and start playback from the beginning When the internal clock is running pressing SHIFT PLAY Restart allows you to reset the internal clock and resume playback from the beginning 6 3 2 Adjusting Tempo Adjusting Tempo in the Software The Tempo con...

Страница 53: ...nt peak level of the output signal Master Volume controls In order to adjust the output volume Click and drag the slider to the left or to the right This will adjust the output volume in 0 5dB increments from 30dB to 10dB Below 30dB the keyboard s volume control is exponentially scaled and quickly lowers the out put signal to complete silence Adjusting Master Volume with the Keyboard To to adjust ...

Страница 54: ... audio interface when KOMPLETE KONTROL is running as a stand alone application When using KOMPLETE KONTROL as a plug in the audio configuration is managed by the host and the Audio page is not available The Routings section allows you to configure the connections between the virtual outputs of KOMPLETE KONTROL and the physical outputs of your audio interface Global Controls and Preferences Prefere...

Страница 55: ...evices if you have connected more than one audio interface Status This shows you whether your audio interface is currently running Sample Rate This displays the selected sample rate of your audio interface Please restart KOMPLETE KONTROL after changing the sample rate Global Controls and Preferences Preferences KOMPLETE KONTROL A Series Manual 55 ...

Страница 56: ... when playing more demanding Products Windows When using an ASIO driver the Audio page shows an ASIO Config button instead of the Buffer Size slider Click this button to open the settings window of the selected ASIO driver Latency This shows the delays introduced by the current Buffer Size setting Routings Under Routings you will be presented with a list of the 16 stereo outputs from KOMPLETE KONT...

Страница 57: ... KOMPLETE KONTROL is running as a stand alone application When using KOMPLETE KONTROL as a plug in the MIDI configuration is managed by the host and the MIDI page is not available Preferences panel MIDI page entries may vary on your computer Global Controls and Preferences Preferences KOMPLETE KONTROL A Series Manual 57 ...

Страница 58: ...KONTROL to automatically track anonymous usage data that you can choose to share with us Usage Data Tracking can be enabled or disabled in the General page of the Preferences in the KOMPLETE KONTROL software However we encourage all users to keep Data Tracking ena bled as it provides a valuable tool for understanding the performance of Native Instruments ap plications when they are used in real li...

Страница 59: ... enable or disable Usage Data Tracking 1 Open the General page of the Preferences by clicking Preferences in the KOM PLETE KONTROL menu 2 Click the Allow usage data tracking checkbox to enable or disable user data tracking Global Controls and Preferences Preferences KOMPLETE KONTROL A Series Manual 59 ...

Страница 60: ...At the top of the page the Factory and User buttons allow you to switch between the Factory pane and the User pane Factory Pane The Factory pane shows all factory libraries available These libraries will appear in the Factory view of the Browser s Library pane Preferences panel the Library page s Factory pane Global Controls and Preferences Preferences KOMPLETE KONTROL A Series Manual 60 ...

Страница 61: ...n the left of that library and select its new path Product column Shows the name of each product These names cannot be edited Rescan button If you have made any change to a library e g changed its location select it in the list and click the Rescan button to rescan that library Global Controls and Preferences Preferences KOMPLETE KONTROL A Series Manual 61 ...

Страница 62: ...TROL s standard user directory as well as any other user directory you might have defined These libra ries will appear in the User view of the Browser s Library pane Preferences panel the Library page s User pane Global Controls and Preferences Preferences KOMPLETE KONTROL A Series Manual 62 ...

Страница 63: ...e all your user files will be stored by default Scan user content for changes at start up Enabled by default this option automatically detects any new added user content when starting KOMPLETE KONTROL Add button Click Add to manually add directories to the user library See below for more details Remove button Click Remove to remove the selected user library Files will only be removed from the KOMP...

Страница 64: ...er s Library pane for quick searching and loading Paths to folders added via the IMPORT button in the Browser s Files pane will also show up here The only difference between adding folders via the Add button in Preferences panel described here and via the IMPORT button in the Files pane of the Browser is that the latter allows you to directly tag the files as they are imported Please note that the...

Страница 65: ...f NI Plug ins selects whether or not your Library con tent is always loaded with the latest version of the associated plug in If this option is disabled your Library content is loaded with the lowest required version of the associated plug in found on the computer For example this option is required if you have installed both the full version of REAKTOR 5 as well as a KOMPLETE Instrument that came...

Страница 66: ...lable VST plug ins in KOMPLETE KONTROL Always use latest version of NI Plug ins If this option is enabled default Library content is loaded with the latest version of the associated plug in If this option is disabled Library content is loaded with the lowest required version of the associated plug in Global Controls and Preferences Preferences KOMPLETE KONTROL A Series Manual 66 ...

Страница 67: ...d and Remove folders from the list as well as use the Rescan function to update the available plug ins in KOMPLETE KONTROL according to any changes made to the folders or their contents To display the Locations pane click the Locations button at the top of the Plug ins page Preferences panel the Plug ins page s Locations pane Global Controls and Preferences Preferences KOMPLETE KONTROL A Series Ma...

Страница 68: ... from the list Rescan Scans all folders in the list for compatible plug ins and updates the Manager pane accordingly 6 6 Loading a Plug in in Default State You can load a Plug in in default state directly from the KOMPLETE KONTROL menu In the KOMPLETE KONTROL menu select e g Plug ins Native Instruments Massive Global Controls and Preferences Loading a Plug in in Default State KOMPLETE KONTROL A Se...

Страница 69: ...ded All parameters are set to their default values Loading Plug ins in default state is only possible in the software Global Controls and Preferences Loading a Plug in in Default State KOMPLETE KONTROL A Series Manual 69 ...

Страница 70: ...the KOMPLETE KONTROL Library pane Adding and editing tags can only be done using the software For more information refer to section 12 1 Saving Preset Files to the User Library and 12 3 Editing the Tags and Properties of User Preset Files Browsing for Products instead of Browsing for Instruments or Effects Since the same workflows apply to Instruments and Effects this section refers to both produc...

Страница 71: ... the Browser Consequently when you select any other Plug in slot the Product Type is set to Effect which is reflected by the respective icon in the Browser These icons also appear in the display on the KOMPLETE KONTROL keyboard For more information on the Plug in chain and usage refer to 4 5 Plug in Chain Panel re spectively 8 Working with Effects 7 1 2 About the Library and Meta Information To or...

Страница 72: ... files included in the Library are all KOMPLETE KONTROL relevant files found in the folders whose paths are listed in the Library page of the Preferences panel You can also save the sounds you created in KOMPLETE KONTROL to the User content sec tion of the Library pane 7 1 3 Browsing the Library vs Browsing Your Hard Disks Besides of browsing KOMPLETE KONTROL Library the Browser also allows you to...

Страница 73: ...rowsing and loading files from the file system using the KOMPLETE KONTROL keyboard is not possible The Browser called up from the keyboard can only load files that have already been added to the Library This is why you should always import all your files to the Library and tag them using the software Browser beforehand Browsing the Library Browser Basics KOMPLETE KONTROL A Series Manual 73 ...

Страница 74: ...the B key Calling up the Browser on the Keyboard When the Plug in chain is entirely empty the displays show PRESS BROWSE In order to call up the Browser on the keyboard s displays Press the BROWSER button 7 3 Loading Preset Files When the Browser is open you can directly load any of the Preset files shown in the Results list When loading a Preset file the corresponding product automatically opens ...

Страница 75: ...n the Browser 1 Open the Browser by pressing the BROWSER button 2 Skip directly to the Results list by moving the 4 D encoder to the right until RESULTS is shown in the display 3 Select a Preset file in the Results list by turning the 4 D encoder 4 Load the selected Preset file by pressing the 4 D encoder The Preset file together with the product is loaded and the keyboard switches to PLUG IN mode...

Страница 76: ...oard Press the Page Left M or Page Right S button to choose between FACTORY content and USER content By default the FACTORY content is selected 7 5 Filtering Preset Files by Product The Product selector allows you to filter Preset files according to a certain Product By default the Product selector header displays All Instruments or All Effects This means that no certain Product is selected In ord...

Страница 77: ...nts or Ef fects available in your KOMPLETE KONTROL Library 2 Select either Category or Vendor in the Category Vendor selector to filter the Products ac cordingly 3 Scroll through the Product groups to find the Product you are looking for Browsing the Library Filtering Preset Files by Product KOMPLETE KONTROL A Series Manual 77 ...

Страница 78: ...4 Click on the Product image to select it Browsing the Library Filtering Preset Files by Product KOMPLETE KONTROL A Series Manual 78 ...

Страница 79: ...or header shows the Product name You can now browse for all Preset files associated with the selected Product in the Results list Browsing the Library Filtering Preset Files by Product KOMPLETE KONTROL A Series Manual 79 ...

Страница 80: ...n alphabetical order Filtering Products and so their Preset files by Category or Vendor is not supported 7 6 Filtering Product Preset Files by Bank Banks can be additional Libraries for example Expansions different versions of the original Factory Library or any other content categorization specific to a particular Product When you select specific Products in the Product list an additional Bank dr...

Страница 81: ...Bank The Results list further narrow its content accordingly You can remove the selected Bank by clicking the little cross in the closed Bank menu Filtering Product Preset Files by Bank using the Keyboard Filtering Product Preset Files by Bank using the KOMPLETE KONTROL A Series Keyboard is not supported The Results list always provides you with all Preset Files of the Product Browsing the Library...

Страница 82: ...es for all Instruments respectively Effects Products are shown in the Product selector only if the Library contains files for them If a particular Instrument does not show up make sure that it is installed correctly and has been updated to the latest available version Resetting the Product Selection on the Keyboard To reset the Product selection 1 Skip directly to the Products Filter by moving the...

Страница 83: ...cs of a sound Recommended but not man datorily the TYPES and MODES tag filters bring best results in combination with a selected Product TYPES and MODES filters for MASSIVE As soon the desired tags in the tag filters are selected the search is limited to the Preset files that are tagged correspondingly Tags can also be deselected to broaden the search Browsing the Library Types and Modes Tag Filte...

Страница 84: ...ercussive Synthetic etc The MODES filter is always displayed You can start your search with the MODES filter be fore or even without using the TYPES filter However the list of tags available in the MODES filter will vary depending on the tags se lected in the TYPES filter If no file contains both the Type and Mode tags that you have selected the Type tags will prevail and the Mode tags will be des...

Страница 85: ... browsing Effects In this tutorial you will learn how to filter find a bass line Preset file exemplary from the MON ARK Instrument using the Types filter We assume here you have already selected the MON ARK Instrument in the Product selector For now the TYPES filter shows only top level tags Browsing the Library Types and Modes Tag Filters KOMPLETE KONTROL A Series Manual 85 ...

Страница 86: ...r to find a bass sound 1 Select the Bass tag from the TYPES filter Upon your selection the second level of tags appears underneath with Sub Types like Ana log Bass Fingered Bass etc Browsing the Library Types and Modes Tag Filters KOMPLETE KONTROL A Series Manual 86 ...

Страница 87: ...is filtered accordingly to the Types and Modes filters This method allows you to quickly find various Preset files for an Instrument with similar char acteristics Filtering Preset Files by Types and Modes Using the Keyboard In order to find a bass sound 1 Skip to the TYPES filter by moving the 4 D encoder to the left or to the right until TYPES is shown in the first display line Browsing the Libra...

Страница 88: ...wsing Effects In both TYPES and MODES filter you can select multiple tags from the same level 1 Hold Shift on your computer keyboard and click two tags at a particular level to select these tags and all tags in between 2 Hold Ctrl Cmd on macOS on your computer keyboard and click any number of tags at a particular level to select these particular tags The result list will include all files satisfyi...

Страница 89: ...t will only show Preset files that have been assigned to be a Favorite and also match all other selected filters including the search query entered into the search field The KOMPLETE KONTROL Browser showing all Favorites tagged with the Type Bass 7 9 1 Adding Preset Files to the Favorites To add a Preset File to the Favorites 1 Place the mouse cursor over any selected or unselected entry in the Re...

Страница 90: ...ults list to the Favorites no matter if it is selected or not Adding Preset Files to the Favorites on the Keyboard In order to add a Preset File to the Favorites on the keyboard 1 Select the Preset File you want to add to the Favorites in the Results list 2 Press and hold SHIFT press the 4 D encoder The Preset File is added to the Favorites A star icon is at the Preset File entry indicates that it...

Страница 91: ...The Favorites icon is now lit and the Results list shows all favorite Preset Files Displaying all favorite Preset Files on the Keyboard In order to display all Favorites in the Results list on the keyboard Press and hold SHIFT BROWSER The Results list now shows all favorite Preset Files Browsing the Library Working with Favorites KOMPLETE KONTROL A Series Manual 91 ...

Страница 92: ...et Favorite icon The next time you select the Favorites filter the Preset file will not be shown in the Re sults list You can also remove a Preset file from the Favorites when the Results list is not filtered by Favorites Removing Preset Files from the Favorites on the Keyboard In order to remove a Preset File from the Favorites on the keyboard 1 Select a favorite Preset File Browsing the Library ...

Страница 93: ... narrowing in the result list below You can also limit the search by selecting Types and Mode tags In order to reset both text search tag search use the Reset button showing a little cross on the right side of the search field The Instrument selection is not affected 7 11 Displaying Preset File Information Click the Information button showing a little i next to the EDIT button in the right part of...

Страница 94: ...ontrols 1 Click the Prehear button showing a little speaker icon to enable disable Prehear When Prehear is enabled you can directly hear Preset Files as you select them in the Re sult list of the Library pane or Files pane 2 Drag the Prehear Volume slider next to the Prehear button to adjust the volume of the Preset Files you are pre listening to 3 Click on any entry in the Results list In order t...

Страница 95: ...tion on using the Browser refer to 7 Browsing the Library 8 1 Opening the Plug in Chain Panel In order to work with the Plug in chain in the KOMPLETE KONTROL software you need to make sure the Plug in chain panel is displayed If this is not the case you can display the Plug in chain panel by the following action Click on the Plug in chain panel button in the Header Working with Effects Opening the...

Страница 96: ...fects to the Plug in chain 8 2 Adding Effects Assuming an Instrument has already been loaded into the first Plug in slot you can then add Effects to the Plug in chain In order to add an Effect to the Plug in chain Working with Effects Adding Effects KOMPLETE KONTROL A Series Manual 96 ...

Страница 97: ...1 Click on the empty Plug in slot to select it 2 Browse for an Effect to your liking Working with Effects Adding Effects KOMPLETE KONTROL A Series Manual 97 ...

Страница 98: ...r to add an Effect to the Plug in chain 1 Push the right 4 D encoder to the right until you select the rightmost Plug in slot which is empty The display shows Press BROWSE Empty Slot 2 Press the BROWSER button to open the Browser 3 Select an Effect and its Preset file to your liking in the Results list 4 Press the 4 D encoder to load the selection The Effect is now added to the Plug in chain To ad...

Страница 99: ...ght to select the previous or next Plug in slot in the Plug in chain The Plug in controls are mapped to the Control section accordingly 8 4 Reordering Effects If you want to reorder your Effects in the Plug in chain you can easily move them by drag and drop In order to move an Effect in the Plug in chain 1 Hover the mouse over the Plug in slot you want to move 2 Click and hold the left mouse butto...

Страница 100: ...the Effect you want to move 3 Press and hold SHIFT push the 4 D encoder to the left or to the right in order to move the selected Effect in the Plug in chain 8 5 Scrolling the Plug in Chain Theoretically it is possible to add an unlimited amount of Effects to the Plug in chain If the Plug in chain exceeds the space on the GUI due to numerous Effects loaded big scroll arrows appear on the left and ...

Страница 101: ...ning the Effect you want to bypass Additional controls are displayed 2 Click the Bypass button at the top left of the Plug in slot The Effect is now bypassed and the image is grayed out Bypassing Effects using the Keyboard 1 Press PLUG IN to access the Plug in chain 2 Push the 4 D encoder to the left or to the right to select the Plug in slot containing the Effect you want to bypass 3 Press and ho...

Страница 102: ...ug in chain Removing Effects from the Plug in Chain using the Keyboard In order to remove an Effect from the Plug in chain 1 Press PLUG IN to access the Plug in chain 2 Push the 4 D encoder to the left or to the right to select the Plug in slot containing the Effect you want to remove 3 Press and hold SHIFT push the 4 D encoder up 4 Press the 4 D encoder to confirm 5 The Effect is removed from the...

Страница 103: ...u can customize the parameter mapping for each Preset file in the Plug in Panel of the KOM PLETE KONTROL software For more information refer to 9 4 Customizing Parameter Mappings using the Plug in Panel 9 2 Adjusting Parameters Once you have loaded an Instrument the eight knobs on the keyboard are automatically as signed to eight Instrument parameters Whenever you turn a knob on the KOMPLETE KON T...

Страница 104: ...umber at the bottom right of the right display indicates the current parameter page and the total number of available pages for the loaded Instrument 9 4 Customizing Parameter Mappings using the Plug in Panel If you want to customize the parameter mapping for an Instrument s Preset file you have to enable the Edit mode of the Plug in panel To enable or disable the Plug in panel s Edit mode click o...

Страница 105: ...a label to view and edit the controls on this page The current page is highlight ed 2 To delete a page click on the cross icon next to its label The Add Page button 2 allows you to add more pages to the Control section for the current Preset file while the Learn button 3 enables Learn mode for the Plug in panel In Learn mode select a control in the Plug in panel and move any parameter on the In st...

Страница 106: ...ntrol double click on it and enter a new name Press enter or click elsewhere to confirm the changes If you place the mouse over a control 6 in Edit mode additional options allow for changing the parameter mapping of this control 1 Click on the arrow icon at the left of the control s knob and select a parameter from the drop down menu to map it to this control 2 Click on the cross icon at the right...

Страница 107: ...out Music Theory KOMPLETE KONTROL has built in scales and harmonies that you can select to play your In struments with chords and arpeggiator sequences To learn more about what that really means continue reading below Scales Traditionally music is built by combining elements of rhythm and harmony There are many ex ceptions to this but to understand the concepts of scales chords and arpeggiator seq...

Страница 108: ...use this knowledge to play a C major chord by pressing the root note C then pressing another key two whole steps above C the E note and then yet another key a half step and a whole step further up the keyboard the G note all simultaneously This C major chord corresponds to a root note C a third E and a fifth G which is the note interval of a major triad By playing a triad chord you have just learn...

Страница 109: ...ears 2 To switch on the Scale engine click the check box next to SCALE in the Perform section so it is filled blue Activating the Scale Engine on the Keyboard To switch on the Scale engine press SCALE Edit in the Perform and Edit section on the keyboard Smart Play Playing and Editing Scales and Chords Activating the Scale Engine KOMPLETE KONTROL A Series Manual 109 ...

Страница 110: ...s are being played back 4 To map the knobs to Instrument parameters again press PLUG IN The Scale engine will still be switched on If you selected Scale Type CHROM all keys are mapped 10 4 Playing Chords You can play chords in the usual way by pressing any number of keys simultaneously or send multiple MIDI notes simultaneously from the host but KOMPLETE KONTROL also lets you create and play chord...

Страница 111: ...aning the first third and fifth note of a chord All played back notes are indicated by the Light Guide 5 To map the knobs to Instrument parameters again press PLUG IN The Scale engine re mains switched on 10 5 Editing Scales and Chords You have the possibility to tailor the scales and chords to your liking using the Scale engine parameters To edit the Scale engine parameters in the KOMPLETE KONTRO...

Страница 112: ...ote The SCALE parameters Root Note Bank and Type 10 6 1 SCALE Root Note The first SCALE parameter is Root Note On the keyboard it is mapped to Knob 1 of the Con trol section in Scale Edit mode Setting the root note of a scale means deciding what key the scale will begin with The following notes of the scale depend on which scale pattern you se lect with the SCALE Type parameter see below You can t...

Страница 113: ... example using the default Root Note value C combined with the default Type Major from the default Bank Main you get the scale C major which spans over one octave and contains the notes C D E F G A and B followed by C again If instead you select G as your Root Note the G major scale contains the notes G A B C D E and F followed by G again You will notice that the distance between each note follows...

Страница 114: ...pattern consisting of the notes C D D will be played back as such if Type is set to Chromatic named CHROM on the keyboard from Bank Main but instead as C D E if Type is set to Major The Light Guide indicates the active keys in the selected Type via lit LEDs while inactive keys are unlit The following scales are available Smart Play Playing and Editing Scales and Chords Setting the SCALE Parameters...

Страница 115: ...ic Main Arabic 1 2 3 4 5 6 7 Altered Main Altered 1 2 2 3 4 6 7 Whole Tone Main WH Tone 1 2 3 4 5 7 H W Dim Main H W Dim 1 2 2 3 4 5 6 7 W H Dim Main W H Dim 1 2 3 4 4 5 6 7 Ionian Modes Ionian 1 2 3 4 5 6 7 Dorian Modes Dorian 1 2 3 4 5 6 7 Phrygian Modes Phrygian 1 2 3 4 5 6 7 Lydian Modes Lydian 1 2 3 4 5 6 7 Mixolydian Modes Mixolyd 1 2 3 4 5 6 7 Aeolian Modes Aeolian 1 2 3 4 5 6 7 Locrian Mod...

Страница 116: ... 4 5 6 7 Mixo b13 Jazz Mix b13 1 2 3 4 5 6 7 Mixo b9 b13 Jazz Mixb9b13 1 2 3 4 5 6 7 Lydian 7 b2 Jazz Lyd 7b2 1 2 3 4 5 6 7 Bebop Jazz Bebop 1 2 3 4 5 6 7 7 Whole Tone Jazz Whole Tn 1 2 3 4 5 7 Blues Maj Jazz Blues Ma 1 2 3 3 5 6 Blues Min Jazz Blues Mi 1 3 4 4 5 7 Blues Combined Jazz BluesCmb 1 2 3 3 4 4 5 6 7 Lydian 5 Jazz Lyd 5 1 2 3 4 5 6 7 Jazz Minor Jazz Jazz Mi 1 2 3 4 5 6 7 Half Dim Jazz H...

Страница 117: ...ian 4 1 2 3 4 5 6 7 Mid East 1 World M East 1 1 2 3 4 5 6 7 Mid East 2 World M East 2 1 2 3 4 5 6 7 Mid East 3 World M East 3 1 2 3 4 5 6 7 Mid East 4 World M East 4 1 2 3 4 5 6 7 Penta I 5 Tone Pent I 1 2 3 5 6 Penta II 5 Tone Pent II 1 2 4 5 7 Penta III 5 Tone Pent III 1 3 4 6 7 Penta IV 5 Tone Pent IV 1 2 4 5 6 Penta V 5 Tone Pent V 1 3 4 5 7 Hirajoshi 5 Tone Hira 1 2 3 5 b6 Insen 5 Tone Insen ...

Страница 118: ...Lead Wh 1 2 3 4 5 6 7 Enigmatic Modern Enigmatc 1 2 3 4 5 6 7 Scriabin Modern Scriabin 1 2 3 4 6 7 Tcherepnin Modern Tcherepn 1 1 2 3 4 5 5 6 7 Messiaen I Modern Mes I 1 2 3 4 5 6 Messiaen II Modern Mes II 1 2 2 3 4 5 6 7 Messiaen III Modern Mes III 1 2 3 3 4 5 6 7 7 Messiaen IV Modern Mes IV 1 2 2 4 4 5 6 7 Messiaen V Modern Mes V 1 2 4 4 5 7 Messiaen VI Modern Mes VI 1 2 3 4 4 5 6 7 Messiaen VII...

Страница 119: ...2 3 4 5 6 Penta 1 Major Penta 1 1 2 3 5 6 Penta 2 Major Penta 2 1 3 4 5 7 Penta 3 Major Penta 3 1 3 5 6 7 Natural Minor Natural 1 2 3 4 5 6 7 Dorian Minor Dorian 1 2 3 4 5 6 7 Phrygian Minor Phrygian 1 2 3 4 5 6 7 Minor Major Minor Min Maj 1 2 3 4 5 6 7 Harmonic Minor Minor Har Min 1 2 3 4 5 6 7 Dbl Har Minor Minor Dbl Min 1 2 3 4 5 6 7 Neapolitan Min Minor Nea Min 1 2 3 4 5 6 7 Minor Locrian Mino...

Страница 120: ... MODE parameter is Mode On the keyboard it is mapped to Knob 3 of the Con trol section in Scale Edit mode It defines how the selected is mapped to the keys of the key board The KEY MODE parameter Mode The KEY MODE menu consists of the following three modes which are described in detail be low Guide Mapped default value Easy Smart Play Playing and Editing Scales and Chords Setting the KEY MODE Para...

Страница 121: ...e can be played using the white keys of the keyboard only The black keys are inactive and press ing them will not trigger any other notes Selecting the 12 step Chromatic scale in KEY MODE Easy maps the keys in the same way as in the Mapped mode The Root Note is always mapped to the middle C key commonly called C3 If the selected scale consists of seven notes it matches the seven white keys of a si...

Страница 122: ... 10 8 Setting the CHORD Parameters 10 8 1 CHORD Mode The first CHORD parameter is Mode On the keyboard it is mapped to Knob 5 of the Control section in Scale Edit mode Use it to generate chords from single notes either from the KOM PLETE KONTROL keyboard or from incoming MIDI notes from the host The CHORD parameter Mode Smart Play Playing and Editing Scales and Chords Setting the CHORD Parameters ...

Страница 123: ...the third note and the fifth note CHORD Type value 1 3 5 The CHORD parameter Mode set value Harm Chd Set If CHORD Mode is set to Chd Set the CHORD Type menu allows you to choose from a selec tion of major and minor chords depending on the current Root Note The CHORD parameter Mode set value Chd Set The SCALE Type and KEY MODE parameters are not available when CHORD Mode is set to Chd Set Smart Pla...

Страница 124: ...n of individual notes present in the selected SCALE Type This means that for all scales except the 12 tone Chrom scale see further below you can select the interval of notes that will make up your chord The note interval is added onto the key of an incoming MIDI note either from the KOM PLETE KONTROL keyboard or from the host For example you can select to play a C minor triad by setting Root Note ...

Страница 125: ...ing values Chord Type Interval Added to Played Note Octave Octave 1 3 3rd 1 5 5th 1 3 5 3rd and 5th 1 4 5 4th and 5th 1 3 5 7 3rd 5th and 7th 1 4 7 4th and 7th Smart Play Playing and Editing Scales and Chords Setting the CHORD Parameters KOMPLETE KONTROL A Series Manual 125 ...

Страница 126: ...lectable chords Values are e g Maj 4 and Min 7 which would generate a major and minor chord respectively both using C as the chord s root note When CHORD Mode is set to Chd Set the CHORD Type setting includes the following values Maj 1 Maj 2 Maj 3 Maj 4 Maj 5 Maj 6 Maj 7 Maj 8 Min 1 Min 2 Min 3 Min 4 Min 5 Min 6 Smart Play Playing and Editing Scales and Chords Setting the CHORD Parameters KOMPLETE...

Страница 127: ...select virtually any CHORD Type The following chords are available and can be generated Chord Type Semitones Added above Played Note Octave 12 Perf 4 Perfect 4 5 Perf 5 Perfect 5 7 Major 4 and 7 Minor 3 and 7 Sus 4 Suspended 4 5 and 7 Maj 7 Major 7 4 7 and 11 Min 7 Minor 7 3 7 and 10 Dom 7 Dominant 7 4 7 and 10 Dom 79 Dominant 9 4 7 10 and 14 Min 7 b5 Minor 7 b5 3 6 and 10 Dim 7 Diminished 7 3 6 a...

Страница 128: ...ed chord is always played 1 to 8 Decreasing Position with negative values moves the highest note of the current chord down by an octave this inverts the chord to a lower position in the selected scale 1 to 8 Increasing Position with positive values moves the lowest note of the current chord up by an octave this inverts the chord to a higher position in the selected scale Auto This provides a more ...

Страница 129: ...e To play an ar peggiated note sequence you only need to press any key on the KOMPLETE KONTROL key board or receive an incoming MIDI note from the host Activating the Arpeggiator in the KOMPLETE KONTROL Software Click the Perform panel button in the Header to show the Perform panel The Perform panel appears in KOMPLETE KONTROL To switch on the Arpeggiator click the blue check box next to ARP in th...

Страница 130: ...g Arpeggiator Parameters You can also edit the Arpeggiator parameters in the Control section for further tweaking of the sequence 1 Press SHIFT ARP Edit to map the knobs of the Control section to the Arpeggiator pa rameters 2 To change the direction of the sequence to e g UP DOWN turn Knob 2 TYPE by de fault set to UP 3 To adjust the OCTAVES reach of the Arpeggiator turn Knob 6 by default set to 1...

Страница 131: ...e the playback direction of the arpeggiator sequence use the MAIN parameters Mode and Type To create interesting rhythms for the arpeggiator sequence use the RHYTHM parameters Rate Sequence and Swing To change the range of available notes for the arpeggiator sequence as well as their veloci ty and length use the OTHER parameters Octaves Dynamic and Gate To explore alternative versions of the same ...

Страница 132: ...ing two modes Arp mode which generates arpeggiator sequences based on chords you play on the key board or the output of the Scale engine With ARP switched on and Mode set to Arp any chord you created using the Scale engine will play as an arpeggiated note sequence In this case you only need to press one key on the keyboard to hear the arpeggiated notes play out according to the selected scale Note...

Страница 133: ...the order you pressed down the corresponding keys on the KOMPLETE KONTROL keyboard Automating the Type parameter in the host can create interesting variations and tex tures The Type setting includes the following values Up Down Up Down UP DOWN on the keyboard Order Played PLAYED on the keyboard Chord 11 4 RHYTHM Parameters The RHYTHM parameters Rate Sequence and Swing allow you to create interesti...

Страница 134: ...d notes are 1 5 times longer than the corresponding basic notes Triplets are 2 3 the du ration of their corresponding basic notes so that e g three 1 4 notes are equal in duration to two basic 1 4 notes The Rate setting includes the following values 1 1 1 2 Dotted 1 2 D 1 1 Triplet 1 1 T 1 2 1 4 Dotted 1 4 D 1 2 Triplet 1 2 T 1 4 1 8 Dotted 1 8 D 1 4 Triplet 1 4 T 1 8 1 16 Dotted 1 16 D 1 8 Triple...

Страница 135: ...ariety of rhythms at different tempos If Rate is set to a basic or dotted value then Sequence applies a 16 step sequencer to the notes If Rate is instead set to a triplet val ue then Sequence applies a 12 step sequencer to the notes You can switch sequences in real time during playback For example if sequence 1 is running and you instead select sequence 2 after the fourth MIDI note in a pattern ha...

Страница 136: ...by delaying every second note The delay length is a percentage of the current step size To display the set value of the SWING parameter tap Knob 5 Using Swing in combination with the Gate parameter adds further variations in note duration For example if Gate is set to 100 KOMPLETE KONTROL sends a MIDI note off message before each note and plays back the sequence legato If Gate is set to values lar...

Страница 137: ... the KOMPLETE KONTROL keyboard or you can select up to eight octaves and let the corresponding notes of your chord or scale be played back in as many octaves Depending on the settings you have made to the Type parameter the octaves played back can be above e g Up below e g Down or both above and below Up Down the pressed keys The Octaves setting includes the following values 1 2 3 4 5 6 7 8 To dis...

Страница 138: ...3 OTHER Gate The third OTHER Parameter Gate is available in both Arp and Note Repeat mode On the key board it is mapped to Knob 8 of the Control section in Arp Edit mode It lets you decide the length of the notes in your sequence Setting a value between 1 and 99 makes the dura tion of the notes shorter than they otherwise would be Setting a value between 101 and 200 instead elongates the duration ...

Страница 139: ...1 2 3 4 5 and Retrigger is set to 8 the Arpeggiator output is 1 2 3 4 5 1 2 3 repeat Rests in a Sequence are treated as steps If the arpeggiator sequence consists of 6 pitches the Sequence is 1 2 3 rest 4 5 6 rest and Retrigger is set to 5 the Arpeggiator output is 1 2 3 rest 4 repeat 11 6 2 ADVANCED Repeat The second ADVANCED parameter Repeat is only available in Arp mode On the keyboard it is ma...

Страница 140: ...version is only available in Arp mode On the keyboard it is mapped to Knob 4 of the Control section when page 2 is selected in Arp Edit mode Inver sion adds inverted alternations of the arpeggiator sequence to the cycle For example If the arpeggiator sequence consists of a 3 note cycle 1 2 3 Type is set to Up and Inversion is set to 0 the Arpeggiator output is 1 2 3 repeat If the arpeggiator seque...

Страница 141: ...e Arpeggiator can still generate pitches below the Min Key setting 11 7 2 RANGE Max Key The second RANGE parameter Max Key is only available in Arp mode On the keyboard it is mapped to Knob 6 of the Control section when page 2 is selected in Arp Edit mode Max Key sets the highest key that can be used as an input for the arpeggiator sequence The Arpeggiator can still generate pitches above the Max ...

Страница 142: ...D parameter On Off HOLD On Off is a switch control that lets you select the values On and Off 1 Pressing any key while HOLD is On will set a new sequence 2 To stop the Arpeggiator playback set the HOLD parameter to Off Alternatively you can switch the Arpeggiator completely off to stop playback by pressing ARP Edit in the keyboard s PERFORM section When you switch the Arpeggiator back on HOLD will...

Страница 143: ...utomatically added to the user content section of the Library pane and can be filtered and searched like any other Preset file in the KOMPLETE KONTROL Library On your hard drive the user Preset files are saved in the following folder sorted by Instrument in corresponding subfolders Windows C Users your user name Documents Native Instruments User Content macOS Macintosh HD Users your user name Docu...

Страница 144: ...menu of the KOMPLETE KONTROL menu click on Save Or if you want to save a Preset file you are working on with a new name click on Save As in the File submenu of the KOMPLETE KONTROL menu 3 Enter a name for your new Preset file and click Save in the Save Preset dialog to save the Preset file Managing the Library Saving Preset Files to the User Library KOMPLETE KONTROL A Series Manual 144 ...

Страница 145: ...select them as described above and right click any of them A warning dialog opens to inform you that the Preset file will be not only removed from the KOMPLETE KONTROL Library but also deleted from your hard disk 2 Click OK to confirm the deletion or Cancel to keep the file The Preset file is deleted from the KOMPLETE KONTROL Library and from your hard disk When browsing factory content the Delete...

Страница 146: ... files by using the Type and Mode filters in the Library pane The Type and Mode tags are also recognized by the MASCHINE Browser This way you can easily find the user Preset files you saved with KOMPLETE KONTROL in the User content section of MA SCHINE s Library pane The MODES tag filter is not available when browsing Effects Follow the instructions below to assign tags to your Preset file and cha...

Страница 147: ...e 3 Click and drag the upper edge of the Attribute Editor upwards to increase its size This makes it easier to navigate in the list of available tags Managing the Library Editing the Tags and Properties of User Preset Files KOMPLETE KONTROL A Series Manual 147 ...

Страница 148: ...mes 5 Click on MODES to edit the Mode tags for your Preset file You can assign them in the same way you assigned the Type tags before by clicking on the checkboxes next to their names Managing the Library Editing the Tags and Properties of User Preset Files KOMPLETE KONTROL A Series Manual 148 ...

Страница 149: ...r selection of Types and Modes and the properties are saved You can close the Attribute Editor by clicking on EDIT again 12 4 Working with the Files Pane This section details the actions you can perform that help you to browse for files on your hard disks using the Files pane The Results list of the Files pane shows the files and folders found in the path selected in the Location bar above Only KO...

Страница 150: ...a right click on the selected entry or entries respectively The context menu in the result list of the Files pane Following commands are available Command Description Add to Favorites folders only Adds the selected folder to your Favorites Import to Library folders only Imports the selected folder s into the Library Managing the Library Working with the Files Pane KOMPLETE KONTROL A Series Manual ...

Страница 151: ...The Location bar shows and lets you modify the selected path At any time the Results list will display the content of the path shown here The Location bar The Location bar provides following tools Up arrow Use the Up arrow on the left to go one level up in your file system Selected path Within the path displayed you can Click any folder name to jump to that folder Click any right pointing arrow af...

Страница 152: ...ing to Recent File Locations The Recent Locations button shows a clock icon at the right of the Location bar The Recent Location button The last 10 locations you have visited are stored by KOMPLETE KONTROL and available here Click the Recent Location button and select any recently visited location from the list This location is loaded in the Location bar and its content displayed in the result lis...

Страница 153: ...oots of each of your hard disks your desktop folder and your user folder Jumping to Favorite Folders Click any favorite folder in the Favorite bar to jump to that location The selected location is loaded in the Location bar and its content appears in the Results list Adding and Removing Favorite Folders You can add your own favorite folders to the Favorites bar This is done in the Results list 1 N...

Страница 154: ...ative Kontrol Standard NKS are automatically loaded when you call up a Preset file from the KOMPLETE KONTROL Library However you can also load plug ins directly allowing you to integrate any VST plug in in KOM PLETE KONTROL This way you can play your VST plug ins using the Smart Play features map their parameters to the controls on the keyboard and save Preset files for them in your KOM PLETE KONT...

Страница 155: ...me deep level as KOMPLETE Instruments and Effects The Native Kontrol Standard includes Seamless integration into the KOMPLETE KONTROL Browser for a unified browsing experi ence Full parameter mapping for instant hands on control NKS Instruments can be found in the KOMPLETE KONTROL Browser next to your KOM PLETE Instruments All of their Preset files are fully tagged so filtering in the Browser give...

Страница 156: ... a folder that contains all Instrument files including Preset files and samples Instead of running an instal ler this folder needs to be stored on the hard drive The Instrument can then be activated with Native Access which also adds it to the KOMPLETE KONTROL Library If you are using KON TAKT or REAKTOR the Instrument is automatically added to their respective Browser To activate your KONTAKT Ins...

Страница 157: ... Native Access 4 Enter the serial number of the Instrument and click ADD SERIAL 5 Click BROWSE and open the folder containing the Instrument files in the file dialog Managing the Library Installing NKS Instruments KOMPLETE KONTROL A Series Manual 157 ...

Страница 158: ...d the Instrument files If an Instrument can not be found use the Rescan function on the Preferences Library page to update the Library with the correct folder location 12 7 Importing KOMPLETE KONTROL Compatible User Files Apart from the huge KOMPLETE factory library you might want to use e g your own REAK TOR ensembles or KONTAKT Instrument files you received from other users You can load them dir...

Страница 159: ...ired folder 3 Click the IMPORT button at the bottom right of the Browser You will be presented with the Attribute Editor 4 In the Attribute Editor tag the files you are about to import to the Library 5 Click OK at the bottom right of the Browser to import the files to the Library All KOMPLETE KONTROL compatible files found in the selected folder s are imported to your Library They are added as use...

Страница 160: ...oes not receive MIDI Clock However when using KOMPLETE KON TROL as a plug in it is automatically synchronized to the host tempo The tempo display in KOMPLETE KONTROL s header is grayed out and tempo is adjusted in the host Outgoing MIDI You can also send MIDI data from KOMPLETE KONTROL Triggering MIDI instruments and recording MIDI notes KOMPLETE KONTROL sends MIDI Note and Pitch Bend messages to ...

Страница 161: ...ort record in order to record automation while others make use of dedicated automation controls Once the host is ready to record automa tion you can start playback and adjust parameters on the KOMPLETE KONTROL keyboard in order to record them For detailed information about recording automation in the host refer to the documentation of your host software Changing the State of an On Off Switch To ch...

Страница 162: ...omputer mouse and select an entry 2 Turn the knob on the keyboard currently assigned to the corresponding parameter Changing the Value of a Drag Control To change the value of a drag control 1 Click and drag the corresponding drag control with your computer mouse MIDI Communication Host Automation KOMPLETE KONTROL A Series Manual 162 ...

Страница 163: ...Ds for the Perform Panel The following automation IDs are reserved for parameters in KOMPLETE KONTROL s Perform panel Automation ID Parameter 000 Reserved for Instance Recognition and Automatic Focus Follow 001 Scale On Off 002 Root Note Scale 003 Scale Type Scale 004 Key Mode Scale 006 Chord Mode Scale 007 Chord Type Scale 026 Arp On Off 027 Mode Arp 028 Type Arp 029 Rate Arp 030 Sequence Arp 031...

Страница 164: ...tomation ID Parameter 035 Retrigger Arp 036 Repeat Arp 037 Offset Arp 038 Inversion Arp 039 Min Key Arp 040 Max Key Arp 041 Hold Arp MIDI Communication Host Automation KOMPLETE KONTROL A Series Manual 164 ...

Страница 165: ...ple Logic Pro X Apple GarageBand Ableton Live For more information on the integration of the supported hosts refer to the section for the re spective host 14 2 Integration with Apple Logic Pro X and GarageBand 14 3 Integration with Ableton Live Integration with Steinberg Cubase and Nuendo 14 1 Integration with MASCHINE If you own MASCHINE you can control many of MASCHINE s functions directly from ...

Страница 166: ... and GarageBand If you own Apple Logic Pro X or GarageBand you can control many of their functions directly from the KOMPLETE KONTROL keyboard The available functions mapped to the sections of the keyboard are listed below For more information on how to set up Host Integration with Apple Logic Pro X or GarageBand refer to 3 3 1 Setting up Apple Logic Pro X and GarageBand Host Integration Integrati...

Страница 167: ...ying REC Count In Stop playback recording at current position STOP Relocate playhead position to song start when stopped STOP Scroll playhead position Turn 4 D encoder Enable disable count in SHIFT REC Count In Enable disable metronome METRO Enable disable loop mode LOOP Move Loop by its own length LOOP turn 4 D encoder Tap tempo TEMPO Host Integration Integration with Apple Logic Pro X and Garage...

Страница 168: ...ro X and GarageBand Button on KOMPLETE KONTROL A Series Select Browser fields Push 4 D encoder left right Search Browser tags and Preset files Turn 4 D encoder Select Browser tags Press 4 D encoder Load the selected Preset in the Results list Press 4 D encoder Clear Browser Filters SHIFT Push 4 D encoder left Set Preset as Favorite in Results List SHIFT Press 4 D encoder Filtering by Favorites in ...

Страница 169: ...e selected Plug in from Plug in chain SHIFT Push 4 D encoder up Navigate Parameter Pages Page Left M Page Left S Track Control Action in Logic Pro X and GarageBand Button on KOMPLETE KONTROL A Series Select previous next track Push 4 D encoder left right Select previous next Region Push 4 D encoder up down Mute unmute selected Track SHIFT Page Left M Solo unsolo selected Track SHIFT Page Left S Ad...

Страница 170: ...g up Ableton Live Windows Transport Control Action in Ableton Live Button on KOMPLETE KONTROL A Series Start playback PLAY Restart Start recording REC Count In Restart playback recording PLAY Restart Stop playback recording at current position STOP Relocate playhead position to song start when stopped STOP Start Arranger recording SHIFT REC Count In Scroll playhead position Turn 4 D encoder Enable...

Страница 171: ...n in Logic Pro X and GarageBand Button on KOMPLETE KONTROL A Series Select Browser fields Push 4 D encoder left right Search Browser tags and Preset files Turn 4 D encoder Select Browser tags Press 4 D encoder Load the selected Preset in the Results list Press 4 D encoder Clear Browser Filters SHIFT Push 4 D encoder left Set Preset as Favorite in Results List SHIFT Press 4 D encoder Filtering by F...

Страница 172: ...p Slot in Track Push 4 D encoder down up Start stop selected Clip Push 4 D encoder Mute unmute selected Track SHIFT Page Left M Solo unsolo selected Track SHIFT Page Left S Adjust volume for selected track Turn 4 D encoder Adjust panorama for selected track SHIFT Knob 1 8 Host Integration Integration with Ableton Live KOMPLETE KONTROL A Series Manual 172 ...

Страница 173: ... Plug in on empty Plug in slot BROWSER Move selected FX Plug in left or right in the Plug in chain SHIFT Push 4 D encoder left right Bypass selected plug in in Plug in chain SHIFT Press 4 D encoder Remove selected Plug in from Plug in chain SHIFT Push 4 D encoder up Navigate Parameter Pages Page Left M Page Left S Host Integration Integration with Ableton Live KOMPLETE KONTROL A Series Manual 173 ...

Страница 174: ...ters 138 Dynamic 138 editing 131 Gate 138 Groove 136 Hold 142 Inversion 140 Main 132 Main mode 132 Main type 133 Max Key 141 Min Key 141 note value 134 Octaves 137 Offset 140 Other 136 playing sequences 130 Range 137 140 rate 134 Repeat 139 Index KOMPLETE KONTROL A Series Manual 174 ...

Страница 175: ...n 41 Automatically assigned controls 103 B Browser 24 Files pane 32 Library pane 28 Loading Preset files 74 Product selector 30 showing and hiding 74 Browsing choosing factory or user content 76 displaying Preset file information 93 filtering by Bank 80 filtering by TYPES and MODES 85 Filtering Preset files by Instrument 76 performing a text search 93 Prodcut types 71 resetting the selection 82 TY...

Страница 176: ...103 customizing parameter mappings 104 Controlling Parameters switching parameter pages 104 D Driver selecting an audio driver 55 E Effects 95 bypassing 101 reordering 99 F Favorites adding 89 displaying 91 removing 92 working with Favorites 89 Files pane 32 additional Results list features 150 Control bar 33 Favorite bar 33 IMPORT button 33 Information button 33 Location bar 33 navigating file lo...

Страница 177: ...Ableton Live 170 integration with Apple GarageBand 166 integration with Apple Logic Pro X 166 integration with MASCHINE 165 setting up 18 setting up Ableton Live on macOS 19 setting up Ableton Live on Windows 21 setting up Apple GarageBand 19 setting up Apple Logic ProX 19 supported hosts 19 165 Host Transport Control 42 I IMPORT button 159 Importing KOMPLETE KONTROL Compatible User Files 158 Inst...

Страница 178: ... Velocity buttons 39 USB connector 40 L Latency 56 Library 71 importing your own files 158 organizing 143 saving Preset files 143 tags 72 Library pane 28 Content selector 28 Control bar 29 EDIT button 29 Favorites 29 Information button 29 Library 28 MODEs filter 29 Prehear controls 29 Product selector 29 30 Product Type icon 28 Results list 29 Search field 29 TYPES filter 29 Loading a Plug in in d...

Страница 179: ...161 configuration 57 Controlling MIDI applications and devices 160 controlling parameters via 161 incoming MIDI 160 MIDI communication 160 outgoing MIDI 160 receiving MIDI clock 160 routing and recording processed MIDI notes 160 triggering MIDI instruments and recording MIDI notes 160 Mode Buttons BROWSER button 43 INSTANCE button 43 PLUG IN button 43 MODES filter 29 Modulation Wheels 39 Music the...

Страница 180: ...dit Section 41 Perform panel Scale 107 PLAY Restart button 42 Plug in area 37 Plug in chain bypassing Effects 101 Plug in chain 36 Plug in slot 36 removing Effects 102 reordering Effects 99 scrolling 100 selecting Plug in slots 99 Plug in chain panel 36 opening 95 overview 36 Plug in chain 36 Plug in slot 36 Plug in panel 34 Edit mode 104 overview 34 Plug in slot 36 Plug ins Loading a Plug in in d...

Страница 181: ...72 managing 143 organizing 71 saving to the Library 143 saving user Preset files 144 Product selector 29 30 Category Vendor selector 31 Product list 31 Product selector header 30 Product types Instrument and Effect 71 Q QUANTIZE button 41 R REC Count in button 42 Removing Effects 102 Reordering Effects 99 Resetting the clock from the Keyboard 52 in the software 52 Results list 29 Root Note 112 Ind...

Страница 182: ...engine 107 activating 109 Scale Type 113 chromatic 127 Scales 107 Searching Preset files 72 Setting up connecting the keyboard to the computer 15 Host integration 18 Stand alone application 16 SHIFT button 41 Software Overview 24 Browser 24 27 Header 24 25 Plugin area 24 Plug in area 37 Soundcard output routing 54 settings 54 Stand alone application Setting up 16 STOP button 42 Switching Instances...

Страница 183: ...button 51 Tempo control 51 TRANSPORT section 42 TYPES and MODES selecting multiple tags from the same level 88 TYPES filter 29 U UNDO Redo button 41 Usage Data Tracking enabling disabling 59 User Library adding folders 64 removing folders 64 User Preset files deleting 145 editing tags and properties 146 saving 144 V Volume Control 26 VST plug ins 65 154 loading 154 managing 65 Index KOMPLETE KONTR...

Отзывы: