background image


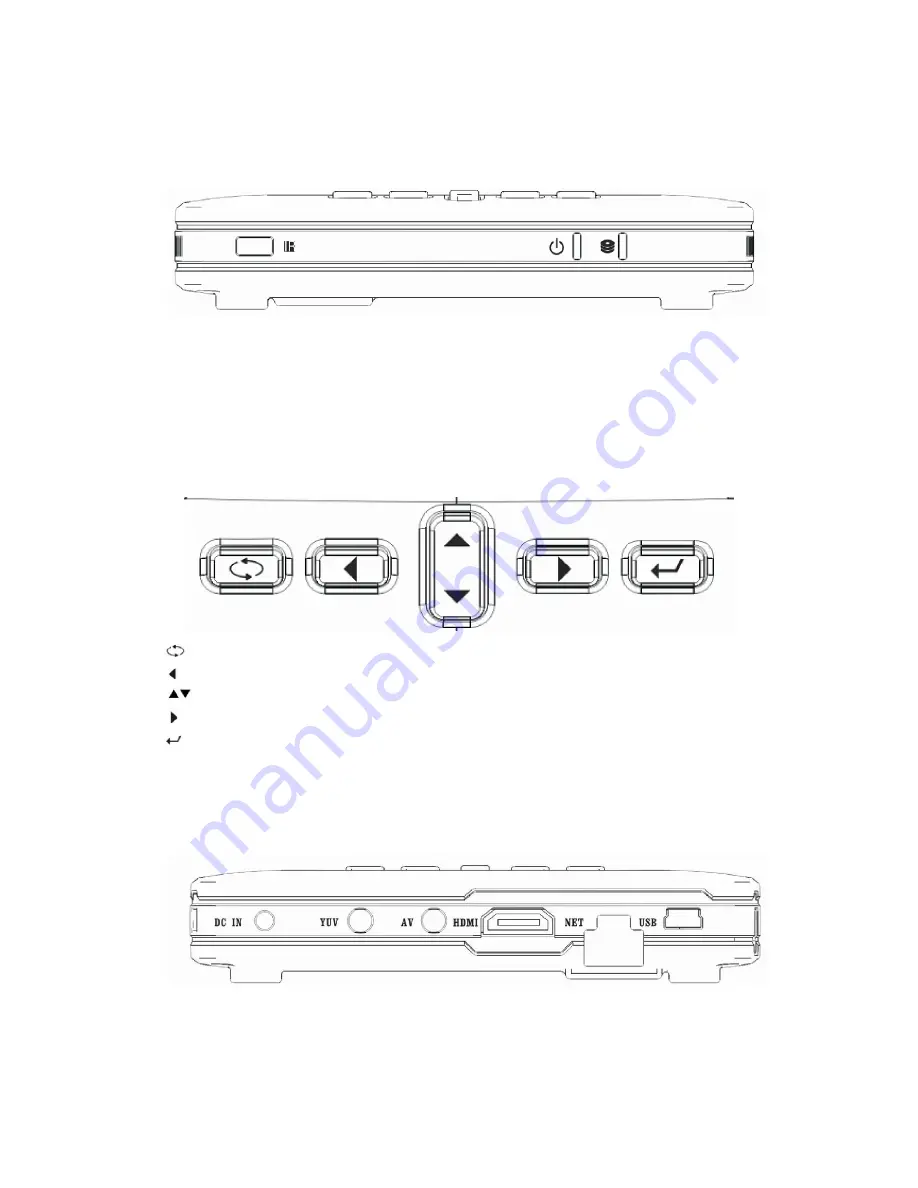
2.2 The elements of the front side


Remote control indication light


Power indication light, Infra red receiver


External storage indication light


2.3 The button of the top side


Return to main menu


Navigation button left


Navigation button up and down


Navigation button right


Start of playback or confirm the settings


2.4 The elements of the rear side


DC IN


Power adapter input


YUV


3-wire Video component output


AV


Audio/Video output


HDMI


HDMI output


6


Содержание HDVP2

Страница 1: ...NATIONITE HDVP2 User s Manual...

Страница 2: ...CONNECTION 7 3 1 ASSEMBLING STEPS OF HARD DISK 7 3 2 YUV OUTPUT 8 3 3 AV OUTPUT 8 3 4 HDMI OUTPUT 9 3 5 CONNECT TO COMPUTER 10 3 6 USB DEVICE LIKE USB DISK USB HDD ETC CONNECTION 11 3 7 MULTIMEDIA CAR...

Страница 3: ...ding backend and video post processing Decode RealVideo 8 9 10 video streams 720p MPEG 1 2 4 1080i 1080p 30fps decoding H 264 HP level 4 1 Logistic support VOB DVD IFO DVD MPG MPEG 2 1 AVI MPEG 4 ASP...

Страница 4: ...ore usage 1 3 1 Usage cautions User should not modify this player If commercial hard disk is being used the environmental temperature should be within 5 35 1 3 2 Power cautions The player s power volt...

Страница 5: ...o not press the buttons too hard Do not let the player come into contact with water or other liquid Do not disassemble the player repair the player or change the design of the player any damage done w...

Страница 6: ...2 About the Player 2 1 Remote Control 4...

Страница 7: ...crease the volume 17 Fast forward To fast forward the current playback 18 OSD to evocative function of column 19 Fast rewind To fast rewind the current playback 20 Device To change device 21 Subtitle...

Страница 8: ...e indication light 2 3 The button of the top side Return to main menu Navigation button left Navigation button up and down Navigation button right Start of playback or confirm the settings 2 4 The ele...

Страница 9: ...ng and Connection 3 1 Assembling steps of Hard Disk Open the rear cover by screwdriver Insert the HDD to SATA interface of the unit Put the sponge between the interspaces to fix the HDD Put the rear c...

Страница 10: ...Note Make sure you observe the colours of the three sockets when you establish the connection When the colours are connected in a wrong way no picture or a picture with wrong colours will be displayed...

Страница 11: ...3 4 HDMI Output Follow the picture and Use HDMI cable to connect TV 9...

Страница 12: ...3 5 Connect to Computer Connect the unit to PC by USB cable when it power on you can copy stick and delete files Please refer to the picture 10...

Страница 13: ...device you can play the files in it Please refer to the picture 3 7 Multimedia Card Connection Connect the unit to Multimedia Card USB device you can play the files in it Please refer to the picture 3...

Страница 14: ...se Directory language Music setup English Repeat View Lyric Sorting Sorting Directory Directory Repeat Front color Photo setup Text setup cropping Background color Slideshow duration Auto Browser spee...

Страница 15: ...e HOME button on the remote control 5 2 Movies Menu Select the movie icon in Main menu or press the Movie button in remote to enter the movie Menu Enter the folder press UP and DOWN to select the file...

Страница 16: ...wide screen mode keep ratio mode full screen mode and subtitle mode Search search all movie file in storage and list them in the menu Control bar If you press the OSD button during the playback of a...

Страница 17: ...he playback and returns to the file browser Fast rewind Fast forward Previous Previous file Next Next file Zoom Enlarge the movie The zoom factors are x2 x4 and x8 Audio Changes the audio track VOL VO...

Страница 18: ...le in storage and list them in the menu 5 4 TXT Menu Select the TXT icon in main menu to enter the TXT Menu Enter the folder press UP and DOWN to select the file you want to view and press OK to play...

Страница 19: ...o the file browser Previous Previous file Next Next file Search search all flash file in storage and list them in the menu 6 Network To use the UPNP function you must install the software IntelToolsFo...

Страница 20: ...Tick I agree and Next to go on the installation Choose everyone or Just me and press Next to go on the installation 18...

Страница 21: ...Press Next to confirm the installation and wait before it finishes 19...

Страница 22: ...Press close to finish the installation of the software 6 1 2 Run the software Run the software AV Media Server in the IntelToolsForUPnP V2 Click Add Shared Directory in the Sharing item 20...

Страница 23: ...Choose the file you want to share and click confirm You can see your shared files in the software Intel AV Media Server 21...

Страница 24: ...the network cable to the RJ 45 interface in the player Turn on the player and enter setting network setup Choose Setting Ethernet DHCP it can search the ethernet automatically or you can choose the se...

Страница 25: ...e the IP address and Connect Success on the screen 6 3 The setting on the player for WIFI connection To use the wifi function you must use a wifi dongle and connect it to the player first Choose setti...

Страница 26: ...Select the network you are using and if it needs a password please enter it by the remote control And if the network is correctly set you can see the IP address and Connect Success on the screen 24...

Страница 27: ...6 4 Playing the shared files Go back to the main menu and choose network icon Then choose the UPNP icon 25...

Страница 28: ...The menu is same to Main menu Choose the file type what you want play you can find the file you shared on PC 26...

Отзывы: