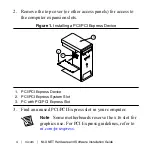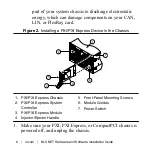
4. Remove the corresponding slot cover on the back panel of the
computer.
5. Insert the CAN, LIN, or FlexRay card into the slot with the
bus connector(s) sticking out of the opening on the back
panel. It might be a tight fit, but do not force the interface
into place.
6. Screw the mounting bracket of the CAN, LIN, or FlexRay
card to the back panel rail of the computer.
7. You can use a RTSI cable to connect your CAN, LIN, or
FlexRay card RTSI interface to other National Instruments
RTSI-equipped hardware. Refer to the
Synchronization
section of
NI-XNET Hardware Overview
in the
NI-XNET
Hardware and Software Help
for more information about the
RTSI interface on your CAN, LIN, or FlexRay card.
8. Replace the top cover (or the access panel to the expansion
slot).
9. Proceed to the
Verify Your Installation
section.
Install Your PXI/PXI Express Hardware
Caution
Before you remove the card from the
package, touch the antistatic plastic package to a metal
NI-XNET Hardware and Software Installation Guide
|
© National Instruments
|
5


