Getting Started with NI SMD-7620/7621 and NI 73xx
|
© National Instruments
|
11
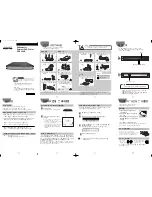
Step 5: (Optional) Connect the Encoder Signals to the
UMI-7772/7774
If your motor includes an encoder, complete the following steps to connect the encoder to the
UMI-7772/7774:
1.
Connect one end of the encoder cable to the encoder.
2.
Cut the 15-pin DSUB connector off of the other end of the cable and expose the encoder
wires.
3.
Connect the encoder wires to the DB25M cable as indicated in Table 1.
4.
Insulate any unused wires.
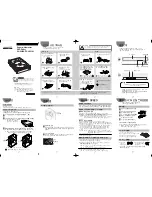
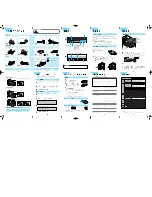
Step 6: Connect the NI SMD-7620/7621 to AC Power
Note
Do not apply power until after you complete
Step 9: Power on the Drive and
.
Complete the following steps to connect the NI SMD-7620/7621 to AC power.
1.
Connect an AC input cable to the line, neutral, and protective earth connectors as shown in
Figure 5.
2.
(Optional) Install a fuse on the AC input line as shown. The SMD-7620 contains an internal
8A fast acting fuse. The SMD-7621 contains an internal 3.5A fast acting fuse. If an external
fuse is desired, National Instruments recommends a 6A fast acting fuse for the SMD-7620
and a 3 amp fast acting fuse for the SMD-7621 version.
3.
(Optional) If your application requires EMC compliance, install a Corcom 6ET1 line filter
in series with the AC input as shown.
Table 1.
NI SMD-7620/7621 to UMI-7772/7774 Connections
Encoder
S
ignal Name
Encoder Cable
Wire Color
DB25M
Wire Number
(Color)
UMI-7772/7774
S
ignal Name
CH A
blue
1 (black)
Encoder Phase A
CH A-
blue/white
14 (brown/white)
Encoder Phase A-
CH B
yellow
2 (brown)
Encoder Phase B
CH B-
yellow/white
15 (red/white)
Encoder Phase B-
INDEX
orange
3 (red)
Encoder Index
INDEX-
orange/white
16 (orange/white)
Encoder Index-
GND
black
17 (green/white)
Digital Ground
+Vcc
red
4 (orange)
+5V OUT