manualshive.com logo in svg
background image

5.

Turn on the Prototyping Board Power Switch to power up the NI ELVIS RIO CM.

6.

Launch the Getting Started Wizard from the USB Monitor.

Note


The Getting Started Wizard can also be launched through the LabVIEW

Getting Started Window or LabVIEW Project right-click menu.

Tip


The USB Monitor pop-up window appears once the NI ELVIS RIO CM is

connected to the computer and powered up.

7.

Test the onboard devices with the test panel at the end of the Getting Started Wizard.

Connecting MXP Plants to the NI ELVIS RIO CM

Caution


To prevent damage to the MXP plant and MXP connectors, secure the

NI ELVIS RIO CM to the NI ELVIS II Series Workstation using two M4 mounting
screws.

Caution


To prevent damage to the NI ELVIS RIO CM and MXP plant, ensure that

the NI ELVIS RIO CM power is turned off before connecting the MXP plant.
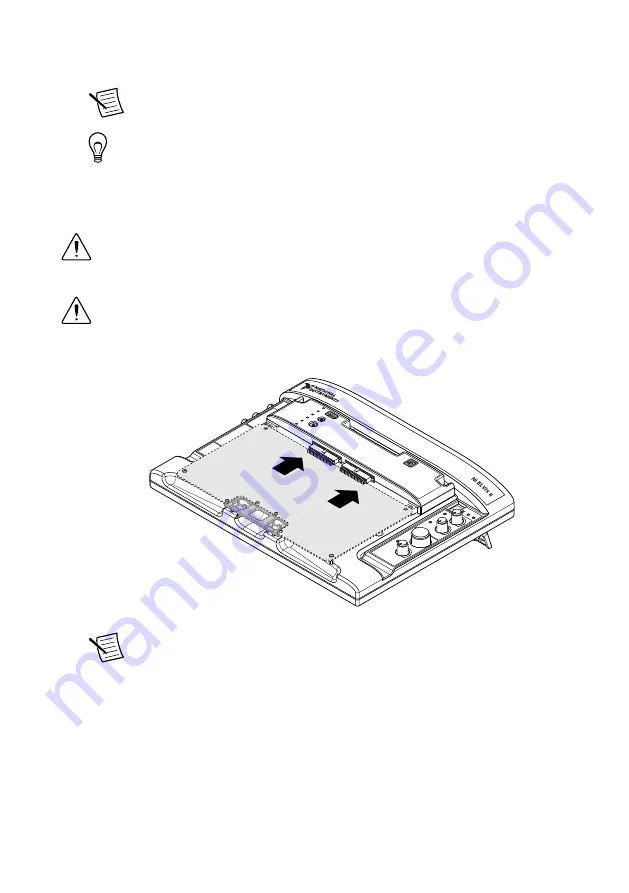
1.

Position the opening in the MXP plant over the prototyping board mounting bracket on
the NI ELVIS II Series Workstation.

Note


For smaller MXP plants that are clear of the prototyping board mounting

bracket, position the MXP plant so that the MXP connectors are aligned.

2.

Slide the MXP plant into the MXP connectors on the NI ELVIS RIO CM.

3.

Secure the MXP plant to the NI ELVIS RIO CM using two M4 mounting screws.

6

  | 

ni.com

  | 

NI ELVIS RIO CM Getting Started Guide

Содержание ELVIS RIO CM

Страница 1: ...aged in any way If the product is damaged return it to NI for repair Electromagnetic Compatibility Guidelines This product was tested and complies with the regulatory requirements and limits for electromagnetic compatibility EMC stated in the product specifications These requirements and limits provide reasonable protection against harmful interference when the product is operated in the intended ...

Страница 2: ...y use direct board to board connections to connect myRIO Expansion Port MXP connectors Preparing the Environment Caution Clean the NI ELVIS RIO CM with a soft nonmetallic brush Make sure that the device is completely dry and free from contaminants before returning it to service Ensure that the environment in which you are using the NI ELVIS RIO CM meets the following specifications Operating tempe...

Страница 3: ...erifying the Kit Contents Verify that the following items are included in the NI ELVIS RIO CM kit Figure 1 NI ELVIS RIO CM Kit Contents 3 2 4 5 1 1 NI ELVIS RIO CM Device 2 NI LabVIEW 2016 ELVIS RIO Control Software Bundle 3 Getting Started Guide 4 M4 Mounting Screw x4 5 USB 2 0 A to B Angled Cable Installing the NI ELVIS RIO CM What to Use Hardware NI ELVIS II Series Workstation NI ELVIS II Serie...

Страница 4: ...connectors 1 Position the NI ELVIS RIO CM on the NI ELVIS II Series Workstation 2 Slide the Workstation Interface Connector of the NI ELVIS RIO CM into the Prototyping Board Connector on the workstation and ease it into place 3 Secure the NI ELVIS RIO CM to the workstation using two M4 mounting screws 4 ni com NI ELVIS RIO CM Getting Started Guide ...

Страница 5: ...O CM to the NI ELVIS II Series Workstation Refer to the Installing the NI ELVIS RIO CM section for more information 3 Connect the USB Device Port on the NI ELVIS RIO CM to the computer with the USB cable 4 Turn on the Workstation Power Switch to power up the NI ELVIS II Series Workstation NI ELVIS RIO CM Getting Started Guide National Instruments 5 ...

Страница 6: ... to the MXP plant and MXP connectors secure the NI ELVIS RIO CM to the NI ELVIS II Series Workstation using two M4 mounting screws Caution To prevent damage to the NI ELVIS RIO CM and MXP plant ensure that the NI ELVIS RIO CM power is turned off before connecting the MXP plant 1 Position the opening in the MXP plant over the prototyping board mounting bracket on the NI ELVIS II Series Workstation ...

Страница 7: ...Note For information about MXP plant design requirements visit ni com info and enter the Info Code mxpplanttemplates NI ELVIS RIO CM Getting Started Guide National Instruments 7 ...

Страница 8: ... resource for technical support At ni com support you have access to everything from troubleshooting and application development self help resources to email and phone assistance from NI Application Engineers Visit ni com services for NI Factory Installation Services repairs extended warranty and other services Visit ni com register to register your NI product Product registration facilitates tech...

Страница 9: ...d party legal notices in the readme file for your NI product Refer to the Export Compliance Information at ni com legal export compliance for the NI global trade compliance policy and how to obtain relevant HTS codes ECCNs and other import export data NI MAKES NO EXPRESS OR IMPLIED WARRANTIES AS TO THE ACCURACY OF THE INFORMATION CONTAINED HEREIN AND SHALL NOT BE LIABLE FOR ANY ERRORS U S Governme...

Отзывы: