background image

49 / 64

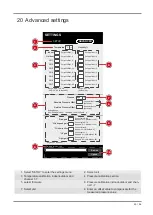
20 Advanced settings

Upload

Browse

Firmware version: 1.00

-560~ 560hpa / -16.54 ~ 16.54inHg / -420 ~ 420mmH g

Setting Range:

Temperature

o

C

Outdoor

Indoor

CH 1

CH 2

CH 3

CH 4

CH 5

CH 6

CH 7

Humidity %

Relative Pressure Offset:

Absolute Pressure Offset:

hpa

Range: -20 ~ 20
(Default: 0.0 )

Current off set: 1 0

Current off set: - 9

Current off set: - 5

Current off set: 2

Current off set: - 2

Current off set: 3

Current off set: - 2

Current off set: 1.2

Current off set: - 5

Current off set: -0. 2

Current off set: - 3

Current off set: -20. 1

Current off set: -10

Current off set: 1 1.5

Current off set: - 3

Current off set: - 3
(Default: 0 )

Current off set: 1 0
(Default: 0 )

Current off set: 0.2

Current off set: - 5

Current off set: 1

Pressure

Range: -20.0 ~ 20. 0

o

C

-36.0 ~ 36. 0

o

F (Default: 0.0)

*UV gain:

Range: 0.01 ~ 10(Default: 1.00)

Current gain: 1.1

*Light gain:

Range: 0.01 ~ 10(Default: 1.00)

Current gain: 1.1

* Depends on the model

*Wind speed gain:

*Wind direction:

*Rain gain:

Range: 0.5 ~ 1.5(Default: 1.00)

Range: -10 ~ 10(Default: 0

o

)

Range: 0.5 ~ 1.5(Default: 1.00)

Current gain: 0.8 5

Current off set: 2

o

Current gain: 0.7 5

SETUP

ADVANCED

SETTINGS

2

3

6

7

8

9

1

4

5

10

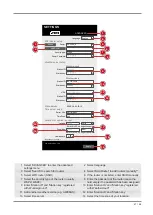
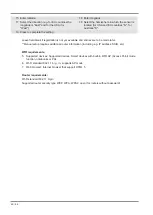
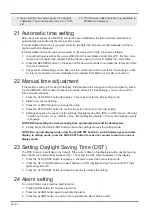
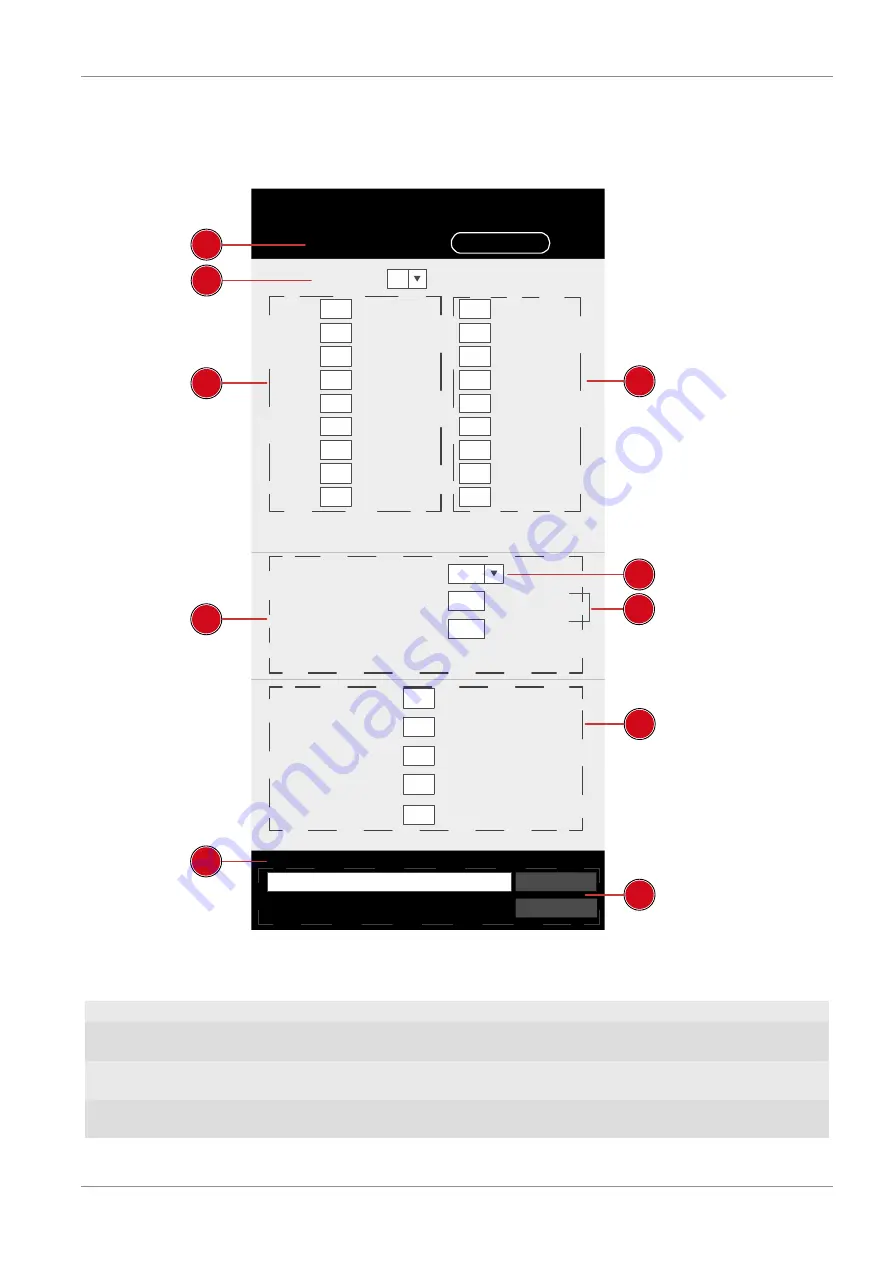
1 Select 'SETUP' to enter the settings menu

2 Select unit

3 Temperature calibration indoor/outdoor and

channel 1-7

4 Pressure calibration section

5 Latest firmware

6 Pressure calibration indoor/outdoor and chan-

nel 1-7

7 Select unit

8 Enter an offset value to compensate for the

measured pressure value

Содержание WIFI Weather Center 7in1

Страница 1: ...Wetterstation Weather Station WIFI Weather Center 7in1 DE Bedienungsanleitung EN Instruction manual ...

Страница 2: ...roducto en un idioma determinado Entonces visite nuestra página web utilizando el siguiente enlace código QR para ver las versiones disponibles I T Desidera ricevere informazioni esaustive su questo prodotto in una lingua specifica Venga a visitare il nostro sito Web al seguente link codice QR Code per conoscere le versioni disponibili www bresser de warranty_terms GARANTIE WARRANTY GARANTÍA GARAN...

Страница 3: ...Deutsch 4 English 34 ...

Страница 4: ... für Weather Underground einrichten optional 14 17 Benutzerkonto für weathercloud einrichten optional 15 18 Benutzerkonto für weitere Wetterdienste z B AWEKAS einrichten 15 19 Konfiguration W LAN Verbindung herstellen 15 20 Erweiterte Einstellungen 19 21 Automatische Zeiteinstellung 20 22 Manuelle Zeiteinstellung 20 23 Sommerzeit DST einstellen 20 24 Weckrufeinstellung 21 25 Schlummerfunktion 21 2...

Страница 5: ... Hitzeindex 28 42 Taupunkt 28 43 Historie Daten der letzten 24 Stunden 28 44 MAX MIN Wetterdaten 29 45 Helligkeit der Displayanzeige regulieren 29 46 Weather Underground Live Wetterdaten abrufen 29 47 Weathercloud Wetterdaten abrufen 29 48 Firmware update 29 49 Technische Daten 30 50 Fehlerbehebung 31 51 EG Konformitätserklärung 31 52 Reinigung und Wartung 31 53 Entsorgung 33 ...

Страница 6: ...d oder weiteren Ländern waren mar ken und oder patentrechtlich geschützt National Geographic Partners LLC All rights reserved NATIONAL GEOGRAPHIC and Yellow Border Design are trademarks of National Geographic Society used under license Visit our website www nationalgeographic com 2 Gültigkeitshinweis Diese Dokumentation ist gültig für die Produkte mit den nachfolgend aufgeführten Artikelnummern 90...

Страница 7: ...n Beachten Sie daher unbedingt die nachfolgenden Sicherheitsinformationen Lassen Sie Kinder beim Umgang mit dem Gerät nie unbeaufsichtigt Die Nutzung darf nur wie in der Anleitung beschrieben erfolgen andernfalls besteht die Gefahr eines Stromschlags Unterbrechen Sie die Stromzufuhr wenn Sie das Gerät nicht benutzen im Falle einer längeren Betriebsunterbrechung sowie vor allen Wartungs und Reinigu...

Страница 8: ...ät und oder die Zubehörteile beschädigt werden Verwenden Sie das Gerät deshalb nur entsprechend den nachfolgenden Sicherheitsinformationen Bauen Sie das Gerät nicht auseinander Wenden Sie sich im Falle eines Defekts an Ihren Fach händler Er nimmt mit dem Service Center Kontakt auf und kann das Gerät ggf zwecks Reparatur einschicken Setzen Sie das Gerät keinen hohen Temperaturen aus und schützen Si...

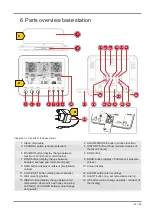
Страница 9: ...nzeige 6 SUN Taste 7 WIND Taste Wechsel zwischen Beaufort durchschnittlicher und aktueller Windböe 8 BARO Taste Anzeige verschiedener Luft druckwerte 9 RAIN Taste Anzeige verschiedener Nieder schlagswerte 10 Farbdisplay 11 CLOCK SET Taste manuelle Zeiteinstellung 12 ALARM Taste Weckrufeinstellung 13 Wandhalterung 14 ALERT Taste u a Temperaturalarm einstel len 15 INDEX Taste Anzeigewechsel zwischen...

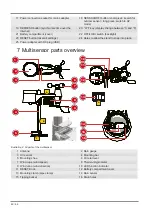
Страница 10: ...ste alle Einstellungen zurückset zen 24 Öffnungen um den Standfuß einrasten zu las sen 25 Netzadapter mit DC Stecker USB 7 Teileübersicht Multisensor 1 2 3 4 5 6 7 8 9 10 11 12 13 14 15 16 E G F D Abb 2 Alle Teile des Multisensors 1 Antenne 2 Regensammelbehälter 3 UV Sensor 4 Montagestab 5 Montagefuß 6 Dosenlibelle 7 Windschalen Windrichtung 8 Thermo Hygrometer 9 Windfahne Windrichtung 10 LED Funk...

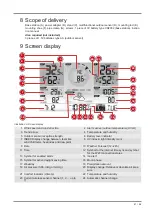
Страница 11: ...mperatur und Luftfeuchtigkeit 5 Empfangsstärke Außensensor 6 Batterieladestandanzeige 7 INDEX Anzeigewechsel zwischen gefühlter Temperatur feels like Windkühlfaktor Wär meindex und Taupunkt 8 UV Index Lichtintensität Sonne 9 Datum 10 Wettervorhersage 12 24h 11 Uhrzeit 12 Symbol für die Internet Zeitsynchronisierung und Symbol für den WI FI Verbindungsstatus 13 Symbol für aktiven Weckruf 14 Frostwa...

Страница 12: ...on der Basiseinheit und des Außensensors abhängt Durch externe Einflüsse diverse Funksender und andere Störquellen kann sich die mögliche Reichweite stark ver ringern In solchen Fällen empfehlen wir sowohl für das Basisgerät als auch den Außensensor andere Standorte zu suchen Manchmal reicht schon ein Verschieben um wenige Zentimeter 11 Die ersten Schritte Befolgen Sie die Punkte in der angegebene...

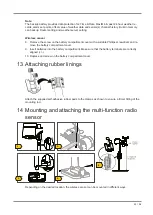
Страница 13: ... mit einem geeigneten Kreuzschraubendreher entfernen und Bat teriefachdeckel abnehmen 9 Batterien in das Batteriefach einsetzen Dabei die korrekte Ausrichtung der Batteriepole be achten 10 Batteriefachdeckel wieder aufsetzen und anschrauben 13 Gummibeläge anbringen Die mitgelieferten selbstklebenden Gummibeläge an den Rohrschellen wie abgebildet anbringen um einen festeren Sitz der Montagestange z...

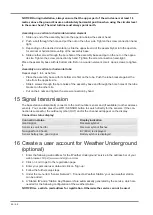
Страница 14: ...chrauben durch die Bohrungen des Montagefußes und auf der anderen Seite durch die Bohrungen der Rohrschelle stecken Die 4 Muttern aufsetzen und die Schraubverbindungen handfest anziehen 15 Signalübertragung Die Basisstation verbindet sich automatisch mit dem Multi Außensensor und wenn verfügbar mit an deren kabellosen Sensoren Sie können außerdem die WIFI SENSOR Taste drücken um direkt nach den Se...

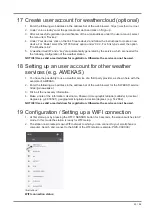
Страница 15: ... Adresse verwenden da die Nutzung des Dienstes sonst nicht möglich ist 18 Benutzerkonto für weitere Wetterdienste z B AWEKAS einrichten 1 Sie haben die Möglichkeit einen Wetterdienst von Drittanbietern zu nutzen wie hier am Beispiel von AWEKAS gezeigt 2 Folgende Webadresse für den Dienst AWEKAS in die Adresszeile des Webbrowsers eingeben https join awekas at 3 Füllen Sie dort alle benötigten Angab...

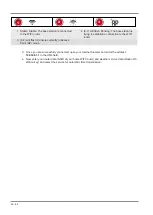
Страница 16: ...linkt Die Basisstation befindet sich derzeit im Access Point AP Modus 3 Sobald Sie erfolgreich verbunden sind öffnen Sie Ihren Internet Browser und geben Sie die Adresse 192 168 1 1 in das URL Feld ein 4 Tragen Sie jetzt Ihre Router Daten SSID Ihres heimischen WIFI Routers und Wetterdienst Daten Station ID Station Key ein und wählen Sie den Dienst zur automatischen Zeitübermittlung aus ...

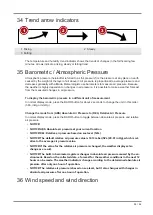
Страница 17: ... 00 07 10 Hemisphere Depends on the mode l SETUP Apply Firmware version 1 00 0 00 Time Zone N SETTINGS 3 4 15 16 5 2 6 7 8 9 10 11 12 13 14 17 18 1 19 1 ADVANCED wählen um ins erweiterte Ein stellungsmenü zu gelangen 2 Sprache wählen 3 Search wählen um nach Router zu suchen 4 Add Router wählen um Router manuell hin zuzufügen 5 Gewünschten W LAN Router SSID wählen 6 Falls Router nicht aufgelistet S...

Страница 18: ...m die Einstellung abzuschließen Feld leer lassen wenn Registrierung noch nicht vorliegt und Eingaben zu einem späteren Zeitpunkt vorgenommen werden sollen Für die manuelle Anlage sind weitere Router Informationen erforderlich u a IP Adresse SSID etc WIFI Vorraussetzungen 5 Unterstütze Geräte Intelligente Geräte smart devices mit eingebauter WIFI AP Access Point Modus Funktion Notebooks oder PCs 6 ...

Страница 19: ...nt off set 10 Default 0 Current off set 0 2 Current off set 5 Current off set 1 Pressure Range 20 0 20 0 o C 36 0 36 0o F Default 0 0 UV gain Range 0 01 10 Default 1 00 Current gain 1 1 Light gain Range 0 01 10 Default 1 00 Current gain 1 1 Depends on the model Wind speed gain Wind direction Rain gain Range 0 5 1 5 Default 1 00 Range 10 10 Default 0 o Range 0 5 1 5 Default 1 00 Current gain 0 8 5 ...

Страница 20: ...den die SENSOR WIFI Taste drücken Wenn AP nicht mehr blinkt können Sie jetzt die Uhrzeit und das Datum manuell einstellen 1 CLOCK SET Taste ca 3 Sekunden drücken um in den Zeiteinstellungsmodus zu gelangen 2 Die einzustellenden Ziffern blinken 3 UP oder DOWN Taste drücken um den Wert zu verändern 4 CLOCK SET Taste drücken um die Eingabe zu bestätigen und zur nächsten Einstellung zu wechseln 5 Reih...

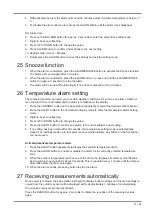
Страница 21: ...des Weckrufs ALARM Taste drücken oder ALARM SNOOZE Taste für ca 3 Se kunden drücken um den Weckruf bis zum erneuten Erreichen der eingestellten Weckzeit auszu setzen 3 Wird keine Taste gedrückt schaltet sich der Weckruf automatisch nach 2 Minuten ab 26 Temperaturalarmeinstellung Der Temperaturalarm kann Sie auf bestimmte Wetterbedingungen aufmerksam machen Sobald ein Alarmkriterium erfüllt ist wir...

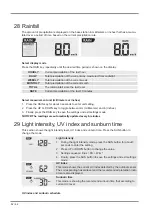
Страница 22: ...ehrmals bis der gewünschte Zeitraum auf dem Display angezeigt wird HOURLY Gesamter Niederschlag der letzten Stunde DAILY Gesamter Niederschlag des aktuellen Tages gemessen ab Mitternacht WEEKLY Gesamter Niederschlag der aktuellen Woche MONTHLY Gesamter Niederschlag des aktuellen Monats TOTAL Die Gesamtregenmenge seit dem letzten Zurücksetzen RATE Gegenwärtiger Niederschlag der letzten 10 Minuten M...

Страница 23: ... Sie sich im Frei en aufhalten müssen suchen Sie unbedingt Schatten 30 Manuelle Messwertanzeige 1 MAX MIN Taste mehrmals drücken um nacheinander die gespeicherten Werte anzuzeigen 2 Reihenfolge der Anzeige Temperatur Höchstwert außen Temperatur Tiefstwert Außen Luftfeuchtigkeit Höchstwert außen Luftfeuchtigkeit Tiefstwert außen Temperatur Höchst wert innen Temperatur Tiefstwert innen Luftfeuchtigk...

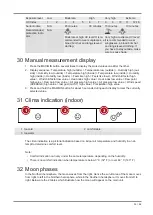
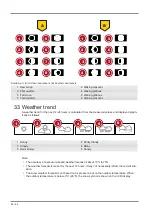
Страница 24: ...r Su dhalbkugel hingegen wandert diese von links nach rechts In den beiden nachfolgenden Tabellen sind die Darstellungen der Mondphasen dargestellt A 1 2 3 4 5 6 7 8 B 1 2 3 4 5 6 7 8 Abb 5 A Nördliche Halbkugel B Südliche Halbkugel 1 Neumond 2 Zunehmender Sichelmond 3 Erstes Viertel 4 Zunehmender Mond 5 Vollmond 6 Abnehmender Mond 7 Letztes Viertel 8 Abnehmender Sichelmond 33 Wettertrend Aus den ...

Страница 25: ...zum durch schnittlichen Druck und fällt mit steigender Höhe allmählich ab Meteorologen benutzen Barometer zur Messung des Luftdrucks Weil das Wetter in hohem Maße von der Veränderung des Luftdrucks ab hängt ist es möglich aus den gemessenen Luftdruckveränderungen eine Wetterprognose zu erstellen Den barometrischen Luftdruck in einer anderen Maßeinheit anzeigen Im normalen Anzeigemodus die BARO Tas...

Страница 26: ...ichtungsanzeige der letzten 5 Minuten 5 Durchschnittliche Böenwindgeschwindig keit oder Beaufort Skala Einheit der Windgeschwindigkeit und Anzeigeformat der Windrichtung einstellen 1 WIND Taste für ca 3 Sekunden drücken um in den Einstellungsmodus zu gelangen 2 UP oder DOWN Taste drücken um m s Meter pro Stunde km h Kilometer pro Stunde knots Knoten oder mph Meilen pro Stunde zu wählen 3 WIND Tast...

Страница 27: ... 3 knots 0 3 1 5 m s 3 schwache Brise 12 19 km h 8 12 mph 7 10 knots 3 5 5 4 m s 4 mäßige Brise 20 28 km h 13 17 mph 11 16 knots 5 5 7 9 m s 5 frische Brise 29 38 km h 18 24 mph 17 21 knots 8 0 10 7 m s 6 starker Wind 39 49 km h 25 30 mph 22 27 knots 10 8 13 8 m s 7 steifer Wind 50 61 km h 31 38 mph 28 33 knots 13 9 17 1 m s 8 stürmischer Wind 62 74 km h 39 46 mph 34 40 knots 17 2 20 7 m s 9 Sturm...

Страница 28: ...lags 41 C 54 C 106 F 129 F Gefahr Hitzekollaps wahrscheinlich 33 C 40 C 91 F 105 F Erhöhte Vorsicht Gefahr einer Dehydration 27 C 32 C 80 F 90 F Vorsicht Gefahr eines Hitzekollaps Hinweis Die gefühlte Temperatur basiert auf den gemeinsamen Auswirkungen von Temperatur und Luftfeuch tigkeit Der Hitzeindex wird nur berechnet wenn sich die Temperatur bei 27 80 F oder höher befin det Die angezeigte gef...

Страница 29: ...etrieb die SNOOZE Taste drücken um die Hintergrundbeleuchtung für ca 5 Sekun den zu aktivieren 46 Weather Underground Live Wetterdaten abrufen 1 Um die Live Daten Ihres Multisensors in einem Webbrowser anzuzeigen besuchen Sie bitte wun derground com und geben dann in der Menüleiste Ihre Station ID im Suchfeld ein 2 Sie können die Smartphone App von Weather Underground herunterladen um die Online L...

Страница 30: ... DST AUTO OFF Maße 118 x 192 5 x 21 mm B x H x T Gewicht inkl Batterien 260 g Multisensor Batterien 3x AA 1 5V Maximale Anzahl der Sensoren 1x drahtloser Multisensor RF Übertragungsfrequenz 868Mhz RF Übertragungsreichweite 150 m Maximale Sendeleistung 25mW Temperatur Messbereich von 40 C bis 60 C von 40 F bis 140 F Barometer Messbereich Von 540 bis 1100hPa Luftfeuchtigkeits Messbereich Von 1 bis 9...

Страница 31: ...tig eingestellt ist Wenn sie falsch eingestellt ist melden Sie möglicherweise alte Daten und nicht Echtzeitdaten Gesamtdarstellung des Graphen der Niederschlags ansammlung auf Wunder ground um 1 Stunde ver schoben während der Som merzeit 1 Vergewissern Sie sich dass die Zeitzone des Gerätes auf Wunder ground korrekt eingestellt ist 2 Stellen Sie sicher dass die Zeitzone und die Sommerzeit auf Ihre...

Страница 32: ...klinse vor der Montage zu reinigen Dies sollte in regelmäßi gen Abständen vorgenommen werden Sie können auch den UV Index mit einem Präzisi ons UV Meter kalibrieren um eine hohe Genauig keit der UV Indexmessung aufrechtzuerhalten 3 Die Windfahne austauschen Windfahne abschrauben und austau schen 4 Regen Auffangbehälter Trichter reinigen Drehen Sie den Auffangbehälter um etwa 30 ge gen den Uhrzeige...

Страница 33: ...enrein Informationen zur ordnungsgemäßen Entsorgung erhalten Sie beim kommunalen Entsorgungsdienstleister oder Umweltamt Werfen Sie Elektrogeräte nicht in den Hausmüll Gemäß der Europäischen Richtlinie 2012 19 EG über Elektro und Elektronik Altgeräte und deren Umsetzung in nationales Recht müssen verbrauchte Elektrogeräte getrennt gesam melt und einer umweltgerechten Wiederverwertung zugeführt wer...

Страница 34: ... user account for Weather Underground optional 44 17 Create user account for weathercloud optional 45 18 Setting up an user account for other weather services e g AWEKAS 45 19 Configuration Setting up a WIFI connection 45 20 Advanced settings 49 21 Automatic time setting 50 22 Manual time adjustment 50 23 Setting Daylight Saving Time DST 50 24 Alarm setting 50 25 Snooze function 51 26 Temperature ...

Страница 35: ...t index 58 42 Dew point 58 43 History record for the past 24 hours 58 44 MAX MIN Weather data 58 45 Adjusting the display brightness 58 46 Viewing Live weather data with Weather Underground 59 47 Retrieve Weathercloud weather data 59 48 Firmware update 59 49 Technical data 59 50 Troubleshooting 60 51 EC declaration of conformity 61 52 Cleaning and maintenance 61 53 Disposal 63 ...

Страница 36: ...law in Germany the European Union and or other countries National Geographic Partners LLC All rights reserved NATIONAL GEOGRAPHIC and Yellow Border Design are trademarks of National Geographic Society used under license Visit our website www nationalgeographic com 2 Validity note This documentation is valid for the products with the following article numbers 9080600 Manual version v0820 Manual des...

Страница 37: ...instructions carefully and do not attempt to power this device with anything other than power sources recommended in this instruction manual otherwise there is a danger of an electric shock Disconnect the power supply by pulling the mains plug when the appliance is not in use in case of a longer interruption of operation and before any maintenance and cleaning work Place your device so that it can...

Страница 38: ...ollowing safety information Do not disassemble the device In the event of a defect please contact your dealer They will con tact the Service Center and can arrange the return of this device for repair if necessary Do not expose the device to high temperatures and protect it from water and high humidity Do not immerse the unit in water Do not subject the device to excessive vibrations Only use acce...

Страница 39: ...r current value 6 SUN button 7 WIND button display change between beaufort average and current wind gust 8 BARO button display of different air pressure values 9 RAIN button display of different precipitation values 10 Colour display 11 CLOCK SET button setting time manually 12 ALARM button alarm setting 13 Wall mounting holder 14 ALERT button e g set temperature alarm 15 INDEX button display chan...

Страница 40: ...et all settings 24 Holes to allow the stand to snap into place 25 Power adapter with DC plug USB 7 Multisensor parts overview 1 2 3 4 5 6 7 8 9 10 11 12 13 14 15 16 E G F D Illustration 2 All parts of the multisensor 1 Antenna 2 Rain gauge 3 UV sensor 4 Mounting bar 5 Mounting shoe 6 Circular level 7 Wind cups wind speed 8 Thermo Hygrometer 9 Wind vane wind direction 10 LED function indicator 11 R...

Страница 41: ...d arrow 4 Temperature and humidity 5 Outdoor sensor reception strength 6 Battery level indicator 7 INDEX Display change between feels like wind chill factor heat index and dew point 8 UV index light intensity sun 9 Date 10 Weather Forecast 12 24h 11 Time 12 Symbol for the internet time sync and symbol for the WI FI connection status 13 Symbol for enabled alarm 14 Ice alert 15 Symbol for active day...

Страница 42: ...ious radio transmitters and other sources of interference can greatly reduce the possible range In such cases we recommend finding other loca tions for both the base unit and the outdoor sensor Sometimes a shift of just a few centimetres is enough 11 The first steps Follow the bullet points in order to ensure a successful setup 1 Setting up power supply base station and wireless sensor 2 Mount the...

Страница 43: ...itable Phillips screwdriver and re move the battery compartment cover 9 Insert batteries into the battery compartment Make sure that the battery terminals are correctly aligned 10 Replace and screw on the battery compartment cover 13 Attaching rubber linings Attach the supplied self adhesive rubber pads to the clamps as shown to ensure a firmer fitting of the mounting rod 14 Mounting and attaching...

Страница 44: ...the assemby base and through the bore holes of the tube bracket on the other site Put on the 4 nuts and tighten the screw connection by hand 15 Signal transmission The base station automatically connects to the multi outdoor sensor and if available to other wireless sensors You can also press the WIFI SENSOR button to search directly for the sensors If the con nection is successful the outdoor sym...

Страница 45: ...p an user account for other weather services e g AWEKAS 1 You have the possibility to use a weather service of a third party provider as shown here with the example of AWEKAS 2 Enter the following web address in the address bar of the web browser for the AWEKAS service https join awekas at 3 Fill in all the necessary information 4 Make a note of the information Username Password Geographic latitud...

Страница 46: ... to the WIFI router 3 6 7 will flash Console currently in Access Point AP mode 3 Once you are successfully connected open your Internet browser and enter the address 192 168 1 1 in the URL field 4 Now enter your router data SSID of your home WIFI router and weather service data station ID station key and select the service for automatic time transmission ...

Страница 47: ...Firmware version 1 00 0 00 Time Zone N SETTINGS 3 4 15 16 5 2 6 7 8 9 10 11 12 13 14 17 18 1 19 1 Select ADVANCED to enter the advanced settings menu 2 Select language 3 Select Search to search for routers 4 Select Add Router to add routers manually 5 Select WIFI router SSID 6 If the router is not listed enter SSID manually 7 Select the security type of the router usually WAP2 WAP2 8 Enter the pas...

Страница 48: ...on is not yet available and entries are to be made later Manual setup requires additional router information including e g IP address SSID etc WIFI requirements 5 Supported devices Supported devices Smart devices with built in WIFI AP Access Point mode function notebooks or PCs 6 Wi Fi standard 802 11 b g n supports AP mode 7 Web browser Internet browser that support HTML 5 Router requirements Wi ...

Страница 49: ...t off set 10 Default 0 Current off set 0 2 Current off set 5 Current off set 1 Pressure Range 20 0 20 0 o C 36 0 36 0o F Default 0 0 UV gain Range 0 01 10 Default 1 00 Current gain 1 1 Light gain Range 0 01 10 Default 1 00 Current gain 1 1 Depends on the model Wind speed gain Wind direction Rain gain Range 0 5 1 5 Default 1 00 Range 10 10 Default 0 o Range 0 5 1 5 Default 1 00 Current gain 0 8 5 C...

Страница 50: ...y 1 Press the CLOCK SET button for approx 3 seconds to enter the time setting mode 2 Digits to be set are flashing 3 Press UP or DOWN button to change the value 4 Press the CLOCK SET button to confirm the entry and move to the next setting 5 Settings sequence Sequence of the settings Daylight saving time DST on off Hours Minutes 12 24 hour mode Year Month Day Month Day Day Month Time synchronizati...

Страница 51: ...to select the desired outdoor sensor 2 Press the ALERT button in the normal time display mode to enter the temperature alarm setting mode 3 Digits to be set are flashing 4 Press UP or DOWN button to change the value 5 Press the ALERT button to confirm and switch to the next setting the next setting 6 If no setting has been made after 30 seconds the temperature setting mode is automatically closed ...

Страница 52: ...the UP or DOWN key to toggle between mm millimeters and in inches 3 Finally press the RAIN key to save the settings and exit settings mode NOTICE The readings are automatically updated every 6 minutes 29 Light intensity UV index and sunburn time This section shows the light intensity level UV index and sunburn time Press the SUN button to change the mode Light intensity 1 During the light intensit...

Страница 53: ...gh value Wind chill factor low value Heat index high value Heat index low value Dew point high value Dew point low value Air pressure high value Air pressure low value Wind speed AVERAGE high value last gust GUST high value Precipitation high value 3 Press and hold the MAX MIN button for about 3 seconds during each display to clear the currently selected value 31 Clima indication indoor 1 2 3 1 to...

Страница 54: ...ed from the measured values and displayed graph ically as follows 1 2 3 4 5 6 1 Sunny 2 Partly Cloudy 3 Cloudy 4 Rainy 5 Rain stormy 6 Snowy Note The accuracy of a pressure based weather forecast is about 70 to 75 The weather forecast is meant for the next 12 hours it may not necessarily reflect the current situ ation The snow weather forecast is not based on air pressure but on the outdoor temper...

Страница 55: ...his order hPa inHg or mmHg Change the mode from ABS Absolute Air Pressure to REL Relative Air Pressure In normal display mode press the BARO button to toggle between absolute air pressure and relative air pressure NOTICE NOTICE ABS Absolute air pressure at your current location NOTICE REL Relative air pressure based on sea level N N NOTICE The default relative air pressure value is 1013 mbar hPa 2...
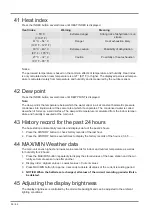
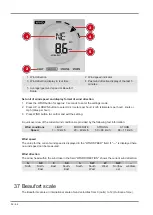
Страница 56: ...nd exit the setting A quick overview of the current wind conditions is provided by the following text information Wind conditions LIGHT MODERATE STRONG STORM Speed 1 19 km h 20 49 km h 50 88 km h 88 11 km h Wind speed The value for the current wind speed is displayed in the WIND SPEED field If is displayed here no wind speed can be measured Wind direction The arrow head within the wind rose in the...

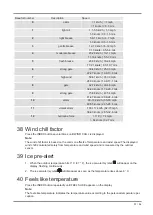
Страница 57: ... 5 28 4 m s 11 violent storm 103 117 km h 64 73 mph 56 63 knots 28 5 32 6 m s 12 hurricane force 118 74 mph 64 knots 32 7 m s 38 Wind chill factor Press the INDEX button several times until WIND CHILL is displayed Note The wind chill factor is based on the common effects of temperature and wind speed The displayed wind chill is calculated solely from temperature and wind speed and is measured by t...

Страница 58: ... dew when it forms on a solid surface The dewpoint temperature is calculated from the indoor temper ature and humidity measured at the main unit 43 History record for the past 24 hours The base station automatically records and displays data of the past 24 hours 1 Press the HISTORY button to check history records of the last hour 2 Press the HISTORY button several times to display the history reco...

Страница 59: ...lick on the View icon within the Settings pop up menu of your station 48 Firmware update 1 Download the latest firmware if available to your PC Mac You will find the download on page 2 2 Set the base station into AP Access Point mode and connect to the base station 192 168 1 1 and go to the Advanced Setup page 3 Click the browse button and navigate to the firmware file you have downloaded Click on...

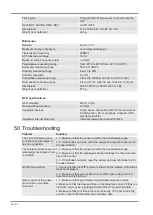
Страница 60: ...wser that support HTML 5 50 Troubleshooting Problem Solution The 7 in 1 wireless sensor connection is interrupted or has no connection 1 1 Make sure that the sensor is within the transmission range 2 3 If it still does not work reset the sensor and resynchronize it with the base station The wireless indoor sensor is temporarily interrupted or dis connected 1 1 Make sure that the sensor is within t...

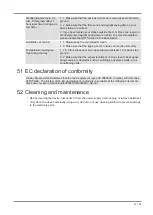
Страница 61: ...eading too high during the day 1 1 5 Place the sensor in an open area and at least 1 5 m above the ground 2 2 Make sure that the sensor location is not too close to heat gener ating sources or obstacles such as buildings pavement walls or air conditioning units 51 EC declaration of conformity Hereby Bresser GmbH declares that the radio equipment type with 9080600 complies with Directive 2014 53 EU...

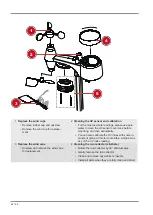
Страница 62: ...e mounting and then periodically You can also calibrate the UV index with some in strument grade UV meter to maintain a high accur acy of the UV index reading 3 Replace the wind vane Unscrew and remove the wind vane for replacement 4 Cleaning the rain collector sinkhole Rotate the rain collector by 30 anticlockwise Gently remove the rain collector Clean and remove any debris or insects Install all...

Страница 63: ...ironmental authority for information on the proper disposal Do not dispose of electronic devices in the household garbage According to the European Directive 2012 19 EU on Waste Electrical and Electronic Equip ment and its transposition into national law used electrical equipment must be collected sep arately and recycled in an environmentally sound manner Batteries and rechargeable batteries must...

Страница 64: ...l sav bresser fr Téléphone 00 800 6343 7000 BRESSER France SARL Pôle d Activités de Nicopolis 314 Avenue des Chênes Verts 83170 Brignoles France Prix d un appel local depuis la France ou Belgique Service NL BE Als u met betrekking tot het product vragen of eventuele klachten heeft kunt u contact opnemen met het service centrum bij voorkeur per e mail e mail info folux nl Teléfono 31 528 23 24 76 F...

Отзывы: