background image

Operation

16

Concrete

Blade should be bevel up when working over concrete. Pretty much anything over con-

crete works. Try different setups to see which works best. If goods come up difficult, the 

slide plate should be at a low setting, 1” (2.5 cm) off the floor. Use a smaller size blade. If 

goods come up easily, a wider blade can be used.

Wood Sub-Floor

A heavy machine cannot be used on wood subfloors or raised panel computer floors. 

Keep machine light; remove all weights. A weighted machine could break through the 

floor. The slide plate should be adjusted to a low setting, 1” (2.5 cm) off the floor. Blades 

should be as flat of an angle as possible. Use a heavy duty blade (these blades have 

a bend to them) or a regular blade bevel down. When using a regular blade, bending 

up the corners of the blade will help from the blade digging into the floor. Sometimes a 

shank blade or a shank blade with a carbide tip will work. Allow blade to shear material 

from the floor. The trick on wood floors is to run the blade flat. Approach should be at a 

45° angle to the board. This keeps from digging into the board and hanging up at the 

seams.

Soft Sub-Floor

The slide plate should be adjusted to a low setting 1” (2.5 cm) off the floor. Blades should 

be as flat of an angle as possible. Use a heavy duty blade (these blades have a bend to 

them) or a regular blade bevel down. When using a regular blade, bending up the cor-

ners of the blade will help from the blade digging into the floor. Sometimes a shank blade 

or a shank blade with a carbide tip will work.

DITCHING

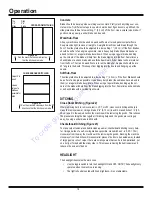
Cross Room Ditching  (Figure 22)

When removing hard to remove ceramic, VCT, or VAT, cross-room ditching will help to 

make the removal easier. Using a blade 2”-6” (5-15 cm) in width, make ditches 1’-2’ (30-

60 cm) apart in the same direction the machine will be removing the goods. This relieves 

the pressure holding the tiles together. If ditching helps and the goods are coming up 

easy, try using a wider blade to ditch with. 

Checkerboard Ditching (Figure 23)

To make carpet removal and debris clean-up easier, checkerboard ditching is very help-

ful. Using as wide of a self-scoring blade as possible, make ditches 4’-6’ (1.25-1.75 m) 

crossways from the way the machine will be removing the goods. Running the machine 

crossways from the ditches will make smaller pieces of debris to be hauled away. Instead 

of large gummy rolls of carpet, there are small squares that can be rolled, palletized, put 

on a dolly, or folded with the sticky side in. This makes removing the debris easier and 

reduces the amount of debris.

HEADLIGHT

The headlight illuminates the work zone.

•  Use the toggle switch to turn the headlight ON and OFF. 

NOTE: The headlight only 

operates when the machine is running.

• 

The light is fixed-mounted with fixed brightness--it is not adjustable.

CROSS-ROOM DITCHING

Ditch 

2”-6” 

Blade

Tile

1’-2’

Strips

Figure 22

Run the machine the same direction 

that the ditches are made

Carpet 4’-6’ 

apart

Use as 

large of a 

blade as 

possible for 

ditch

Figure 23

Run the machine crossways from the 

directions that the ditches are made

CHECKERBOARD DITCHING

16

To 

order 

go 

to 

Discount-Equipment.com

Содержание 5000 CINQ MILLE

Страница 1: ...Read Manual Before Operating Machine 403706 Rev D 5000 CINQ MILLE RIDE ON SCRAPER OPERATING MANUAL T o o r d e r g o t o D i s c o u n t E q u i p m e n t c o m...

Страница 2: ...Curtis Gehl Pavers Heli Honda ICS PowerGrit IHI Partner Imer Clipper MMD Koshin Rice CH E General Equip ment Amida Coleman NAC Gradall Square Shooter Kent Stanley Tamco Toku Hatz Kohler Robin Wiscons...

Страница 3: ...structions 8 Machine Charging 8 Transport 9 Jobsite Movement 9 Cutting Head and Blades 10 Foot Pegs 12 Storage 12 Operation 13 Operating Controls 13 Start Up Procedure 13 Shut Down Procedure 14 Slide...

Страница 4: ...Changes the angle of the cutting head via the control handle next to the operator seat Debris Deflector Redirects debris away from the operator Swivel Cutting Head Ensures continuous blade contact wit...

Страница 5: ...l or any medication that may cause decreased control Keep hands away from all moving parts and tooling Wear gloves when changing tooling Remove tooling when ma chine is not in use and or lower cutting...

Страница 6: ...ould cause batteries to fail Re charge as soon as possible after discharge if they are warm first allow them to cool Charger is not water proof only resistant and cannot with stand immersion continuou...

Страница 7: ...he proper conditions Leaking pres surized hydraulic fluids may develop a mist or fine spray that can flash or explode upon contact with a source of ignition These explosions can be very severe and cou...

Страница 8: ...improper charging and or charger damage Only use extension cord provided with machine 2 Complete charging sequence Refer to Charger manual for more details 3 Disconnect cord from the power source Ens...

Страница 9: ...the cups then slide as far back as possible Figure 4 1 Before lifting machine secure it to the forklift with 3 000 lb 1 361 kg or heavier straps or a chain Tilt forks back to lift machine Palletizing...

Страница 10: ...re 6 Never leave machine unattended with strap holding levers open Moving Machine on Caster Moving a weighted machine on only the front caster and not on the cutting head or the front wheel assembly c...

Страница 11: ...iameter disk with 120 or finer grit Be careful not to catch disk on edge or corner of blade Pass grinder along blade edge starting on one end and continuing in one direction being careful to hold grin...

Страница 12: ...cutting ability sharpen or replace as needed After removing a portion of material clear the work area of debris This will give the machine maximum performance and help to keep the work area safe FOOT...

Страница 13: ...accomplished by slightly reducing pressure on one lever or the other while moving Emergency Stop Switch Figure 14 The emergency stop switch is designed to immediately cut power to the system Seat Swi...

Страница 14: ...there are two basic slide plate settings Low Setting Figure 19 the hydraulic slide plate is positioned 1 off the floor This setting is most commonly used during initial scraping or removal application...

Страница 15: ...ving carpet connected to the pad works the best Note When removing carpet from over VCT tile and the tile needs to be saved run the machine at a 45 angle over the tile This should help to save the til...

Страница 16: ...ometimes a shank blade or a shank blade with a carbide tip will work DITCHING Cross Room Ditching Figure 22 When removing hard to remove ceramic VCT or VAT cross room ditching will help to make the re...

Страница 17: ...ic fluid should be changed Regular maintenance should be performed according to the schedule Maintenance to be performed Interval Daily 200 hrs 1000 hrs 2000 hrs After initial 100 hrs After initial 50...

Страница 18: ...ne Inspect and tighten bolts as needed Charger is hot Charger is in use This is normal Fluid is leaking from machine Hose connections or fittings have loosened through normal use Tighten hydraulic hos...

Страница 19: ...Curtis Gehl Pavers Heli Honda ICS PowerGrit IHI Partner Imer Clipper MMD Koshin Rice CH E General Equip ment Amida Coleman NAC Gradall Square Shooter Kent Stanley Tamco Toku Hatz Kohler Robin Wiscons...

Страница 20: ...T o o r d e r g o t o D i s c o u n t E q u i p m e n t c o m...

Отзывы: