background image

Operation

OPERATING CONTROLS

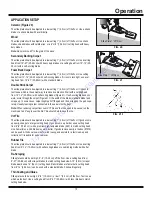
Key Switch (Figure 12)

The key switch turns the machine ON and OFF. 

Note:

 Never use the key switch as a 

method for speed control. Speed control is achieved by the hydraulic valve only. Using 

the key switch repeatedly will cause excessive wear and premature failure of electrical 

components. 

Hydraulic Levers (Figure 13)

The hydraulic levers steer the machine. For even movement, move levers slowly. Fast 

movement of control levers will result in jerky, uneven movement.

•  To move the machine forward, push both levers forward 

——

.

•  To move the machine in reverse, pull both levers backward 

˜˜

.

•  To turn the machine quickly to the right, move the left lever forward and the right 

lever backward 

—˜

 .

•  To turn the machine quickly to the left, move the left lever backward and the right 

lever forward 

˜—

.

•  To turn the machine slowly to the right or left, push or pull only the right or left lever 

forward 

—

or

˜

.

•  Putting the levers in the center/neutral position causes the wheels to lock-up. 
•  Correcting direction while moving forward is accomplished by slightly reducing 

pressure on one lever or the other while moving.

Emergency Stop Switch (Figure 14)

The emergency stop switch is designed to immediately cut power to the system.

Seat Switch

The seat has a safety switch.  Operator must be properly positioned for machine to run.

Cylinder Lift Lever (Figure 15)

The cylinder lift lever raises and lowers the cylinder and cutting head. After setting the 

slide plate to proper height, use the cylinder lift lever to set blade to proper cutting angle. 

•  To raise the cutting head, pull back 

˜


on the cylinder lift lever.

•  To lower the cutting head, push the cylinder lift lever forward 

—

•  Continuing to push the cylinder lift lever forward will adjust the angle of the cutting 

head. This will also jack up the front of the machine for maintenance purposes.

START-UP PROCEDURE

1.  Verify 70 Amp circuit breaker is in ON position (Figure 16).
2. 

Verify 48V blue plugs are firmly connected.

3.  Operator should be properly positioned on seat.
4.  Twist emergency stop (Figure 14) up.
5.  Turn key switch (Figure 12) to ON position.
6.  Maneuver machine with hydraulic levers (Figure 13).

FIG. 16

13

FIG. 13

Circuit 

Breaker

FIG. 15

FIG. 12

FIG. 14

To 

order 

go 

to 

Discount-Equipment.com

Содержание 5000 CINQ MILLE

Страница 1: ...Read Manual Before Operating Machine 403706 Rev D 5000 CINQ MILLE RIDE ON SCRAPER OPERATING MANUAL T o o r d e r g o t o D i s c o u n t E q u i p m e n t c o m...

Страница 2: ...Curtis Gehl Pavers Heli Honda ICS PowerGrit IHI Partner Imer Clipper MMD Koshin Rice CH E General Equip ment Amida Coleman NAC Gradall Square Shooter Kent Stanley Tamco Toku Hatz Kohler Robin Wiscons...

Страница 3: ...structions 8 Machine Charging 8 Transport 9 Jobsite Movement 9 Cutting Head and Blades 10 Foot Pegs 12 Storage 12 Operation 13 Operating Controls 13 Start Up Procedure 13 Shut Down Procedure 14 Slide...

Страница 4: ...Changes the angle of the cutting head via the control handle next to the operator seat Debris Deflector Redirects debris away from the operator Swivel Cutting Head Ensures continuous blade contact wit...

Страница 5: ...l or any medication that may cause decreased control Keep hands away from all moving parts and tooling Wear gloves when changing tooling Remove tooling when ma chine is not in use and or lower cutting...

Страница 6: ...ould cause batteries to fail Re charge as soon as possible after discharge if they are warm first allow them to cool Charger is not water proof only resistant and cannot with stand immersion continuou...

Страница 7: ...he proper conditions Leaking pres surized hydraulic fluids may develop a mist or fine spray that can flash or explode upon contact with a source of ignition These explosions can be very severe and cou...

Страница 8: ...improper charging and or charger damage Only use extension cord provided with machine 2 Complete charging sequence Refer to Charger manual for more details 3 Disconnect cord from the power source Ens...

Страница 9: ...the cups then slide as far back as possible Figure 4 1 Before lifting machine secure it to the forklift with 3 000 lb 1 361 kg or heavier straps or a chain Tilt forks back to lift machine Palletizing...

Страница 10: ...re 6 Never leave machine unattended with strap holding levers open Moving Machine on Caster Moving a weighted machine on only the front caster and not on the cutting head or the front wheel assembly c...

Страница 11: ...iameter disk with 120 or finer grit Be careful not to catch disk on edge or corner of blade Pass grinder along blade edge starting on one end and continuing in one direction being careful to hold grin...

Страница 12: ...cutting ability sharpen or replace as needed After removing a portion of material clear the work area of debris This will give the machine maximum performance and help to keep the work area safe FOOT...

Страница 13: ...accomplished by slightly reducing pressure on one lever or the other while moving Emergency Stop Switch Figure 14 The emergency stop switch is designed to immediately cut power to the system Seat Swi...

Страница 14: ...there are two basic slide plate settings Low Setting Figure 19 the hydraulic slide plate is positioned 1 off the floor This setting is most commonly used during initial scraping or removal application...

Страница 15: ...ving carpet connected to the pad works the best Note When removing carpet from over VCT tile and the tile needs to be saved run the machine at a 45 angle over the tile This should help to save the til...

Страница 16: ...ometimes a shank blade or a shank blade with a carbide tip will work DITCHING Cross Room Ditching Figure 22 When removing hard to remove ceramic VCT or VAT cross room ditching will help to make the re...

Страница 17: ...ic fluid should be changed Regular maintenance should be performed according to the schedule Maintenance to be performed Interval Daily 200 hrs 1000 hrs 2000 hrs After initial 100 hrs After initial 50...

Страница 18: ...ne Inspect and tighten bolts as needed Charger is hot Charger is in use This is normal Fluid is leaking from machine Hose connections or fittings have loosened through normal use Tighten hydraulic hos...

Страница 19: ...Curtis Gehl Pavers Heli Honda ICS PowerGrit IHI Partner Imer Clipper MMD Koshin Rice CH E General Equip ment Amida Coleman NAC Gradall Square Shooter Kent Stanley Tamco Toku Hatz Kohler Robin Wiscons...

Страница 20: ...T o o r d e r g o t o D i s c o u n t E q u i p m e n t c o m...

Отзывы: