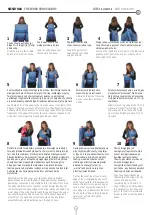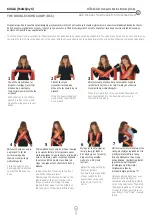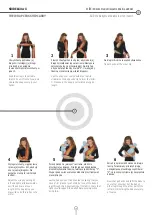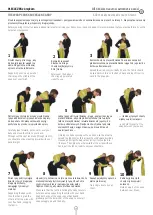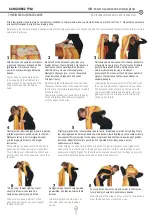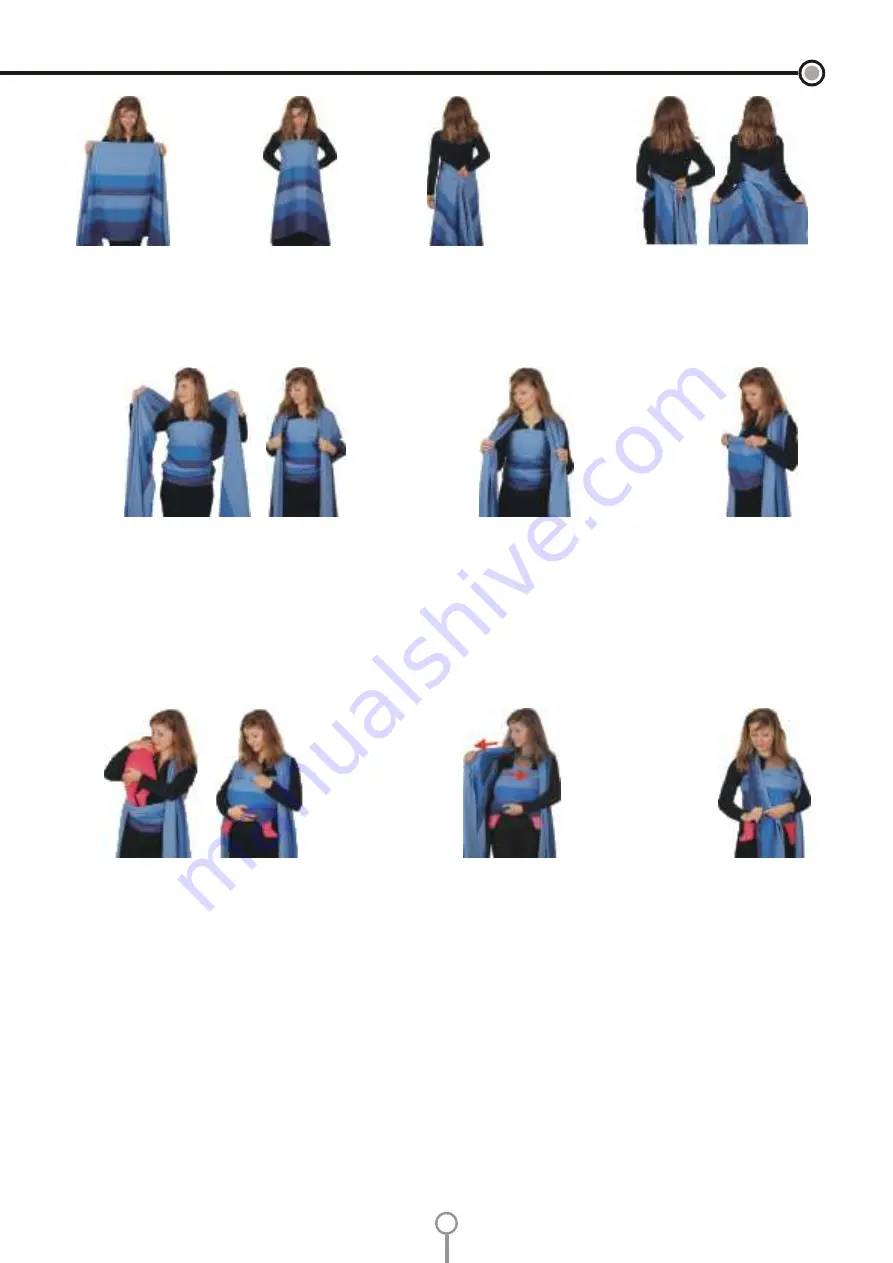
Chwyć chustę pośrodku jej
długości i rozciągnij jej brzegi
przed sobą.
Poprowadź chustę nad
klatką piersiową do tyłu
Poluzuj troszeczkę chustę z przodu, aby
przygotować "kieszonkę" dla dziecka.
Górny brzeg chusty można troszeczkę
zrolować lub zmarszczyć do ok. 1/3 jej
szerokości.
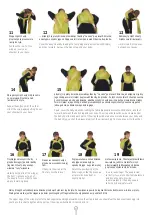
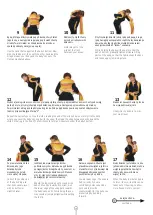
Chwyć drugą ręką już
naciągnięty fragment chusty, a
potem dociągnij kawałek po
kawałku resztę szerokości
tkaniny, aby ciasno otuliła ona
dziecko. Naciągnięcie
zewnętrznej części tkaniny jest
potrzebne, aby dobrze naprężyć
tkaninę pod kolanami dziecka.
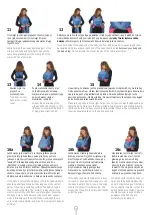
Poprowadź obie części chusty górą do przodu. Jeśli Twoja chusta ma
krawędzie w dwóch różnych kolorach, to brzegi znajdujące się przy
Twojej szyi powinny być w tym samym kolorze co górny brzeg
poziomego fragmentu chusty. Jeśli jest inaczej, to sprawdź, czy chusta
nie przekręciła się wzdłuż długości podczas krzyżowania jej za plecami.
Za plecami chwyć obie
części chusty w jedną rękę.
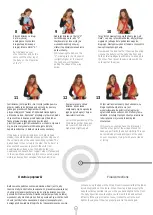
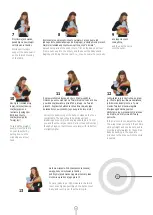
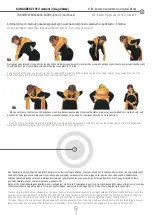
Ostrożnie przełóż maleństwo przez bark, odchylając się lekko do
tyłu, aby główka dziecka była oparta o Twoje ramię. Pamiętaj przy
tym o bardzo stabilnym przytrzymaniu dziecka. Następnie wsuń
dziecko delikatnie do „kieszonki” tak, aby nóżki dziecka wystawały
spod spodu, a górny brzeg chusty sięgał jego główki. Dolny brzeg
chusty powinien sięgać dołów podkolanowych dziecka, górny
brzeg powinien otulać kark maleństwa. Na plecach dziecka
tkanina powinna być gładko rozłożona (nie powinna tworzyć fałd),
nadmiar tkaniny najlepiej zgromadzić w okolicach karku
maleństwa.
Naciągnij wewnętrzną (znajdującą się
przy szyi) krawędź chusty, chwytając
w rękę ok. 1/3 szerokości tkaniny. Jest
to potrzebne, aby dobrze naprężyć
tkaninę w okolicach karku celem
stabilnego przytrzymywania główki
dziecka. Pamiętaj przy tym, że
„wolna” ręka powinna cały czas
przytrzymywać dziecko.
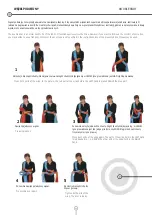
Drugą rękę poprowadź pod jedną z części tkaniny i
chwyć dłonią drugą część chusty, aby skrzyżować
obie krawędzie chusty.
Zmarszcz w dłoniach obie
części chusty na ramionach.
WIEK: od urodzenia
KIESZONKA
1
5
8
9
10
6
7
2
3
4
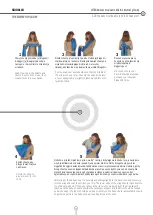
Grab the wrap in the middle
and stretch it in front of you.
Lead the wrap above your
chest and to the back.
Grab both parts of the
wrap behind your back
using one hand.
Put the other hand under one part of the fabric and
grab the other part of the wrap in order to cross
both ends of the wrap.
Slightly loosen the wrap at the front, to
prepare a “pocket” for the baby. The
upper edge of the wrap can be rolled
up or creased slightly to about 1/3 of
its width.
Lead both parts of the wrap to the front above your shoulders. If the
edges of the wrap are in two different colors, the edges next to your
neck should be of the same color as the upper edge of the horizontal
fragment of the wrap. If this is not the case, check to make sure the
wrap has not twisted while crossing behind your back.
Crease both parts of the wrap
on your shoulders with your
hands.
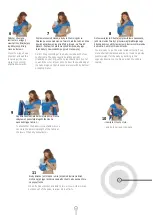
Grab the already tightened
fragments of the wrap with the
other hand and pull the
remaining fabric bit by bit, to
wrap it tightly around the baby.
It is necessary to pull the outer
part of the fabric to provide its
proper tension under the baby's
knees.
Carefully put the baby over your shoulder, bending slightly
backwards so as to lean the baby's head against your shoulder.
Remember to provide a very stable hold for the baby. Next, slide
the baby carefully into the “pocket” so that its legs stand out at
the bottom and the upper edge of the wrap reaches its head. The
lower edge of the wrap should reach the baby's knees; the upper
one should cover the baby's neck. The fabric should be spread
smoothly on the baby's back (there should not be any folds),
excess fabric should be gathered near the baby's neck.
Tighten the inner (next to your neck)
edge of the wrap grabbing about 1/3
of the fabric's width. It is necessary to
ensure the fabric is snug around your
neck in order to provide support for
your baby's neck. Remember that your
free hand should be holding the baby
securely at all times during the
adjustments.
AGE: from birth
THE WRAP CROSS CARRY
8
Содержание Woven Wrap
Страница 23: ...Come with us Come with us...


