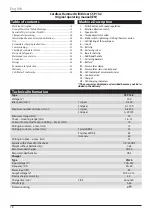
Narex CSP 13-2 Скачать руководство пользователя страница 21

English

21

8� 

DO NOT USE ACCUMULATOR BATTERIES

 if they are damaged 

or if liquid leaks out of the cells� If the battery liquid comes 

into contact with your skin, immediately flush the area with 

water and monitor the skin’s reaction� Seek medical attention 

if needed� If it comes into contact with your eyes, flush them 

with lots of water and immediately seek medical attention�

9�  If you are charging a  fully discharged battery or if you stop 

charging the battery before it is fully charged, you must count 

each of these cycles as an entire charging cycle�

Note on Lithium-ion (Li-Ion) batteries

•  These types of batteries do not have a memory effect, in other 

words, the batteries can be charged at any state of discharge� If 

you take the batteries out of the charger prior to fully charging 

them, it will not damage them�

•  Each Li-Ion battery is equipped with deep discharge protec-

tion� If the voltage falls (due to overloading or discharge) be-

low the monitored range, the electronic circuit will disconnect 

the cells� The machine will then either work intermittently or 

not at all� You must reduce machine load or recharge the bat-

tery�

Storing lithium-ion batteries

•  Store fully charge batteries in a dry and dust-free environment 

at an ambient temperature between 5 °C and 40 °C� If you are 

not using the batteries for a longer period of time, we recom-

mend you charge them fully once every three months�

•  Keep the battery contacts clean� Do not store the replacement 

battery together with metal items as it may cause a short cir-

cuit�

•  It is always necessary to charge batteries that were not used for 

a long time prior to use�

Transporting lithium-ion batteries

As per legal regulation, lithium-ion batteries fall into the hazard-

ous load category� These batteries must be transported while com-

plying with local, national, as well as international guidelines and 

regulations�

•  Consumers may transport these batteries on public roads 

without a problem�

•  Commercial transportation of lithium-ion batteries by trans-

portation companies must comply with the regulation on 

hazardous load transportation� Only trained personnel may 

carry out the preparation and the actual transport� The entire 

process must have expert supervision�

The following must be maintained during battery transpor-

tation:

•  Make sure that contacts are protected and isolated to prevent 

a short circuit�

•  Be careful so that a  large number of batteries do  not move 

around or fall and collapse during transport�

•  Damaged and leaking batteries cannot be transported�

Please contact your carrier for additional information�

Warning!!

It is not expected for the user to perform any service repairs on the 

charger� There are no spare parts inside the charger, which users 

could repair on their own� It is necessary to bring the charger to 

your nearest authorised service centre to prevent damage to spare 

parts, which are sensitive to static electricity, for example�
Always use the right set of batteries (the set delivered with the 

tools or a  replacement set recommended by Narex s�r�o�)� Never 

use any other sets of accumulator batteries because they could 

damage your tools and cause a hazardous situation�

Commissioning

Inserting and removing a battery

Insert the battery  (B1) into the shaft on the bottom side of the 

machine handle all the way� Pull on the battery to make sure it is 

fitted properly�
To remove the accumulator  (B1) from the machine, push on the 

accumulator clamp (B2) and pull the accumulator out�

Turning the device ON

Pressing on the switch button (B1) and gradually pushing on it will 

regulate speed� If you press the switch button (B1) the LED work 

areal light (5) will automatically switch on� It is used to light up the 

work space directly in front of the machine –clamped device in the 

chuck�

Turning the device OFF

Release the switch button (B1)� The rundown of the spindle with 

the chuck is decreased using the brake after being turned off�
Lower speed is suitable for guiding the screw/bolt into the mate-

rial� Higher speed is suitable for tightening the screw/bolt into the 

material or for drilling�

Attention! Long-term use of variable rotation speeds is 

not recommended. It can lead to switch button dam-

age.

Changing the rotation direction

Using the turn direction switch (B2) changes the rotation direction:

•  Push down from right to left – clockwise�
•  Push down from left to right – counter-clockwise�
•  Button is in between – protection against accidental start�

Attention!

If you wish to change the position of the shift button, first check 

that the switch button is released�

Note:

You may hear a loud click when you first use the device after 

changing the rotation direction� This is normal and does not indi-

cate a problem�

Changing the speed

Use the shift button (3) to change speed�

1� Low speed:  move the button away from the chuck – the “

1

“ 

letter appears

2� High speed:  move the button towards the chuck – the “

2

“ 

letter appears

Work mode selection

You can set up tightening, impact free drilling or impact drilling by 

turning the mode switch (4b) to the relevant symbol� You may also 

use the torque set function for batch or gentle tightening when 

setting up the drive mode� The machine has a maximum torque 

available when setting the impact free drilling mode� Impact drill-

ing makes drilling more efficient, e�g� when drilling into brick or 

other such hard construction materials�

Attention!

 Only change the tightening/drilling/impact drilling 

modes while the machine is idle!
Always use only drill bits designed for impact drilling when drilling 

in this manner�

Tightening

Symbol 

  = suitable for tightening�

Setting up torque

The function for setting up torque can be used only if the machine 

or set collar (6b) is set to tightening mode� 
Turning the set collar for torque set-up (4a) to the relevant symbol 

will set the required torque�

Tightening

Symbol 

1


= lowest tightening torque

Symbol 

23

  = highest tightening torque

Impact free drilling

Symbol 

  = suitable for driving, drilling into metal, wood 

etc�

Impact Drilling

Symbol 

  = suitable for impact drilling into brick�

Mounting and releasing tools

Turning the chuck mounting case  (6) opens and closes the jaws 

between which you place the working tools (drill bit, bit holder 

etc�)� The machines are automatically equipped with a spindle stop, 

which makes changing the tool using only one hand in the desired 

direction very simple�

Содержание CSP 13-2

Страница 1: ...n vod na pou itie SK 12 Original operating manual EN 18 Original Bedienungsanleitung DE 24 Instrucciones de uso originales ES 30 Mode d emploi original FR 36 Manuale d uso originale IT 42 p RU 48 Ins...

Страница 2: ...nie rizika razu si pre tajte n vod 3 Dvojit izol cia 4 Nepatr do komun lneho odpadu 5 Pou vajte len vo vn tri 6 Stejnosmern pr d 7 Pr stroj je vybaven poistkou udan ch parametrov Figure and descriptio...

Страница 3: ...r Atornillador de percusi n con acumulador Tournevis percussion sans fil Trapano avvitatore a batteria Akumulatorowa wiertarko wkr tarka udarowa CSP 13 2 1 Akumul tor Akumul tor Battery Akku Bater a B...

Страница 4: ...4 6 4a 4b 9 3 2 5 1 B4 B2 7a 8 7b 7c B2 B1 B3 B1 B5 B3 N2 N1...

Страница 5: ...5...

Страница 6: ...e ku 8 Informace o hlu nosti a vibrac ch 8 Pou it 8 Pokyny pro nab jen akumul tor 8 Uveden do provozu 9 Kontrola stavu akumul toru 10 Ochrann elektronika 10 dr ba a servis 10 P slu enstv 10 Skladov n...

Страница 7: ...ochrana sluchu pou van v souladu s podm nkami pr ce sni uj nebezpe poran n osob c Vyvarujte se ne mysln ho spu t n Ujist te se zda je sp na p i zapojov n vidlice do z suvky a nebo p i zasouv n bateri...

Страница 8: ...tor se nab j 4 Po p ibli n 60 minut ch je akumul tor pln nabit zelen i erven LED kontrolka sv t nep eru ovan 5 Vysu te akumul tor z nab je ky Pokud ji nechcete nab jet dal akumul tor nab je ku odpojt...

Страница 9: ...rvisu aby se p ede lo po kozen vnit n ch d l citliv ch nap na static kou elekt inu V dy pou vejte spr vnou sadu akumul tor sada dodan s n a d m nebo n hradn sada doporu en v robcem Narex s r o Nikdy n...

Страница 10: ...en z materi l odoln ch rozpou t dl m rozpou t dla NIKDY nepou vejte Pokyny k i t n nab je ky Pozor Nebezpe poran n elektrick m proudem P ed jakoukoliv manipulac s nab je kou vyt hn te s ovou z str ku...

Страница 11: ...841 2 1 2018 A11 2019 Sm rnice 2006 42 EC Elektromagnetick kompatibilita EN 55014 1 2017 EN 55014 2 2015 Sm rnice 2014 30 EU RoHS Sm rnice 2011 65 EU M sto ulo en technick dokumentace Narex s r o Chel...

Страница 12: ...ku 14 Inform cie o hlu nosti a vibr ci ch 14 Pou itie 14 Pokyny na nab janie akumul torov 14 Uvedenie do prev dzky 15 Kontrola stavu akumul tora 16 Ochrann elektronika 16 dr ba a servis 16 Pr slu enst...

Страница 13: ...v ne poranenie os b b Pou vajte ochrann pom cky V dy pou vajte ochranu o Ochrann pom cky ako napr respir tor bezpe nostn obuv s proti mykovou pravou tvrd pokr vka hlavy alebo ochrana sluchu pou van v...

Страница 14: ...ku nab ja ky Pripojte nab ja ku N1 k zdroju na p jania Rozsvieti sa erven LED indik tor N2 To znamen e je nab ja ka pripraven na nab janie Ak sa erven LED indik tor nerozsvieti prekontrolujte pripojen...

Страница 15: ...aistite aby kontakty boli chr nen a izolovan aby sa zame dzilo skratom D vajte pozor na to aby sa v po et akumul torov v r mci balenia nemohol pohybova pr padne zosun alebo spadn Po koden a vyte en ak...

Страница 16: ...alebo akumul tora Necha zariadenie vychladn dr ba a servis Pokyny k isteniu stroja Vyf kajte pri spustenom motore z vetrac ch otvorov n radia ne is toty a prach K tejto innosti pou vajte ochrann okuli...

Страница 17: ...62841 2 1 2018 A11 2019 Smernica 2006 42 EC Elektromagnetick kompatibilita EN 55014 1 2017 EN 55014 2 2015 Smernica 2014 30 EU RoHS Smernica 2011 65 EU Miesto ulo enia technickej dokument cie Narex s...

Страница 18: ...level and vibrations 20 Use 20 Accumulator Charging Instructions 20 Commissioning 21 Checking Accumulator Status 22 Electronic Safeguards 22 Maintenance and service 22 Accessories 22 Storage 22 Envir...

Страница 19: ...h or a key left attached to a rotating part of the power tool may result in personal injury e Do not overreach Keep proper footing and balance at all times This enables better control of the power too...

Страница 20: ...r battery temperature too high alternately flashing accumulator is damaged New batteries Battery capacity may be slightly smaller than the listed value dur ing the first few initial charge cycles The...

Страница 21: ...s of accumulator batteries because they could damage your tools and cause a hazardous situation Commissioning Inserting and removing a battery Insert the battery B1 into the shaft on the bottom side o...

Страница 22: ...ling the charger disconnect the line plug from the socket Impurities and dust can be removed from external charg er surfaces by a rag or a non metal brush Use neither water nor detergents Attention Wi...

Страница 23: ...62841 2 1 2018 A11 2019 Directive 2006 42 EC Electromagnetic compatibility EN 55014 1 2017 EN 55014 2 2015 Directive 2014 30 EU RoHS Directive 2011 65 EU Place of storage of the technical documentatio...

Страница 24: ...itsvorschriften 26 Sicherheitshinweise zum Ladeger t 26 Information ber den L rmpegel und Schwingungen 26 Verwendung 26 Ladeprozess 26 Inbetriebnahme 27 Pr fung des Akku Zustands 28 Schutzelektronik 2...

Страница 25: ...hutzschalter RCD Die Verwendung von RCDschr nktdieVerletzungsgefahrdurcheinenStromschlag ein 3 Sicherheit von Personen a Seien Sie aufmerksam bei der Verwendung des elektri schen Werkzeuges bei n chte...

Страница 26: ...gef hrtenWerte von Schwingungen und L rmpegel wurden gem den in EN 62841 angef hrten Pr fbedingungen gemessen und dienen zum Vergleichen der Werkzeuge Sie sind auch f r eine vorl ufige Beurteilung der...

Страница 27: ...efentladung ausgestattet Bei Spannungsabfall berlastung oder Entladung unter die berwachungsgrenze schaltet die Elektronik die Zellen ab Das Ger t arbeitet danach entweder mit Unterbrechungen oder sch...

Страница 28: ...rbindung zu l sen oder festzuziehen Montage der G rtelschnalle Legen Sie die Maschine auf eine waagerechte Unterlage z B Arbeitstisch Schieben Sie die G rtelschnalle 7a mit dem gebo genen Ende in die...

Страница 29: ...gesetzlichen Bestimmungen des gegebenen Landes mindestens jedoch 12 Monate In den Staaten der Europ ischen Union betr gt die Garantiezeit 24 Monate bei einer ausschlie lichen privaten Verwendung mit...

Страница 30: ...nes de seguridad para los cargadores 32 Informaci n sobre el nivel de ruido y vibraciones 32 Uso 32 Instrucciones para la carga de la bater a 32 Puesta en marcha 33 Control del estado de la bater a 34...

Страница 31: ...bajo los efectos del alcohol drogas o medicinas no trabaje con la herramienta el ctri ca Un m nimo descuido al utilizar la herramienta el ctrica puede originar un grave accidente de personas b Utilice...

Страница 32: ...enta el ctrica No obstante si se emplea la herramienta el ctrica para otras aplicaciones con otras herra mientas o con un mantenimiento insuficiente puede aumentar notablemente los valores de vibraci...

Страница 33: ...emperatura ambiente siendo la pti ma de 5 C a 40 C Si lleva mucho tiempo sin utilizar las bate r as es recomendable cargarlas totalmente por lo menos una vez cada tres meses Mantenga limpios los conta...

Страница 34: ...estado de la bater a El equipo dispone de un panel de control del estado de la bate r a B3 Presione el bot n de control B4 en el panel del estado de la ba ter a B3 Al hacerlo se encender el indicador...

Страница 35: ...ertos por la garant a los da os derivados del des gaste natural sobrecarga una manipulaci n inadecuada por ejemplo los da os causados por el usuario o por una utilizaci n contraria a las instrucciones...

Страница 36: ...la perceuse 38 Consignes de s curit pour le chargeur 38 Niveau sonore et vibrations 38 Utilisation 38 Instructions de chargement de la batterie 38 Mise en marche 39 Contr le de l tat de la batterie 40...

Страница 37: ...n instant peut entra ner de graves blessures b Utiliser un quipement de s curit Toujours porter une protection pour les yeux Les quipements de s curit adap t s aux conditions de travail tels que les m...

Страница 38: ...ilisation Les perceuses visseuses percussion ont t con ues pour visser percer et percer avec percussion sans que nous ne soyez d pen dants du r seau lectrique Ces appareils ne peuvent tre utilis s qu...

Страница 39: ...ntation en vigueur Le transport des batteries doit tre effectu conform ment aux r glements et dispositions locaux na tionaux et internationaux Les consommateurs peuvent facilement transporter ces batt...

Страница 40: ...ns de 60 1 moins de 30 lectronique de protection La machine est munie d une lectronique de protection qui per met de pr venir de graves d t riorations de la machine Lorsque l lectronique de protection...

Страница 41: ...t renvoy au four nisseur ou un centre de service NAREX sans tre d mont Veillez conserver la notice d utilisation les instructions de s curit la liste des pi ces de rechange et la preuve d achat Le cas...

Страница 42: ...i di sicurezza per il caricabatterie 44 Informazioni sulla rumorosit e sulle vibrazioni 44 Utilizzo 44 Istruzioni per ricaricare le batterie 44 Messa in funzione 45 Controllo dello stato della batteri...

Страница 43: ...ile elettrico pu provocare gravi lesioni personali b Utilizzare i dispositivi di protezione Indossare sempre la protezione degli occhi I dispositivi di protezione come il re spiratore le calzature di...

Страница 44: ...one avvitatura a percussione senza uso della rete elettrica Questo dispositivo pu essere utilizzato solo per gli scopi indicati L utente responsabile degli utilizzi non previsti Istruzioni per ricaric...

Страница 45: ...oni di litio Secondo la normativa le batterie agli ioni di litio rientrano nella categoria di trasporto di merci pericolose Il trasporto di queste batterie deve avvenire nel rispetto delle norme e del...

Страница 46: ...cintura L orientamento della fibbia per cintura deve corrispondere alla figura Controllo dello stato della batteria La macchina munita di un pannello di controllo dello stato della batteria B3 Premer...

Страница 47: ...oprio ovvero danni causati dall utente oppure provo cati da un utilizzo contrario al manuale d uso oppure danni noti al momento dell acquisto I reclami possono essere riconosciuti soltanto se la macch...

Страница 48: ...B 7C 8 9 B1 B2 B3 B4 B5 N1 N2 48 49 50 50 50 50 50 52 53 53 53 53 53 53 53 CSP 13 2 20 0 1 1 0 500 2 0 1 750 1 1 0 8 500 2 0 29 750 75 1 5 13 10 13 30 45 60 12 1 2 20 UNF 1 68 CN 20 CB 4 CN 20 100 240...

Страница 49: ...o 49 1 2 a RCD RCD 3 a 4 a CB 4 20 0 Li Ion 4 0 80 C 0 45 60 0 67...

Страница 50: ...o 50 5 a 62841 1 CSP 13 2 LpA 79 8 A LwA 90 8 A K 5 0 A ah 2 92 2 K 1 5 2 EN 62481 1 N1 N2 2 B1 3 N2 4 60 5 N2...

Страница 51: ...o 51 60 1 18 C 24 C 0 C 45 C 2 0 C 45 C 3 4 5 6 7 8 9 Li Ion 5 C 40 C...

Страница 52: ...o 52 B1 B1 B2 B1 B1 5 B1 B2 3 1 1 2 2 4b 6b 4a 1 23 6 8 9 7a 7c 7a 7b B3 B4 B3 B5 3 100 2 60 1 30...

Страница 53: ...CSP 13 2 EN 62841 1 2015 EN 62841 2 1 2018 A11 2019 2006 42 EC EN 55014 1 2017 EN 55014 2 2015 2014 30 EU RoHS 2011 65 EU Narex s r o Chel ick ho 1932 470 01 esk L pa Czech Republic 1932 470 01 2021 N...

Страница 54: ...ptera do adowania 56 Informacje o g o no ci i wibracjach 56 Zastosowanie 56 Instrukcje dotycz ce adowania akumulator w 56 Rozpocz cie eksploatacji 57 Kontrola stanu akumulatora 58 Elektronika ochronna...

Страница 55: ...d cie uwa ni nastawcie si na to co aktualnie robicie koncentrujcie si i my lcie trze wo Nie pracujcie z urz dzeniami elektrycz nymi je eli jeste cie zm czeni lub pod wp ywem narko tyk w alkoholu lub l...

Страница 56: ...a asem pod czas u ytkowania Podane parametry emisji dotycz g wnych zastosowa elektro narz dzia Je li jednak narz dzie elektryczne zostanie u yte do in nych zastosowa z innymi narz dziami mocowanymi lu...

Страница 57: ...m w rodowisku suchym i wolnym od kurzu w tempe raturze otoczenia w zakresie 5 40 C Je li baterie nie b d u ywane przez d u szy czas zalecamy ich pe ne na adowanie raz na trzy miesi ce Styki akumulator...

Страница 58: ...sa musi by zgodna z rysunkiem Kontrola stanu akumulatora Urz dzenie jest wyposa one w kontrolny panel stanu akumulato ra B3 Nacisn przycisk kontrolny B4 na panelu stanu akumulato ra B3 Nast pnie za wi...

Страница 59: ...niepra wid owego obchodzenia si ew szkody z winy u ytkownika lub w wyniku u ywania niezgodnie z instrukcj obs ugi lub szkody kt re by y znane w chwili zakupu nie s obj te gwarancj Reklamacje mog zosta...

Страница 60: ...ervice centres can be found at our website www narex cz section Service Centres Die aktuelle Liste der autorisierten Servicest tzpunkte finden Sie unter www narex cz im Abschnitt Servicestellen La lis...

Отзывы: