background image

39 

" V I D E O "   B U T T O N   >   E N R O L L   C A M E R A S   ( C O N T ' D )  

you wish to view the characters).   

4.  Wait for the Wi-Fi connection to complete.  When finished, the live video feed will appear.   


If Camera Does Not Connect  

  As you enroll multiple cameras, keep the cameras physically separated to avoid Wi-Fi signal interference.  Move the mobile 

device closer to the router and retry.  Verify the Wi-Fi password and SSID are on 2.4GHz wireless network.  Reset the cam-

era (see the 

Factory Reset 

section in the instructions that came with the camera), then repeat the above steps.   


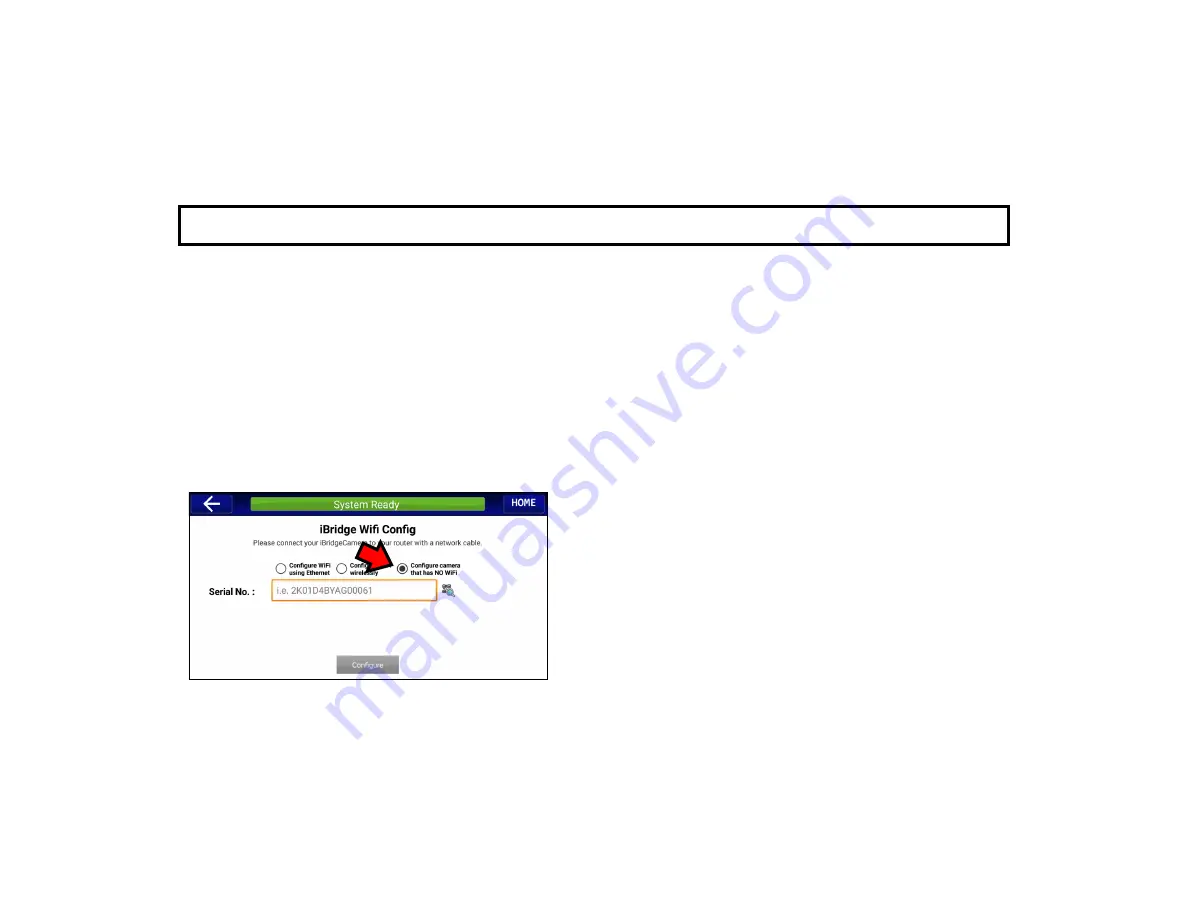
C.  Configure camera that has NO Wi-Fi 

Use this method when you wish to connect the camera to the subscriber's router using a permanently installed Ethernet cable.   


1.  Power camera.  Wait for the camera green LED to flash slowly.   

2.  Tap within the 

Serial No.

 field and manually type the characters of the video camera serial number.   

3. Tap 

CONFIGURE

.  Wait for the connection to complete.  When finished, the live video feed will appear.   


If Camera Does Not Connect  

Verify all physical plug/socket and power connections.  Verify the 

serial number was typed correctly.  If the camera still does not 

connect, verify the subscriber's router is not limiting the number of 

IP addresses it can assign to a device, or limiting the MAC ad-

dresses to which it can communicate ("MAC address filtering").  If 

still unable to connect, try rebooting the camera and the subscrib-

er's router, then verify the Wi-Fi password and SSID are on 

2.4GHz wireless network.  Reset the camera (see the 

Factory 

Reset 

section in the instructions that came with the camera), 

then repeat the above steps.   


Содержание iSecure IBR-TOUCH-WL

Страница 1: ...1 NAPCO 2019 OI413LF 12 19...

Страница 2: ...at least once a week in both the ac battery and battery only modes ask your alarm professional how to make these tests OVERVIEW IMPORTANT TEST YOUR SYSTEM WEEKLY Test your sounding device and backup b...

Страница 3: ...26 ADVANCED FEATURES 27 KEYPAD MESSAGES 28 USER SETTINGS MENU 31 VIDEO BUTTON 36 VIDEO BUTTON ENROLL CAMERAS 37 CLIMATE BUTTON 40 GLOSSARY 41 SYSTEM TROUBLE ERROR CODES 43 COPYRIGHT TRADEMARKS 47 LIMI...

Страница 4: ...co services or applications personal information you submit may be read collected or used by the ser vice or application provider and or other users of those services Napco is not responsible for your...

Страница 5: ...d see page 7 Video optional Tap to discover and view the cam era transmissions in your system see page 36 Automation optional Tap to control the Z Wave home automation system components see OI414 incl...

Страница 6: ...n the system that may prevent arming see SYSTEM TROUBLE ERROR CODES If you are unable to clear the trouble to allow the system to be armed call for service immediately EMERGENCY Buttons Used to signal...

Страница 7: ...7 1 SECURITY KEYPAD CONTROLS INDICATORS 2 6 7 14 10 13 12 16 17 4 11 3 8 9 5 15 Change Area...

Страница 8: ...s various system troubles displays etc see text 2 Resets residential smoke detectors 9 Area Selects other areas see Manager s Mode on page 12 10 Numerical Keys 1 9 0 Used to enter codes zone numbers e...

Страница 9: ...assing Zones on page 11 Fire Appears during a Fire Alarm When Pulsing Fire Alarm Silenced System Trouble Appears when a Fire or general trouble is detected Flashing Trouble has been acknowledged Low B...

Страница 10: ...ss IP Network Wi Fi Yellow OFF Network OK Rapid Flashes No IP connection 1 blink No network cable detected 2 blinks No access to Internet via network cable 3 blinks Ethernet failed to com municate 4 b...

Страница 11: ...exit door before the exit time expires Priority Arming If you attempt to arm the system with an unsecured faulted zone a 3 second tone will sound and the TROUBLE icon will appear on the left side of...

Страница 12: ...m disarm selected Areas in a partitioned system To arm a different Area 1 If you start at the Home Screen tap Security to display the keypad 2 At the keypad take note of the current Area number displa...

Страница 13: ...ion to leave the premises during this exit delay or remain inside Automatic Interior Bypass Optional Automatic Interior Bypass programmed YES NO Your system may have been programmed for Automatic Inte...

Страница 14: ...NO Easy Exit Optional Easy Exit programmed YES NO Your system may have been programmed for Easy Exit which allows you to exit the premises while the system is armed STAY or armed NIGHT By activating E...

Страница 15: ...an intruder may still be on the premises leave immediately and call authorities from a neighbor s telephone To silence an audible alarm 1 Enter your User Code and press Disarm After the system is dis...

Страница 16: ...ed to leave through the exit door When the Exit Delay ends a violation of any perimeter zone will cause an instant alarm 1 If you start at the Home Screen tap Security to display the keypad 2 At the k...

Страница 17: ...FIRE icon on the display will go out If the FIRE icon is still displayed the fire zone has not been properly reset If you cannot clear this condition by tapping RESET call for service Fire Zone Troub...

Страница 18: ...th all those who use the building 1 In a residence sleep with the bedroom door closed A closed door will hold back deadly smoke while you escape 2 When the fire alarm signals escape quickly Do not sto...

Страница 19: ...19 FIRE PROTECTION Floorplan Draw a plan of your premises in the space provided below Floorplan...

Страница 20: ...fires because the fire may be a slow smoldering low heat type producing smoke because they may not be near the fire or because the heat of the fire may bypass them These detectors will not detect oxyg...

Страница 21: ...longer than one minute Display Zone Directory Displays a listing of all zones in the Area Tap the Arm Stay and Arm Away buttons to scroll down and up through the zone directory names respectively Dis...

Страница 22: ...f 1 to 4 hours To Delay Arm the system With the function To Arm in 1 4hrs displayed in the window tap 1 2 3 or 4 to select the desired Delay Arming time in hours followed by Arm Stay or Arm Away or Ar...

Страница 23: ...ble Area and zone or User To check previous events scroll back using the Arm Stay button Display Alarm Log Displays most recent alarm events displays event date time Area and zone To check previous a...

Страница 24: ...f the trouble continues call for service Activate Fault Find At the initiation of a test the Hub sends a message to the central station that a test is in progress and normally causes all zones to give...

Страница 25: ...n tap the Arm Stay and Arm Away buttons to scroll down and up through the zones in trouble respectively As each zone is corrected the sounder will stop momentarily signaling its repair and the display...

Страница 26: ...5 seconds at your option by consulting with your installer Regular Burglary Non 24 Hour Zone reports are aborted by disarming within the delay period 24 Hour Zones and zones programmed to report resto...

Страница 27: ...deactivate that zone Similarly a bypassed zone may be unbypassed using the same procedure Note The BYPASS icon shown appears on the left side of the keypad screen when zones are bypassed Exit Delay R...

Страница 28: ...s arming with Instant protection Entry delay in progress XXX shows entry time remaining in seconds System armed The I indicates arming with Instant protection Zones not secured doors or windows may be...

Страница 29: ...larm condition on a Fire Zone Tap RESET to silence sounder Evacuate premises or correct cause of alarm For partitioned systems only code not valid for area Wrong code entered In Manager s Mode Arming...

Страница 30: ...cknowledgment from the central station of the cancellation of the alarm signal Indicates problem s detected on system See examples below and SYSTEM TROUBLE ERROR CODES for a complete list of system tr...

Страница 31: ...31 USER SETTINGS MENU Home Startup Wizard Z Wave Enable KeySwitch Arming Configure Remote Logins Voice Remote Login Mode App Version Tap the User Settings Button...

Страница 32: ...i Fi connection Tap to analyze the strength of the wireless connection between the device running the app and the customer s router and or ISEE WAP When installing be sure the large Wi Fi Icon is colo...

Страница 33: ...nutes and never Font size Controls the size of the lettering that appears in the Dealer and User Settings menus Date Time Automatic When checked to enable retrieves date time data automatically from n...

Страница 34: ...charges Weather Feed Check to display a weather re port feed on the Home Screen Uncheck to re move the weather feed from the Home Screen Note To customize the weather report feed to a particular Zip C...

Страница 35: ...the Using your iBridge IBR TOUCH Series Z Wave Home Automation Sys tem OI409 for more information Enable KeySwitch Arming When checked enabled allows a zone input to be used to arm disarm the security...

Страница 36: ...een shown on the next page where you can select a method to enroll an ISV2 series camera into your iBridge app Locking Devices optional Tap to access the Z Wave door locking devices in your system VID...

Страница 37: ...e wireless router or access point be fore mounting the camera also be sure the final mounting location is within wireless range of the router access point Perform the en rollment procedure with your m...

Страница 38: ...network Reset the camera see the Fac tory Reset section in the instructions that came with the cam era then repeat the above steps B Configure Wi Fi wirelessly With this method the network connection...

Страница 39: ...et cable 1 Power camera Wait for the camera green LED to flash slowly 2 Tap within the Serial No field and manually type the characters of the video camera serial number 3 Tap CONFIGURE Wait for the c...

Страница 40: ...o view real time temperatures and control your system Note The appearance of this screen may vary with the cli mate control device used Tap to select thermostat from pull down Tap to select system opt...

Страница 41: ...or Zones simul taneously to allow free movement within the premises while armed perimeter zones is maintained a violation of any perimeter zone will cause an instant alarm Battery Backup power source...

Страница 42: ...ble c a Day Zone condition exists see Zones Day Zone d 10 seconds exit time remaining e invalid code entered or f central station acknowledged arming see Ringback System Trouble A problem low battery...

Страница 43: ...ress YES to send a test signal to the central station 4 If the trouble continues call installing company for service E04 NN Wireless Transmitter Su pervisory Failure A problem has been detected with a...

Страница 44: ...f other types may pre sent a risk of fire or explosion Never recharge or disassemble a battery or dispose of in fire E06 NN Receiver Response Failure Call installing company for service E09 00 System...

Страница 45: ...est routine Call installing company for service E41 NNN Fire Trouble A problem has been detected on the fire zone indicated Call installing company for service E42 NNN CO Zone trouble A problem has be...

Страница 46: ...46 NOTES...

Страница 47: ...la ble information and believed to be accurate at the time of printing Napco reserves the right to change or modify any information or specifications without notice or obligation Note The diagrams and...

Страница 48: ...f the following criminal tampering electrical or communications disruption it is possible for the system to fail to perform as expected NAPCO does not represent that the product system may not be comp...

Отзывы:

Похожие инструкции для iSecure IBR-TOUCH-WL