6
2. Getting Started
2.1 Inserting Memory Card
With the Car DVR turned off and the screen facing towards you insert the memory card with the text on the Micro SD card facing away
from you. Push the memory card in until a click is heard.
Note:
1.
Do not remove or insert the memory card while the Car DVR is turned on as this may
damage the memory card or corrupt the memory cards stored data.
2.
Please use a Class 6 or higher rated micro SD card with a maximum capacity of 32GB.
3.
Please format the Micro SD card before the initial use.
4.
When removing the memory card, be careful as the card may eject quickly.
To remove the memory card
Ensure that the Car DVR is powered off, push the memory card until a click is heard and release the card to eject.
2.2 Installing the Car DVR
1.
Remove the protective stickers from the Car DVR and the Suction Mount.
2.
Slot the mount bracket into the socket on the top of the Car DVR and with the screen facing you, slide the bracket from front to
back until the bracket locks in place.
3.
With the suction mount tab in the up position attach the suction cup to the windscreen.
4.
Press the mount base firmly against the windscreen and switch the suction mount tab to the down position.
2.2.1 Adjust the angle of the Car DVR
1.
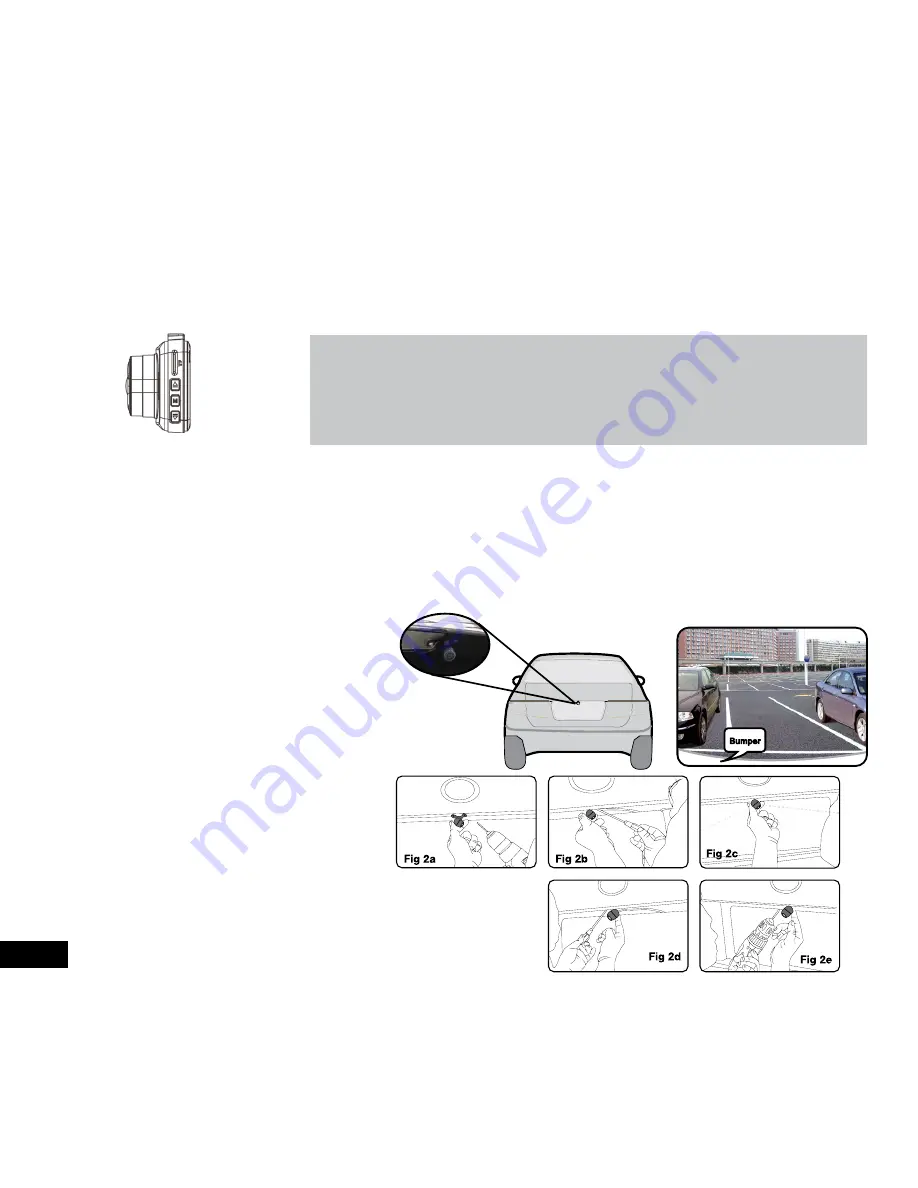
Select a flat and centred location near the
number plate lamp at the rear of the vehicle to
mount camera.
IMPORTANT:
When selecting this location, it is
highly recommended that the image transmitted
by the camera show the rear bumper and area
behind the vehicle.
2.
Attach tape to the bracket of the camera, and
drill a small hole for the first screw.
(Refer to
Fig 2a)
3.
Use a screw driver to fix the first screw, but
don’t tighten it yet.
(Refer to Fig 2b)
4.
Insert camera wire through newly drilled hole
and mount securely in place.
(Refer to Fig 2c)
5.
Mark the position suitable for the second screw and drill a small hole for
it.
(Refer to Fig 2d)
6.
Fix the second screw and tighten both screws.
(Refer to Fig 2e)
Suggested location
to mount camera


