background image

20

Cooling system - Seawater

 Caution! : 

When the craft is in the water, there is a 

risk of water penetrating the craft when working on the 

seawater circuit. Water can penetrate the craft via com-

ponents located below the waterline. Close the seacock 

(if fitted) or prevent water discharge before working on 

the seawater system !
Cleaning  the  seawater  system  is  essential  to  prevent 

the formation of deposits and salt crystals. 
Your generating set may not be fitted with a seawater 

cooling system (such as in the case of a Keel Cooling 

system). 

Cleaning the seawater filter 

The seawater filter is an optional component. These in-

structions are given as an example only.

• Check the condition of the seawater filter with the

engine stopped. If deposits have formed, remove

the filter in order to clean it.

• Remove the cover and then the filtering part 

A

. Re-

move all the debris on the housing.

• Rinse  the  filter  and  the  housing  with  fresh  water

and check the condition of the seal, then re-install

all the components and check there are no water

and/or air leaks in the circuit when operational.

Draining and rinsing the seawater circuit

• Close the seacock.
• Disconnect the hose running from the seacock.
• Place the hose in a receptacle filled with fresh wa-

ter. Ensure the receptacle you use is large enough

as the seawater pump must never be run without

water.

• Check that no one is in the vicinity of the engine

and then start it. Let the engine run for several min-

utes,  checking  that  the  receptacle  is  at  all  times

filled with fresh water.

• Once the circuit is fully rinsed, re-connect the hose

correctly to the seawater filter.

• Drain  also  the  exhaust  circuit. A  small  amount  of

water  may  remain  in  the  bottom  of  the  waterlock

box.

• Run the engine for few minutes in order to check

for leakage.

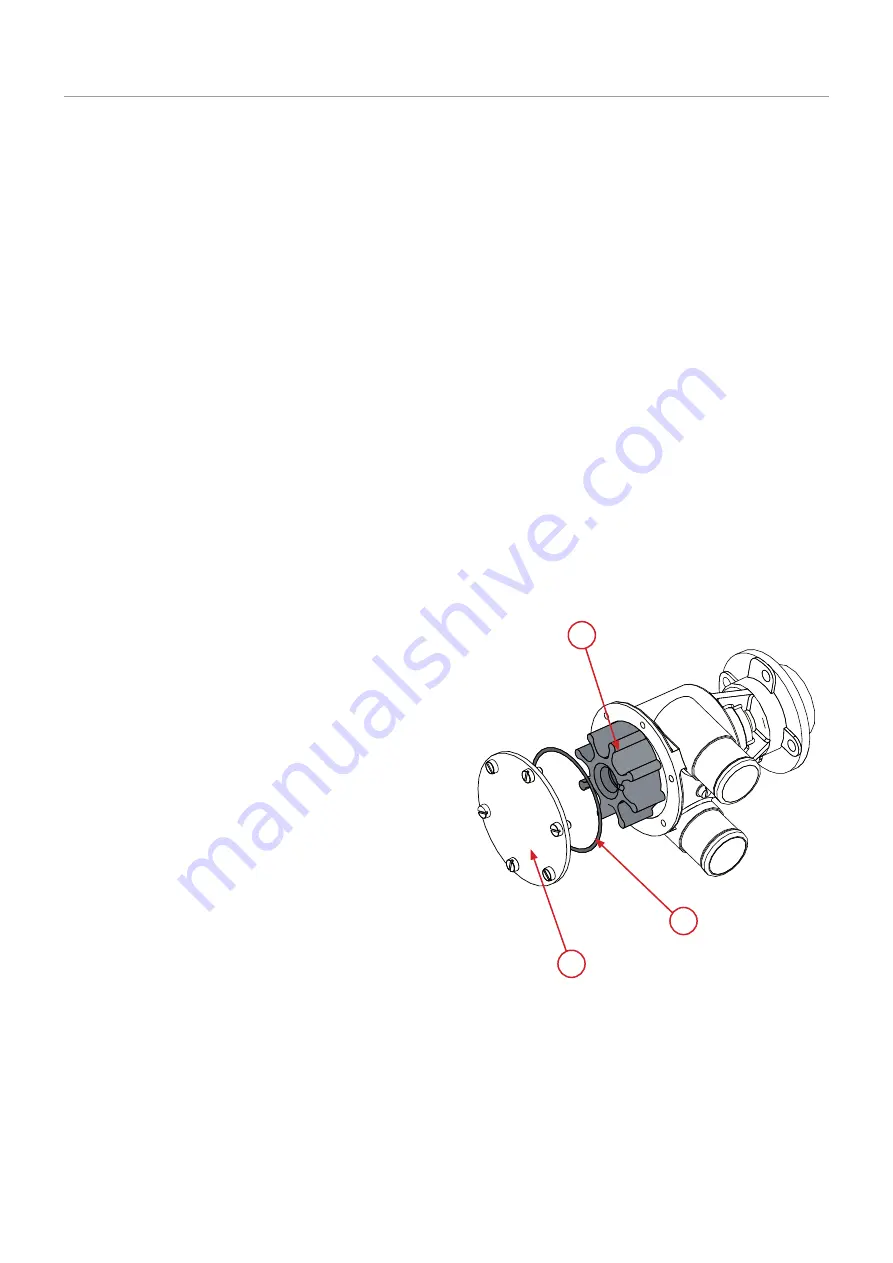
Replacing the seawater pump rotor 

The seawater pump rotor is an essential component. It 

must be replaced regularly along with the seal. A worn 

rotor could crack and damage the cooling system. Al-

ways have a replacement rotor on board the craft. 

• Close the seacock.
• Remove the seawater pump cap 

and the seal 

B

,

then remove the rotor 

C

 without damaging it.

• Check the condition of the rotor: replace it if even

the most minor defect is noted. If the rotor is dam-

aged,  drain  the  seawater  system  and  check  that

the heat exchanger is not clogged by pieces of rub-

ber. Clean it if necessary.

• Clean the elements.
• Fit a new rotor by turning it clockwise.
• Lubricate the pump casing and the inside of the lid

with waterproof grease for rubber.

• Refit the water pump cap using a new seal.
• Open  the  seacock  and  then  start  the  engine  to

check that the circuit is leak-tight.

B

A

C

Maintenance

Содержание QLS 10T

Страница 1: ...MARINE GENERATING SET INSTRUCTION MANUAL MU_GE_970315535_ENG QMS 32T QMS 39T QLS 32T QLS 39T QLS 47T...

Страница 2: ......

Страница 3: ...l system 16 Bleeding the fuel circuit 16 Replacing the fuel filter 16 Replacing the fuel prefilter 16 Draining the water from the fuel prefilter 16 Lubrication system 17 Checking the oil level 17 Drai...

Страница 4: ...should be carried out by Nanni Diesel authorised per sonnel or by a professional If you have to work on the generating set carefully follow the safety instructions set down in this manual Certain info...

Страница 5: ...ant and oil circuit caps when the generating set is operational and or hot Never start or run the generating set when the oil fill cap is not screwed on as hot oil could spray out If you come into con...

Страница 6: ...nal I Rotating parts Rotating parts can be extremely dangerous and cause serious injury and even death Do not work on the generating set when it is operational If work on the engine when running is ab...

Страница 7: ...use special filters Avoid using fuel mixed with water or other substances as you may damage the engine The engine performance is influenced by the fuel tem perature the temperature and relative humidi...

Страница 8: ...ng I Caution Your generating set must be installed by a shipyard or authorised representative following the on board assembly instructions The electrical connections must also be carried out by qualif...

Страница 9: ...gauge 14 Fuel filter 15 Fuel pump 16 Supports 17 Generator 18 Generator identification plate 19 Engine identification plate 20 Generating set hoisting eyes Principal parts of the generating set QLS32T...

Страница 10: ...orifice 11 Oil filter 12 Oil drain pump option 13 Oil gauge 14 Fuel filter 15 Fuel pump 16 Supports 17 Generator 18 Generator identification plate 19 Engine identification plate 20 Generating set hoi...

Страница 11: ...3 Battery charge This indicator illuminates when the set is switched on If it lights when the generating set is running this indicates an engine alternator charging fault 4 Oil pressure This indicator...

Страница 12: ...INJECTION SYSTEM QMS32T QLS32T QMS39T QLS39T QLS47T Combustion principle Indirect Direct Intake Atmosph rique Natural Turbo Injectors Type Bosch mini Injection pressure bar 140 250 Fuel type Gazole NF...

Страница 13: ...circuit compo nent has been replaced Starting the generating set I Caution On a soundproof generating set the lo cal remote selector must be in remote position to start the generating set using the in...

Страница 14: ...set except in emergencies and contact your Nanni Diesel authorised dealer Stopping the generating set Before stopping the generating set cut the power of the electrical appliances connected to the cr...

Страница 15: ...50 of pure antifreeze Use clean and distilled water for the mix Water that is too hard will produce limescale build up and will reduce the cooling system s effectiveness The cooling system allow the...

Страница 16: ...e generating set as they may increase the risk of fire in the engine compartment Check the operation of the different lamps and indica tors situated on the instrument panel Take care not to get the ge...

Страница 17: ...receptacle under the filter and then remove the used filter C cartridge Apply a thin layer of fuel over the seal surface of the new filter cartridge before fitting it Tighten it by hand until the fil...

Страница 18: ...urn Start the engine and let it warm up for approximately 5 minutes so that oil suction is easier Stop the engine Use a pail to collect the extracted oil and pump until the oil has been completely ext...

Страница 19: ...t must be drained in or der to remove the various deposits that can build up in the circuit Carry out this operation with the engine stopped and cold Place a receptacle under the drain cap then un tig...

Страница 20: ...d with fresh wa ter Ensure the receptacle you use is large enough as the seawater pump must never be run without water Check that no one is in the vicinity of the engine and then start it Let the engi...

Страница 21: ...p propriate grease If the battery is replaced use a battery with similar specifications to the previous one If starting with an emergency battery and connection cables proceed as follows Connect the e...

Страница 22: ...tec tion of the generating set and consequently the gener ating set itself The installer should ensure that all the necessary precautions are taken to guarantee the cor rosion protection of the genera...

Страница 23: ...ce the fuse or replace the circuit breaker Electrical circuit breaker is not working Electrical connections are faulty Check the electrical connections and wires especially the battery cables Clean an...

Страница 24: ...ck or faulty Re tighten or replace the belt Seawater pump rotor is faulty Replace the rotor Insufficient coolant Fill with coolant and check that the cooling system is leak tight Thermostat is malfunc...

Страница 25: ......

Страница 26: ...Nanni Industries S A S 11 Avenue Mariotte 33260 La Teste France Tel 33 0 5 56 22 30 60 Fax 33 0 5 56 22 30 79 www nannidiesel com...

Отзывы: