


EN
WWW.NAKAYAMATOOLS.COM
8
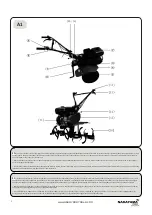
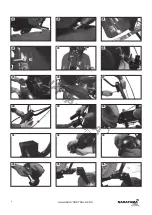
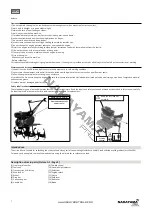
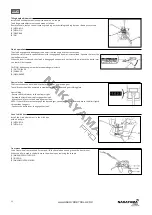
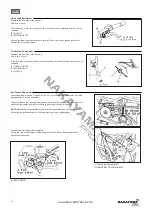
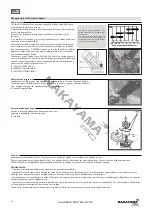
Assembly instructions (Pictures 1-46 Pages 3-5)
Pre-operation check
Each of the numbers below corresponds to the corresponding picture.
1) Position the wheels to support the machine during assembly.
2) Assemble the support leg/depth adjuster.
3) Adjust the safety on the support/depth adjuster leg.
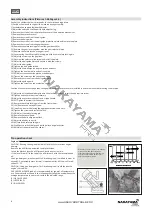
4) Remove the screws from the protective cover of the belt drive mechanism.
5) Remove the protective cover.
6) Remove the screws from the belt guide.
7) Remove the belt guide.
8) Remove the screws from the belt guide protection plate and remove the plate.
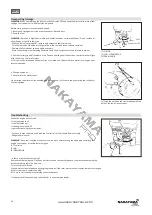
9) Remove the screws from the gearbox cover.
10) Remove the safety locking pin from the gearbox shifter.
11) Replace the gear lever together with the gear selector blade.
12) Replace the safety catch on the gear lever.
13) Secure using the shifter safety locking pin with its own safety locking pin.
14) Adjust the screws on the gearbox.
15) Unscrew the selector plate screw and install the plate.
16) Adjust the belt guide plate and secure it with the screws.
17) Adjust the belt guide.
18) Tighten the belt guide screws.
19) Adjust the two bumpers using the screws and nuts.
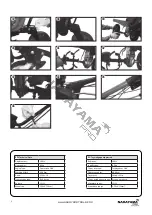
20) Tighten the bumper bolts and nuts securely.
21+22) Adjust the connection plate on the bumpers.
23) Tighten the screws on the connection plate.
24) Remove the screws from the belt guide plate.
25) Adjust the guide guard.
26) Tighten the screws on the protective cover.
Caution. Make sure that the guards, linkage plates and protective cover are installed in a secure manner before using the machine.
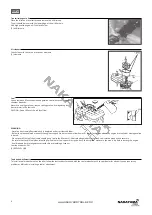
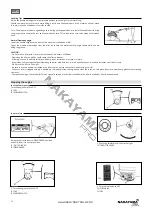
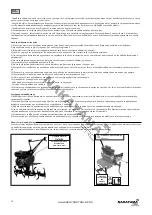
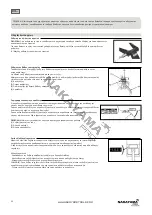
27) Adjust the U-type handlebar grip onto the machine shaft and insert the appropriate screw.
28) Tighten and secure the screw securely.
29) Adjust the cover over the shaft and U-type handle.
30+31) Tighten the screws for the cover.
32) Remove the safety locking pin from the front wheel.
33) +34) Remove the nut and screws.
35) Install the front wheel using the appropriate screws and nuts.
36) Tighten the screws and install the lock.
37+38) Adjust the safety locking pin.
39) Remove the rear wheels.
40) Remove the knife adjustment lock.
41) Adjust the knives correctly.
42+43) Insert the safety locking pin.
44) Stabilize the switch cables and clutch pulley using plastic ties.
45+46) Adjust the position of the cables.
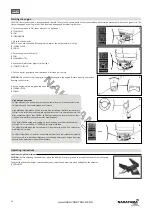
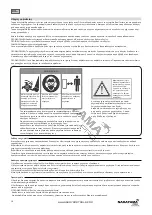
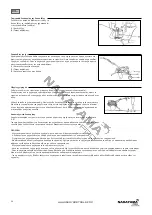
Engine oil
CAUTION: Running the engine with low oil level will cause serious engine
damage.
·Remove the oil filler cap and wipe the dipstick clean.
·Insert the dipstick into the oil filler neck, but do not screw it in .
·If the level is low, fill to the top of the oil filler neck with the recommended
oil.
Use high-detergent, premium quality 4-stroke engine oil, certified to meet or
exceed U.S. automobile manufacturer's requirement for API Service Classifi
-
cation SG, SF.
CAUTION: Using non-detergent oil or 2-stroke engine oil could shorten the
engine's service life.
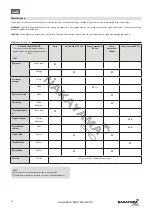
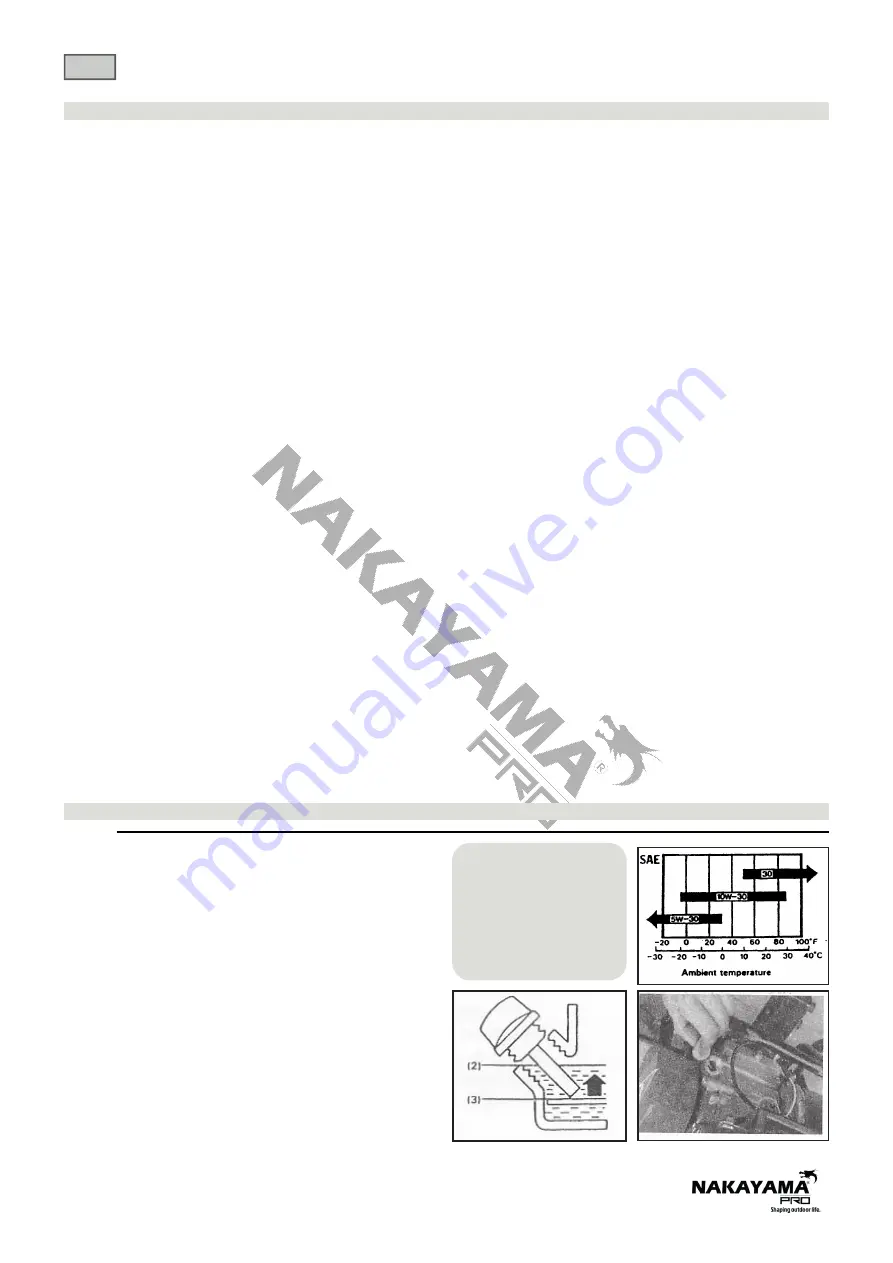
SAE 20W-50 or SAE30 type oil
is recommended for general, all temperature
use. Other viscosities shown in the following chart might be used when at the
average temperature in your area is within the indicated range.
(1) OIL FILLER HOLE
(2) UPPER LEVEL
(3) LOWER LEVEL
Attention! For safety reasons, the machine
may be delivered without engine oil.
Please check the engine oil level and top
up with the appropriate amount of oil
before starting the machine.
Содержание 042808
Страница 1: ...en el WWW NAKAYAMATOOLS COM ART NO MB6100 042808...
Страница 17: ...EL WWW NAKAYAMATOOLS COM 18 1 2 3 4 1 2 3...
Страница 18: ...EL WWW NAKAYAMATOOLS COM 19 4 5 1 2 3 4 5 6 7 8 9 10 11 12 13 14 1 2 3 4 5 6...
Страница 20: ...EL WWW NAKAYAMATOOLS COM 21 SAE 20W 50 SAE30 1 2 MAX 3 MIN 1 1 95...
Страница 22: ...EL WWW NAKAYAMATOOLS COM 23 1 1 2 3 4 1 2 3...
Страница 23: ...EL WWW NAKAYAMATOOLS COM 24 1 2 3 6 8o 300mm 1 2...
Страница 24: ...EL WWW NAKAYAMATOOLS COM 25 ON OFF OFF 1 OFF 2 ON OFF 1 1 1 2 2 ON OFF OFF 1 OFF 2 ON OFF 3 OFF 1 2 OFF 1 2...
Страница 25: ...EL WWW NAKAYAMATOOLS COM 26 20 3 50 6 100 300 1 2 2 2 2 1 2...
Страница 26: ...EL WWW NAKAYAMATOOLS COM 27 0 6 L 1 2 3 1 2 OFF ring ON 1 O RING 2 0 7 0 8mm 1 2 1 4 1 2...
Страница 27: ...EL WWW NAKAYAMATOOLS COM 28 3 8mm 1 2 5 10mm 1 2 3 60 65mm 2 4 2 6 in 1 2 1...
Страница 28: ...EL WWW NAKAYAMATOOLS COM 29 1 2 OFF ON 3 4 5 1 O RING 2 3 1 ON OFF ON ON 1 2 ON 3 ON OFF ON...
Страница 29: ......