NAD T175 HD Скачать руководство пользователя страница 48

OPERATION

USING THE HTRC 1 REMOTE CONTROL

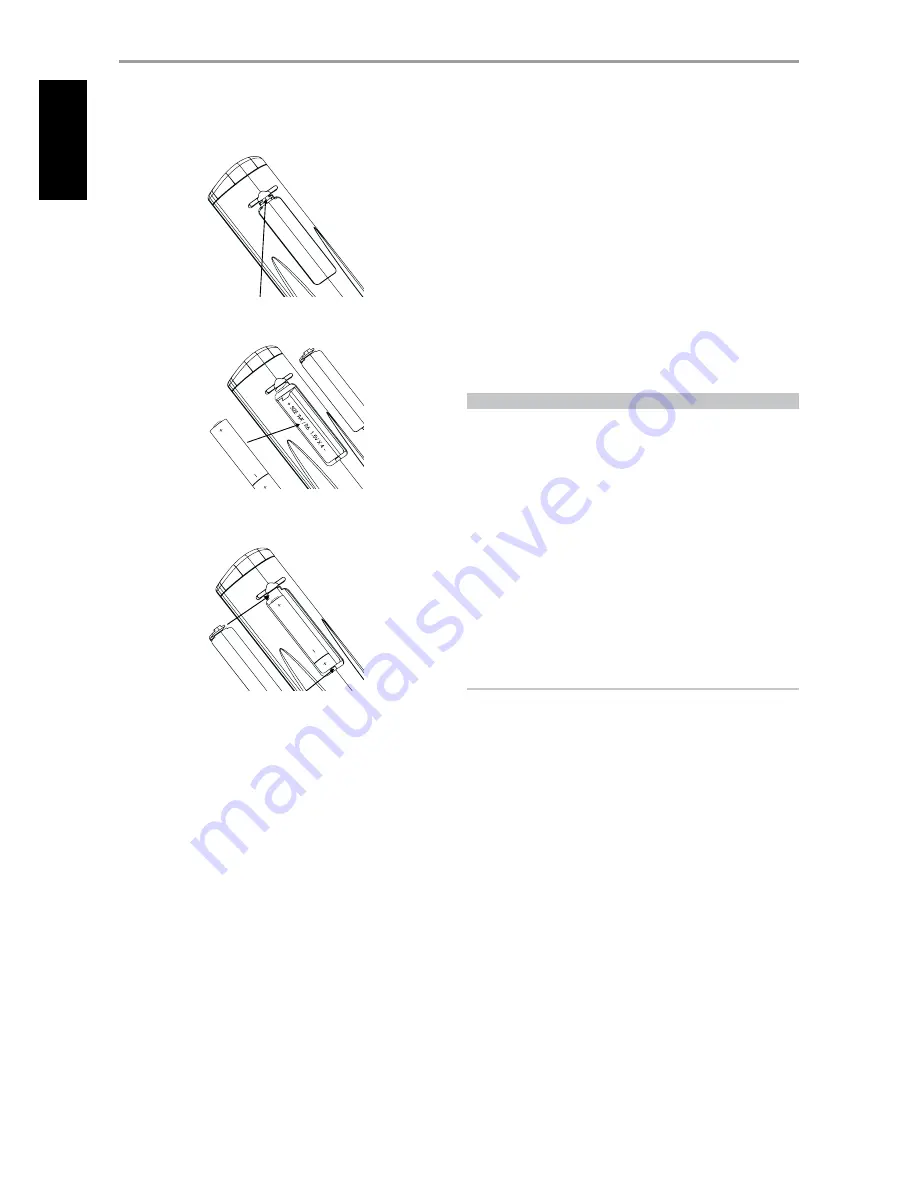
BATTERY INSTALLATION

Press in and lift tab to remove battery cover out from recess

Place batteries into opening. Ensure the correct polarity is observed

Press battery cover into place until it ‘clicks’ closed

SLEEP MODE

The Sleep Mode timer will switch the T 175 to Standby mode automatically 
after a preset number of minutes. Pressing the HTRC 1’s SLEEP button once 
will display the setting of the sleep time increment.  Pressing the HTRC 1’s 
SLEEP button a second time within a 3-second period will change the 
sleep time increment in 15-minute intervals, after which time the T 175 will 
automatically switch into Standby mode.  

To adjust the sleep delay, press the HTRC 1’s SLEEP button twice; first 
to display the sleep time increment, and a second time to change the 
sleep time increment.  The sleep time increment and a “SLEEP” icon will 
continuously display on the T 175’s front panel Vacuum Fluorescent Display 
(VFD). Each consecutive press increases the sleep time in 15-minute 
increments from 15 to 90 minutes. To cancel the sleep mode, continue 
pressing the HTRC 1’s SLEEP button until “SLEEP OFF” displays on the VFD.  
Switching the T 175 to standby from either the HTRC 1’s OFF or the T 175’s 
STANDBY button will also cancel the sleep mode

USING THE ZR 4 REMOTE CONTROL

The ZR 4 remote control is a discrete compact remote for controlling the 
T 175 from various rooms other than the main room. The ZR 4 remote 
allows full separate control of the source selection irrespective to the main 
room. This means the zone input may be completely different, audio and 
video, from the main input and thus corresponding volume levels as well.
If one wishes to enjoy the same source, as the main room the ZR 4 remote 
has a [LOCAL] button to allow simultaneous listening, but with full separate 
volume levels.

To mute the Zone Volume level, press [MUTE] on the ZR 4. If the “Zone 
Controls” OSD menu is ON, the Zone “Volume” level section will display “Mute”.

The T 175’s front florescent display will show activity of the zone control 
so that main room occupants are aware of the zone remote activity. 
Furthermore if there is no main room activity, only the zone indicator will 
be active in the T 175’s fluorescent display.

NOTE


The ZR 4 remote control will only control Zone 2 applications. Zone 
3 and Zone 4 could be configured and managed at the appropriate 
Zone OSD menu using the front panel navigations keys as well as 
the corresponding keys on the HTRC 1 remote control. The HTRC 1’s 
“CUSTOM” device is also defaulted to Zone 2 remote control codes.

48

EN

G

LIS

H

FR

A

N

Ç

A

IS

ES

PA

Ñ

O

L

IT

A

LIA

N

O

D

EU

TS

CH

N

ED

ER

LA

N

D

S

SV

EN

SK

A

РУ

СС

К

И

Й

Содержание T175 HD

Страница 1: ...ENGLISH FRAN AIS ESPA OL ITALIANO DEUTSCH NEDERLANDS SVENSKA Owner s Manual T175 AV Tuner Preamplifier...

Страница 2: ...rticle 810 of the National Electrical Code ANSI NFPA 70 provides information with regard to proper grounding of the mast and supporting structure grounding of the lead in wire to an antenna discharge...

Страница 3: ...nection to the mains supply If this product is not provided with a mains plug or one has to be fitted then follow the instructions given below IMPORTANT DO NOT make any connection to the larger termin...

Страница 4: ...EASE OF USE 5 INTEGRATION 5 ZONE 5 RS 232 5 UPGRADABILITY 5 ABOUT THE HTRC 1 SYSTEM REMOTE CONTROL 5 GETTING STARTED 6 WHAT S IN THE BOX 6 CHOOSING A LOCATION 6 QUICK START 7 identification of control...

Страница 5: ...fine tune your listening setup for different conditions sources or listeners and to recall these multiple parameters with a single key press INTEGRATION The T 175 offers extensive flexible system int...

Страница 6: ...r in which to do so We ve seen too many otherwise perfect components damaged in transit for lack of a proper shipping carton so please Save that box CHOOSING A LOCATION Choose a location that is well...

Страница 7: ...Front Input Audio Front Input S Video Front IN Media Player Audio MP input Tuner For Video output select the highest video quality format available on your TV Monitor and utilize this for your Monitor...

Страница 8: ...this button to cycle through Preset Name RDS name and RDS text 4 AM FM DB Toggle this button to select either AM FM DAB 230V version only or XM 120V version only tuner functions 5 TUNER MODE In FM mo...

Страница 9: ...abled again See also section about Tone Controls under Setup Menu discussions 15 FRONT INPUT MP Use this button to directly select Front Input and Media Player Toggle button to switch between Front In...

Страница 10: ...T 175 for a subwoofer Connect the SUBW 1 or SUBW 2 output or both to powered active subwoofers or to power amplifier channels driving a passive system 3 MP DOCK The T 175 is equipped with a data port...

Страница 11: ...Menu literature for guidelines on how to configure TRIGGER IN OUT 8 IR IN OUT These mini jacks accept and output remote controlled codes in electrical format using industry standard protocols for use...

Страница 12: ...ipment connected via HDMI sockets 14 DIGITAL AUDIO IN OPTICAL 1 3 COAXIAL 1 3 Connect to the optical or coaxial S PDIF format digital output of sources such as CD or DVD BD players HDTV or satellite t...

Страница 13: ...are enabled during A V Preset setting Please see the section AV Presets for reference Listening Mode The T 175 offers distinct listening modes tailored for different types of recording or program mat...

Страница 14: ...al jazz and folk genres as well as numerous examples from others Its virtues include realistic stable front stage sonic imaging and spacious but unexaggerated ambient virtual acoustics that remain fai...

Страница 15: ...the correct frequency response and surround volume levels moment by moment The resulting bass response octave to octave balance and surround impression remained the same despite changes in volume Aud...

Страница 16: ...of preference ASPECT MODE The Aspect Mode allows one the choice of adjusting the video output configuration of the T 175 Letterbox Original aspect ratio is maintained preserving the original image s...

Страница 17: ...refers to the adjustable secondary Zone 2 Volume level that can be increased or decreased using the buttons of the HTRC 1 or front panel s corresponding navigation buttons When a Zone is activated a...

Страница 18: ...n settings 576i and 576p 50Hz is the only available option 60Hz Setting normally for North America For resolution settings 480i and 480p 60Hz is the only available option 24Hz Select to deliver film l...

Страница 19: ...your DVD player is attached to Source 1 it is possible to rename Source 1 to DVD Player In order to rename the Source label scroll to Name and press to go the character Then press to pick through the...

Страница 20: ...s A fifth option is Off wherein the particular Source is prompted not to select any Video input Navigate through theVideo input selections by pressing and then to step through the selections The follo...

Страница 21: ...etup Normal View menu All the Source settings are summarized and displayed in tabulated form in the Source Setup Table View Navigating through the Source Setup Table View via a combination of and then...

Страница 22: ...rocessing this information using very sophisticated digital signal processing is able to precondition the signal to effectively make the walls disappear This creates a family size sweet spot where the...

Страница 23: ...on Filter calculated by NAD T 175 Corrected Room Response Flat EQ is a third option but not one that we recommend for listening it is useful for verifying system performance when using external instru...

Страница 24: ...connected to the T 175 s SUBW1 or SUBW2 output jack Enhanced Bass When the subwoofer is set to ON and Front is set to Large Enhanced Bass is also available Normally with speakers set to Large the subw...

Страница 25: ...r level adjustment by ear using music and film sound material is frequently useful Due to the effects of room acoustics matched pair speakers front surround back will not always calibrate to exactly t...

Страница 26: ...volume control When set to Variable and while at the Zone Controls menu OSD the Zone 2 Volume level can be adjusted using the HTRC 1 s or the corresponding front panel navigation buttons or directly v...

Страница 27: ...Zone 4 as described above will all be activated given a 12V DC input at Trigger IN Warning If Auto Trigger IN at Trigger Setup menu is assigned to Main or All and the TRIGGER switch is set to AUTO mo...

Страница 28: ...field If media sources recorded in Dolby Digital EX are decoded with a Digital EX decoder the format is detected automatically and the Dolby Digital EX mode is selected However some media sources rec...

Страница 29: ...r Audio adopts variable data transfer rates facilitating data transfer to the maximum rate of 24 5 Mbps in the Blu ray disc format 18 0 Mbps in the HD DVD format which by far exceeds that of a standar...

Страница 30: ...rations set forth at Display Setup are carried over whenever it is enabled during A V Preset setting Please see also the section below about AV Presets Vacuum Fluorescent Display VFD Display Select On...

Страница 31: ...the keys you can selectively include in the particular Preset any of the above mentioned parameter settings by choosing Yes If you decide not to include in the particular Preset a certain parameter se...

Страница 32: ...setting While at Save Current Setup to Preset menu line use to save the above settings to Preset 1 Below OSD will be shown affirming that the above settings are now saved to Preset 1 When you recall P...

Страница 33: ...p settings that will be applied at Preset 2 will be the last or current Speaker Setup settings which in this sample are the same Speaker Setup settings shown above in Step 1 7 You can setup up to 5 Pr...

Страница 34: ...TUNE for more than 2 seconds to search up or down the T 175 s tuner will stop at the next sufficiently strong signal it encounters Pressing the TUNE during the search process will stop the search 3 Af...

Страница 35: ...Radio TheT 175 is XM Ready which means that with the addition of separately sold XM Mini Tuner CPC 9000 and XM Mini Tuner Home Dock it has everything you need to listen to live XM Everything else is b...

Страница 36: ...to is available on the HTRC 1 remote control and front panel then the reference to said button is applicable to both the HTRC 1 remote control and front panel The same condition applies to their equi...

Страница 37: ...channel list DRC The level of compression of stations can be set to eliminate the differences in dynamic range or sound level between radio stations Popular music would normally be more compressed th...

Страница 38: ...n is shown This is the default display DLS Dynamic Label Segment DLS is the scrolling text supplied by the broadcasting station It may contain information on music titles or details regarding the prog...

Страница 39: ...of the buttons NOTES The iPod player s click wheel and controls will not operate when it is properly connected to the T 175 via the NAD docking station To exit from the iPod Menu at Source 5 press br...

Страница 40: ...on ENTER Press ENTER to select an option or start playback REPEAT Toggle to initiate repeat mode as follows repeat one song repeat all songs or cancel repeat mode RANDOM Toggle to initiate playback in...

Страница 41: ...ce allows programming from a Personal Computer The HTRC 1 is already preprogrammed with a full complement of NAD commands on its AMP DEVICE SELECTOR page and with library commands to operate most NAD...

Страница 42: ...onds to display version numbers SETUP MENU Press and hold the SETUP and ENTER keys for five seconds to enter the Setup Menu You cannot enter the setup menu if the remote is currently displaying Low Ba...

Страница 43: ...select between No desired library code is not uploaded and Yes desired library code is uploaded and saved to the applicable device page NOTE Instead of scrolling through the library list you can also...

Страница 44: ...e key twice in a row the IR signal toggles between two different variations of the same command At 2 Pass mode step 5 and onwards of the above example would be as follows the same Steps 1 4 of the abo...

Страница 45: ...ll be saved and process is completed EXECUTE PUNCHED THROUGH MACRO To recall the punched through macro command as above example press BD in the DEVICE SELECTOR page and then press RTN the macro comman...

Страница 46: ...s with a space Space or blank can also be selected using buttons scroll up to the blank character 8 Press ENTER when you have finished the renaming sequence 9 Display shows Save and No use to select b...

Страница 47: ...s and hold TUNER 10 SETUP and ENTER buttons Use to scroll to Reset 3 Press ENTER 4 Use to select between No HTRC 1 will not be reset and Yes HTRC 1 will be reset to its factory defaults When you selec...

Страница 48: ...OFF or the T 175 s STANDBY button will also cancel the sleep mode USING THE ZR 4 REMOTE CONTROL The ZR 4 remote control is a discrete compact remote for controlling the T 175 from various rooms other...

Страница 49: ...too low on Speaker Levels menu No Dolby Digital DTS Source s digital output is not connected to a T 175 digital input Check connections Source component not configured for multichannel digital output...

Страница 50: ...der U S Patent s 5 451 942 5 956 674 5 974 380 5 978 762 6 226 616 6 487 535 7 212 872 7 333 929 7 392 195 7 272 567 other U S and worldwide patents issued pending DTS is a registered trademark and th...

Страница 51: ...51 ENGLISH FRAN AIS ESPA OL ITALIANO DEUTSCH NEDERLANDS SVENSKA...

Страница 52: ...l rights reserved NAD and the NAD logo are trademarks of NAD Electronics International a division of Lenbrook Industries Limited No part of this publication may be reproduced stored or transmitted in...

Отзывы: