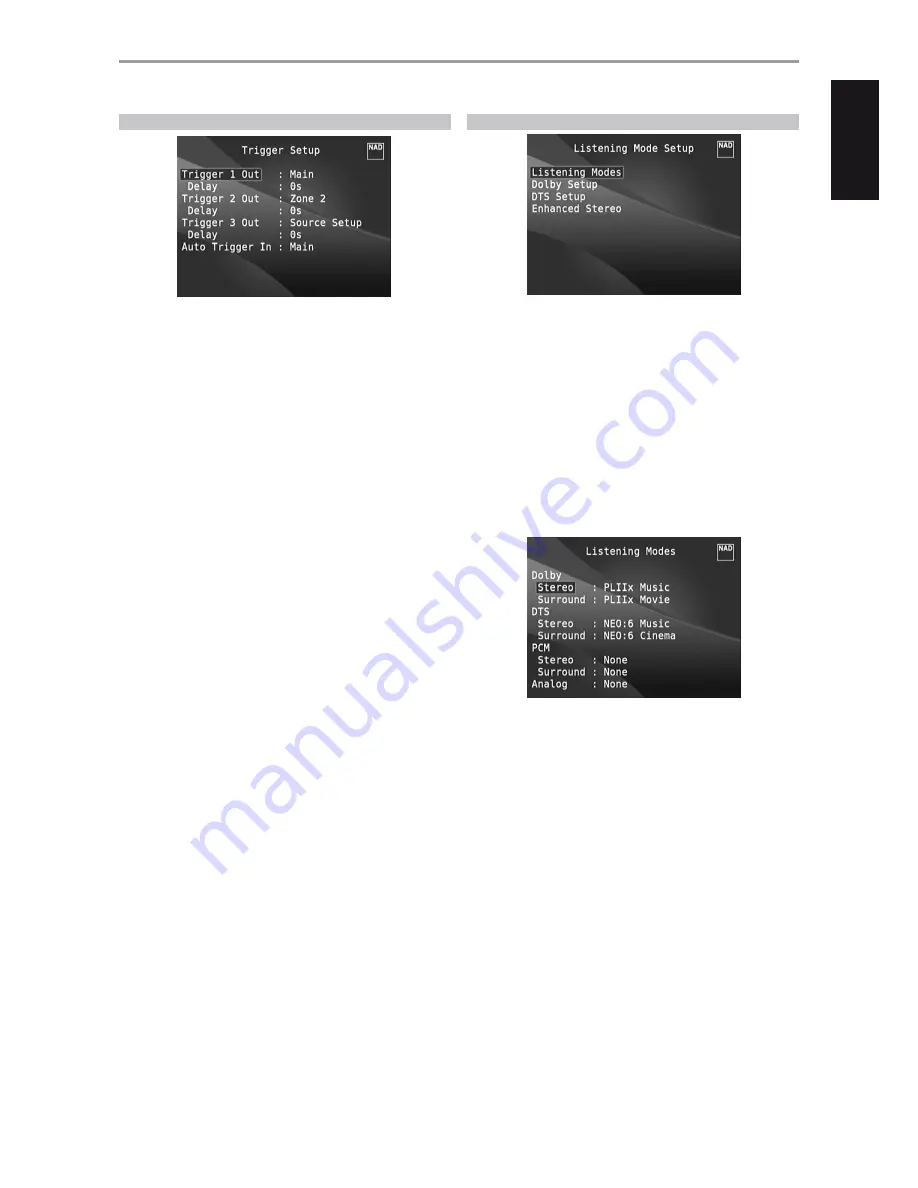
NAD T 787 Скачать руководство пользователя страница 25

TRIGGER SETUP

The T 787 features three config12V DC Trigger Output that can be 
used to activate a component or system it is fed into. A Trigger Input is also 
available to turn on the applicable link it is associated to. Use a combination 
of [

A/S/D/F

] and [ENTER] keys to navigate through the Trigger Setup 

menu parameters.

TRIGGER OUT

Triggers are low voltage signals used to turn on/off other compliant 
devices. The T 787’s three +12V DC Trigger Outputs (Trigger 1 Out, Trigger 2 
Out and Trigger 3 Out) are dependent upon the mode they are associated 
with. There are six choices where +12V DC output can be assigned and 
these are – Main, Zone 2, Zone 3, Zone 4, Zone 2+3+4 and Source Setup. 

Main :

 +12V DC is available at the assigned Trigger Out when the T 787 

is at powered state.

Zone 2, Zone 3, Zone 4, Zone 2+3+4 :

 When the applicable Zone is 

at powered state, +12V DC is available at the assigned Trigger Out.

Source Setup :

 If Trigger Output is linked to ‘Source Setup,’ +12V DC 

is available at Trigger Out whenever the particularly assigned Source is 
selected. Please see also separate discussion about ‘Trigger Out’ under 
the Source Setup (Normal View) section.

DELAY

The availability of +12V DC at Trigger Out can be regulated. If it is desired 
that +12V DC is available without delay the moment Trigger Out is linked 
to its assigned setting, set Delay to 0s. Otherwise, one can select through a 
delay time of 1s to 15s.

AUTO TRIGGER IN

Auto Trigger IN allows external system controllers to toggle the associated 
section of the T 787 from ‘Standby’ to ‘On’ and vice versa. 

Main :

 From standby mode, the T 787 is powered ON when +12V DC is 

applied at Trigger IN.

Zone 2, Zone 3, Zone 4 :

 Applicable Zone is turned ON wh12V 

DC is present at Trigger IN.

All :

 Main, Zone 2, Zone 3 and Zone 4 as described above will all be 

activated given a +12V DC input at Trigger IN.

See also ‘Item 8.  +12V TRIGGER OUT, +12V TRIGGER IN of REAR PANEL 
discussion as well as the ‘Trigger Out’ discussion under ‘Source Setup 
(Normal View).’ 

LISTENING MODE SETUP

The T 787 has various listening mode options and is mostly configurable. 
These are provided to reproduce a variety of sound effects depending upon 
the content of the source to be played. Use a combination of [

A/S/D/F

and [ENTER] keys to configure the following settings.

LISTENING MODES

The audio format as detected by the selected Source can be automatically 
configured and processed through the following options:

DOLBY

Dolby Digital is the multi-channel digital signal format developed in the 
Dolby laboratories. Discs bearing the Dolby Digital (double-D symbol) logo 
were recorded with up to 5.1 channels of digital signals, reproducing a 
much better sound quality, with dynamic and spatial sound sensations that 
are much better than in the previous Dolby Surround.

A Dolby Digital audio input can be configured relative to its format as 
follows

Stereo:

 If the detected audio is of Dolby stereo format, you can default 

it to one of the following settings – Pro Logic, PLIIx Movie, PLIIx Music or 
None. 

Surround:

 If the detected audio is of Dolby Surround format, you can 

default it to one of the following settings –Surround EX, PLIIx Movie, 
and PLIIx Music, Stereo Downmix or None. 

None:

 If ‘None’ is selected, the Dolby Digital signal will be defaulted 

to the ‘Stereo’ or ‘Surround’ settings set forth at the ‘PCM’ option. See 
discussion below about ‘PCM’.

OPERATION

USING THE T 787 – SETUP MENU

25

ENGLISH

FR

ANÇ

AIS

ESP

AÑOL

IT

ALIANO

DEUT

SCH

NEDERL

ANDS

SVENSK

A

РУ

ССКИЙ

Содержание T 787

Страница 1: ...ENGLISH FRAN AIS ESPA OL ITALIANO DEUTSCH NEDERLANDS SVENSKA Owner s Manual T787 AV Surround Sound Receiver...

Страница 2: ...ticle 810 of the National Electrical Code ANSI NFPA 70 provides information with regard to proper grounding of the mast and supporting structure grounding of the lead in wire to an antenna discharge u...

Страница 3: ...hnician for help CAUTION Changes or modifications to this equipment not expressly approved by NAD Electronics for compliance could void the user s authority to operate this equipment CAUTION To preven...

Страница 4: ...3 DSP OPTIONS 14 TONE CONTROLS 15 ZONE CONTROLS 15 USING THE T 787 SETUP MENU 16 SETUP MENU 16 CONTROL HDMI SETUP 16 SOURCE SETUP 17 SOURCE SETUP NORMAL VIEW 17 SOURCE SETUP TABLE VIEW 18 iPod SETUP 1...

Страница 5: ...liable infrared remote control communications The T 787 generates a modest amount of heat but nothing that should trouble adjacent components It is perfectly possible to stack the T 787 on top of othe...

Страница 6: ...manually scan the AM or FM band Press and hold a s for more than 2 seconds to search up or down the T 787 s tuner will stop at the next sufficiently strong signal it encounters Note that this function...

Страница 7: ...l toggle between FM STEREO and FM MONO Select FM MONO FM STEREO and FM MUTE icons at VFD are extinguished for stations that have too much interference or are too weak In DAB 230V version only or XM 12...

Страница 8: ...he LISTENING TO AM FM RADIO section of the OPERATION page 3 AUDIO 1 6 VIDEO 1 3 S VIDEO 1 3 These comprise the T 787 s other sets of principal input Connect these audio and video input ports to corres...

Страница 9: ...preserve optimum dynamics you may wish to defeat it by setting this switch to OFF 7 RS 232 NAD is a certified partner of AMX and Crestron and fully supports these external devices Check out the NAD w...

Страница 10: ...e Component Video input of a compatible video monitor TV Be sure to observe consistency in connecting the Y Pb Pr jacks to the corresponding sources inputs The routing of the three component video inp...

Страница 11: ...draw of all devices connected to this outlet must not exceed 120 watts It is powered ON and OFF by the front panel STANDBY button or by the HTR 8 s ON and OFF keys 19 POWER Supply the AC mains power t...

Страница 12: ...are directed to the subwoofer if one is present in the Speaker settings Select Stereo when you wish to listen to a stereo or monaural production such as music CD or FM broadcast without surround enha...

Страница 13: ...stereo recordings Typically these include classical jazz and folk genres as well as numerous examples from others Its virtues include realistic stable front stage sonic imaging and spacious but unexa...

Страница 14: ...ynamic EQ determines the proper loudness compensation based on the sound pressure level measurements MultEQ provides Audyssey Dynamic EQ working in tandem with Audyssey MultEQ provides the right liste...

Страница 15: ...n the applicable Zone can be configured and managed via this Zone Controls window Select On to activate the applicable Zone When activated the Source input for the particular Zone can be allocated by...

Страница 16: ...CEC device requests a Source change For example if PLAY is pressed on a BD Player with CEC the T 787 and TV with CEC will automatically switch to their respective input connections the T 787 switchin...

Страница 17: ...ions Press S to move to the next character and at the same time save the changes done on the current character The name can be as long as twelve characters The new Name will be shown in the VFD as wel...

Страница 18: ...nd HD digital video sources and displays A V PRESET A particular Source can be assigned a stored Preset The parameters set up in the selected Preset number will be adopted into the particular Source i...

Страница 19: ...It has been shown that many if not most surround sound systems are not accurately setup and calibrated To be done properly calibration requires special knowledge and instrumentation that the average...

Страница 20: ...sponse for your particular room and speaker setup If some inconsistencies or discrepancies are detected during the Audyssey calibration the process maybe interrupted or the problem is shown in the par...

Страница 21: ...p your speakers manually or if you already had run Audyssey Auto Calibration but would like to make adjustments the following sections on Speaker Configuration Speaker Levels and Speaker Distance can...

Страница 22: ...le Normally with speakers set to Large the subwoofer is not active The Enhanced Bass option allows full range operation of the speakers with the additional bass contribution of the subwoofer This feat...

Страница 23: ...evel adjustment by ear using music and film sound material is frequently useful Due to the effects of room acoustics matched pair speakers front surround back will not always calibrate to exactly the...

Страница 24: ...d if Volume is set to Fixed the Zone 2 Volume is set to a preset dB level and thereafter the Zone s volume can be varied via the volume control of the separate amplifier it is fed into MODE Zone 3 and...

Страница 25: ...ed at Trigger IN Zone 2 Zone 3 Zone 4 Applicable Zone is turned ON whenever 12V DC is present atTrigger IN All Main Zone 2 Zone 3 and Zone 4 as described above will all be activated given a 12V DC inp...

Страница 26: ...field If media sources recorded in Dolby Digital EX are decoded with a Digital EX decoder the format is detected automatically and the Dolby Digital EX mode is selected However some media sources rec...

Страница 27: ...ving audio quality DTS HD Master Audio adopts variable data transfer rates facilitating data transfer to the maximum rate of 24 5 Mbps in the Blu ray disc format 18 0 Mbps in the HD DVD format which b...

Страница 28: ...igurations set forth at Display Setup are carried over whenever it is enabled during A V Preset setting Please see also the section below about AV Presets VACUUM FLUORESCENT DISPLAY VFD Display Select...

Страница 29: ...e in the particular A V Preset any of the above mentioned parameter settings by choosing Yes If you decide not to include in the particular A V Preset a certain parameter setting select No Now in orde...

Страница 30: ...Save Current Setup to Preset menu line use S to save the above settings to Preset 1 Below OSD will be shown affirming that the above settings are now saved to Preset 1 When you recall Preset 1 using t...

Страница 31: ...at Preset 2 will be the last or current Speaker Setup settings which in this sample are the same Speaker Setup settings shown above in Step 1 7 You can setup up to 5 A V Presets These same A V Presets...

Страница 32: ...ncy allocation you can tune directly to the station 1 Toggle ENTER button to switch between Preset and Tune mode see the lower line of the VFD Select Tune mode 2 Using the numeric keys of the remote c...

Страница 33: ...epeat this process for each character in sequence 5 Press the MEMORY key again to store the User Name and exit the text entry mode ABOUT RDS The Radio Data System RDS permits sending small amounts of...

Страница 34: ...nnel Press and hold A S for faster scanning of XM channels 2 Direct Channel Call Toggle ENTER button to switch between Preset and Tune mode see the lower line of the VFD Select Tune mode Using the num...

Страница 35: ...DIN connector supplied with your NAD DAB Adaptor DB from the DAB module s output port into the corresponding DAB module input socket on the rear panel of the T 787 Select DAB mode on the T 787 by togg...

Страница 36: ...yed last in the channel list DRC The level of compression of stations can be set to eliminate the differences in dynamic range or sound level between radio stations Popular music would normally be mor...

Страница 37: ...adcast station is shown This is the default display DLS Dynamic Label Segment DLS is the scrolling text supplied by the broadcasting station It may contain information on music titles or details regar...

Страница 38: ...ce 5 iPod press A bringing you to Menu Select OSD Follow the instructions as shown Source 5 is defaulted to iPod For Source 5 iPod to be changed and allocated for other inputs go to iPod Setup menu un...

Страница 39: ...option or menu selection ENTER Press ENTER to select an option or start playback m REPEAT Toggle to initiate repeat mode as follows repeat one song repeat all songs or cancel repeat mode RANDOM Toggl...

Страница 40: ...you may need to load one or more different code libraries see Loading Code Libraries below CONTROLLING THE T 787 The HTR 8 is divided into two main sections Eight Device Selector keys at the top AMP D...

Страница 41: ...Device Selector key again to exit Learning Mode Example Punch through AMP SURR MODE key to the DVD page On the HTR 8 simultaneously press and hold DVD and RES the Learn LED turns steady green Press SU...

Страница 42: ...gthen it still further CONFIGURING KEY ILLUMINATION Keys to Press for 3 seconds Mode DISP Digit Key 0 9 Set key illumination timeout to number of seconds corresponding to digit key Zero turns off the...

Страница 43: ...5325 604 L56 204 5060 605 T513 T514 T515 T517 T524 T533 T534 205 M5 606 L53 DVD SEARCH MODE If none of the codes from the table when entered turns on the component and if you are quite sure you have...

Страница 44: ...E CONTROL The ZR 7 is a discrete compact remote for controlling the Zone 2 feature of the T 787 Irrespective of the main room zone settings the ZR 7 allows full separate control of the Zone 2 source s...

Страница 45: ...to IR Channel 0 If OFF button is pressed on the HTR 8 remote control or SR 8 remote control for the C 326BEE both products will go to standby mode Press ON and both products will power up from standby...

Страница 46: ...OFF on Speaker Configuration menu Correct Speaker Configuration or Speaker Levels settings Center level set too low on Speaker Levels menu No Dolby Digital DTS Source s digital output is not connected...

Страница 47: ...nded rear panel terminals Specifications are subject to change without notice For updated documentation and features please log onto www NADelectronics com for the latest information about T 787 Manuf...

Страница 48: ...D All rights reserved NAD and the NAD logo are trademarks of NAD Electronics International a division of Lenbrook Industries Limited No part of this publication may be reproduced stored or transmitted...

Отзывы: