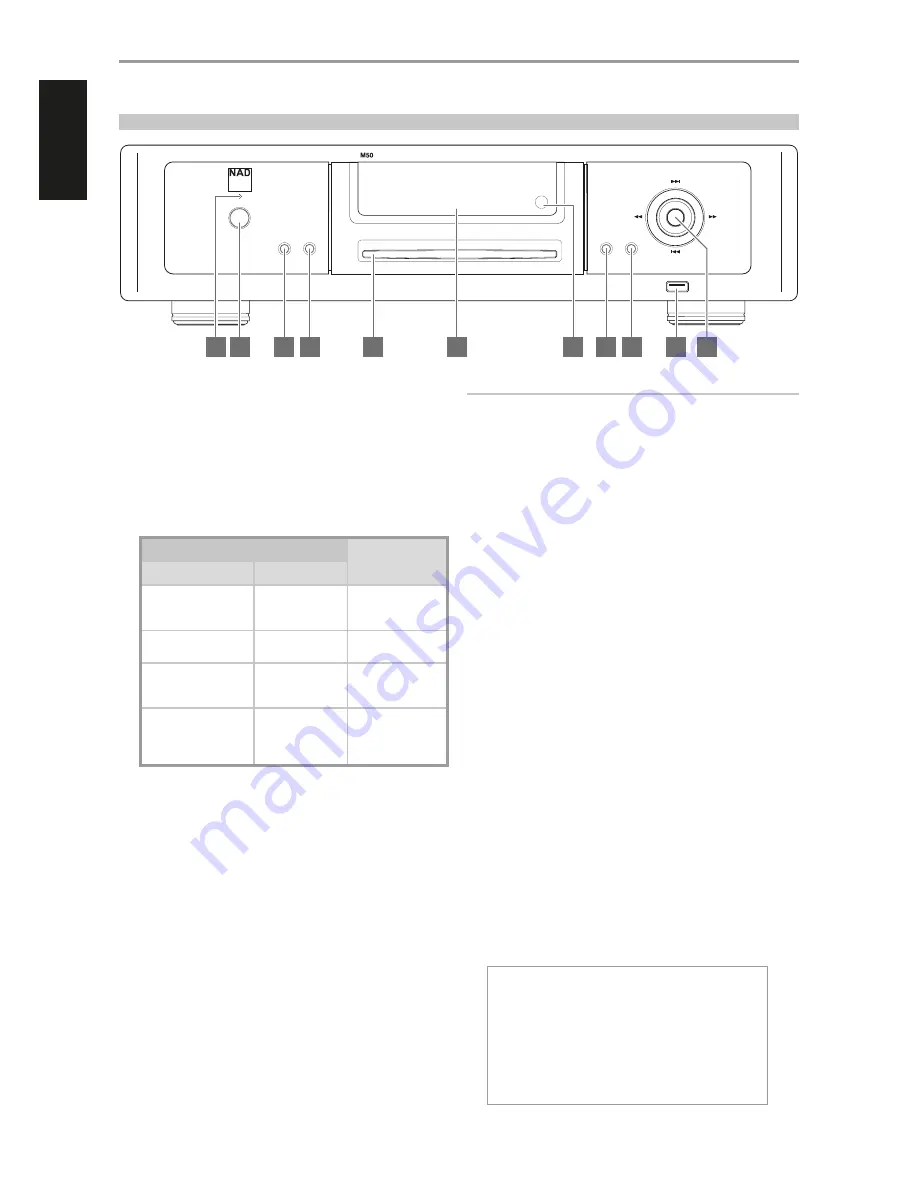
1 STANDBY LED
•
This indicator will light up amber upon switching ON the rear panel
POWER switch.
•
When the front panel Standby button is pressed to power up the
M50 from standby mode, this indicator will illuminate blue.
2 STANDBY BUTTON
The rear panel POWER switch must be at ON position for the Standby
button to activate. Pressing the Standby button will result to varying
actions or responses and is best illustrated by the table below.
ACTION/RESPONSE
RESULT
STANDBY BUTTON
STANDBY LED
After switching ON the rear
panel POWER button, press
from standby mode.
Turns from amber
to blue.
M50 is powered up.
VFD is illuminated.
With M50 already powered
ON, toggle button.
Remains illuminated
in blue.
M50 remains ON.
VFD is turned on or off.
Press and hold...until
Standby LED turns to solid
amber.
Flashing amber and
then turns to solid
amber.
M50 switches to
standby mode.
VFD is turned off.
With the M50 at standby
mode, press Standby
button or any front panel
button.
Turns from amber
to blue.
M50 is powered up.
VFD is illuminated.
3 INPUT
Switch input Sources when available. Toggle INPUT button to select
through the following Sources
•
USB Front – Playback music files from a USB mass storage device
•
Library – Makes available songs from shared computer, NAS,
connected USB mass storage device or M52.
•
CD – Playback loaded CD.
4 STOP/OPEN
Pressing STOP/OPEN during disc playback will cause the M50 to stop
playback and then eject the loaded disc.
5 DISC SLOT
Insert CD or audio disc face down into this slot and playback will
automatically start provided the M50 is not connected to an active M52
(optional device).
IMPORTANT NOTES
•
The M50 must stand-alone, i.e. not connected to an active M52, for a loaded
CD to be automatically played back. A CD inserted into the disc slot will be
directly ripped to a connected M52 drive (This is the default setting).
•
Only Audio CD can be played back by a stand-alone M50. If a CD-R/RW
with data files is inserted into the disc slot, it will directly be indexed/
shared with the network the M50 is connected to.
6 VACUUM FLUORESCENT DISPLAY (VFD)
Display visual information about the current Source. Information
supplied is generated by the Source.
7 REMOTE SENSOR
•
Point the remote control at the remote sensor and press the
buttons.
•
Do not expose the remote sensor of the M50 to a strong light
source such as direct sunlight or illumination. If you do so, you may
not be able to operate the M50 with the remote control.
Distance:
About 23ft (7m) from the front of the remote sensor.
Angle:
About 30
o
in each direction of the front of the remote sensor.
8 PLAY/PAUSE
•
Toggle to start, pause or resume playback of current source.
9 MENU
•
Display main menu options. Use the remote control’s
D/F
buttons
to move up or down the menu selections. Press
S
to select a menu
item (use
A
to return to the main menu or previous display). Having
selected a menu item, use
D/F
buttons to select an option and
then press ENTER to confirm selection. Upon pressing ENTER, the
display will revert back to the main menu window.
•
The front panel
7
/
8
/
9
/
0
and ENTER buttons perform
respectively the same functions of the remote control
A
/
S
/
F
/
D
and ENTER buttons. Use these buttons to navigate through the
MENU options.
}WiFi Hotspot Mode
M52 Disk Usage
Info
IR Channel
Reboot
Factory Reset
IDENTIFICATION OF CONTROLS
© NAD M50
play/
pause
menu
skip
skip
scan
scan
input
stop/
open
digital music player
4
5
6
7
8
9
10
11
1
2
3
FRONT PANEL
8
ENGLISH
FR
ANÇ
AIS
ESP
AÑOL
IT
ALIANO
DEUT
SCH
NEDERL
ANDS
SVENSK
A
РУ
ССКИЙ


