background image

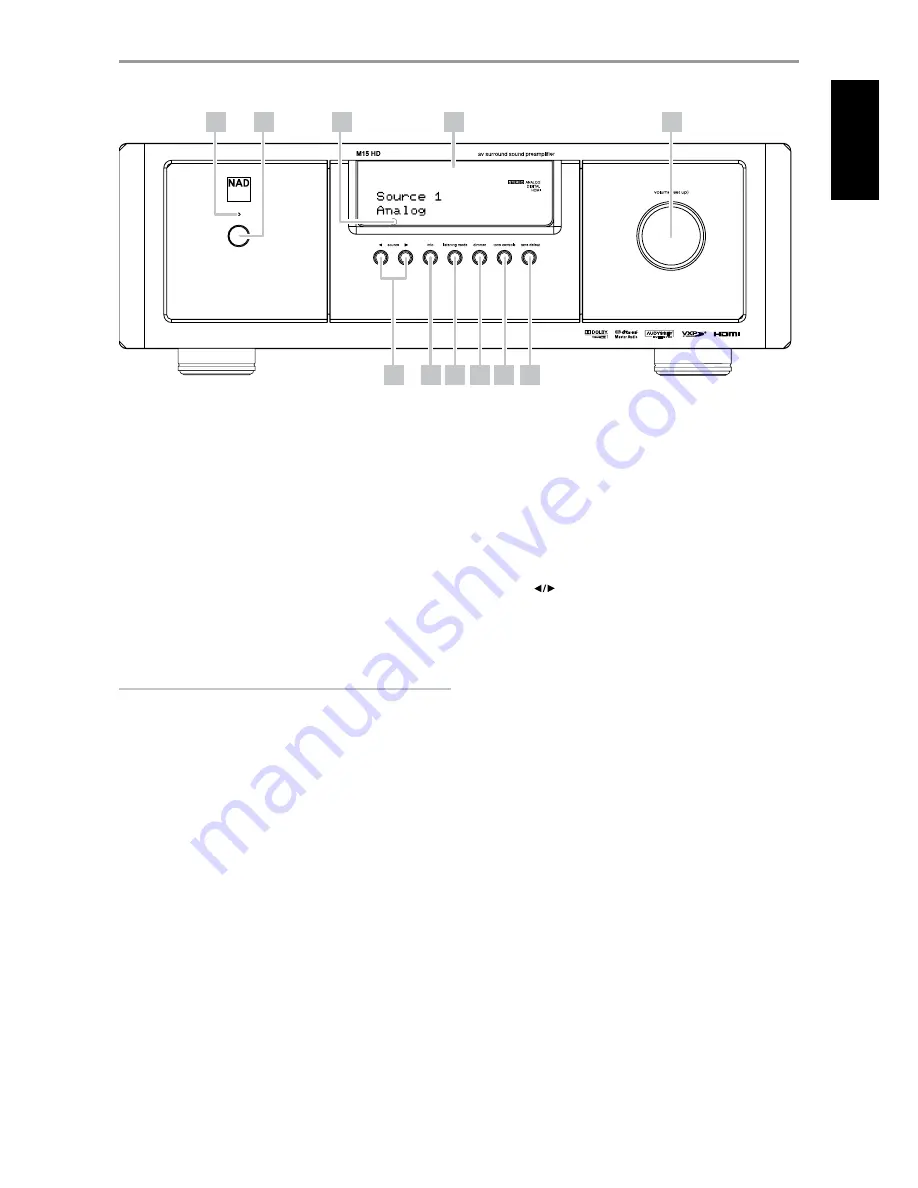
1  STANDBY LED:

 This indicator will light up amber when the M15 HD is 

in standby state. When the M15 HD main or zones are in the ON state, 
this indicator will illuminate blue. In the unlikely event that the M15 
HD switches to protection state, then this indicator will illuminate red. 
When infrared command from the HTRM is received, this indicator will 
also flash momentarily.

2  STANDBY BUTTON:

 Press this button or the HTRM remote’s [ON] 

button to switch ON the M15 HD. The Standby LED indicator will turn 
from amber to blue and illuminate the VFD. Pressing the standby button 
again turns the unit back to standby mode. 

The M15 HD can also be switched ON from standby mode by pressing 
any of the front panel buttons. When both Main and Zones are ON, 
press and hold this button for more than five seconds to place them at 
standby mode. 

NOTES

·  The rear panel POWER switch must be in the ON position for the Standby 

button to activate.

·  If Auto Trigger IN at Trigger Setup menu is assigned to “Main” or “All” 

and the TRIGGER switch is set to “AUTO” mode, the standby button in 
the front panel as well as the corresponding ON/OFF function keys in the 
HTRM remote control will be disabled effectively handing this function 
to an external controller. Switch TRIGGER to “OFF” to maintain normal 
power ON/OFF function procedures. See section also about “Trigger 
Setup” under the “Setup Menu” discussions.

3  REMOTE SENSOR:

 Point the HTRM remote control at the remote 

sensor and press the buttons. Do not expose the remote sensor of the 
M15 HD to a strong light source such as direct sunlight or illumination. 
If you do so, you may not be able to operate the M15 HD with the 
remote control.

Distance:

 About 23ft (7m) from the front of the remote sensor.

Angle:

 About 30° in each direction of the front of the remote sensor.

4  VACUUM FLUORESCENT DISPLAY (VFD):

 Displays visual information 

about the current settings like the active Source, volume level, listening 
mode, audio format, iPod-related display information and other related 
indicators. Refer also to the item about DISPLAY SETUP under the USING 
THE M15 HD – SETUP MENU segment of the OPERATION section.

5  VOLUME:

 Use this control to adjust the overall loudness of the signal 

output at AUDIO PRE-OUT. The default volume level is -20dB. The 
VOLUME knob is also used to increment/decrement other adjustable 
parameters like Tone Controls.

6  SOURCE [ 

 ] :

 Press these buttons to toggle through the input 

selections – Source 1 - 9.  Refer also to the item about SOURCE 
SETUP under the USING THE M15 HD – SETUP MENU segment of the 
OPERATION section.

7  INFO:

 Repeatedly toggle this button to display both at the Vacuum 

Fluorescent Display (VFD) and On-Screen Display (OSD) the following 
– Current Source, Volume level, Listening mode, Audio Source Format, 
Audio Codec, Video Mode and active Zones with their corresponding 
Source Inputs.  

8  LISTENING MODE:

 Toggle to select through the various Listening 

mode options. Depending on the format of the currently selected input 
(digital or analog, stereo or multichannel), various listening modes are 
available. Refer also to the item about LISTENING MODE under the 
USING THE M15 HD – MAIN MENU segment of the OPERATION section.

9  DIMMER:

 Toggle to either reduce or restore normal VFD brightness.

10  TONE CONTROLS:

 Press to adjust TREBLE control using the VOLUME 

knob over a ± 10dB range. Press again to adjust BASS control and a third 
time for DIALOG control. See also section about “Tone Controls” under 
“Main Menu” discussions.

11  TONE DEFEAT:

 Tone Controls are enabled or disabled by pressing 

this button. Tone controls are bypassed at “Tone Defeat” while at “Tone 
Active,” the tone controls are enabled again. See also section about 
“Tone Controls” under “Main Menu” discussions.

IDENTIFICATION OF CONTROLS

FRONT PANEL

3

4

5

6

11

10

1

2

9

8

7

7

EN

G

LI

SH

FR

ANÇ

AIS

ESP

AÑOL

IT

ALIANO

DEUT

SCH

NEDERL

ANDS

SVENSK

A

РУ

ССКИЙ

Содержание M15 HD

Страница 1: ...ENGLISH FRANÇAIS ESPAÑOL ITALIANO DEUTSCH NEDERLANDS SVENSKA РУССКИЙ Owner s Manual M15HD AV Surround Sound Preamplifier ...

Страница 2: ...cle 810 of the National Electrical Code ANSI NFPA 70 provides information with regard to proper grounding of the mast and supporting structure grounding of the lead in wire to an antenna discharge unit size of grounding conductors location of antenna discharge unit connection to grounding electrodes and requirements for the grounding electrode NOTE TO CATV SYSTEM INSTALLER Thisreminderisprovidedto...

Страница 3: ...tion to the mains supply If this product is not provided with a mains plug or one has to be fitted then follow the instructions given below IMPORTANT DO NOT make any connection to the larger terminal which is marked with the letter E or by the safety earth symbol or colored GREEN or GREEN AND YELLOW The wires in the mains lead on this product are colored in accordance with the following code BLUE ...

Страница 4: ... warranty information contact your local distributor introduction TABLE OF CONTENTS IMPORTANT SAFETY INSTRUCTIONS 2 introduction ABOUT THE M15 HD 5 E A R S AND DIGITAL SURROUND 5 EASE OF USE 5 INTEGRATION 5 ZONE 5 RS 232 5 UPGRADABILITY 5 ABOUT THE HTRM SYSTEM REMOTE CONTROL 5 GETTING STARTED 6 WHAT S IN THE BOX 6 CHOOSING A LOCATION 6 QUICK START 6 identification of controls FRONT PANEL 7 REAR PA...

Страница 5: ... you to fine tune your listening setup for different conditions sources or listeners and to recall these multiple parameters with a single key press INTEGRATION The M15 HD offers extensive flexible system integration options through its configurable DC trigger outputs and input and its standard protocol IR communications links The DC trigger outputs can be assigned to either Local and or Zone loca...

Страница 6: ...TART Packed with your M15 HD is a Quick Start Guide that will guide you through typical setup configurations in combination with your ancillary devices The Quick Start Guide also features the contents of your M15 HD package as well as start up procedures The M15 HD is defaulted to the following settings Source Audio Input Video Input Source 1 HDMI 1 Audio 1 IN HDMI 1 Source 2 Optical 2 IN Audio 2 ...

Страница 7: ... DISPLAY VFD Displays visual information about the current settings like the active Source volume level listening mode audio format iPod related display information and other related indicators Refer also to the item about DISPLAY SETUP under the USING THE M15 HD SETUP MENU segment of the OPERATION section 5 VOLUME Use this control to adjust the overall loudness of the signal output at AUDIO PRE O...

Страница 8: ...ource keys or the HTRM s input select keys with the exception of Source 3 or Source 4 There will be no output at AUDIO 3 OUT VIDEO 3 OUT S VIDEO 3 OUT when Source 3 AUDIO 3 IN VIDEO 3 IN S VIDEO 3 IN is selected Likewise there will be no output at AUDIO 4 OUT when Source 4 AUDIO 4 IN VIDEO 4 IN S VIDEO 4 IN is the active source input This prevents feedback through the recording component thereby p...

Страница 9: ...re fully compatible with the M15 HD For non NAD models please check with your other product s service specialists as to their compatibility to the M15 HD s IR features 8 12V TRIGGER IN OFF AUTO When at AUTO position the M15 HD selects the 12V Trigger Input to turn ON if so assigned at the Trigger Setup menu and at the same time disables the HTRM and front panel s ON OFF function When at OFF positi...

Страница 10: ...all devices connected to this outlet must not exceed 120 watts Mains power at this outlet can be shut down by switching OFF the M15 HD via the rear panel POWER switch 16 AC MAINS INPUT The M15 HD comes supplied with a separate AC Mains cable Before connecting the cable to a live wall socket ensure that it is firmly connected to the M15 HD s AC Mains input socket first Connect only to the prescribe...

Страница 11: ...enabled during A V Preset setting Please see the section AV Presets for reference Listening Mode The M15 HD offers distinct listening modes tailored for different types of recording or program material With a two channel Stereo source the following listening modes can be selected IMPORTANT NOTICE The M15 HD is an AV Surround Sound Preamplifier and therefore has no speakers The mention of Speaker s...

Страница 12: ...jazz and folk genres as well as numerous examples from others Its virtues include realistic stable front stage sonic imaging and spacious but unexaggerated ambient virtual acoustics that remain faithful to the original recording Enhanced Stereo All recordings are reproduced in stereo via the maximum speaker complement configured in the current Speaker Configuration Enhanced stereo can be useful fo...

Страница 13: ...t box icon to the right of AUDYSSEY are illuminated at the VFD Audyssey MultEQ options can also be directly selected or changed using HTRM s AUDYSSEY button with DEVICE SELECTOR set to AMP mode Toggle AUDYSSEY button to select Audyssey MultEQ and then use the to select through the Audyssey MultEQ options Press AUDYSSEY again to save the selected option and at the same time move on to the next menu...

Страница 14: ...directly by pressing the front panel s TONE CONTROLS button and then rotating the Volume knob to select desired setting Maximum and minimum values for all threeTone Control levels are 10 dB Tone Defeat gives one the choice of varying or completely bypassing the tone control section of the M15 HD If Off Tone Active in the VFD is selected the Tone Control circuits are active Select On Tone Defeat in...

Страница 15: ...activity Select Local as your selected Zone s Source input if you wish to enjoy the same source as the main Zone and allow simultaneous listening but with full separate volume levels Zone 2 only If a Zone is set to Off it is deactivated or powered off Volume refers to the adjustable secondary Zone 2 Volume level that can be increased or decreased using the buttons of the HTRM When a Zone is activa...

Страница 16: ... settings 576i and 576p 50Hz is the only available option 60Hz Setting normally for North America For resolution settings 480i and 480p 60Hz is the only available option 24Hz Select to deliver film like motion characteristics 24Hz is selectable only at 1080p resolution setting Aspect Ratio Select a picture size matching the aspect ratio of your TV Monitor 4 3 Select 4 3 when a standard 4 3TV is co...

Страница 17: ...o a Source label For example if your DVD player is attached to Source 1 it is possible to rename Source 1 to DVD Player In order to rename the Source label scroll to Name and press to go the character Then press to pick through the alphanumeric selections Press to move to the next character and at the same time save the changes done on the current character The name can be as long as twelve charac...

Страница 18: ... Video and Video inputs A fifth option is Off wherein the particular Source is prompted not to select any Video input Navigate through theVideo input selections by pressing and then to step through the selections The following are the assignableVideo inputs HDMI HDMI 1 HDMI 2 HDMI 3 HDMI 4 Component Video Component 1 Component 2 Component 3 S Video S Video 1 S Video 2 S Video 3 S Video 4 Video Vid...

Страница 19: ...t are all assigned to Main Zone 2 Zone 3 Zone 4 Zone 2 3 4 Main Zone 2 Main Zone 3 Main Zone 4 or Main Zone 234 with not even one Trigger Out port allocated to Source Setup Source Setup Table View The Source Setup Table View reflects the settings made in the Source Setup Normal View menu All the Source settings are summarized and displayed in tabulated form in the Source Setup Table View Navigatin...

Страница 20: ...e terms Small and Large and Off but note that physical size may be irrelevant A Small speaker is any model regardless of physical size that lacks significant deep bass response that is below about 200 Hz A Large speaker is any full range model that is one with deep bass response An Off speaker is one that is not present in your system For example you might not have any surround back speakers insta...

Страница 21: ...eated listener s head A tripod is helpful but with a little duct tape almost anything a pole lamp music stand or ladder backed chair for example can do as well Just be sure that no large acoustically reflective surfaces obstruct or are near the microphone element Orient the meter with its microphone usually at one end pointing straight up toward the ceiling not toward the speakers and ensure that ...

Страница 22: ...er master volume setting was last used however if the prior setting was greater than 20 dB the M15 HD will power up at 20 dB This prevents inadvertently beginning a session at excessive volume MUTING THE SOUND Use the HTRM s Mute key to silence all channels completely Muting is always available regardless of the source or listening mode selections NoteS Changing input or listening mode selections ...

Страница 23: ...er Out Triggers are low voltage signals used to turn on off other compliant devices The M15 HD s three 12V DC Trigger Outputs Trigger 1 Out Trigger 2 Out and Trigger 3 Out are dependent on which mode they are associated with There are six choices where 12V DC output can be assigned and these are Main Zone 2 Zone 3 Zone 4 Zone 2 3 4 and Source Setup Main 12V DC is available at the assigned Trigger ...

Страница 24: ...output interactive mixing and streaming capability in advanced systems Supported by High Definition Media Interface HDMI a single cable digital connection is possible for high definition audio and video Dolby TrueHD Dolby TrueHD is a lossless encoding technology developed for high definition optical discs in the upcoming era Dolby TrueHD delivers tantalizing sound that is bit for bit identical to ...

Страница 25: ...gnal the following are the surround modes the input can be defaulted Pro Logic PLIIx Movie PLIIx Music NEO 6 Cinema NEO 6 Music EARS Enhanced Stereo Analog Bypass and None Note All these Listening Modes for Dolby Digital DTS PCM and Analog can be directly changed by pressing the Listening Mode button on the front panel or through the Listening Mode option at the Main Menu window The chosen audio f...

Страница 26: ...nd right and surround left channels of the surround system in such a way that none of the signal components are lost DTS ES MATRIX 6 1 In this format the additional signals of the back channel receive a matrix encoding and are inputted into the right and left surround channels During reproduction they are decoded to the right left and back surround channels Since this bit stream format is 100 comp...

Страница 27: ...deo out whenever any of the front panel controls or their corresponding keys in the remote control is activated Set to On if it is desired to show the applicable OSD at the monitor TV otherwise select Off A V Presets The M15 HD s simple but powerfully flexible system of Presets allows you to customize virtually every aspect of your audio video playback and recall them with a single key press The p...

Страница 28: ...play Setup Set Line 2 to Listening Mode Picture Controls Aspect Mode Letterbox Speaker Setup from the Speaker Setup menu go to Speaker Configuration sub menu and change Subwoofer from On to Off Front becomes Large 2 With the above settings scroll to A V Presets from the SETUP MENU page Use to access A V Presets menu operation USING THE M15 HD SETUP MENU 28 ENGLISH FRANÇAIS ESPAÑOL ITALIANO DEUTSCH...

Страница 29: ...V PSET 1 the above preset values allocated at Preset 1 preset settings as shown in the OSD captures at Step 1 will be recalled and effected at the current source 4 Now repeat again Step 1 above but this time with the following settings Listening Mode PLIIx Music DSP Options 0ms Tone Controls Tone Defeat Off Display Setup Set Line 2 to Volume Picture Controls Aspect Mode Stretch 5 With the above se...

Страница 30: ...his sample are the same Speaker Setup settings shown above in Step 1 7 You can setup up to 5 Presets These same Presets can also be associated defaulted to each Source in the Source Setup Normal View window as below In the above example Preset 1 settings are allocated for Source 1 Whenever Source 1 is accessed the Preset 1 settings will be applied to Source 1 You can still manually override the as...

Страница 31: ... using a combination of the buttons NOTES The iPod player s click wheel and controls will not operate when it is properly connected to the M15 HD via the NAD docking station To exit from the iPod Menu at Source 4 press bringing you to Menu Select OSD Follow the instructions as shown CONTROL FEATURES AND SETTINGS The following control functions and settings are selectable or enabled using the front...

Страница 32: ...ress ENTER to select an option or start playback REPEAT Toggle to initiate repeat mode as follows repeat one song repeat all songs or cancel repeat mode RANDOM Toggle to initiate playback in random order There are three random modes Shuffle Song Shuffle Album or Shuffle Off TO VIEW VIDEOS OR PHOTOS LOADED IN YOUR iPod Videos or photos uploaded in your iPod can be viewed directly via the M15 HD The...

Страница 33: ...erface allows programming from a Personal Computer The HTRM is already preprogrammed with a full complement of NAD commands on its AMP DEVICE SELECTOR page and with library commands to operate most NAD DVD CD and TUNER components on the corresponding DEVICE SELECTOR keys These default commands are permanent Even if you teach the HTRM new commands to take their place the underlying library commands...

Страница 34: ...to display version numbers SETUP MENU Press and hold the SETUP and ENTER keys for five seconds to enter the Setup Menu You cannot enter the setup menu if the remote is currently displaying Low Batt This feature prevents the setup from becoming corrupted under low battery conditions Please refer to HTRM SETUP MENU section below for the overall structure and basic operation of the Setup Menu HTRM SE...

Страница 35: ...elect between No desired library code is not uploaded and Yes desired library code is uploaded and saved to the applicable device page NOTE Instead of scrolling through the library list you can also key in directly the library code based on the list of Library Codes below LIBRARY CODE NAD PRODUCT DESCRIPTION LIBRARY CODE NAD PRODUCT DESCRIPTION 100 Receiver Processor Discrete ON OFF 300 Tuner 101 ...

Страница 36: ...ey twice in a row the IR signal toggles between two different variations of the same command At 2 Pass mode step 5 and onwards of the above example would be as follows the same Steps 1 4 of the above example applies 5 Press and hold the corresponding MENU button of the TV remote control 6 Release MENU button 7 Pass 2 means that you have to press MENU button again Press until Success is shown in th...

Страница 37: ...be saved and process is completed EXECUTE PUNCHED THROUGH MACRO To recall the punched through macro command as above example press BD in the DEVICE SELECTOR page and then press RTN the macro command will then be executed Refer also to the MACRO section below for information on how to setup macros COPY This function allows you to copy functions from one key to another Example Copy PAUSE command fro...

Страница 38: ...with a space Space or blank can also be selected using buttons scroll up to the blank character 8 Press ENTER when you have finished the renaming sequence 9 Display shows Save and No use to select between No new name will not saved and Yes new name will be saved and process is completed MACRO A macro command is a series of two or more remote codes issued automatically from a single keypress You mi...

Страница 39: ...Press and hold TUNER 10 SETUP and ENTER buttons Use to scroll to Reset 3 Press ENTER 4 Use to select between No HTRM will not be reset and Yes HTRM will be reset to its factory defaults When you select Yes another prompt display will be shown 5 Select Yes to reset the HTRM and complete the process USB INTERFACE The HTRM allows one to upload and download the configuration through a Windows PC and N...

Страница 40: ...de USING THE ZR 5 REMOTE CONTROL The ZR 5 is a discrete compact remote for controlling the applicable Zone 2 features of the M15 HD Irrespective of the main room zone settings the ZR 5 allows full separate control of the Zone 2 source selection among other applicable features 1 ON OFF Switch ON OFF the Zone feature 2 SOURCE Select the active input of the NAD M15 HD that will be sent out to the cor...

Страница 41: ...rrect Speaker Configuration or Speaker Levels settings Center level set too low on Speaker Levels menu No Dolby Digital DTS Source s digital output is not connected to a M15 HD digital input Check connections Source component not configured for multichannel digital output Check source component setup No video display Resolution setting is not supported by the TV Monitor To restore video display pr...

Страница 42: ...der U S Patent s 5 451 942 5 956 674 5 974 380 5 978 762 6 226 616 6 487 535 7 212 872 7 333 929 7 392 195 7 272 567 other U S and worldwide patents issued pending DTS is a registered trademark and the DTS logos Symbol DTS HD and DTS HD Master Audio are trademarks of DTS Inc 1996 2008 DTS Inc All Rights Reserved Manufactured under license from Dolby Laboratories Dolby Pro Logic and the double D sy...

Страница 43: ...43 ENGLISH FRANÇAIS ESPAÑOL ITALIANO DEUTSCH NEDERLANDS SVENSKA РУССКИЙ ...

Страница 44: ...ll rights reserved NAD and the NAD logo are trademarks of NAD Electronics International a division of Lenbrook Industries Limited No part of this publication may be reproduced stored or transmitted in any form without the written permission of NAD Electronics International M15 HD Manual Issue 1 5 06 09 ...

Отзывы: