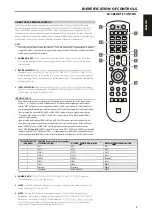
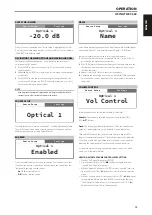

1 COAX 1-2, OPT 1-2
•
Connect to the corresponding optical or coaxial digital output of
sources such as CD or BD/DVD players, digital cable box, digital
tuners and other applicable components.
2 PHONO IN, LINE 1-2 IN
PHONO:
Input for a Moving Magnet (MM) phono cartridge. Connect
the twin RCA lead from your turntable to this input if you are using a
Moving Magnet cartridge.
LINE1, LINE 2:
Input for line level sources such as CD player, tuner or
any compatible devices. Use a twin RCA-to-RCA lead to connect the
source device’s left and right “Audio Output” to this input.
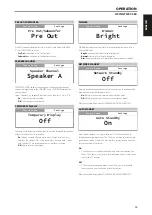
3 PRE-OUT/SUBW
•
These output terminals have dual function. They are used either as
PRE-OUT or SUBWOOFER terminals.
•
The C 368 and associated external devices must be turned OFF
always before connecting or disconnecting anything to the PRE-
OUT/SUBW sockets.
PRE-OUT
•
The PRE OUT/SUBW sockets make it possible to use the C 368 as a
full range preamplifier to an external power amplifier.
•
Use dual RCA cable to connect PRE-OUT/SUBW to the
corresponding analog audio input of compatible devices such as
amplifiers, receivers or other applicable devices.
•
PRE-OUT/SUBW will be affected by the C 368’s volume control
settings. Turn the VOLUME control to adjust the output level of the
PRE OUT/SUBW sockets.
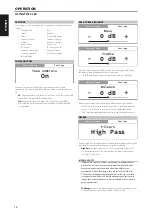
SUBWOOFER
•
Use a dual RCA cable to connect PRE OUT/SUBW to the low level
input of a powered subwoofer.
•
Low frequency information up to 150 Hz is sent to the connected
subwoofer via PRE-OUT/SUBW. This is based from 2nd order
Linkwitz-Riley Crossover Filter @150 Hz.
4 IR IN/IR OUT
•
These mini-jacks accept and output remote-controlled codes in
electrical format, using industry-standard protocols, for use with
“IR-repeater” and multi-room systems and related technologies.
•
All NAD products with IR IN/IR OUT features are fully compatible
with the C 368. For non-NAD models, please check with your other
product’s service specialists with respect to their compatibility to
the C 368’s IR features.
IR IN
•
This input is connected to the output of an IR (infrared) repeater
(Xantech or similar) or the IR output of another compatible device
to allow control of the C 368 from a remote location.
IR OUT
•
Connect IR OUT to the IR IN jack of a compatible device.
•
Command and control the linked compatible device by directing its
own remote control to C 368’s infrared receiver.
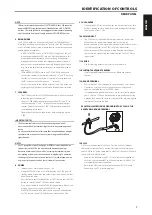
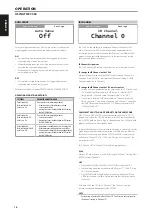
5 T12V
+12V TRIGGER OUT
•
The +12V TRIGGER OUT is used for controlling external equipment
equipped with a +12V trigger input.
•
Connect this +12V TRIGGER OUT to the other equipment’s
corresp12V DC input jack using a mono cable with 3.5mm
male plug.
•
This output will be 12V when the C 368 is ON and 0V when it is
either OFF or in standby mode.
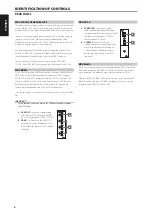
+12V TRIGGER IN
•
With this input triggered by a 12V DC supply, the C 368 can be
switched ON remotely from standby mode by compatible devices
such as amplifiers, preamplifiers, receivers, etc. If the 12V DC supply
is cut off, the C 368 will return to standby mode.
•
Connect this +12V Trigger input to the remote device’s
corresp12V DC output jack using a mono cable with
3.5mm male plug. The controlling device must be equipped with a
+12V trigger output to use this feature.
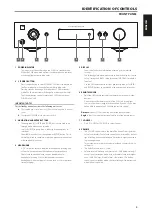
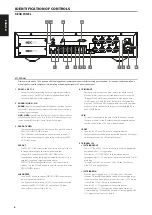
IDENTIFICATION OF CONTROLS
REAR PANEL
100-120V/220-240V~50/60Hz
POWER
ON
Serial No./N de serie
SPEAKERS
B
LEFT
RIGHT
SERVICE
BT
ANTENNA
GND
SPEAKERS
A
LEFT
RIGHT
RS232
BRIDGE MODE
BRIDGE MODE
COAXIAL IN
1
2
OPTICAL IN
PHONO IN
LINE 1 IN
PRE-OUT/SUBW
1
2
L
R
L
IR
IN
R
R
L
MM
LINE 2 IN
IN
R
L
T12V
(STEREO)
BRIDGE MODE
OFF
ON
(MONO)
© NAD C368
OUT
M o d u l a r
D e s i g n
C o n s t r u c t i o n
M o d u l a r
D e s i g n
C o n s t r u c t i o n
11 12
13
14
7
6
1
2
3
4
5
8
9
10
ATTENTION!
Please ensure that the C 368 is powered off or unplugged from the main power source before making any connections. It is also advisable to power down
or unplug all associated components while making or breaking any signal or AC power connections.
6
ENGLISH
FR
ANÇ
AIS
ESP
AÑOL
IT
ALIANO
DEUT
SCH
NEDERL
ANDS
SVENSK
A
РУ
ССКИЙ


