


(Revised 2011-07-21)
Page 13 of 158
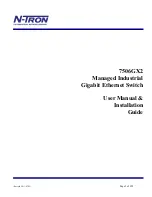
APPLYING POWER (Side View)
Unscrew & Remove the DC Voltage Input Plug from the top header.
Install the DC Power Cables into the Plug (observing polarity on unit).
Plug the Voltage Input Plug back into the top header.
Tightening torque for the terminal block power plug is
0.5 Nm/0.368 Pound Foot
.
All LEDs will flash ON Momentarily.
Verify the Power LED stays ON (GREEN).
Notes:
Only 1 power supply must be connected to power for minimal operation. For redundant power
operation, V
1
and V
2
inputs must be connected to separate DC Voltage sources. This device will
draw current from both sources simultaneously. Use 16-28 gauge wire when connecting to the
power supply.
Recommended 24V DC Power Supplies, similar to: N-Tron‘s P/N
NTPS-24-1.3
:
Input AC 115/230V
Output DC 24-28V
Output Current 1.3A @ 24V
1.0A @ 28V
Power 30W
35 mm DIN-Rail Mountable
Dimensions: 45X75X91 mm
Содержание 7506GX2 Series
Страница 28: ...Revised 2011 07 21 Page 28 of 158...
Страница 33: ...Revised 2011 07 21 Page 33 of 158 Administration SNMP Continued...
Страница 36: ...Revised 2011 07 21 Page 36 of 158 DHCP Server Setup Profiles Continued...
Страница 39: ...Revised 2011 07 21 Page 39 of 158 DHCP Server Setup IP Maps Continued...
Страница 45: ...Revised 2011 07 21 Page 45 of 158 DHCP Relay Local IP Setup Continued...
Страница 59: ...Revised 2011 07 21 Page 59 of 158...
Страница 80: ...Revised 2011 07 21 Page 80 of 158 IGMP RFilter Continued Modifying rfilter port settings...
Страница 88: ...Revised 2011 07 21 Page 88 of 158 N Ring Advanced Configuration Continued...
Страница 148: ...Revised 2011 07 21 Page 148 of 158 And the New VLAN may be deleted when it is no longer required...


