background image

118     Head cleaning

  1.  

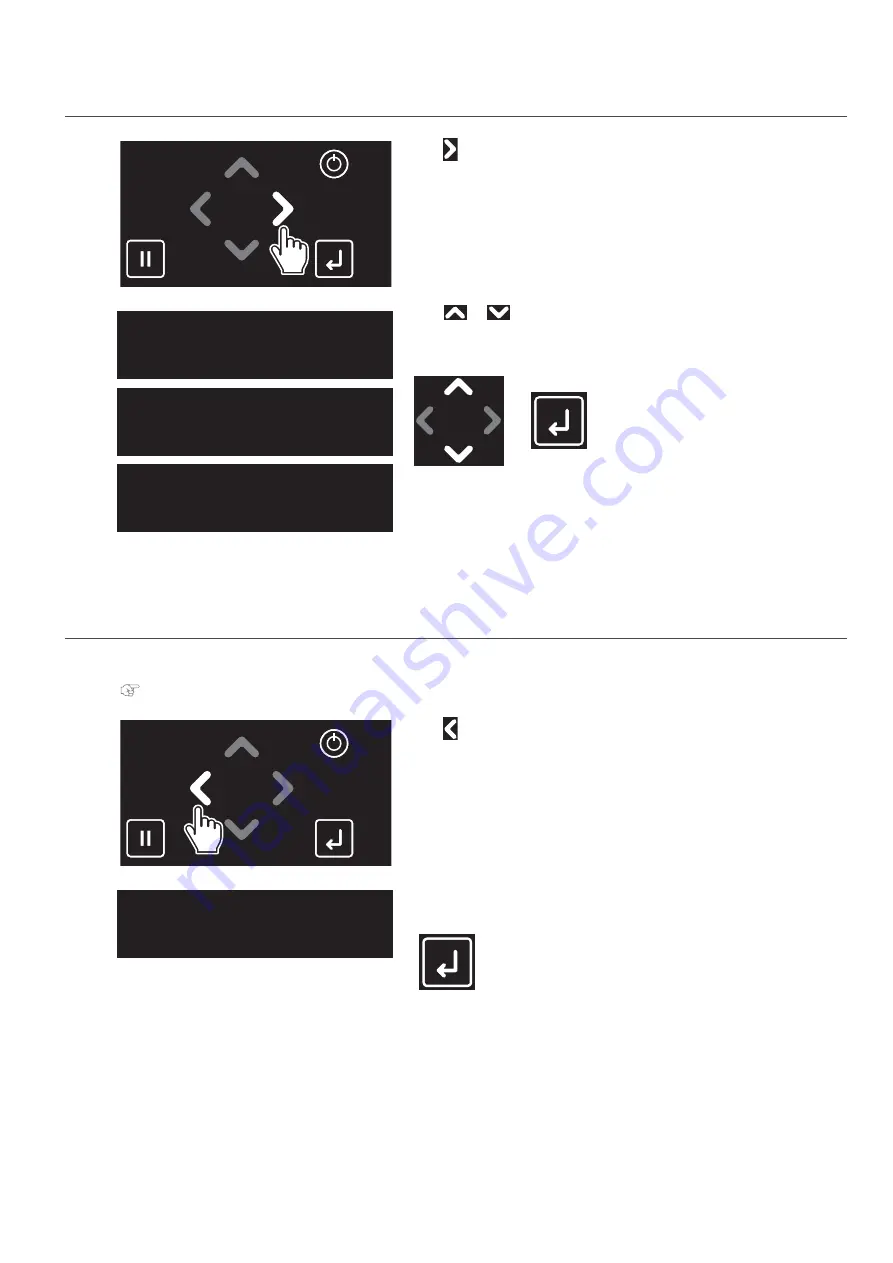
Performing Head cleaning

[1]

Tap  

.

[2]

Use 

 or 

 to choose the cleaning mode.

Tap [Enter].

• The printer will start cleaning.

[3]

Run a nozzle check.

  2.  

Performing Nozzle check

[1]

Load a roll media to print the nozzle check pattern.


"Loading a roll media" P. 22

[2]

Tap  

.

[3]

Tap [Enter].

• The printer will print the nozzle check pattern.

Clean Print Head?

   Short

Clean Print Head?

   Normal

Clean Print Head?


Long

Print Nozzle Check?

Start 

  -> 

Enter

Содержание XPJ-1641SR

Страница 1: ...tact MUTOH or the dealer you purchased the product from if you find any unclear erroneous or otherwise unsatisfactory content in the manual Please be aware that MUTOH will not be liable in any way for failures or accidents that result from handling or operating the printer according to any procedures other than those set forth in this manual Company names and product names that appear in this manu...

Страница 2: ...ich case the user will be required to correct the interference at his own expense Installation Location Requirements This equipment is not suitable for use in locations where children are likely to be present Illustrations for the printer used in this manual The illustration of XPJ 1682SR is used in this manual and Startup Guide The CE marking is a mandatory European marking for certain product gr...

Страница 3: ...OFF 21 Loading a roll media 22 Load a roll media into the printer 22 Nozzle check and cleaning 31 Nozzle check 31 Cleaning 32 Calibrating your printer 33 Head alignment XPJ 1682SR Only 33 Print quality calibration 35 Media feed adjustment 38 Advanced setting 40 Changing the Head Height 40 Changing holddown pressure using media feed lever 41 Canceling or reducing pressure rollers individually 42 Op...

Страница 4: ...Slant Check 82 Setup 15 Auto Cleaning 83 Setup 16 Ink Status 85 Setup 17 Roll Length 85 Setup 18 Exhaust Fan 87 Setup 19 Longstore 87 Setup 20 CR Maintenance 87 Setup 21 Initialization 88 Setup 22 Life Times 88 Setup 23 IP Address 89 Setup 24 Subnet Mask 89 Setup 25 Gateway 89 Setup 26 Header Dump 90 Setup 27 Single Head XPJ 1682SR Only 90 Setup 28 Heater Control 91 Setup 29 Start Feed 91 Setup 30...

Страница 5: ... 108 Chapter 3 Maintenance Maintenance 110 Checking ink and replacing ink bag 111 Checking ink level 111 When it becomes time to replace ink bag 112 Replacing ink bag 112 Emptying waste ink tank 115 Emptying waste ink tank 115 Cleaning 117 Head cleaning 117 Cleaning of cleaning wiper 120 Cleaning around the capping unit 123 Cleaning around the print head 125 Cleaning the color sensor 127 Inside cl...

Страница 6: ...or Messages 146 Status messages 146 Error message display and remedies 148 Error requiring restart 150 Troubleshooting 151 Installation and initial setup troubleshooting 151 Boot up troubleshooting 152 Media related troubleshooting 153 Printing related troubleshooting 155 The media is jammed 158 Specifications of this product 161 List of specifications 161 Options Supply list 164 Revision History ...

Страница 7: ...21 Loading a roll media 22 Load a roll media into the printer 22 Nozzle check and cleaning 31 Nozzle check 31 Cleaning 32 Calibrating your printer 33 Head alignment XPJ 1682SR Only 33 Print quality calibration 35 Media feed adjustment 38 Advanced setting 40 Changing the Head Height 40 Changing holddown pressure using media feed lever 41 Canceling or reducing pressure rollers individually 42 Operat...

Страница 8: ...8 ...

Страница 9: ...e edge of the media to prevent media curl while printing While not printing slide them to the left and right side edges of the platen Carriage The print head is installed on the carriage Adjuster Waste ink tank Collect waste ink produced during printing and cleaning cycle Empty the tank as needed Stand Media guide Front media path that the heater is installed inside to dry the print Front cover Op...

Страница 10: ...tor AC inlet Ink slots Insert an ink bag case into the slot Illustration XPJ 1682SR Media feed slot Insert the front edge of the media into this slot and pass it to the front side to load it into the printer Media feed lever Hold down or release the media This lever is interlocked with the media feed lever on the front side Roll media holder Attach the media flanges to both ends of a roll media an...

Страница 11: ...e the printer is in standby mode it is used to feed media run a nozzle check or perform head cleaning key Feed the media backward Long touch to feed it with high speed key Tap to run a nozzle check key Tap to perform cleaning key Feed the media forward Long touch to feed it with high speed 6 Power button Long press to power on the printer The Power LED above the Power button turns on with a solid ...

Страница 12: ...7 Memory 8GB minimum Network XPJ 1641SR Use a network port that supports Ethernet and an Ethernet cable that supports Category 5 Gigabit Ethernet or later XPJ 1682SR UseanetworkportthatsupportsGigabitEthernet andanEthernetcablethatsupportsCategory 6GigabitEthernet or later 1 Connect the Gigabit Ethernet cable to the printer 2 Insert the tip of the cable tie into the hole on the printer to attach i...

Страница 13: ...e the front panel on the printer to assign the IP address subnet mask and gateway Setup 23 IP Address P 89 Setup 24 Subnet Mask P 89 Setup 25 Gateway P 89 Note The illustration above shows the peer to peer connection between this product and computer If you are using the LAN connection make sure that your printer and computer are on the same subnet ...

Страница 14: ... Log into MUTOH Club https club mutoh co jp mutoh guser Internet Printer driver Printer driver for Windows OS allowing to directly print from typical graphic design software and MUTOH Layout and Print Tool 2 Layout and Print Tool 2 Easy layout and print application that allows you to arrange multiple images and texts on a page and print it on your printer You can save it with the printer settings ...

Страница 15: ... Printing Preferences dialog of the printer driver will appear Note XPJ 1682SR only When you click on Printing preferences for the first time the Printer Configuration dialog will appear Move to the Step 3 3 first startup on XPJ 1682SR only Select the ink configuration settings and click OK After clicking the Printing Preferences screen of printer driver opens Note If you use the Windows printer d...

Страница 16: ...the Desktop Windows 10 Windows 7 Double click the MSM icon on the Desktop Note Launching from the Start Menu of Windows Windows 8 Windows 8 1 Right click somewhere the Start screen tiles are not displayed to display the application bar and click All Apps Windows 10 Windows 7 From the Start menu click All Programs or All Apps MUTOH MUTOH Status Monitor Displaying MSM Double click the MSM icon in th...

Страница 17: ...r printer do not exit MSM To close the MSM window click Settings Close Windows 8 1 Click the Down Arrow in the Start screen Click MUTOH Status Monitor Launching Layout and Print Tool 2 Windows 8 Window 8 1 Display the charm bar on the desktop and then click Search Enter Layout and Print Tool 2 and then click Click the Layout and Print Tool 2 icon displayed in the search result Windows 10 Windows 7...

Страница 18: ...Help menu is available in the printer driver and MUTOH LFP Finder Displaying Help Printer driver Open the Printing Preferences screen of printer driver and click Help MUTOH LFP Finder Launch MUTOH LFP Finder and click Help ...

Страница 19: ...ness 2 8 mm When the head height is set to High Important The default head height is set to Low In the Low setting media up to 0 3 mm thick can be loaded on the printer Note Contact your local MUTOH dealer about roll media recommended for your printer a c b d Printable Area Media feeding direction a 5 mm 1 b 5 mm to 25 mm c 5 mm d 5 mm to 25 mm 1 The value of a will be 15 mm in the following cases...

Страница 20: ...k This printer is designed to bring out the best performance when using with the MUTOH genuine ink Non MUTOH ink may cause print defects or damage to the printer This product requires regular user maintenance Run a nozzle check before and after printing If nozzle missing is found run a head cleaning Clean the cleaning wiper and around the print head once a week If you are not using the printer for...

Страница 21: ...ights up The printer will start mechanical initialization Note Once the Power LED lights up release the Power button Turning the power OFF 1 Make sure printing is done 2 Long press the Power button The printer will start powering off 3 When the message on the left appears release the Power button The Power LED lights off Powering ON OFF Power Off ...

Страница 22: ... the flange Pull three tabs on the adapter outward then remove it from the flange Note If adaptor cannot be removed turn the handle on the flange anti clockwise to loose see Step 2 then remove it If you are using 3 inch core roll media skip this step 2 Push the media flange 2 into the both ends of the media core Before inserting twist the handle on the flange anticlockwise to unlock it 3 Twist the...

Страница 23: ...iclockwise to loosen 2 Twist the knob bolt on the left side of the media holder anticlockwise to loosen 3 Slide both left and right media holders about 30 cm towards the center of the slider for easy access 4 Tighten the knob bolts on both media holders 5 When looking from the rear side of the printer Use the screwdriver to loosen two screws securing the roller shaft guide plate to the right media...

Страница 24: ...bolts 3 Place the media onto the media holder 1 Twist the knob bolt on the right side of the media holder anticlockwise to loosen 2 Place the roll media onto the left media holder Carefully and gently place it on the holder If torque is enabled When looking from the left side check that the protrusion on the roller shaft guide plate is fitted into between two protrusions on the flange end cap When...

Страница 25: ...lace it on the holder If torque is enabled When looking from the right side check that the protrusion on the roller shaft guide plate is fitted into between two protrusions on the flange end cap When looking from the rear side of the printer check that there is a gap between the protrusion on the roller shaft guide plate and stopper on the shaft Important Do not drop or apply excessive impact whil...

Страница 26: ... to the media feed lever from the rear side of the printer To release the pressure rollers push the media feed lever To lock the pressure rollers pull it towards you Note Using this lever the holddown pressure can be changed between High and Normal To apply high pressure pull the lever towards you as much as possible Changing holddown pressure using media feed lever P 41 3 Open the front cover 4 F...

Страница 27: ... approximately 1 m 6 While one person holds the front edge of the media the other person turns the flange to slightly rewind the media onto the roll to remove warp or skew Note If you remove your hands from the front edge of the media while rewinding the media can be removed from the media slot ...

Страница 28: ... the media guide line If not print quality can be affected 8 If needed use a slide lock lever on the pressure rollers to individually cancel or reduce the holddown pressure Canceling or reducing pressure rollers individually P 42 Note Normally you do not need to adjust the holddown pressure by the slide lock levers ...

Страница 29: ...t the pressure rollers hold down the both edges of the media properly If it holds as a No Good example pull the media feed lever towards you as much as possible then adjust the position of the left or right side of the media holder until the both edges of the media are held down properly see Load the media into the printer P 26 for more details 3 Place the edge holders on both edges of the media I...

Страница 30: ...r to enter the value Tap Enter to confirm the setting Note The side margin can be set between 5 mm and 25 mm 8 Close the front cover 9 User Type OK appears on the touch panel Use or to choose the correct user type and tap Enter to start media initialization End the media loading Menu 1 Setup Setup3 Side Margin Side Margin 5 25 10 mm User Type 1 OK ...

Страница 31: ...tern 4 Check the nozzle check print to see all nozzles are clear If you find missing or thin lines on the print go to Cleaning steps P 32 If all lines are clearly printed you can start printing Note The pattern shown above is an example when printed on XPJ 1682SR with 4 color configuration The printer information date and time printed printer s serial number firmware version is printed on the nozz...

Страница 32: ...Enter The printer will start cleaning 3 Run a nozzle check again Nozzle check steps P 31 If the problem persists repeat normal cleaning until all nozzles are clear See Head cleaning P 117 for Short and Long cleaning Clean Print Head Short Clean Print Head Normal Clean Print Head Long ...

Страница 33: ...e is different from the user defined mode Note If you experience following problems the head alignment can help to improve print quality Suffering from poor print quality in unidirectional printing mode Details of print mode XPJ 1682SR P 62 Print quality does not improve even after performing print quality adjustment After you have performed head adjustment make sure you perform print quality cali...

Страница 34: ... Enter 4 Tap until the menu on the left appears Tap 5 Use or to choose the alignment method Tap Enter 6 The printer will print the confirmation pattern 7 Follow the steps below to align the two print heads Standard or Custom Adjustment Methods P 96 Auto Adjustment Method P 98 Menu 2 Test Print Test Print 5 Adjust Head Adjust Head 1 Standard Adjust Head 3 Auto Adjust Head 2 Custom ...

Страница 35: ... even if the print mode on the RIP side is different from the user defined mode Note If you are suffering from print quality defects after changing installation site or a roll media loaded on the printer perform the print quality calibration If you change the user type after performing the Standard calibration you need to perform the print quality calibration for the print mode chosen Since all pr...

Страница 36: ...a roll media P 22 2 Tap Home 3 Tap 4 Tap 5 Use or to choose the user type you want to use Tap Enter 6 Tap until the menu on the left appears Tap 7 Enter the thickness of the media Use or to specify the thickness Tap Enter Menu 1 Setup Setup 1 User Type User Type Type 1 Type 2 Adjust Print Thickness 80 2800 170 μm ...

Страница 37: ...1 Standard P 63 Adjust Print 2 Custom P 64 Adjust Print 3 Auto P 64 For a pre adjustment check select Confirm Pattern Check the printing results in Confirm Pattern To adjust large misalignment select Rough Pattern To adjust small misalignment select Fine Pattern 9 Follow the steps below and adjust the print quality Standard or Custom Adjustment Methods P 66 Auto Adjustment Method P 68 Adjust Print...

Страница 38: ...than above cases move to Nozzle check and cleaning P 31 You will need a ruler to perform this adjustment Media feed adjustment Note If the following symptom appears on your print this adjustment may help to solve the problem Image overlapping Horizontal white lines on the print Media feed adjustment steps 1 Load a roll media Loading a roll media P 22 2 Tap Home 3 Tap 4 Tap Menu 1 Setup Setup 1 Use...

Страница 39: ...il the menu on the left appears Tap 7 Use or to choose the menu Tap 8 Follow the steps below and adjust the print quality Steps P 69 User Type Type 1 Type 3 PF Adjust PF Adjust 3 Confirm Print PF Adjust 2 Initial Change PF Adjust 5 Micro Change PF Adjust 4 Micro Print PF Adjust 1 Initial Print ...

Страница 40: ... print quality calibration Changing the Head Height Important Do not open Front cover and change the head height during printing Print quality cannot be guaranteed 1 Open the front cover 2 Use the head height adjustment lever orange to change the head height to Mid or High High set the head height to High Mid set the head height between Low and High Low Default head height 3 Close the front cover ...

Страница 41: ...Normal Recommended for typical roll media To apply normal pressure push the lever from the front side of the printer until it clicks High Recommended for heavy weight media such as Tarpaulin To apply high pressure push it as far as it goes Changing holddown pressure using media feed lever Important Every time after you change the holddown pressure by the media feed lever you must perform the media...

Страница 42: ...dia feed lever Slide lock lever Normal Normal Low Cancel High Normal Cancel Important Every time after you change the holddown pressure by individual slide lock lever you must perform the media feed adjustment Media feed adjustment P 38 Note Thin media or media without stiffness is likely to be wrinkled during printing Wrinkles can contact the bottom side of the print head causing the media to bec...

Страница 43: ...fully slide it to the front until it clicks into place Note First try to reduce or cancel the rollers on both edges of the media It the problem persists reduce or cancel more rollers 4 To cancel the individual pressure rollers Push the media feed lever back to the original position to lock the pressure rollers 5 Close the front cover 6 Perform media feed adjustment Media feed adjustment P 38 Norma...

Страница 44: ... feed the media with high speed 3 Once it has reached the intended position release the key Pausing Restarting printing 1 Tap Cancel while printing The printer will pause the job Note You cannot cancel the job by tapping Cancel To cancel the job see the following section Canceling printing P 45 2 Tap Cancel again to resume printing Important MUTOH cannot guarantee the print quality when you resume...

Страница 45: ... the message Warming Up is displayed on the operation panel 2 Send a job to the printer Skip Heater Warm Up No is displayed on the front panel Use or to choose Yes Tap Enter 3 Start printing While Warming Up is displayed do not touch the media guide You could get burn injuries Important If you start printing during warming up print quality is not guaranteed Note Even when you start printing during...

Страница 46: ...w roll media is not straight cut it before printing When the media detection is set to Off the printer does not cut the media automatically Setup 4 Media Initial P 77 When the Output mode menu is set to Auto Cut the printer cuts the media automatically after printing Setup 6 Output Mode P 78 The cutter blade is consumable parts Replace it when needed Replacing Cutter P 132 Cut Media Start Enter ...

Страница 47: ...nu then tap Menu 1 Temperature P 48 Menu 2 Pre Heater P 48 Menu 3 Platen Heater P 49 Menu 4 Dryer P 49 Menu 5 PF Micro Adjustment P 50 Menu 6 Backup P 50 Menu 7 Job Status P 51 Receiving PG Low W 1625 mm Converting PG Low W 1625 mm Printing PG Low W 1625 mm Menu 2 Pre Heater Menu 3 Platen Heater Menu 5 PF Micro Adjust Menu 1 Temperature Menu 6 Backup Menu 7 Job Status Menu 4 Dryer ...

Страница 48: ...ote Indicated temperature is approximate The accuracy of the temperature is not guaranteed The display of the current temperature blinks all the time even the heater still warms up or has reached the target temperature Menu 2 Pre Heater 1 Tap 2 Use or to change the value Tap Enter to confirm the change Note The change made is applied to the current job only and is not saved in the printer To save ...

Страница 49: ...er 1 Tap 2 Use or to change the value Tap Enter to confirm the change Note The change made is applied to the current job only and is not saved in the printer To save the change in the user type currently selected go to Menu 6 Backup Menu 4 Dryer 1 Tap 2 Use or to change the value Tap Enter to confirm the change Note The change made is applied to the current job only and is not saved in the printer...

Страница 50: ...u5 PF Micro Adj in the currently selected user type Menu 5 PF Micro Adjustment 1 Tap 2 Use or to change the value Tap Enter to confirm the change Note The change made is applied to the current job only and is not saved in the printer To save the change in the user type currently selected go to Menu 6 Backup Menu 6 Backup 1 Tap 2 Use or to select Yes Tap Enter The change is saved in the selected us...

Страница 51: ...n media feeding direction Done displays the length of the current job that has been already printed Remain displays the remaining length to finish printing Remain time displays remaining time to finish printing Note Indicated value is approximate The accuracy of the value is not guaranteed If the print job data does not contain length information 0 will be displayed in the Job Status menu Menu 7 J...

Страница 52: ...52 Menus you can access while printing Note ...

Страница 53: ... Slant Check 82 Setup 15 Auto Cleaning 83 Setup 16 Ink Status 85 Setup 17 Roll Length 85 Setup 18 Exhaust Fan 87 Setup 19 Longstore 87 Setup 20 CR Maintenance 87 Setup 21 Initialization 88 Setup 22 Life Times 88 Setup 23 IP Address 89 Setup 24 Subnet Mask 89 Setup 25 Gateway 89 Setup 26 Header Dump 90 Setup 27 Single Head XPJ 1682SR Only 90 Setup 28 Heater Control 91 Setup 29 Start Feed 91 Setup 3...

Страница 54: ...leep Mode 101 Sleep Mode 1 Cleaning Setting 101 Sleep Mode 2 Start 102 Menu 7 Display 103 Display 1 Language 103 Display 2 Temperature 103 Display 3 Length 104 Menu 8 Job Status 104 Menu chart 105 Setting menu 1 105 Setting menu 2 106 Setting menu 3 107 Menu during printing 108 ...

Страница 55: ...ter Operating the keys to use the menus 1 To access to the setup menu tap Home Note You cannot access to the setup menu while printing or receiving data the power button is flashing 2 Use or to go to the previous item or next item Use to go to the sub menu Introduction Menu 8 Job Status Menu 3 Cleaning Menu 1 Setup Menu 2 Test Print ...

Страница 56: ...etup menu Menu 1 Setup Configure printer settings Submenus Setup 1 User Type Setup 2 Spitting Setup 3 Side Margin Setup 4 Media Initial Setup 5 Media Width Setup 6 Output Mode Setup 7 Method of Cut Test Print 4 Palette Test Print 5 Adjust Head Test Print 3 Setup List Test Print 1 Nozzle Check Test Print 2 Mode Print Menu 1 Setup Setup1 User Type Setup 2 Spitting Setup 3 Side Margin Setup 4 Media I...

Страница 57: ...tore Setup 20 CR Maintenance Setup 21 Initialization Setup 22 Life Times Setup 23 IP Address Setup 24 Subnet Mask Setup 8 Origin Setup 9 Prevent Stick Setup 10 Standby Heating Setup 11 Head Travel Setup 12 Multi Strike Setup 13 Strike Wait Setup 14 Slant Check Setup 15 Auto Cleaning Setup 16 Ink Status Setup 17 Roll Length Setup 18 Exhaust Fan Setup 19 Longstore Setup 20 CR Maintenance Setup 21 In...

Страница 58: ...nter configuration color palette and print head alignment Submenus Test Print 1 Nozzle Check Test Print 2 Mode Print Test Print 3 Setup List Test Print 4 Palette Test Print 5 Adjust Head XPJ 1682SR Only Setup 25 Gateway Setup 26 Header Dump Setup 27 Single Head Setup 28 Heater Control Setup 29 Start Feed Setup 30 Alert Buzzer Setup 31 LED Light Setup 31 Temporary Menu 2 Test Print Test Print 1 Noz...

Страница 59: ...ng mode and timer to be performed before entering to or while in sleep mode Submenus Sleep Mode 1 Cleaning Setting Sleep Mode 2 Start Menu 7 Display Change the language and unit of temperature and length displayed on the operation panel Submenus Display 1 Language Display 2 Temperature Display 3 Length Menu 8 Job Status Displays the last print job status Menu 8 Job Status Menu 3 Cleaning Menu 4 Me...

Страница 60: ...settings that can be set via the User Type include Print Mode Effect the adjustment value for Adjust Print PF Adjust the setting value for Pre Heater Platen Heater Dryer Vacuum Fan and Thickness When using the printer for the first time or using a new roll media configure a user type settings Making media settings Submenus 1 Print Mode 2 Adjust Print 3 PF Adjust 4 Pre Heater 5 Platen Heater 6 Drye...

Страница 61: ...ct settings Quality 1 1440 1440 16 pass Uni unidirectional Fine Fuzz Quality 2 1440 1440 16 pass Bi bidirectional Fine Fuzz Quality 3 720 1440 8 pass Uni unidirectional Fine Fuzz Quality 4 720 1440 8 pass Bi bidirectional Fine Fuzz Graphics 1 720 720 8 pass Uni unidirectional Fine Fuzz Graphics 2 720 720 8 pass Bi bidirectional Fine Fuzz Graphics 3 720 720 L 8 pass Uni unidirectional Fine Fog Grap...

Страница 62: ... unidirectional None Banner 4 360 720 2 pass 4 pass Bi bidirectional None Select an effect setting Set up this menu when you want to improve print quality by adjusting the set print mode Setting values The Effect function is not used The printing joint will be the wave form The printing joint will shade off XPJ 1641SR Only The printing joint will shade off as the wave form This is the default effe...

Страница 63: ...ns a pattern with the embedded color sensor to correct dot placement Adjusts only the print mode in the user type setting which is currently set Confirm pattern P 66 Rough adjustment pattern P 67 Fine adjustment pattern P 67 Submenus Print the test pattern for the adjustment Check before adjusting Perform this to adjust large misalignment Print Adjust pattern and enter the set value Performthistoa...

Страница 64: ...Perform the automatic adjustment using the embedded color sensor Auto Adjustment Method P 68 Submenus Perform automatic adjustment for all patterns A to F using the color sensor Perform automatic adjustment for the currently selected print mode using the color sensor calibrate the same print mode as Adjust Print 1 Standard Choose the adjustment pattern between A and F for automatic adjustment Adju...

Страница 65: ...Uni D Graphics 4 720 x 720 L 8 pass Bi Banner 1 720 x 720 4 pass Uni A Banner 2 720 x 720 4 pass Bi Banner 3 360 x 720 2 pass Uni Banner 4 360 x 720 2 pass Bi Print mode Print mode specifications Adjustment pattern Quality 1 1440 x 1440 16 pass 32 pass Uni C Quality 2 1440 x 1440 16 pass 32 pass Bi Quality 3 720 x 1440 8 pass 16 pass Uni B Quality 4 720 x 1440 8 pass 16 pass Bi Graphics 1 720 x 10...

Страница 66: ...he number printed under the pattern without alignment errors is the adjustment value 6 Enter the adjustment values 7 Follow the same procedure to adjust print head 2 XPJ 1682SR Only Confirm pattern Press the Enter key to carry out printing Check the printing results If there are shifting problems proceed to rough adjustment pattern printing In the picture below there are misalignments Note Warm up...

Страница 67: ...r of the media and select the number that looks most aligned between 1 and 7 Pattern names such as Pattern B1 4 are shown on the display Use or to enter the number of the best adjusted pattern and tap Enter In the case of the picture below enter 6 so that the display reads Pattern B1 6 Follow the same procedure to adjust print head 2 XPJ 1682SR Only 1 2 3 4 5 6 7 8 9 10 11 2 1 2 3 4 5 6 7 8 9 10 1...

Страница 68: ...e middle of the calibration the adjustment value for the pattern which has been successfully calibrated will be saved in the printer but the adjustment value for the pattern which has been failed to calibrate or has not been calibrated yet will not be saved in the printer Warm up the heater before printing the Confirm and Adjustment patterns Skip Heater Warm Up No is displayed on the front panel Y...

Страница 69: ...nt value 5 Use or on the front panel to select PF Adjust 3 Confirm Print Feed Length 250 mm is displayed on the front panel 3 PF Adjust Sets up various settings on the Media feed correction When the following defects are found in printing results they may improve by conducting a media feed correction Images are overlapping There are white lines in images Submenus PF Adjust 1 Initial Print P 71 PF ...

Страница 70: ...e pattern and micro adjustment value In the pattern look for a place that has least white lines or overlapping in images The number printed below the adequate pattern is the micro adjustment value 8 Enter the micro adjustment value according to the printing result in Step 7 When you know the adjustment value when changing the media or for similar operations 1 Enter the adjustment value for PF Adju...

Страница 71: ...e initial value Note The length of media that is fed feeding length for initial adjustment printing is normally set at 250 mm If you increase the feeding length the accuracy of the Media feed adjustment improves To change the feeding length tap or on the front panel and change the set value Use or to enter the adjustment value and tap Enter Setting values You can set a value that is between 50 mm ...

Страница 72: ...t 1 Initial Print If the measured length matches the feeding length proceed to PF Adjust 4 Micro Print Performs Confirm Print Enter the Feed Length and tap Enter Setting values 100 mm to 250 mm to 500 mm indicates the initial value Note The length of media that is fed feeding length for initial adjustment printing is normally set at 250 mm If you increase the feeding length the accuracy of the Med...

Страница 73: ...as been saved the value will be the baseline value from the next time to be printed in the center of the pattern For example if you have entered 0 20 and print a micro adjustment pattern values printed below block pattern will be changed to from left 1 00 0 60 0 30 0 00 0 20 baseline value 0 30 0 40 0 70 1 00 1 40 Use or to enter the adjustment value and tap Enter Select whether you wish to perfor...

Страница 74: ...er Use or to enter the value and tap Enter Setting values Off 30 C to 50 C indicates the initial value 7 Vacuum Fan Selects the vacuum level Use or to select the value and tap Enter If you are using a thin or delicate media and there is risk of it wrinkling due to the fan set a lower value for the fan Setting values Low Medium High indicates the initial value Type 4 Pre Heater Pre Heater 30 50 30 ...

Страница 75: ... you do not need to configure the thickness of the media in this menu 9 Copy User Type This is for copying the currently selected User Type setting into another User Type The items that will be copied are Print Mode Effect The adjustment value for Adjust Print PF Adjust The setting value for Pre Heater Platen Heater Dryer Vacuum Fan and Thickness Setting values Here you can select the User Type to...

Страница 76: ...is not performed In such a case print quality cannot be guaranteed When the spitting setting is On Media the maximum printable media width becomes 16 mm shorter Therefore the side margins become the value that you have set in Side Margin menu 8 mm Setup 3 Side Margin P 77 Pass Count menu This is for setting the interval at which the print head will carry out spitting operation The head will carry ...

Страница 77: ... operation on Spitting box every time Print head returns to the origin position Off ー Spitting is not performed on Spitting box or the media Setup 3 Side Margin Set up the right and left margins side margins while printing Use or to enter the value and tap Enter Setting values 5 mm to 25 mm indicates the initial value Note When the Spitting menu is set to On Media the maximum printable media width...

Страница 78: ...Unit Set when cutting the media automatically Setup 7 Method of Cut P 79 When the Output Mode is set to Take up the menu is shifted to Page Gap In the Page Gap menu you can change the margin setting between images Setting values The default margin setting between images will be applied This is the initially set value The margin setting between images is smaller than Normal After setting the Page G...

Страница 79: ...set to Off the media cannot be cut automatically Setup 4 Media Initial P 77 Some media may not be cut cannot be cut at all or cannot be cut finely In such a case set the Output Mode menu to Off and cut the media manually Setup 6 Output Mode P 78 Cut Pressure menu Sets the media cutting pressure for the cutting operation Setting values Cut the media at low pressure Suitable for thin media or if the...

Страница 80: ... values PF media feeding direction 15 000 mm to 15 000 mm CR carriage traveling direction 0 mm to 1 405 mm maximum setting range varies by width of media being loaded When the message on the left appears tap Enter to end the origin settings Note Depending on the set value of the side margin the maximum set value of Y print head transferring distance decreases Setup 3 Side Margin P 77 The right sid...

Страница 81: ...eheat Heater while the printer is in the standby mode When the preset time has passed each Heater turns Off Use or to enter the value and tap Enter Setting values 10 min to 60 min indicates the initial value Setup 11 Head Travel Sets up the range that Print head moves while printing Setting values Print head moves the range of the print data width Print head moves from origin to the maximum printa...

Страница 82: ...rwrite printing Use or to enter the value and tap Enter Setting values 0 0 sec to 5 0 sec indicates the initial value Setup 14 Slant Check Sets up slanting detection during media loading Setting values Slant Check is not performed This is the initially set value Slant Check is performed Setup 12 Multi Strike Multi Strike 1 9 1 cnt Setup 13 Strike Wait Strike Wait 0 0 5 0 0 0 sec Setup 14 Slant Che...

Страница 83: ... Setting values Off Short Normal Long indicates the initial value If the cleaning type is set to Short Normal or Long the display goes to the Cleaning Interval setting to set the timer for auto cleaning while in standby mode Setting values 10 min to 360 min to 1 440 min indicates the initial value Setup 15 Auto Cleaning Auto Cleaning 1 Standby Mode Auto Cleaning 2 While Printing Auto Cleaning 3 Be...

Страница 84: ...rmal or Long the display goes to the Cleaning Interval setting to set the timer for auto cleaning while in printing Setting values 5 min to 180 min indicates the initial value Before Print menu Choose the auto cleaning mode to be performed before printing Setting values Off Short Normal Long indicates the initial value Auto Cleaning 2 While Printing Cleaning Type Off Cleaning Type Short Cleaning I...

Страница 85: ...and S C cards If Ink bags other than genuine Ink bags are used ink status will not be displayed correctly Setup 17 Roll Length Sets up the media length Setting values Roll Length is not used This is the initially set value Sets up the media length The set values of the media length can be set as Roll1 to Roll3 Length menu Sets up the media length Setting values 1 m to 30 m to 1 500 m indicates the...

Страница 86: ...nsor detects when the roll paper is finished If you are using the media that does not come off the paper core easily when it is finished printing may not be paused when the media is finished if the Print stop menu is set to Off If this happens set this to On Near End menu Sets whether or not to display Roll Near End m is replaced with a number between 1 and 10 before the length of the media that i...

Страница 87: ...u Wash Print head with the cleaning fluid Tap Enter to perform head cleaning Long term storage P 138 Important Be sure to use the designated cleaning bag Setup 20 CR Maintenance Performs maintenance Used in the following cases Cleaning and replacing of cleaning wiper Cleaning of print head circumference Replacing absorption material for the flushing box Replacing cutter Maintenance P 110 Submenus ...

Страница 88: ...layed when you are not in this menu You can delete this message by pressing the Cancel key The below is an example when using XPJ 1682SR Displays the service life for the print head 1 The service life in this case is at 60 Displays the service life for the print head 2 The service life in this case is at 60 Displays the service life for the pump 1 The service life in this case is at 60 Displays th...

Страница 89: ...increase a setting value Use to decrease a setting value Use to move the cursor to the previous digit Use to move the cursor to the next digit Tap Enter after entering each digit Setting values 0 0 0 0 to 255 255 255 0 to 255 255 255 255 indicates the initial value Setup 25 Gateway Sets the gateway Use to increase a setting value Use to decrease a setting value Use to move the cursor to the previo...

Страница 90: ...e data will be useful when contacting technical support Performing printing if the printer is connected to PC the print settings of RIP soft you are using are printed on data header Setup 27 Single Head XPJ 1682SR Only Selects a print head for printing XPJ 1682SR Only You can still print even if some of the print heads malfunction However in that case the printing speed will drop Setting values Se...

Страница 91: ...rformance choose the Dryer mode Setup 29 Start Feed You can change the margin setting between images Value greater than 0 The margin setting between images will be wider than when setting 0 Value equal to 0 The default margin setting between images will be applied Valueless than 0 The margin setting between images will be smaller than when setting 0 Setting values 10 mm to 0 mm to 500 0 mm indicat...

Страница 92: ... the printer or your print during printing Submenus The LED lights automatically turn on while printing front cover open initializing media cutting media specifying print start position origin and feeding media The default is set to Auto The LED lights are always on It will turn off while in sleep mode or when the printer is powered off The LED lights are disabled Setup 32 Temporary Displays the m...

Страница 93: ...configuration The printer information date and time printed printer s serial number firmware version is printed on the nozzle check pattern Test Print 2 Mode Print Mode print can be performed Used to confirm the following printing conditions Print quality Effect Setting value for Heater Micro adjustment value for feed correction Menu 2 Test Print Test Print 1 Nozzle Check Y K M M C C Y K Y K M M C...

Страница 94: ...min 17 Print Head ALL 18 Print Nozzle NozzleA 1 Print Mode Graphics 2 Effect Fine Fog 2 Adjust Print 3 PF Adjust 1 Initial Adj Print 2 Initial Adjust 250 0 250 0mm 3 Confirm Adj Print 4 Micro Adj Print 5 Micro Adjust 0 00 7 Thickness 170µm 6 Vacuum Fan High 4 Heater Upper Off 5 Heater Lower Off Setup List Information Serial No Model Memory Size 2 None 3 None 4 None 5 None Error 0 None 1 None Menu ...

Страница 95: ... the image quality during bidirectional printing may drop Submenus Adjustment is performed only for the print mode set by the current User Type You can make the adjustments more quickly than by selecting Fine Pattern ALL in Custom Whenselecting Standard here youneed to use the same print mode settings for the RIP Raster Image Processor as the print mode settings for the User Type Use the same sett...

Страница 96: ...ds to the print mode used for printing If the resolution pass and the printing direction of the RIP print mode differ from the print mode for the User Type select the fine pattern that is suitable for the RIP Adjustment patterns for each print mode XPJ 1682SR P 65 Submenus Adjusts all the patterns For printing an adjust pattern selected from A to F Note Warm up the heater before printing the Adjus...

Страница 97: ...p to open the submenu Perform the automatic adjustment using the embedded color sensor If the resolution pass and the printing direction of the RIP print mode differ from the print mode for the User Type select the fine pattern that is suitable for the RIP Adjustment patterns for each print mode XPJ 1682SR P 65 Submenus Perform automatic adjustment for all patterns A to F using the color sensor Pe...

Страница 98: ...te If failed in the middle of the calibration the adjustment value for the pattern which has been successfully calibrated will be saved in the printer but the adjustment value for the pattern which has been failed to calibrate or has not been calibrated yet will not be saved in the printer Warm up the heater before printing the Adjustment pattern Skip Heater Warm Up No is displayed on the front pa...

Страница 99: ...g type Setting values Consumes less ink than Normal cleaning Conduct nozzle check before and after printing and use when nozzle missing is found Consumes more ink than Normal cleaning When nozzle missing still occurs after Normal cleaning conduct Long cleaning Though much better cleaning results can be expected than Long cleaning it consumes a large amount of ink Gives a rather higher cleaning eff...

Страница 100: ... value is Displays the Spitting menu The initial value is Displays the Side Margin menu The initial value is Displays the LED Light menu The initial value is If you tap Enter all the items in Menu Option will be marked with a displayed If you tap Enter all the items in Menu Option will be marked with a not displayed Menu 4 Menu Option Menu Option 1 User Type Menu Option 2 Spitting Menu Option 3 Si...

Страница 101: ...Mode Submenu Sleep Mode 1 Cleaning Setting Sleep Mode 2 Start Sleep Mode 1 Cleaning Setting Set the timer to perform the head cleaning while in sleep mode Setting values Short Normal Long indicates the initial value Tap Enter to confirm the setting and the display goes to the Cleaning Timer setting 1 2 3 4 5 6 9 12 18 24h indicates the initial value Menu 5 System Info Menu 5 System Info Version Ve...

Страница 102: ... passed print head cleaning is not performed under the following circumstances When the front cover is open When the maintenance cover is open The pressure rollers is released The waste ink tank is full The ink bag case has been removed The S C card has been removed The inserted S C card is not the genuine S C card etc If one of the above conditions occurs during Head cleaning cleaning is stopped ...

Страница 103: ...e temperature displayed on the operation panel Setting values Displays the temperature in Celsius This is the initially set value Displays the temperature in Fahrenheit Menu 7 Display Display 1 Language Language English Language Dutch Language Spanish Language French Language Italian Language Portuguese Language German Language Japanese Display 2 Temperature Temperature Celsius C Temperature Fahre...

Страница 104: ...direction will be displayed The printed length will be displayed The remaining length of print data will be displayed Note The values displayed in this function are just standard values not guarantee the accuracy If the print data includes no length data all information will be displayed as 0 This function is to check the information of print data with the print operation is completed For the deta...

Страница 105: ...ead 1 Standard Adjust Head 2 Custom Adjust Head 3 Auto Menu 3 Cleaning Select Print Head ALL Select Print Head Head 1 Select Print Head Head 2 Cleaning Type1 Short Cleaning Type2 Normal Cleaning Type3 Long Cleaning Type4 Little Charge Cleaning Type5 Initial Charge Menu 6 Sleep Mode Sleep Mode 1 Cleaning Setting Menu 8 Job Status Menu 7 Display Display 1 Language Display 2 Temperature Display 3 Len...

Страница 106: ...ne Fog Thickness 80 2800 170 um Adjust Print 1 Standard Adjust Print 2 Custom Adjust Print 3 Auto Setup 2 Spitting Spitting On Pass Count 1 999 1 cnt Setup 6 Output Mode Output Mode Off InkDryTimer 0 sec 60 min 0 sec Setup 7 Method of Cut Method of Cut Single Cut 3 steps Cut Pressure High Setup 8 Origin Setup 9 Prevent Stick Setup 10 Standby Heating Setup 11 Head Travel Setup 12 Multi Strike Setup...

Страница 107: ...Kind Off Roll Kind Roll Length 1 1500 30 m Print Stop Off Print Stop On Setup 21 Initialization Setup 22 Life Times Setup 23 IP Address Setup 24 Subnet Mask Setup 25 Gateway Setup 26 Header Dump Setup 27 Single Head Setup 28 Heater Control Setup 29 Start Feed Setup 30 Alert Buzzer Setup 31 LED Light Setup 31 Temporary Near End Off Near End Remain m XPJ 1682SR only ...

Страница 108: ...nu 6 Backup Menu 7 Job Status Temperature Pre Heater Off Pre Heater Off Platen Heater Off Dryer Off PF Micro Adjust 5 5 5 00 Update Parameter No Update Parameter Yes Parameter Updating Temperature Platen Heater 50 C Temperature Dryer 30 C Job Status ToDoLength 0 0 m Job Status Done 0 0 m Job Status Remain 0 0 m Job Status Remain Time 0 0 min ...

Страница 109: ... Cleaning of cleaning wiper 120 Cleaning around the capping unit 123 Cleaning around the print head 125 Cleaning the color sensor 127 Inside cleaning 129 Replacing consumable parts 130 Replacing absorption material for the flushing box 130 Replacing Cutter 132 Replacing the cleaning wiper 134 Moving or transporting the printer 136 Moving the printer 136 Transporting the printer 137 Long term stora...

Страница 110: ...k tank P 115 Replacing absorption material for the flushing box P 130 Replacing Cutter P 132 Weekly Cleaning of cleaning wiper P 120 Monthly Inside cleaning P 129 Every six months Replacing the cleaning wiper P 134 When not used for a week or more Head cleaning P 117 Once a week When not used for a long period Long term storage P 138 Important Since a service technician has to handle following cas...

Страница 111: ... an example when using XPJ 1682SR To identify the ink slots corresponding to the numbers shown here see Main components of your printer P 9 K Black C Cyan M Magenta Y Yellow 1 K1 Black 2 K2 Black 3 C1 Cyan 4 C2 Cyan 5 M1 Magenta 6 M2 Magenta 7 Y1 Yellow 8 Y2 Yellow 1 M Magenta 2 Lm Light Magenta 3 C Cyan 4 Lc Light Cyan 5 K Black 6 Cl Cleaner 7 Y Yellow 8 Lk Light Black Checking ink and replacing ...

Страница 112: ...ft the slot 4 ink bag is nearing replacement 2 Prepare the replacement ink bag Replacing ink bag Important Do not replace ink bag when the printer is powered off Ink level cannot be detected correctly If ink bag is moved from cold to warm place leave it in the room temperature at least three hours If you do not have any replacement ink bag do not remove the empty ink bag from the printer This may ...

Страница 113: ...w to invert it to mix the ink Face the ink spout side upwards for 3 seconds Invert it and count for 3 seconds Repeat that 3 times 2 Put the ink bag into the case 3 Close the ink bag case Important Make sure the spout of ink bag is properly fitted into the groove in the case If not fitted the printer cannot correctly detect ink bag Close all the latches 4 of the case properly Important Check that a...

Страница 114: ...he new ink bag installed and new S C card into each slot Match the colors of the ink color indicating label on the printer and the label on the ink bag Face the latch side toward you and insert the case into each slot Make sure that they are fully inserted ...

Страница 115: ... waste Dispose of waste ink according to the local waste disposal regulations Wear the protective gloves glasses mask and avoid contact with your eyes or skin Eye or skin contact may cause slight irritation or bloodshot eyes If in eyes or on skin immediately flush with water If irritation is present seek medical advice attention immediately 1 Prepare a container to collect waste ink Important The ...

Страница 116: ...lash move the container closer to the waste ink valve while draining waste ink 4 Once you empty the tank close the waste ink valve securely Wipe the opening of the valve with a cloth 5 Dispose of waste ink according to the local waste disposal regulations ...

Страница 117: ...erform cleaning If cleaning is interrupted it may consume more amount of ink Head cleaning Short cleaning Consumes less ink than Normal cleaning Normal cleaning If nozzle missing is found on the nozzle check print perform Normal cleaning Long cleaning If nozzle missing still persists after Normal cleaning perform Long cleaning It consumes more ink than Normal cleaning Little Charge Little Charge g...

Страница 118: ...will start cleaning 3 Run a nozzle check 2 Performing Nozzle check 1 Load a roll media to print the nozzle check pattern Loading a roll media P 22 2 Tap 3 Tap Enter The printer will print the nozzle check pattern Clean Print Head Short Clean Print Head Normal Clean Print Head Long Print Nozzle Check Start Enter ...

Страница 119: ...ed on XPJ 1682SR with 4 color configuration If nozzle missing persists after repeating normal cleaning several times perform Long cleaning If several Long cleaning does not help to recover nozzles perform Cleaning of cleaning wiper P 120 or Cleaning around the print head P 125 If nozzle missing still persists perform Little Charge from Menu 3 Cleaning Select Print Head Cleaning Type Menu3 Cleaning...

Страница 120: ...an again Use a dry cleaning stick A damp stick can cause damage to the print head Do not touch the tip of a cleaning stick with fingers Skin oil will damage the print head Do not reuse a cleaning stick Dust on the stick will damage the print head This cleaning takes about 5 minutes If it takes longer the stick will get dry causing damage to the print head 1 Putting the printer into the CR maintena...

Страница 121: ...le CR Maintenance End Enter is displayed the pump is activated sucking up the ink in the cap 2 Cleaning the cleaning wiper 1 Open the front cover 2 Open the maintenance cover on the right side 3 Wipe the cleaning wiper with a cleaning stick Wipe the left side of the wiper back and forth Important If it is hard to remove the stain perform Short Head cleaning and then clean again CR Maintenance Star...

Страница 122: ...maintenance cover 6 Close the front cover 7 Tap Enter 8 Tap Home to end the cleaning process Note Used cleaning stick should be put in a plastic bag etc and dispose of it in compliance with local ordinance and instructions of local authorities CR Maintenance End Enter CR Maintenance Start Enter ...

Страница 123: ...stick will damage the print head This cleaning takes about 5 minutes If it takes longer the stick will get dry causing damage to the print head 1 Put the printer into the CR maintenance mode Putting the printer into the CR maintenance mode P 120 2 Open the front cover 3 Open the maintenance cover on the right side 4 Use the cleaning stick to clean around the rubber part of the capping unit to remo...

Страница 124: ...over 7 Tap Enter 8 Tap Home to end the cleaning process Note Used cleaning stick should be put in a plastic bag etc and dispose of it in compliance with local ordinance and instructions of local authorities CR Maintenance End Enter CR Maintenance Start Enter ...

Страница 125: ... on the stick will damage the print head This cleaning takes about 5 minutes If it takes longer the stick will get dry causing damage to the print head 1 Put the printer into the CR maintenance mode Putting the printer into the CR maintenance mode P 120 2 Open the front cover 3 Open the maintenance cover on the left side 4 Use the cleaning stick to remove the ink deposits or dust on the bottom of ...

Страница 126: ...n a plastic bag etc and dispose of it in compliance with local ordinance and instructions of local authorities DO NOT touch the surface of a print head yellow Clean this part grey Surface around print head silver metal part Print head guide black plastic part Clean the part between the print head and print head guide XPJ 1641SR CR Maintenance End Enter CR Maintenance Start Enter ...

Страница 127: ...damage the glass Do not reuse a cleaning stick Dust may adhere to the color sensor causing malfunction This cleaning takes about 5 minutes If it takes longer the stick will get dry causing damage to the print head 1 Put the printer into the CR maintenance mode Putting the printer into the CR maintenance mode P 120 2 Open the front cover 3 Open the maintenance cover on the left side 4 Using a clean...

Страница 128: ...ists contact your local MUTOH dealer or MUTOH customer support Note Used cleaning stick should be put in a plastic bag etc and dispose of it in compliance with local ordinance and instructions of local authorities XPJ 1682SR DO NOT touch the surface of a print head yellow Do not push the glass too hard Clean this part CR Maintenance End Enter CR Maintenance Start Enter ...

Страница 129: ...ver Important Immediately after turning off the power the temperature of the heater in this product is very high Touch the platen or media guide and if it is too hot allow it to cool before cleaning 4 Brush off dusts on the pressure rollers with a soft brush Important Do not blow off dusts inside the product with a gas duster Dust can attach to moving parts causing abnormal sound or malfunctions 5...

Страница 130: ...differs depending on usage frequency please check periodically Preparation Absorption material for the flushing box Paper you can get dirty paper which ink will not bleed through Replacing absorption material for the flushing box 1 Checking steps 1 Open the front cover 2 Open the maintenance cover on the right side 3 Check the absorption material for the flushing box When there are lumps of ink ri...

Страница 131: ...ushing box We recommend covering the floor with paper as well 5 Pull the tab up of the absorption material for the flushing box and release the hook Then remove the absorption material for the flushing box Important When removing the absorption material for the flushing box be cautious of ink drops Note Used absorption material for the flushing box should be put in a plastic bag etc and dispose of...

Страница 132: ...s Replacing Cutter Do not push the knob of cutter or release suddenly Because there is a spring under the cutter the cutter can jump out Do not touch the cutter blade It may cause injury Steps 1 Put the printer into the CR maintenance mode Putting the printer into the CR maintenance mode P 120 2 Open the front cover 3 Open the maintenance cover on the left side CR Maintenance End Enter CR Maintena...

Страница 133: ...ter cap It may damage the part 5 Remove the Cutter Note Used Cutter should be put in a plastic bag etc and dispose of it in compliance with local ordinance and instructions of local authorities 6 Attach a new cutter 7 Press the cutter cap lightly return Cutter holder to its initial position 8 Close the maintenance cover 9 Close the front cover ...

Страница 134: ...he cleaning process Replacing the cleaning wiper Wear the protective gloves glasses mask and avoid contact with your eyes or skin Eye or skin contact may cause slight irritation or bloodshot eyes If in eyes or on skin immediately flush with water If irritation is present seek medical advice attention immediately Steps 1 Put the printer into the CR maintenance mode Putting the printer into the CR m...

Страница 135: ...hould be put in a plastic bag etc and dispose of it in compliance with local ordinance and instructions of local authorities 6 Follow the steps below to install new cleaning wiper Slide the front side of the new cleaning wiper into its slot Press the wiper hook down until it clicks into place Important Do NOT touch the cleaning wiper rubber with your bare hand If finger oil gets on the rubber it w...

Страница 136: ...zontal position Do not tilt set against something or place this product upside down Otherwise the ink may leak or the handling mentioned above may cause abnormality 1 Preparation before moving 1 Make sure that the printer is turned OFF 2 Dispose of waste fluid Emptying waste ink tank P 115 3 Remove all the cables such as Power cord set 4 Loosen the four adjusters of Stand as shown in the left 5 Mo...

Страница 137: ...suitable place for installation Startup Guide 2 Move and install the printer to the location 3 Attach Cables such as Power cord set 4 Perform Nozzle check and then confirm that there is no clogging in Print head Nozzle check steps P 31 5 Perform print quality adjustment Print quality calibration steps P 36 Transporting the printer Important When transporting the printer consult the MUTOH product d...

Страница 138: ...1641SR Cleaning bag 4 XPJ 1682SR Cleaning bag 8 Long term storage 1 Empty the waste ink tank Emptying waste ink tank P 115 2 Tap Home 3 Tap 4 Tap until the menu on the left appears Tap 5 Tap Enter The message on the left will appear Menu 1 Setup Setup 19 Longstore Longstore Start Enter Remove Bags ...

Страница 139: ... message to the left is displayed 7 Put the cleaning bag into the case 8 Close the ink bag case Important Make sure the spout of cleaning bag is properly fitted into the groove in the case If not fitted the printer cannot correctly detect cleaning bag Close all the latches 4 of the case properly Important Check that all the latches 4 are closed If not it may cause cleaner spillage Washing Head Ins...

Страница 140: ...ase into each slot Make sure that they are fully inserted The message on the left will appear Charging of the cleaner begins When charging of the cleaner is complete the message to the left is displayed 10 Remove all ink bag cases and S C cards The message on the left will appear Cleaner discharging begins Washing Head Remove Bags Washing Head ...

Страница 141: ...into each slot Face the latch side toward you and insert the case into each slot Make sure that they are fully inserted The message on the left will appear Charging of the cleaner begins When charging of the cleaner is complete the message to the left is displayed 12 Remove all ink bag cases and S C cards Insert Cleaning Bags Washing Head Remove Bags ...

Страница 142: ... button The Power LED above the Power button lights up This product starts its initialization operations Note Once the Power LED lights up release the Power button 2 When the message to the left is displayed tap Enter 3 When the message to the left is displayed tap Enter Note If you need to perform a head cleaning and Wash retry No is displayed tap the key to change the display to Wash retry Yes a...

Страница 143: ...t the ink bag into the case 6 Close the ink bag case Important Make sure the spout of ink bag is properly fitted into the groove in the case If not fitted the printer cannot correctly detect ink bag Close all the latches 4 of the case properly Important Check that all the latches 4 are closed If not it may cause ink spillage 7 Insert the ink bag cases and S C cards into each slot Match the colors ...

Страница 144: ...nt If the printer perform the nozzle check printing immediately after the initial ink charge is complete the following results may occur Printed lines become blurred The data is partially not printed In such cases follow Menu 3 Cleaning P 99 and perform Little Charge Then check the print result If there is no improvement in the print result even after performing Little Charge leave the printer unu...

Страница 145: ...requiring restart 150 Troubleshooting 151 Installation and initial setup troubleshooting 151 Boot up troubleshooting 152 Media related troubleshooting 153 Printing related troubleshooting 155 The media is jammed 158 Specifications of this product 161 List of specifications 161 Options Supply list 164 Revision History 165 ...

Страница 146: ...nted in meters for the data currently being printed Remain Time XXX Xmin Displays the time remaining to print in minutes for the data currently being printed Media Remain XXX m Displays the remaining length of the media currently set in meters Pausing Print Cancel Print Enter Pausing printing Tap Cancel to resume printing Tap Enter to cancel the print job Warming Up Warming up Heater Warming Up Sk...

Страница 147: ...ote Mode End Enter The remote panel mode is running via MSM or similar In the remote panel mode operations via the front panel are not possible To terminate the remote panel mode press the Cancel key for more than two seconds Roll Remain Error The remaining roll paper count has become 0 Printing stops Roll Near End m The remaining roll paper count is almost 0 The remaining roll paper is m Color co...

Страница 148: ...ly Stops operation Reload the media Media Cut Error The media was not cut Stops operation Change Head Gap PG W mm The head height on the printer does not match with the one specified on the print data Changing the Head Height P 40 End Of Roll The Media has run out Stops operation Load a new media Loading a roll media P 22 Ink End Ink has run out Stops operation Replace with a new ink bag Replacing...

Страница 149: ...t your local MUTOH dealer S C Ink Low Slot ink is low Get a replacement bag ready Broken Chip S C Card has been broken Insert new ink bag Check Ink Ink bag case is not correctly detected Insert ink bag case again If there is still no improvement contact your local MUTOH dealer Note in the message Change Head Gap represents the head height High Mid or Low in the error message indicates the target i...

Страница 150: ... any key on the front panel stops the beeping For an error requiring restart operation will return to normal after removing the cause of the error and restarting the printer If the same error continues to be displayed contact the your local MUTOH dealer Be sure to tell us the code no of the error message when you contact us Error requiring restart Display Description E Err A problem that does not ...

Страница 151: ...perform the initial ink charging Is the front cover or the maintenance cover open Close the front cover or the maintenance cover Is the media loading lever raised Lower the media loading lever Are ink bag cases and S C cards inserted all the way into the printer Make sure ink bag cases and S C cards are all inserted properly Ink does not come out after ink charging Is the ink bag too cold Leave th...

Страница 152: ...r side environment Does not work at all after power activation after loading the media Is the power cable connected to the plug Connect the power cable Does the AC power supply provide the specified voltage Connect the cable to another outlet Is the front cover or the maintenance cover open Close the front cover or the maintenance cover Is the pressure rollers released Lock the pressure rollers Is...

Страница 153: ...he appropriate vacuum fan setting Are you using creased damaged torn or curled media Replace the media Is the media loaded correctly Load the media correctly Is the media loaded at an angle Load the media straight Did you load the media which has been printed before Use a new media The printer does not detect the media Do you use the printer within recommended environmental conditions Make sure to...

Страница 154: ...Set the edge holder at both edges of the media Check that you select the appropriate vacuum fan setting Are you using creased damaged torn or curled media Replace the media Is the media loaded correctly Load the media correctly The media skews during printing Do you use the printer within recommended environmental conditions Make sure to use the printer within the specification range Note If the m...

Страница 155: ...pports Category 5 Gigabit Ethernet or later XPJ 1682SR Use a network port that supports Gigabit Ethernet and an Ethernet cable that supports Category 6 Gigabit Ethernet or later Is there any error message displayed on MSM Go to the Printer Status tab in MSM and check that if any error message is displayed in the Status Information Smears or missing area partially appears on the prints Does the pri...

Страница 156: ...rform Print quality adjustment Did you perform Media feed adjustment Perform Media feed adjustment Does the media contain moisture or are you using the creased or wrinkled media Replace it with the new media Are Nozzles in good condition Perform Nozzle check Then if nozzle missing is found conduct cleaning The printing position is incorrect some parts of the media cannot be printed on Is the media...

Страница 157: ...use the heaters of the printer Check the settings of heaters Did you select an appropriate print mode Check that the print mode is set to the appropriate mode Are Nozzles in good condition Perform Nozzle check Then if nozzle missing is found conduct cleaning Printed color is not accurate Did you install an ink bag on each ink pack case with correct ink color of S C card Check that the ink color wr...

Страница 158: ...ront cover 3 Move the carriage from the top of the media to the right Important When the head height is set to Low change it to High and then shift Head After shifting Head change the setting back to Low Changing the Head Height P 40 4 Slide the edge holder to the right to remove it from the media Important If any deformation is found on the media holder stop using it and contact your local MUTOH ...

Страница 159: ...paper remain inside the printer remove them 9 Turn the printer ON 10 Load a roll media for Nozzle check Loading a roll media P 22 11 Tap 12 Tap Enter The printer will print the nozzle check pattern 13 Check the nozzle check print to see all nozzles are clear If you find missing or thin lines on the print go to Cleaning steps P 32 If all lines are clearly printed you can start printing Print Nozzle...

Страница 160: ...160 The media is jammed Note ...

Страница 161: ...1 625 mm Maximum thickness 0 3 mm when the head height is set to Low 1 3 mm when the head height is set to Mid 2 8 mm when the head height is set to High Maximum Printable Width 1 615 mm Maximum print length 1 500 m Head height adjustment Three level adjustment of Low Mid and High Interface XPJ 1641SR Ethernet 10BASE T 100BASE T XPJ 1682SR Gb Ethernet 1000BASE T Waste ink tank 2 000 ml tank is att...

Страница 162: ... 000 ml each Temperature 20 to 40 C Humidity No condensation Cleaning bag 300 ml Temperature 5 to 40 C Humidity up to 80 No condensation Storage up to 6 months maximum when stored between 5 to 5 or 30 to 40 Power supply specifications Printer Voltage AC 100V to AC 120V 10 AC 200V to 240V 10 Frequency 50 60Hz 1Hz Capacity AC 100V to AC 120V No less than 9 A AC 200V to AC 240V No less than 6 A Heate...

Страница 163: ...List of specifications 163 Dimensions Height 1 428 mm When installing ink bag cases 1 611 mm Width 2 750 mm Depth 895 mm Weight Main body XPJ 1641SR 142 kg XPJ 1682SR 146 kg Stand 32 kg ...

Страница 164: ...nd the supply items contact your local MUTOH dealer Important MUTOH strongly recommends to use genuine ink bags This printer is designed to bring out the best performance when using with the MUTOH genuine ink Non MUTOH ink may cause print defects or damage to the printer Options Supply list ...

Страница 165: ...List of specifications 165 4 Revision History Date Version Manual code Supported Firmware 2019 6 00 XPJ16xxSRE A 00 V 1 00 or later 2019 7 01 XPJ16xxSRE A 01 V 1 00 or later Revision History ...

Страница 166: ...XPJ16xxSRE A 01 ...

Отзывы: