background image

Technical Bulletin

tib 1006-001

RJ-900 Print Head Alignment

5 Self-Diagnosis Mode

RJ-901C/RJ-900C Maintenance Manual

5-22

Test printing

Prints out a nozzle check pattern and adjustment 

variables.

"5.5.12 Test 

Printing Menu" p.5-44

Head cleaning

Cleans the tubes and heads using cleaning liquid.

"5.5.13 Head 

Cleaning Menu" p.5-45

Software counter 

initialization

Clears various software counters.

"5.5.14 Software 

Counter Initialization 

Menu" p.5-46

Feed amount check

Used to check the media feed amount per band.

"5.5.15 Feed Pitch 

Check Menu" p.5-46

Solid print check

Performs solid nozzle print check (color selection, nozzle 

selection and print direction selection are available).

"5.5.16 Solid Print 

Menu" p.5-48

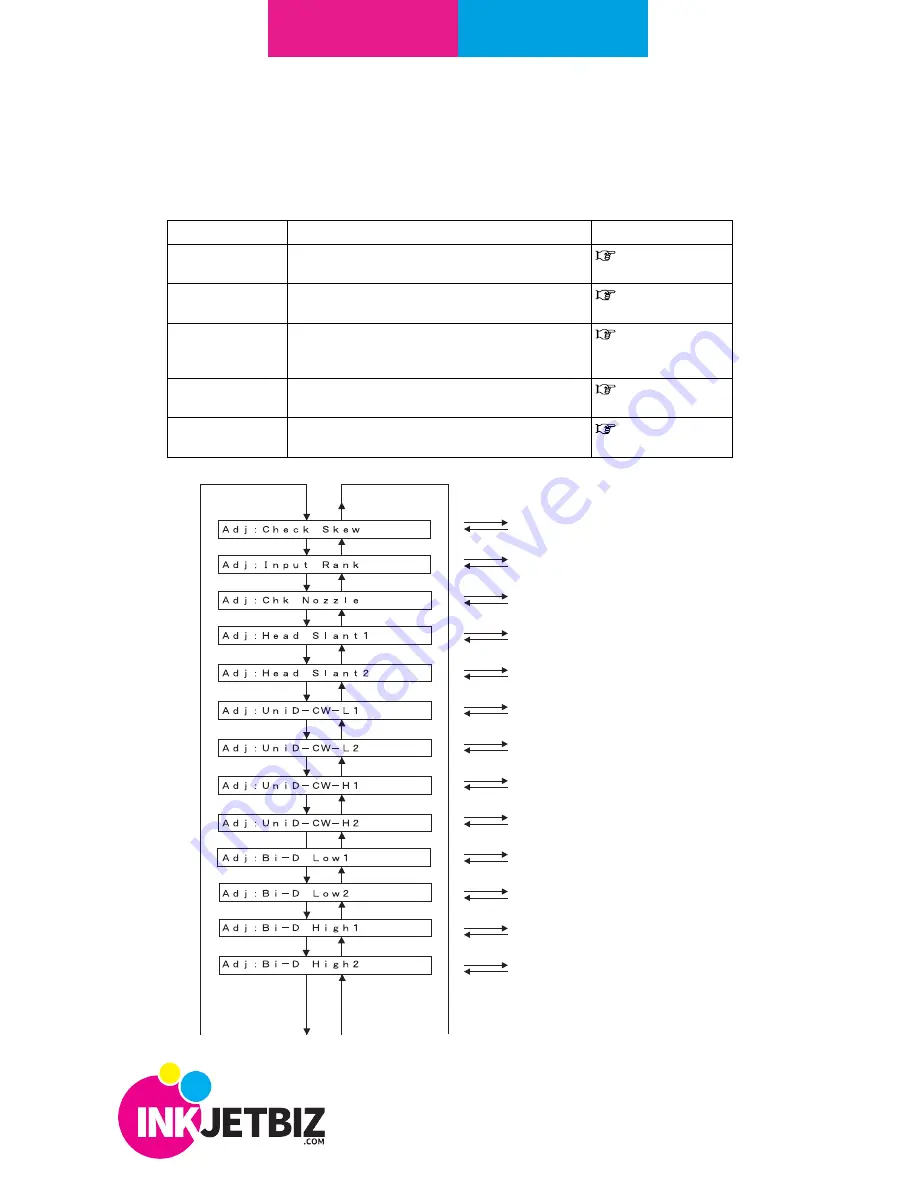
Table 5-4  Diagnosis Items in Adjustment Menu (Continued)

Diagnosis item

Contents

Reference

Previous menu

Next menu

Previous menu

Next menu

Previous menu

Previous menu

Previous menu

Next menu

Next menu

Next menu

Next menu

Previous menu

Next menu

Previous menu

Next menu

Next menu

Previous menu

Previous menu

Previous menu

Next menu

Next menu

Check Skew Menu

Input Rank Menu

Check Nozzle Menu

Head Slant Menu 1

CW Adjustment Menu Low1

Bi-D Adjustment Menu Low1

Bi-D Adjustment Menu Low2

Bi-D Adjustment Menu High1

Bi-D Adjustment Menu High2

Previous menu

[Enter] key

[Cancel] key

[Enter] key

[Cancel] key

[Enter] key

[Cancel] key

[Enter] key

[Cancel] key

[Enter] key

[Cancel] key

[Enter] key

[Cancel] key

[Enter] key

[Cancel] key

[Enter] key

[Cancel] key

[Enter] key

[Cancel] key

[Enter] key

[Cancel] key

[Enter] key

[Cancel] key

[Enter] key

[Cancel] key

[Enter] key

[Cancel] key

Head Slant Menu 2

CW Adjustment Menu Low2

CW Adjustment Menu High1

CW Adjustment Menu High2

Previous menu

Previous menu

Previous menu

Next menu

Next menu

Next menu

Call Us: a (408) 394-7595 • 

www.inkjetbiz.com

SUPPORT

INKJETBIZ

Содержание RJ-900

Страница 1: ...e the keys when the printer displays Check Test 2 Press the RIGHT arrow key to display Check Adjustment Make sure that you have paper loaded and the lever is down before you press ENTER 3 Using the menu tree shown on the following page as a guide go through the steps in this order a Nozzle check This step is to ensure that the head is firing properly b Slant check 1 In this step you will compare t...

Страница 2: ...ustment must be performed as necessary 5 5 5 Head Slant Check Menu 2 p 5 29 CW adjustment Prints out a printing to adjust uni direction CW direction printing between nozzles Low 1 PG Low 3 peak waveform Low 2 PG Low 6 peak waveform High 1 PG High 3 peak waveform High 2 PG High 6 peak waveform 5 5 6 CW Adjustment p 5 31 Repeatability adjustment Prints out a printing to align the positions of the re...

Страница 3: ...tents Reference Previous menu Next menu Previous menu Next menu Previous menu Previous menu Previous menu Next menu Next menu Next menu Next menu Previous menu Next menu Previous menu Next menu Next menu Previous menu Previous menu Previous menu Next menu Next menu Check Skew Menu Input Rank Menu Check Nozzle Menu Head Slant Menu 1 CW Adjustment Menu Low1 Bi D Adjustment Menu Low1 Bi D Adjustment ...

Страница 4: ...u High 2 Previous menu Previous menu Previous menu Previous menu Previous menu Previous menu Previous menu Previous menu Previous menu Previous menu Previous menu Previous menu Next menu Next menu Next menu Next menu Next menu Next menu Next menu Next menu Next menu Next menu Next menu Next menu Next menu Enter key Cancel key Enter key Cancel key Enter key Cancel key Enter key Cancel key Enter key...

Страница 5: ...s set the machine prints out head nozzle check patterns in the following modes 1 pass unidirectional PF 360 dpi CR 360 dpi 3 Check the printed head nozzle check patterns for the following points Ink nozzle discharge amount omission discontinuity meandering Satellite T fence Nozzle alignment in vertical direction Nozzle alignment in horizontal direction Nozzle check Prints the patterns in the order...

Страница 6: ... order of A to H 4 If any abnormal conditions are found in the ink discharge status of the head nozzles perform cleaning TIP 5 5 15 Feed Pitch Check Menu p 5 46 5 After cleaning make the machine print out head nozzle check patterns again Media set Finish media initialization Finish printing If media is not set Display during adjustment printing Previous menu Previous menu Previous menu Next menu N...

Страница 7: ...oard cover 4 6 1 Replacing Print Head p 4 37 Cable cover R 4 6 1 Replacing Print Head p 4 37 1 Start the system in self diagnosis function mode and print the adjustment patterns in Head Slant Check Menu 1 5 5 4 Head Slant Check Menu 1 p 5 28 2 Make adjustment based on the printed adjustment patterns A Check the slant at this point B Media feed direction C OK D Move the head adjusting cam upward E ...

Страница 8: ... the following parts CR board cover 4 6 1 Replacing Print Head p 4 37 Cable cover R 4 6 1 Replacing Print Head p 4 37 1 Start the system in self diagnosis function mode and print the adjustment patterns in Head Slant Check Menu 2 5 5 5 Head Slant Check Menu 2 p 5 29 2 Make adjustment based on the printed adjustment patterns A Check the point to check the vertical slant angle B Media feed direction...

Страница 9: ... height 7 9 1 Jigs and Tools The following jigs and tools are required for cutter holder height adjustment Cutter holder height adjusting jig TIP 10 4 Jigs and Tools p 10 7 7 9 2 Adjustment Procedure To make adjustment follow the steps below NOTE Before starting adjustment remove the following parts CR cover Step 2 to 4 in 4 6 1 Replacing Print Head p 4 37 Cutter blade Operation manual No Part nam...

Страница 10: ... head height PG 1 value using 3 peak waveform CW adjustment Low 2 CW adjustment for low head height PG 1 value using 6 peak waveform CW adjustment High 1 CW adjustment for high head height PG 2 value using 3 peak waveform CW adjustment High 2 CW adjustment for high head height PG 2 value using 6 peak waveform Table 5 7 Uni D Adjustment Items Item Contents Gap1A 1B Uni D CW adjustment of nozzle row...

Страница 11: ... 5 Self Diagnosis Mode A Media feed direction B Adjust the setting value so that the printed dots are aligned at this connecting point C The number shows the performed adjustment items 1 1 CW adjustment Low 1 1 2 CW adjustment Low 2 2 1 CW adjustment High 1 2 2 CW adjustment High 2 For CW adjustment Low 2 High 1 and High 2 perform adjustment using the same procedure Detail on B is as follows Make ...

Страница 12: ...menu Previous menu Next menu Next menu Next menu Next menu Next menu Next menu Next menu Next menu ALL Toucan LT Step 5 Uni directional Alignment Example circled above is shown below is Black to Magenta 1A 3A Repeat for all other colors Perform adjustment in center of focal point of images Ideal In Spec Out of Spec Out of Spec In Spec No Correction Necessary Within 1 2 dot tolerance slight adjustm...

Страница 13: ...just the setting value so that performance of each row becomes average Adjustment items are shown in the tables below The actual procedure is as follows 1 Set media as necessary 2 After media is set the machine prints out repeatability adjustment patterns Table 5 8 Bi D Items Adjustment Item Contents Repeatability adjustment Low 1 Bi D adjustment for low head height PG 1 value using 3 peak wavefor...

Страница 14: ...W printing position and enter the difference as the repeatability adjustment parameter Printing direction Printing direction Printing direction Printing direction Details of circled area 1 3 A C B upper circle above B lower circle above Gap A Assumed center position A Assumed Center Position B In this case note that while the alignment pattern shown to the left is theoretically correct the actual ...

Страница 15: ...ginary line through the center of the primary dots in both the upper and lower section of the test pattern Incorrect alignment The imaginary line through the center of the primary AND satalite dots as a group Alignment is for the primary dot only Allowable alignment Dots are 1 2 pixel off Though specifications are met this pattern should be adjusted closer to ideal alignment To align the condition...

Страница 16: ... RIGHT arrow key until you see Print Adj Variable Press ENTER to print Write the date on the resulting print roll it up and store it inside the left hand cover of the printer You may also use the Mutoh Maintenance Engineer Assistant program to take a backup of the machine s memory See GOTEK TIB 1006 002 for directions on using that program 5 Power off and restart the printer normally It should now...

Отзывы: